ResNet50V2-关键点检测【玩转华为云】

ResNet50V2-关键点检测
一、模型训练与转换
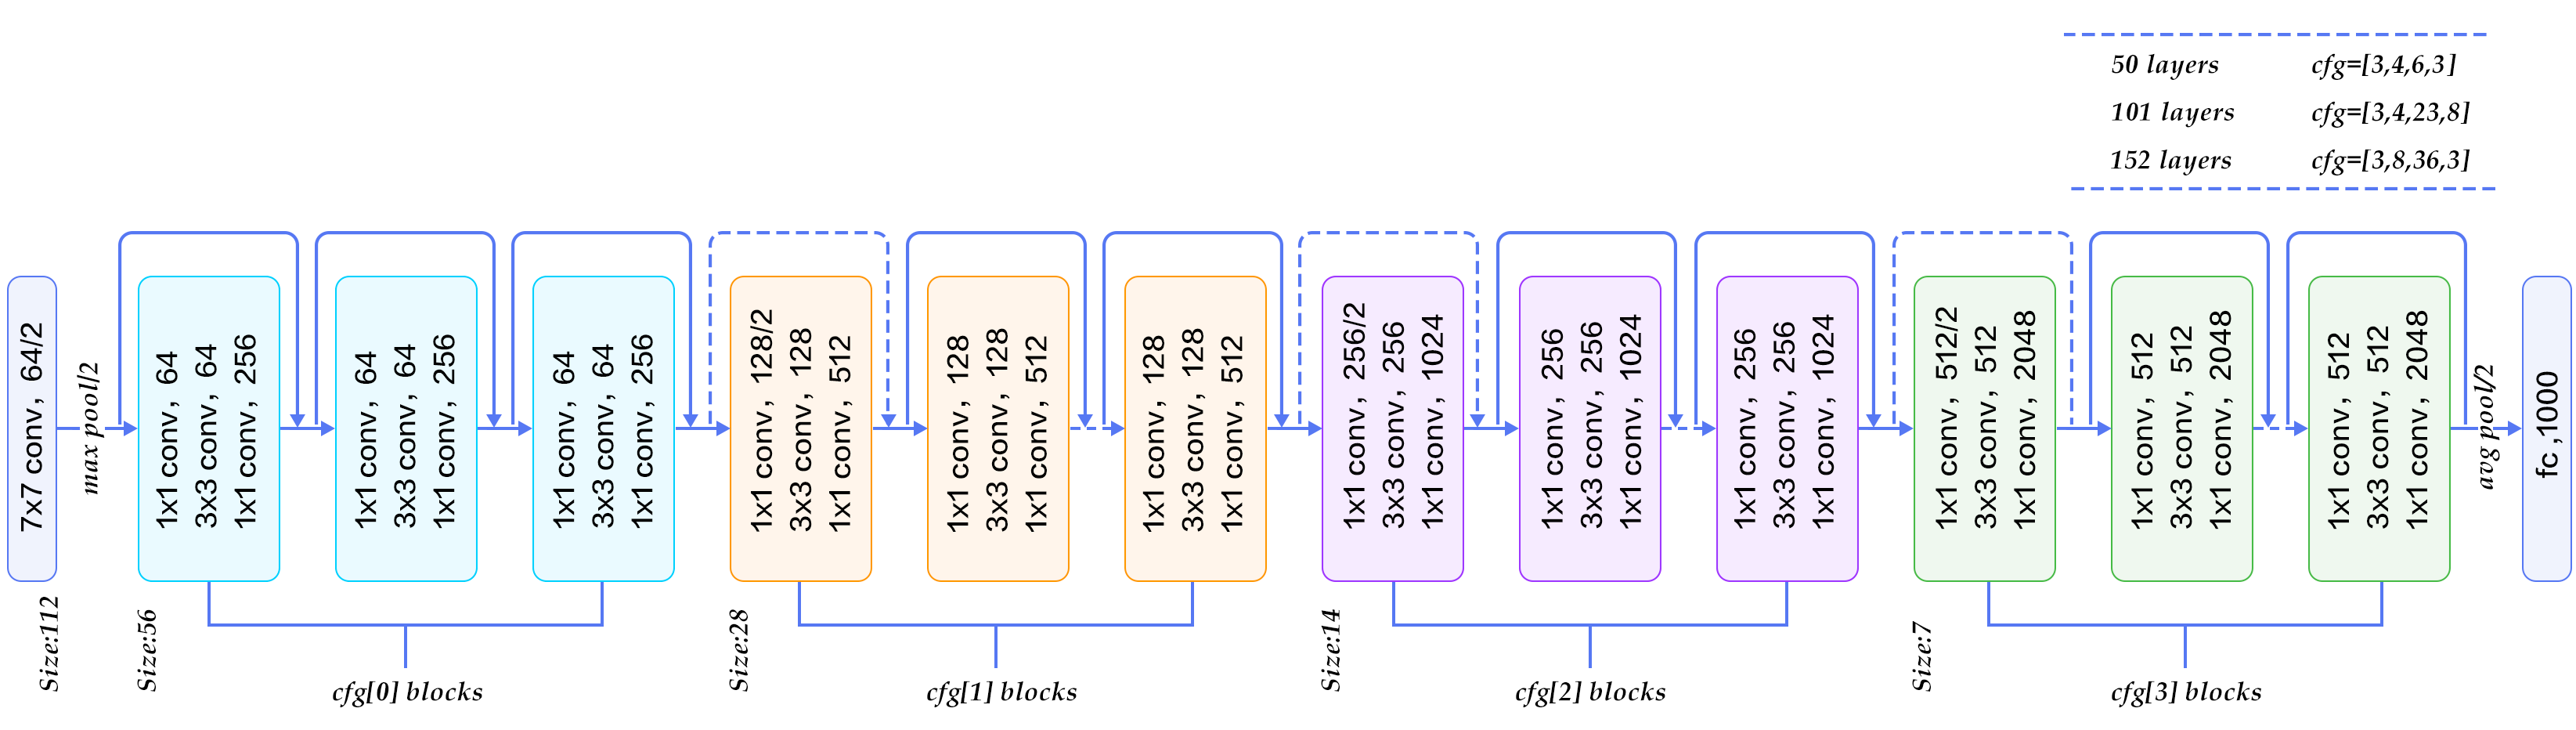
ResNet50V2是改进版的深度卷积神经网络,基于 ResNet 架构发展而来。它采用前置激活(将 BN 和 ReLU 移至卷积前)与身份映射,优化了信息传播和模型训练性能。作为 50 层深度的网络,ResNet50V2 广泛应用于图像分类、目标检测等任务,支持迁移学习,适合快速适配新数据集,具有良好的泛化能力和较高准确率。
模型的训练与转换教程已经开放在AI Gallery中,其中包含训练数据、训练代码、模型转换脚本。

在ModelArts的Notebook环境中训练后,再转换成对应平台的模型格式:onnx格式可以用在Windows设备上,RK系列设备上需要转换为rknn格式。
二、应用开发
1. 创建工程
在ModelBox sdk目录下使用create.bat创建ResNet50V2工程:
PS D:\modelbox-win10-x64-1.5.3> .\create.bat -t server -n ResNet50V2
...
success: create ResNet50V2 in D:\modelbox-win10-x64-1.5.3\workspace
create.bat工具的参数中,-t参数,表示所创建实例的类型,包括server(ModelBox工程)、python(Python功能单元)、c++(C++功能单元)、infer(推理功能单元)等;-n参数,表示所创建实例的名称;-s参数,表示将使用后面参数值代表的模板创建工程,而不是创建空的工程。
2. 创建推理功能单元
在ModelBox sdk目录下使用create.bat创建resnet50v2_infer推理功能单元:
PS D:\modelbox-win10-x64-1.5.3> .\create.bat -t infer -n resnet50_infer -p ResNet50V2
...
success: create infer resnet50_infer in D:\modelbox-win10-x64-1.5.3\workspace\ResNet50V2/model/resnet50_infer
create.bat工具使用时,-t infer即表示创建的是推理功能单元;-n xxx_infer表示创建的功能单元名称为xxx_infer;-p表示所创建的功能单元属于ResNet50V2应用。
下载转换好的ResNet50V2.onnx模型到ResNet50V2\model目录下,修改推理功能单元resnet50v2_infer.toml模型的配置文件:
# Copyright (C) 2020 Huawei Technologies Co., Ltd. All rights reserved.

[base]
name = "resnet50_infer"
device = "cpu"
version = "1.0.0"
description = "your description"
entry = "./ResNet50V2.onnx"  # model file path, use relative path
type = "inference"
virtual_type = "onnx" # inference engine type: win10 now only support onnx
group_type = "Inference"  # flowunit group attribution, do not change

# Input ports description
[input]
[input.input1]  # input port number, Format is input.input[N]
name = "Input"  # input port name
type = "float"  # input port data type ,e.g. float or uint8
device = "cpu"  # input buffer type: cpu, win10 now copy input from cpu

# Output ports description
[output]
[output.output1] # output port number, Format is output.output[N]
name = "Output"  # output port name
type = "float"   # output port data type ,e.g. float or uint8
3. 创建后处理功能单元
在ModelBox sdk目录下使用create.bat创建resnet50v2_post后处理功能单元:
PS D:\modelbox-win10-x64-1.5.3> .\create.bat -t python -n resnet50v2_post -p ResNet50V2
...
success: create python resnet50v2_post in D:\modelbox-win10-x64-1.5.3\workspace\ResNet50V2/etc/flowunit/resnet50v2_post
create.bat工具使用时,-t python即表示创建的是通用功能单元;-n xxx_post表示创建的功能单元名称为xxx_post;-p表示所创建的功能单元属于ResNet50V2应用。
a. 修改配置文件
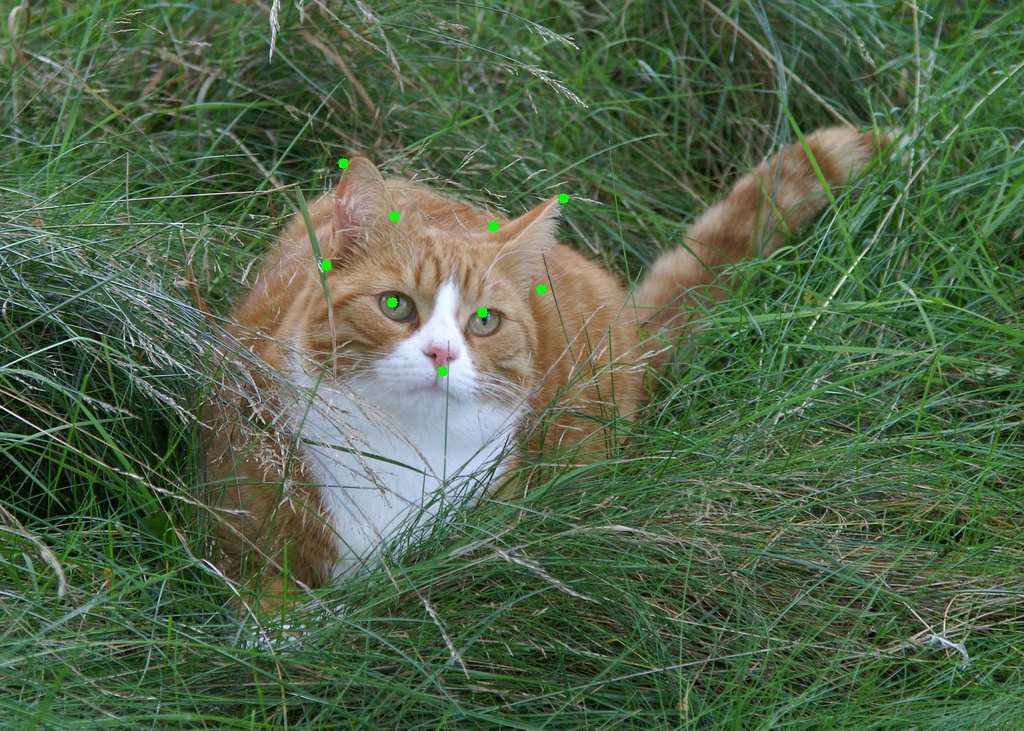
我们的模型有一个输入和输出,总共包含猫脸的9个关键点:
# Copyright (c) Huawei Technologies Co., Ltd. 2022. All rights reserved.

# Basic config
[base]
name = "resnet50v2_post" # The FlowUnit name
device = "cpu" # The flowunit runs on cpu
version = "1.0.0" # The version of the flowunit
type = "python" # Fixed value, do not change
description = "description" # The description of the flowunit
entry = "resnet50v2_post@resnet50v2_postFlowUnit" # Python flowunit entry function
group_type = "Generic"  # flowunit group attribution, change as Input/Output/Image/Generic ...

# Flowunit Type
stream = false # Whether the flowunit is a stream flowunit
condition = false # Whether the flowunit is a condition flowunit
collapse = false # Whether the flowunit is a collapse flowunit
collapse_all = false # Whether the flowunit will collapse all the data
expand = false #  Whether the flowunit is a expand flowunit

# The default Flowunit config
[config]
keypoints = 9

# Input ports description
[input]
[input.input1] # Input port number, the format is input.input[N]
name = "in_feat" # Input port name
type = "float" # Input port type

# Output ports description
[output]
[output.output1] # Output port number, the format is output.output[N]
name = "out_data" # Output port name
type = "string" # Output port type
b. 修改逻辑代码
# Copyright (c) Huawei Technologies Co., Ltd. 2022. All rights reserved.

#!/usr/bin/env python
# -*- coding: utf-8 -*-
import _flowunit as modelbox
import numpy as np
import json

class resnet50v2_postFlowUnit(modelbox.FlowUnit):
    # Derived from modelbox.FlowUnit
    def __init__(self):
        super().__init__()

    def open(self, config):
        # Open the flowunit to obtain configuration information
        self.params = {}
        self.params['keypoints'] = config.get_int('keypoints')

        return modelbox.Status.StatusCode.STATUS_SUCCESS

    def process(self, data_context):
        # Process the data
        in_data = data_context.input("in_feat")
        out_data = data_context.output("out_data")

        # resnet50v2_post process code.
        # Remove the following code and add your own code here.
        for buffer_feat in in_data:
            feat_data = np.array(buffer_feat.as_object(), copy=False)
            keypoints = feat_data.reshape(-1, 2).tolist()
            result = {"keypoints": keypoints}
            result_str = json.dumps(result)
            out_buffer = modelbox.Buffer(self.get_bind_device(), result_str)
            out_data.push_back(out_buffer)

        return modelbox.Status.StatusCode.STATUS_SUCCESS

    def close(self):
        # Close the flowunit
        return modelbox.Status()

    def data_pre(self, data_context):
        # Before streaming data starts
        return modelbox.Status()

    def data_post(self, data_context):
        # After streaming data ends
        return modelbox.Status()

    def data_group_pre(self, data_context):
        # Before all streaming data starts
        return modelbox.Status()

    def data_group_post(self, data_context):
        # After all streaming data ends
        return modelbox.Status()
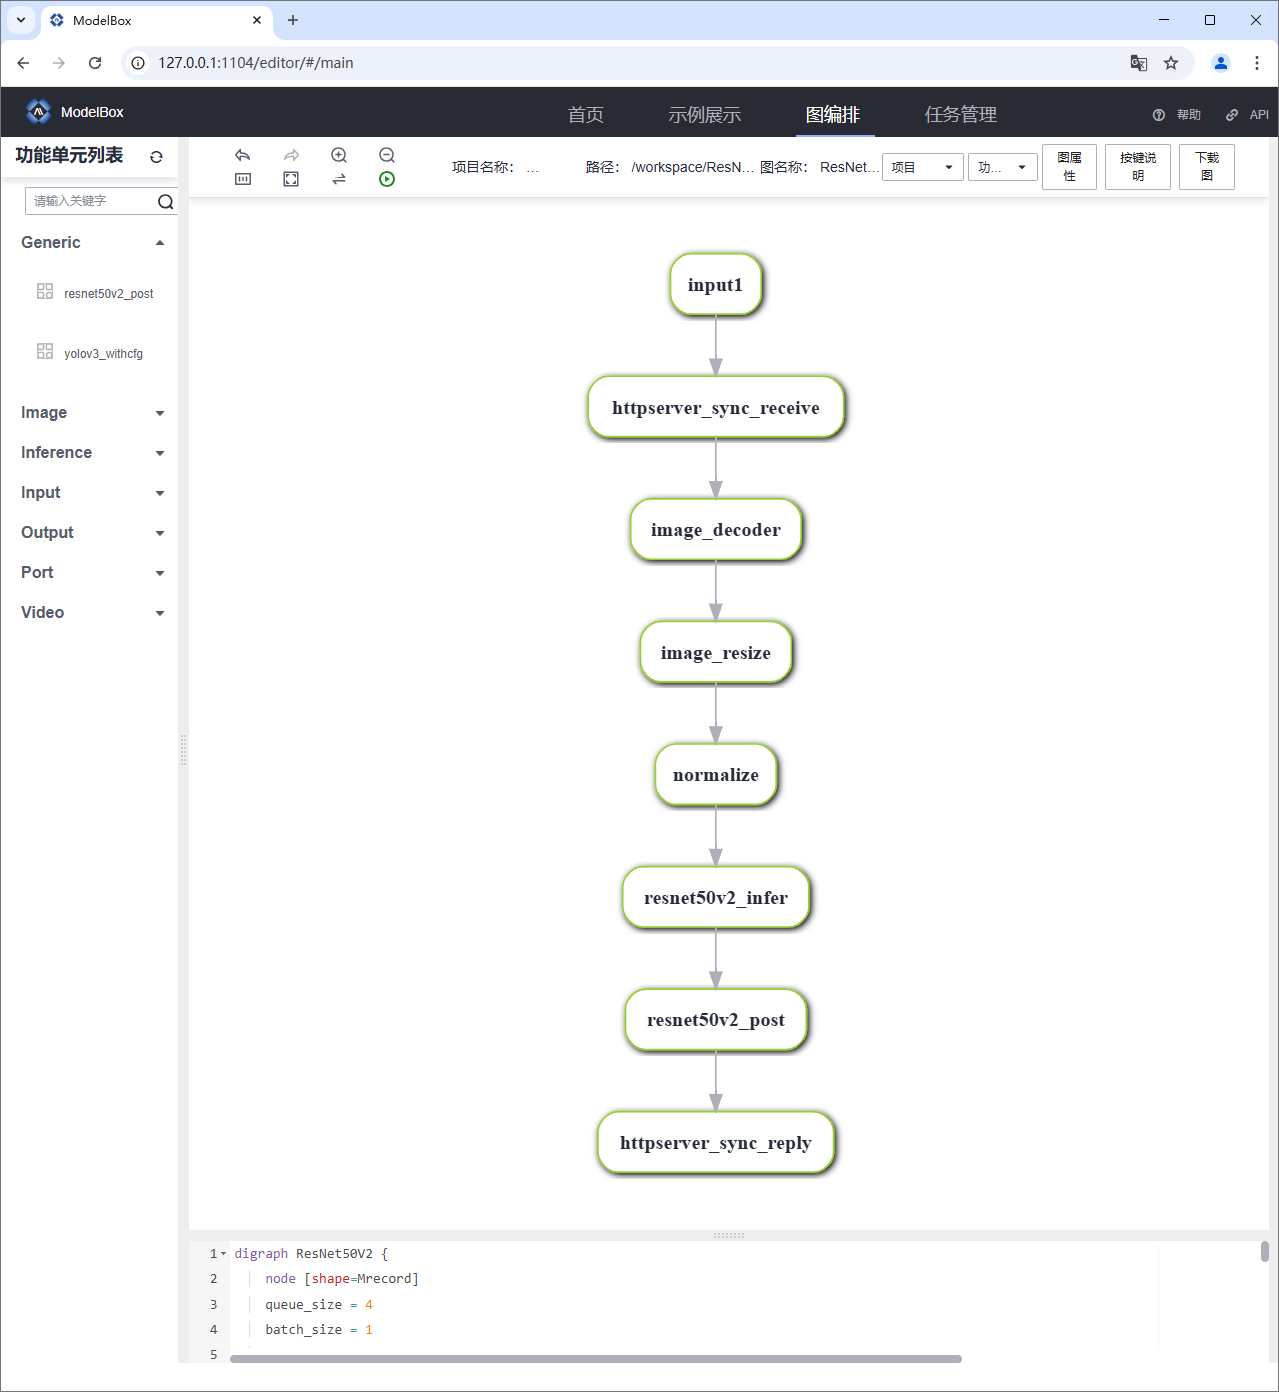
4. 修改应用的流程图
ResNet50V2工程graph目录下存放流程图,默认的流程图ResNet50V2.toml与工程同名:
# Copyright (C) 2020 Huawei Technologies Co., Ltd. All rights reserved.

[driver]
dir = ["${HILENS_APP_ROOT}/etc/flowunit",
"${HILENS_APP_ROOT}/etc/flowunit/cpp",
"${HILENS_APP_ROOT}/model",
"${HILENS_MB_SDK_PATH}/flowunit"]
skip-default = true
[profile]
profile=false
trace=false
dir="${HILENS_DATA_DIR}/mb_profile"
[graph]
format = "graphviz"
graphconf = """digraph ResNet50V2 {
    node [shape=Mrecord]
    queue_size = 4
    batch_size = 1
    input1[type=input,flowunit=input,device=cpu,deviceid=0]
    httpserver_sync_receive[type=flowunit, flowunit=httpserver_sync_receive_v2, device=cpu, deviceid=0, time_out_ms=5000, endpoint="http://0.0.0.0:1234/v1/ResNet50V2", max_requests=100]
    image_decoder[type=flowunit, flowunit=image_decoder, device=cpu, key="image_base64", queue_size=4]
    image_resize[type=flowunit, flowunit=resize, device=cpu, deviceid=0, image_width=224, image_height=224]
    normalize[type=flowunit, flowunit=normalize, device=cpu, deviceid=0, standard_deviation_inverse="0.003921568627450,0.003921568627450,0.003921568627450"]
    resnet50v2_infer[type=flowunit, flowunit=resnet50v2_infer, device=cpu, deviceid=0, batch_size=1]
    resnet50v2_post[type=flowunit, flowunit=resnet50v2_post, device=cpu, deviceid=0]
    httpserver_sync_reply[type=flowunit, flowunit=httpserver_sync_reply_v2, device=cpu, deviceid=0]

    input1:input -> httpserver_sync_receive:in_url
    httpserver_sync_receive:out_request_info -> image_decoder:in_encoded_image
    image_decoder:out_image -> image_resize:in_image
    image_resize:out_image -> normalize:in_data
    normalize:out_data -> resnet50v2_infer:Input
    resnet50v2_infer:Output -> resnet50v2_post:in_feat
    resnet50v2_post:out_data -> httpserver_sync_reply:in_reply_info
}"""
[flow]
desc = "ResNet50V2 run in modelbox-win10-x64"
在命令行中运行.\create.bat -t editor即可打开ModelBox图编排界面,可以实时修改并查看项目的流程图:
PS D:\modelbox-win10-x64-1.5.3> .\create.bat -t editor
5. 运行应用
在ResNet50V2工程目录下执行.\bin\main.bat运行应用:
PS D:\modelbox-win10-x64-1.5.3> cd D:\modelbox-win10-x64-1.5.3\workspace\ResNet50V2
PS D:\modelbox-win10-x64-1.5.3\workspace\ResNet50V2> .\bin\main.bat
在ResNet50V2工程data目录下新建test_http.py测试脚本:
#!/usr/bin/env python
# -*- coding: utf-8 -*-

# Copyright (c) Huawei Technologies Co., Ltd. 2022. All rights reserved.

import os
import cv2
import json
import base64
import http.client


class HttpConfig:
    '''http调用的参数配置'''
    def __init__(self, host_ip, port, url, img_base64_str):
        self.hostIP = host_ip
        self.Port = port

        self.httpMethod = "POST"
        self.requstURL = url
        self.headerdata = {
            "Content-Type": "application/json"
        }
        self.test_data = {
            "image_base64": img_base64_str
        }
        self.body = json.dumps(self.test_data)


def read_image(img_path):
    '''读取图片数据并转为base64编码的字符串'''
    img_data = cv2.imread(img_path)
    img_data = cv2.cvtColor(img_data, cv2.COLOR_BGR2RGB)
    img_str = cv2.imencode('.jpg', img_data)[1].tobytes()
    img_bin = base64.b64encode(img_str)
    img_base64_str = str(img_bin, encoding='utf8')
    return img_data, img_base64_str


def test_image(img_path, ip, port, url):
    '''单张图片测试'''
    img_data, img_base64_str = read_image(img_path)
    http_config = HttpConfig(ip, port, url, img_base64_str)

    conn = http.client.HTTPConnection(host=http_config.hostIP, port=http_config.Port)
    conn.request(method=http_config.httpMethod, url=http_config.requstURL,
                 body=http_config.body, headers=http_config.headerdata)

    response = conn.getresponse().read().decode()
    print('response: ', response)

    result = json.loads(response)
    w, h = img_data.shape[1], img_data.shape[0]

    for x, y in result["keypoints"]:
        if x > 0 and y > 0:
            cv2.circle(img_data, (int(x * w), int(y * h)), 5, (0, 255, 0), -1)
    cv2.imwrite('./result-' + os.path.basename(img_path), img_data[..., ::-1])


if __name__ == "__main__":
    port = 1234
    ip = "127.0.0.1"
    url = "/v1/ResNet50V2"

    img_folder = './test_imgs'
    file_list = os.listdir(img_folder)
    for img_file in file_list:
        print("\n================ {} ================".format(img_file))
        img_path = os.path.join(img_folder, img_file)
        test_image(img_path, ip, port, url)
在ResNet50V2工程data目录下新建test_imgs文件夹存放测试图片:


在另一个终端中进入ResNet50V2工程目录data文件夹下运行test_http.py脚本发起HTTP请求测试:
PS D:\modelbox-win10-x64-1.5.3> cd D:\modelbox-win10-x64-1.5.3\workspace\ResNet50V2\data
PS D:\modelbox-win10-x64-1.5.3\workspace\ResNet50V2\data> D:\modelbox-win10-x64-1.5.3\python-embed\python.exe .\test_http.py

================ 2256.jpg ================
response:  {"keypoints": [[0.19147011637687683, 0.26770520210266113], [0.29639703035354614, 0.26533427834510803], [0.24554343521595, 0.35762542486190796], [0.11009970307350159, 0.2090619057416916], [0.08408773690462112, 0.09547536075115204], [0.17451311647891998, 0.169035404920578], [0.2880205512046814, 0.168979212641716], [0.3739408254623413, 0.0717596635222435], [0.34669068455696106, 0.20229394733905792]]}

================ 6899.jpg ================
response:  {"keypoints": [[0.3829421401023865, 0.41393953561782837], [0.47102952003479004, 0.42683106660842896], [0.4321300983428955, 0.5082458853721619], [0.3185971677303314, 0.36286458373069763], [0.33502572774887085, 0.2243150770664215], [0.3852037489414215, 0.29658034443855286], [0.4819968640804291, 0.30954840779304504], [0.5504774451255798, 0.2711380124092102], [0.5290539264678955, 0.3962092399597168]]}
在ResNet50V2工程data目录下即可查看测试图片的推理结果:

三、小结
本节介绍了如何使用ModelArts和ModelBox训练开发一个ResNet50V2猫脸关键点检测的AI应用,我们只需要准备模型文件以及简单的配置即可创建一个HTTP服务。同时我们可以了解到ResNet50V2网络的基本结构、数据处理和模型训练方法,以及对应推理应用的逻辑。

- 点赞
- 收藏
- 关注作者
评论(0)