YOLOX-目标检测【玩转华为云】

一、模型训练和转换
YOLOX是YOLO系列的优化版本,引入了解耦头、数据增强、无锚点以及标签分类等目标检测领域的优秀进展,拥有较好的精度表现,同时对工程部署友好。
模型的训练与转换教程已经开放在AI Gallery中,其中包含训练数据、训练代码、模型转换脚本。

在ModelArts的Notebook环境中训练后,再转换成对应平台的模型格式:onnx格式可以用在Windows设备上,RK系列设备上需要转换为rknn格式。
二、ModelBox 应用开发
1. 创建工程
在ModelBox sdk目录下使用create.bat创建fish_det工程:
PS D:\modelbox-win10-x64-1.5.3> .\create.bat -t server -n fish_det -s car_det
...
success: create fish_det in D:\modelbox-win10-x64-1.5.3\workspace
create.bat工具的参数中,-t参数,表示所创建实例的类型,包括server(ModelBox工程)、python(Python功能单元)、c++(C++功能单元)、infer(推理功能单元)等;-n参数,表示所创建实例的名称;-s参数,表示将使用后面参数值代表的模板创建工程,而不是创建空的工程。
2. 修改推理功能单元
下载转换好的yolox_fish.onnx模型到fish_det\model目录下,修改推理功能单元yolox_infer.toml模型的配置文件:
# Copyright (c) Huawei Technologies Co., Ltd. 2022. All rights reserved.

[base]
name = "yolox_infer"
device = "cpu"
version = "1.0.0"
description = "fish detection"
entry = "./yolox_fish.onnx"  # model file path, use relative path
type = "inference"
virtual_type = "onnx" # inference engine type: win10 now only support onnx
group_type = "Inference"  # flowunit group attribution, do not change


# input port description, suporrt multiple input ports
[input]
[input.input1]
name = "input"
type = "float"
device = "cpu"

# output port description, suporrt multiple output ports
[output]
[output.output1]
name = "output"
type = "float"
3. 修改后处理功能单元
我们的模型的输入大小为320,类别数量是1,修改fish_det\etc\flowunit\yolox_post目录下的yolox_post.toml配置文件:
# Copyright (c) Huawei Technologies Co., Ltd. 2022. All rights reserved.

# Basic config
[base]
name = "yolox_post" # The FlowUnit name
device = "cpu" # The device the flowunit runs on,cpu,cuda,ascend。
version = "1.0.0" # The version of the flowunit
description = "description" # The description of the flowunit
entry = "yolox_post@yolox_postFlowUnit" # Python flowunit entry function
type = "python" # Fixed value
group_type = "Generic"  # flowunit group attribution, change as Input/Output/Image/Generic ...

# Flowunit Type
stream = false # Whether the flowunit is a stream flowunit
condition  = false # Whether the flowunit is a condition flowunit
collapse = false # Whether the flowunit is a collapse flowunit
collapse_all = false # Whether the flowunit will collapse all the data
expand = false #  Whether the flowunit is a expand flowunit

[config]
net_h = 320
net_w = 320
num_classes = 1
strides = ['8', '16', '32']
conf_threshold = 0.25
iou_threshold = 0.45

[input]
[input.input1]
name = "in_feat"
type = "float"

[output]
[output.output1]
name = "out_data"
type = "string"
4. 修改绘图功能单元
我们这里只有一个类别,所以修改coco_car_labels = [0]只检测鱼这个类别:
...
def decode_car_bboxes(self, bbox_str, input_shape):
    try:
        coco_car_labels = [0]  # fish
        det_result = json.loads(bbox_str)['det_result']
        if (det_result == "None"):
            return []
        bboxes = json.loads(det_result)
        car_bboxes = list(filter(lambda x: int(x[5]) in coco_car_labels, bboxes))
    except Exception as ex:
        modelbox.error(str(ex))
        return []
    else:
        for bbox in car_bboxes:
            bbox[0] = int(bbox[0] * input_shape[1])
            bbox[1] = int(bbox[1] * input_shape[0])
            bbox[2] = int(bbox[2] * input_shape[1])
            bbox[3] = int(bbox[3] * input_shape[0])
        return car_bboxes
...
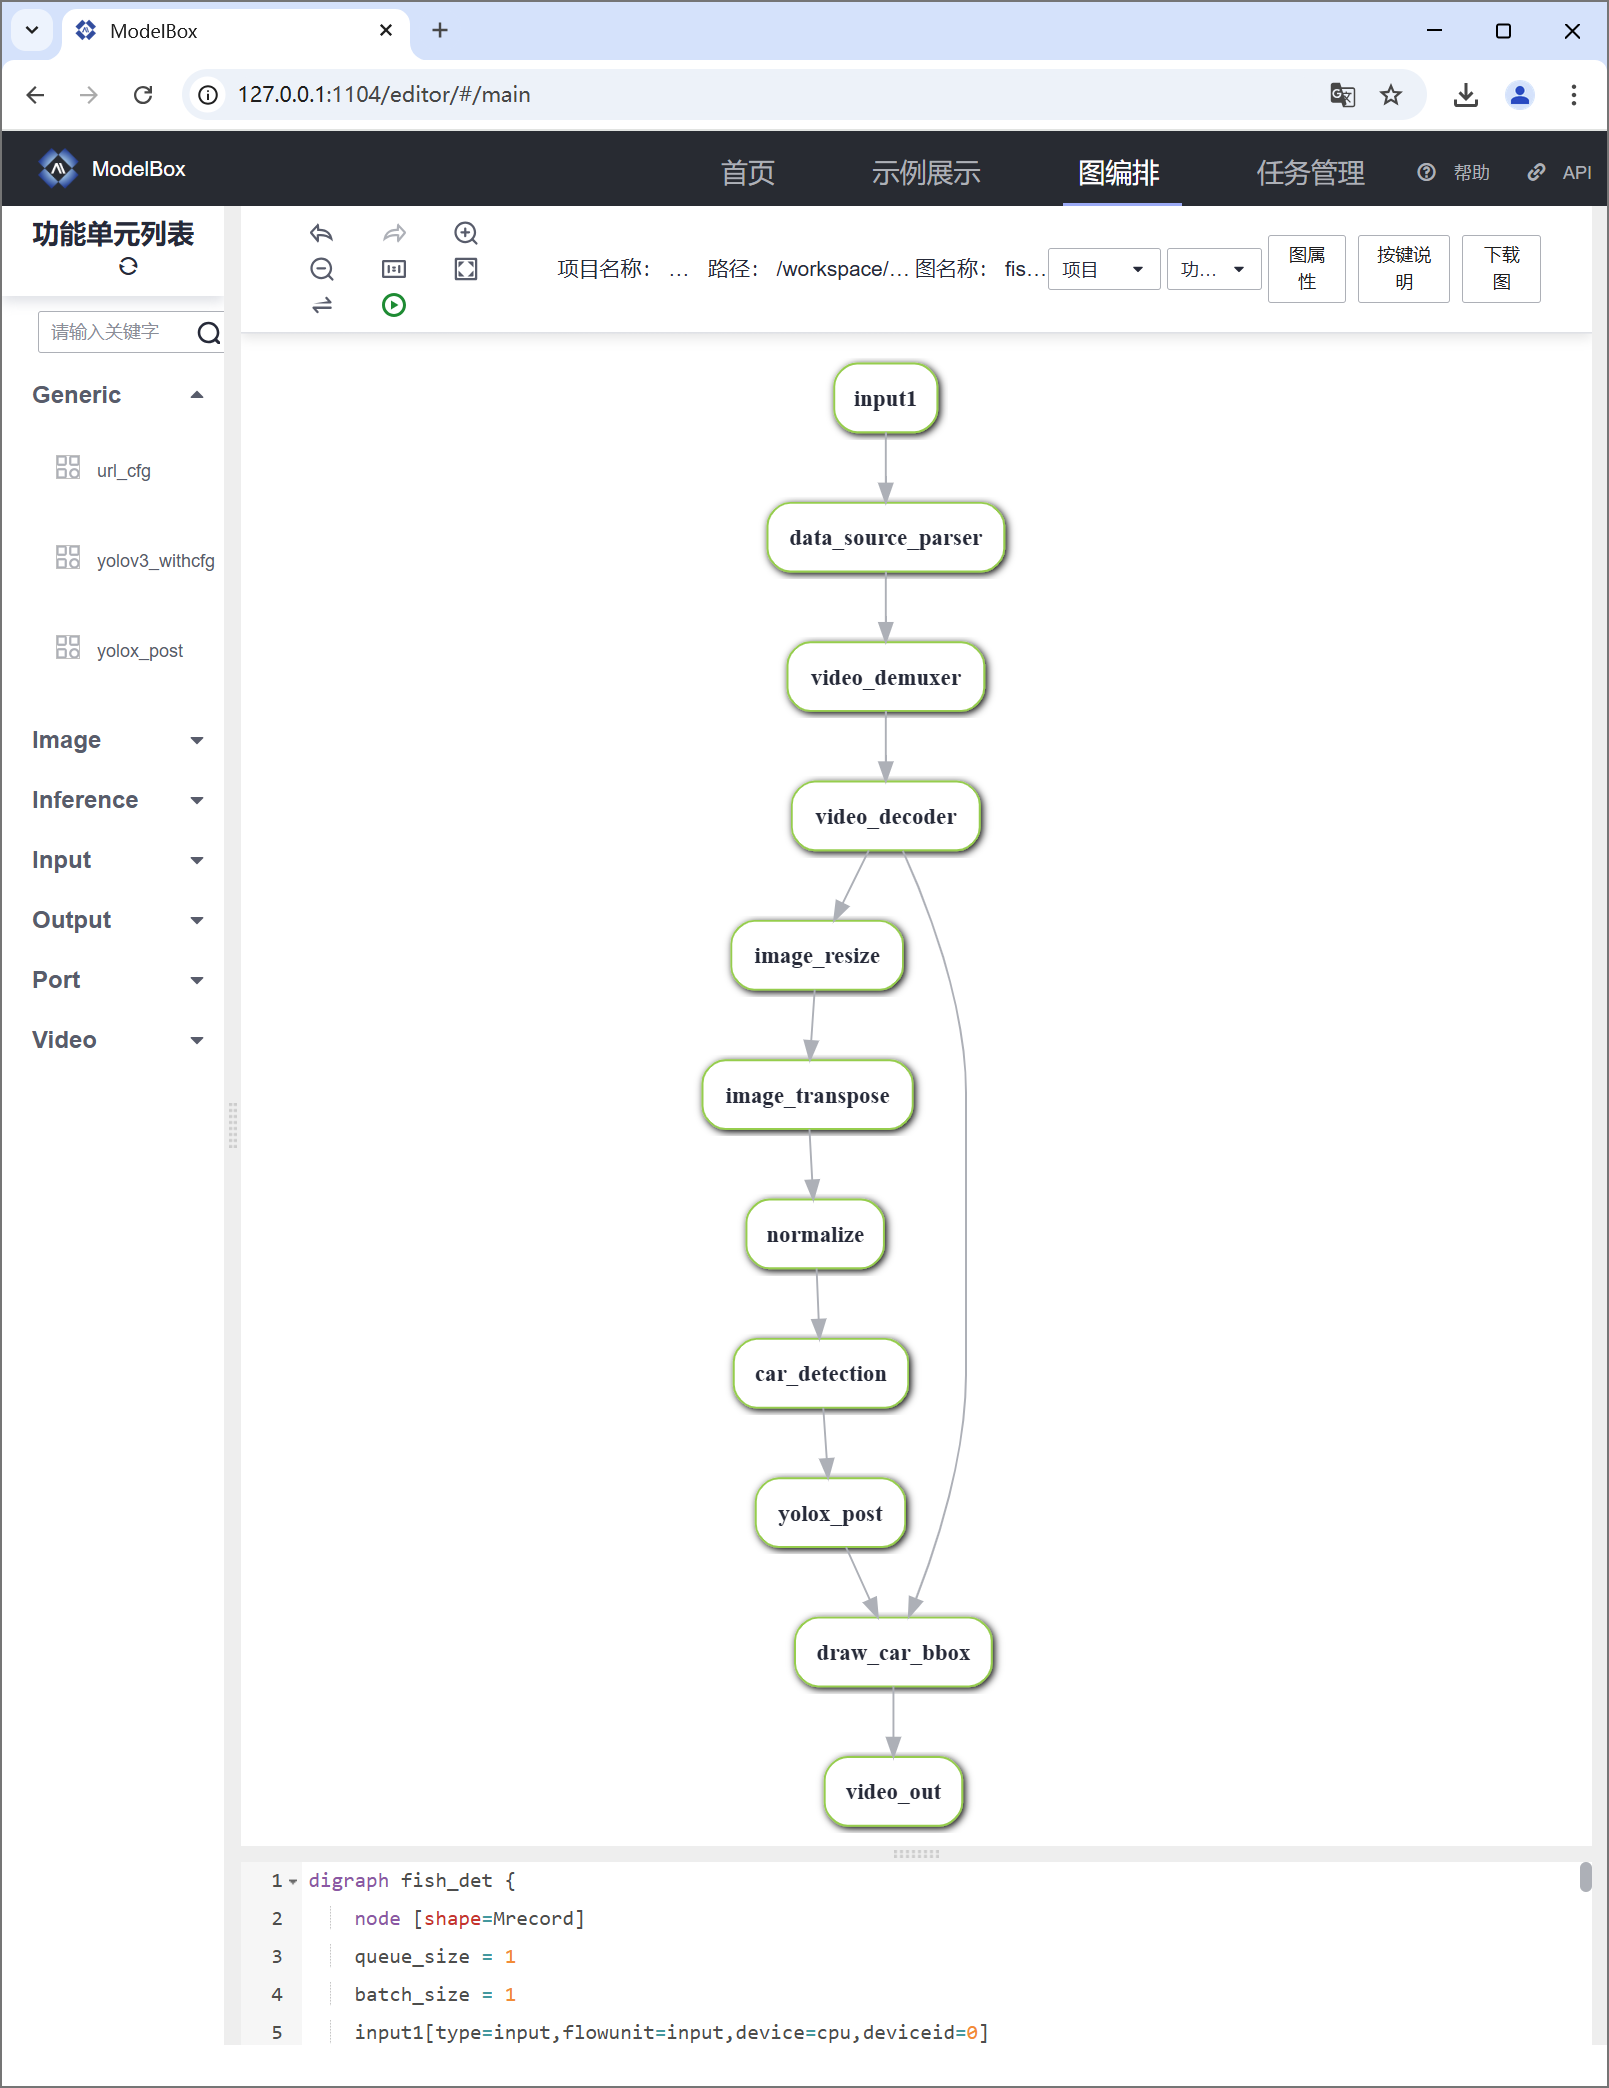
5. 修改应用的流程图
修改image_resize图像预处理功能单元参数image_width=320, image_height=320与模型的输入大小保持一致:
# Copyright (c) Huawei Technologies Co., Ltd. 2022. All rights reserved.

[driver]
dir = ["${HILENS_APP_ROOT}/etc/flowunit",
"${HILENS_APP_ROOT}/etc/flowunit/cpp",
"${HILENS_APP_ROOT}/model",
"${HILENS_MB_SDK_PATH}/flowunit"]
skip-default = true
[profile]
profile=false
trace=false
dir="${HILENS_DATA_DIR}/mb_profile"
[graph]
format = "graphviz"
graphconf = """digraph fish_det {
    node [shape=Mrecord]
    queue_size = 1
    batch_size = 1
    input1[type=input,flowunit=input,device=cpu,deviceid=0]

    data_source_parser[type=flowunit, flowunit=data_source_parser, device=cpu, deviceid=0]
    video_demuxer[type=flowunit, flowunit=video_demuxer, device=cpu, deviceid=0]
    video_decoder[type=flowunit, flowunit=video_decoder, device=cpu, deviceid=0, pix_fmt=bgr]
    image_resize[type=flowunit, flowunit=resize, device=cpu, deviceid=0, image_width=320, image_height=320]
    image_transpose[type=flowunit, flowunit=packed_planar_transpose, device=cpu, deviceid=0]
    normalize[type=flowunit, flowunit=normalize, device=cpu, deviceid=0, standard_deviation_inverse="1,1,1"]
    car_detection[type=flowunit, flowunit=yolox_infer, device=cpu, deviceid=0, batch_size = 1]
    yolox_post[type=flowunit, flowunit=yolox_post, device=cpu, deviceid=0]
    draw_car_bbox[type=flowunit, flowunit=draw_car_bbox, device=cpu, deviceid=0]
    video_out[type=flowunit, flowunit=video_out, device=cpu, deviceid=0]

    input1:input -> data_source_parser:in_data
    data_source_parser:out_video_url -> video_demuxer:in_video_url
    video_demuxer:out_video_packet -> video_decoder:in_video_packet
    video_decoder:out_video_frame -> image_resize:in_image
    image_resize:out_image -> image_transpose:in_image
    image_transpose:out_image -> normalize:in_data
    normalize:out_data -> car_detection:input
    car_detection:output -> yolox_post:in_feat
    video_decoder:out_video_frame -> draw_car_bbox:in_image
    yolox_post:out_data -> draw_car_bbox:in_bbox
    draw_car_bbox:out_image -> video_out:in_video_frame
}"""
[flow]
desc = "fish_det run in modelbox-win10-x64"
在命令行中运行.\create.bat -t editor即可打开ModelBox图编排界面,可以实时修改并查看项目的流程图:
PS D:\modelbox-win10-x64-1.5.3> .\create.bat -t editor
6. 配置应用的输入输出
下载测试视频到fish_det\data目录下,修改应用fish_det\bin\mock_task.toml配置文件:
# 用于本地mock文件读取任务,脚本中已经配置了IVA_SVC_CONFIG环境变量, 添加了此文件路径
########### 请确定使用linux的路径类型,比如在windows上要用  D:/xxx/xxx  不能用D:\xxx\xxx  ###########
# 任务的参数为一个压缩并转义后的json字符串
# 直接写需要转义双引号, 也可以用 content_file 添加一个json文件
[common]
content = "{\"param_str\":\"string param\",\"param_int\":10,\"param_float\":10.5}"

# 任务输入配置,mock模拟目前仅支持一路rtsp或者本地url, 当前支持以下几种输入方式:
# 1. rtsp摄像头或rtsp视频流:type="rtsp", url="rtsp://xxx.xxx"  (type为rtsp的时候,支持视频中断自动重连)
# 2. 设备自带摄像头或者USB摄像头:type="url",url="摄像头编号,比如 0 或者 1 等" (需配合local_camera功能单元使用)
# 3. 本地视频文件:type="url",url="视频文件路径" (可以是相对路径 -- 相对这个mock_task.toml文件, 也支持从环境变量${HILENS_APP_ROOT}所在目录文件输入)
# 4. http服务:type="url", url="http://xxx.xxx"(指的是任务作为http服务启动,此处需填写对外暴露的http服务地址,需配合httpserver类的功能单元使用)
[input]
type = "url"
url = "${HILENS_APP_ROOT}/data/Test_ROV_video_h264_decim.mp4"

# 任务输出配置,当前支持以下几种输出方式:
# 1. rtsp视频流:type="local", url="rtsp://xxx.xxx"
# 2. 本地屏幕:type="local", url="0:xxx" (设备需要接显示器,系统需要安装桌面)
# 3. 本地视频文件:type="local",url="视频文件路径" (可以是相对路径——相对这个mock_task.toml文件, 也支持输出到环境变量${HILENS_DATA_DIR}所在目录或子目录)
# 4. http服务:type="webhook", url="http://xxx.xxx" (指的是任务产生的数据上报给某个http服务,此处需填写上传的http服务地址)
[output]
type = "local"
url = "0"
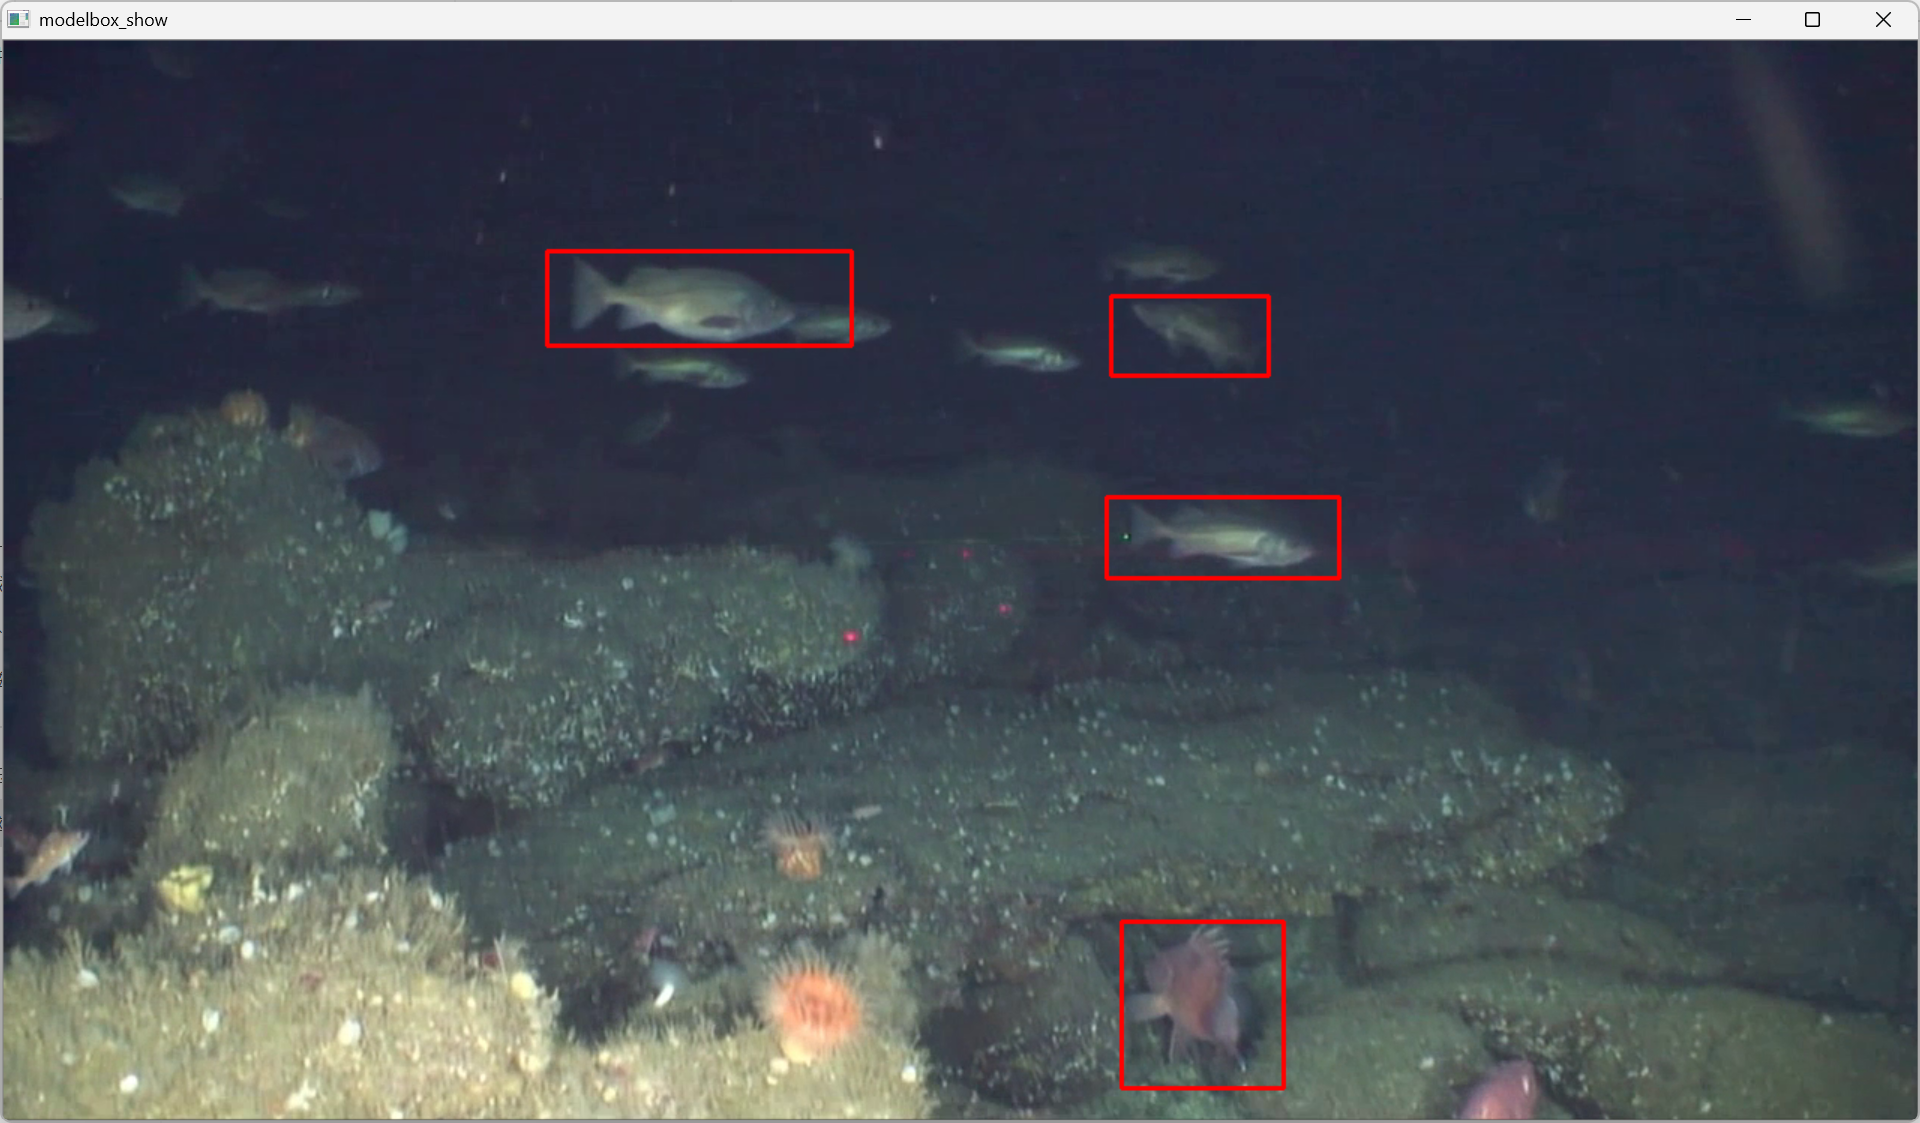
7. 运行应用
在fish_det工程目录下执行.\bin\main.bat运行应用,本地屏幕上会自动弹出鱼群的实时检测画面:
PS D:\modelbox-win10-x64-1.5.3> cd D:\modelbox-win10-x64-1.5.3\workspace\fish_det
PS D:\modelbox-win10-x64-1.5.3\workspace\fish_det> .\bin\main.bat
三、小结
本节介绍了如何使用ModelArts和ModelBox训练开发一个YOLOX鱼类目标检测的AI应用,我们只需要准备模型并配置对应的toml文件,即可快速实现模型的高效推理和部署。

- 点赞
- 收藏
- 关注作者
评论(0)