【愚公系列】《微信小程序与云开发从入门到实践》059-迷你商城小程序的开发(加入购物车与创建订单功能开发)

| 标题 | 详情 |
|---|---|
| 作者简介 | 愚公搬代码 |
| 头衔 | 华为云特约编辑,华为云云享专家,华为开发者专家,华为产品云测专家,CSDN博客专家,CSDN商业化专家,阿里云专家博主,阿里云签约作者,腾讯云优秀博主,腾讯云内容共创官,掘金优秀博主,亚马逊技领云博主,51CTO博客专家等。 |
| 近期荣誉 | 2022年度博客之星TOP2,2023年度博客之星TOP2,2022年华为云十佳博主,2023年华为云十佳博主,2024年华为云十佳博主等。 |
| 博客内容 | .NET、Java、Python、Go、Node、前端、IOS、Android、鸿蒙、Linux、物联网、网络安全、大数据、人工智能、U3D游戏、小程序等相关领域知识。 |
| 欢迎 | 👍点赞、✍评论、⭐收藏 |
🚀前言
在数字化消费日益普及的今天,小程序已经成为商家与消费者互动的重要平台。迷你商城小程序凭借其快捷的访问和丰富的功能,正逐渐改变着传统购物的方式。在这一过程中,购物车与订单创建功能的开发尤为关键,它们不仅是用户购物流程中的重要环节,更直接影响着消费者的购买体验和商家的销售转化率。
购物车功能的实现,使用户能够轻松管理和选择商品,提升了购物的灵活性。而创建订单功能则是购物流程的最后一步,它涉及到用户信息的确认、支付方式的选择等一系列重要操作。如何设计一个直观易用的购物车,以及一个高效流畅的订单创建流程,是每个小程序开发者必须认真考虑的任务。
🚀一、加入购物车与创建订单功能开发
🔎1.购物车功能
在电商类小程序中,购物车是一个核心功能,用户可以将商品添加到购物车、删除不需要的商品,并最终创建订单进行结算。下面是如何通过云函数实现购物车功能的详细步骤,包括添加商品、删除商品、获取购物车信息,以及在小程序端实现相关功能。
🦋1.1 云函数开发
☀️1.1.1 添加商品到购物车 (addToCar)
此云函数用于将商品添加到用户的购物车。
// 云函数入口文件
const cloud = require('wx-server-sdk')
cloud.init({
  env: '' // 填写您的云环境ID
})
const db = cloud.database();
// 云函数入口函数
exports.main = async (event, context) => {
    const wxContext = cloud.getWXContext()
    let openId = wxContext.OPENID;
    let gid = event.gid;
    let collection = db.collection("shop_car");
    return collection.add({
        data:{
            gid:gid,
            openId:openId
        }
    });
}
☀️1.1.2 删除购物车中的商品 (deleteCar)
此云函数用于删除购物车中的指定商品。
// 云函数入口文件
const cloud = require('wx-server-sdk')
cloud.init({
  env: '' // 填写您的云环境ID
})
const db = cloud.database();
// 云函数入口函数
exports.main = async (event, context) => {
    const wxContext = cloud.getWXContext()
    let openId = wxContext.OPENID;
    let gid = event.gid;
    let collection = db.collection("shop_car");
    return collection.where({
        gid:gid,
        openId:openId
    }).remove();
}
☀️1.1.3 获取购物车信息 (carInfo)
此云函数用于获取当前用户的购物车信息,并结合商品信息返回详细数据。
const cloud = require('wx-server-sdk')
cloud.init({
  env: '' // 填写您的云环境ID
})
const db = cloud.database();
exports.main = async (event, context) => {
    const wxContext = cloud.getWXContext();
    let openId = wxContext.OPENID;
    let collection = db.collection("shop_car");
    let productC = db.collection("shop_product");
    let data = await collection.where({
        openId:openId
    }).get();
    let gArray = data.data;
    for (let j = 0; j < gArray.length; j++) {
        let v = gArray[j];
        let p = await productC.where({
            gid:v.gid
        }).get();
        v.detail = p.data[0];
    }
    return gArray;
}
🦋1.2 小程序端 server.js 实现
在小程序端,封装对云函数的调用,方便其他页面调用购物车相关功能。
// utils/server/server.js
const server = {
    addToCar:function(gid, callback) {
        wx.cloud.callFunction({
            name:"addToCar",
            data:{
                gid:gid
            }
        }).then(res=>{
            callback();
        }).catch(error=>{
            wx.showToast({
              title: `加入购物车失败`,
              icon:"none"
            })
            console.log(error);
        });
    },
    getCarInfo:function(callback) {
        wx.cloud.callFunction({
            name:"carInfo",
        }).then(res=>{
            callback(res.result);
        }).catch(error=>{
            wx.showToast({
              title: `获取购物车详情失败`,
              icon:"none"
            })
            console.log(error);
        });
    },
    deleteCar:function(gid, callback) {
        wx.cloud.callFunction({
            name:"deleteCar",
            data:{
                gid:gid
            }
        }).then(res=>{
            callback(res.result);
        }).catch(error=>{
            wx.showToast({
              title: `删除商品失败`,
              icon:"none"
            })
            console.log(error);
        });
    },
};

module.exports = { server };
🦋1.3 商品详情页 addCar 方法
在商品详情页中,用户可以点击“加入购物车”按钮,将商品添加到购物车。这个方法会调用云函数 addToCar。
// pages/product/product.js
const server = require('../../utils/server/server').server;

Page({
  data: {
    gid: "",
    product: {}
  },

  // 页面加载时获取商品ID
  onLoad(options) {
    this.data.gid = options.gid;
  },

  // 添加商品到购物车
  addCar() {
    server.addToCar(this.data.gid, () => {
      wx.showToast({
        title: '添加成功',
        icon: 'none'
      });
    });
  }
});
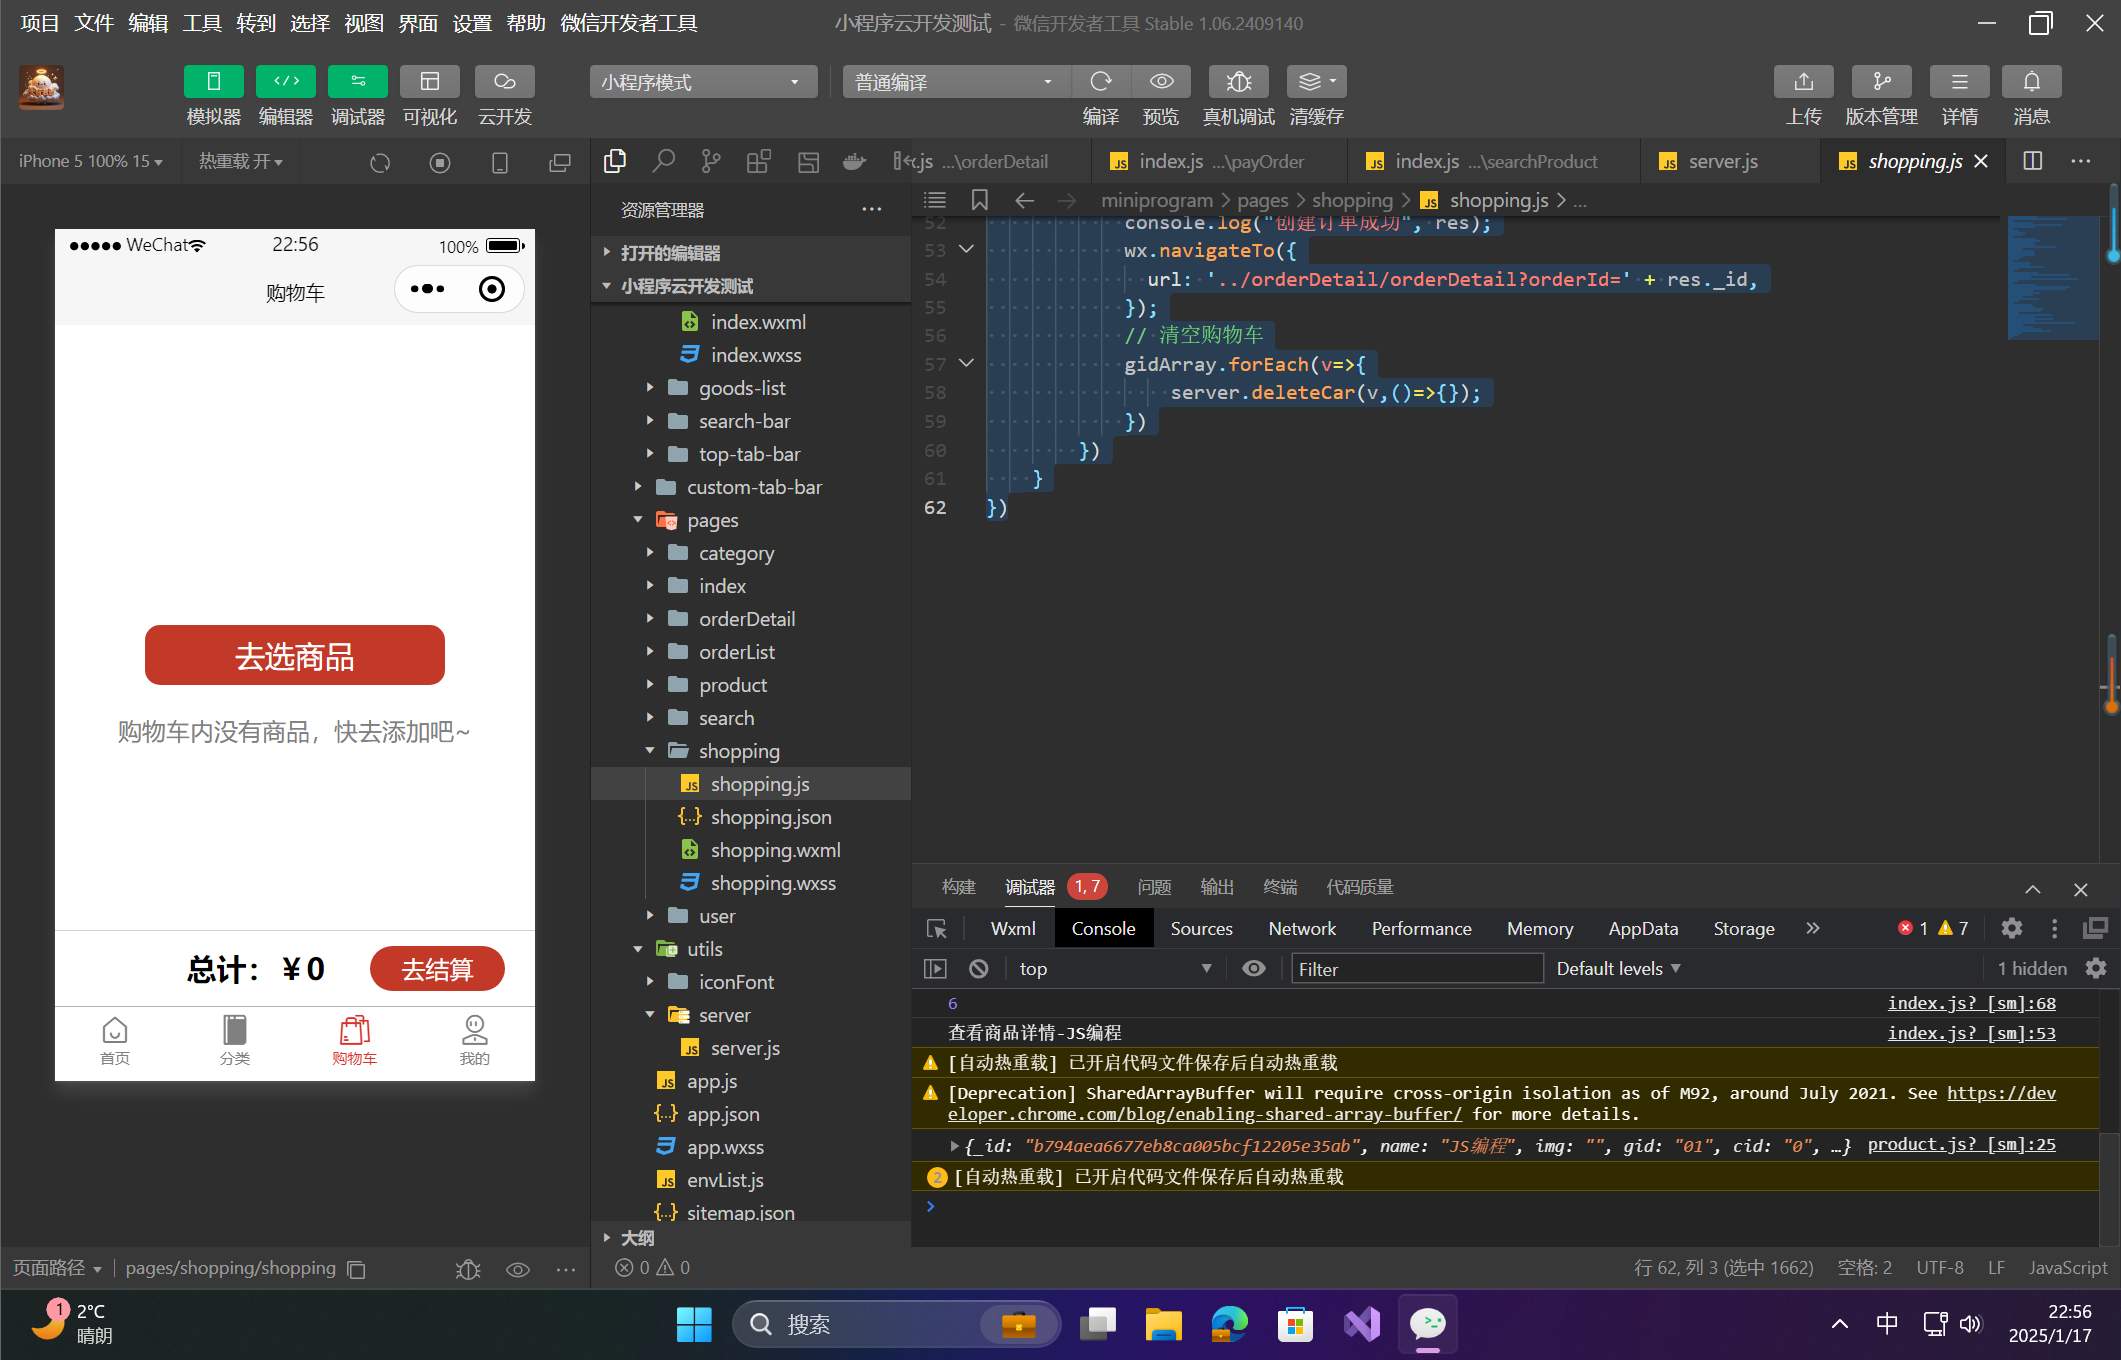
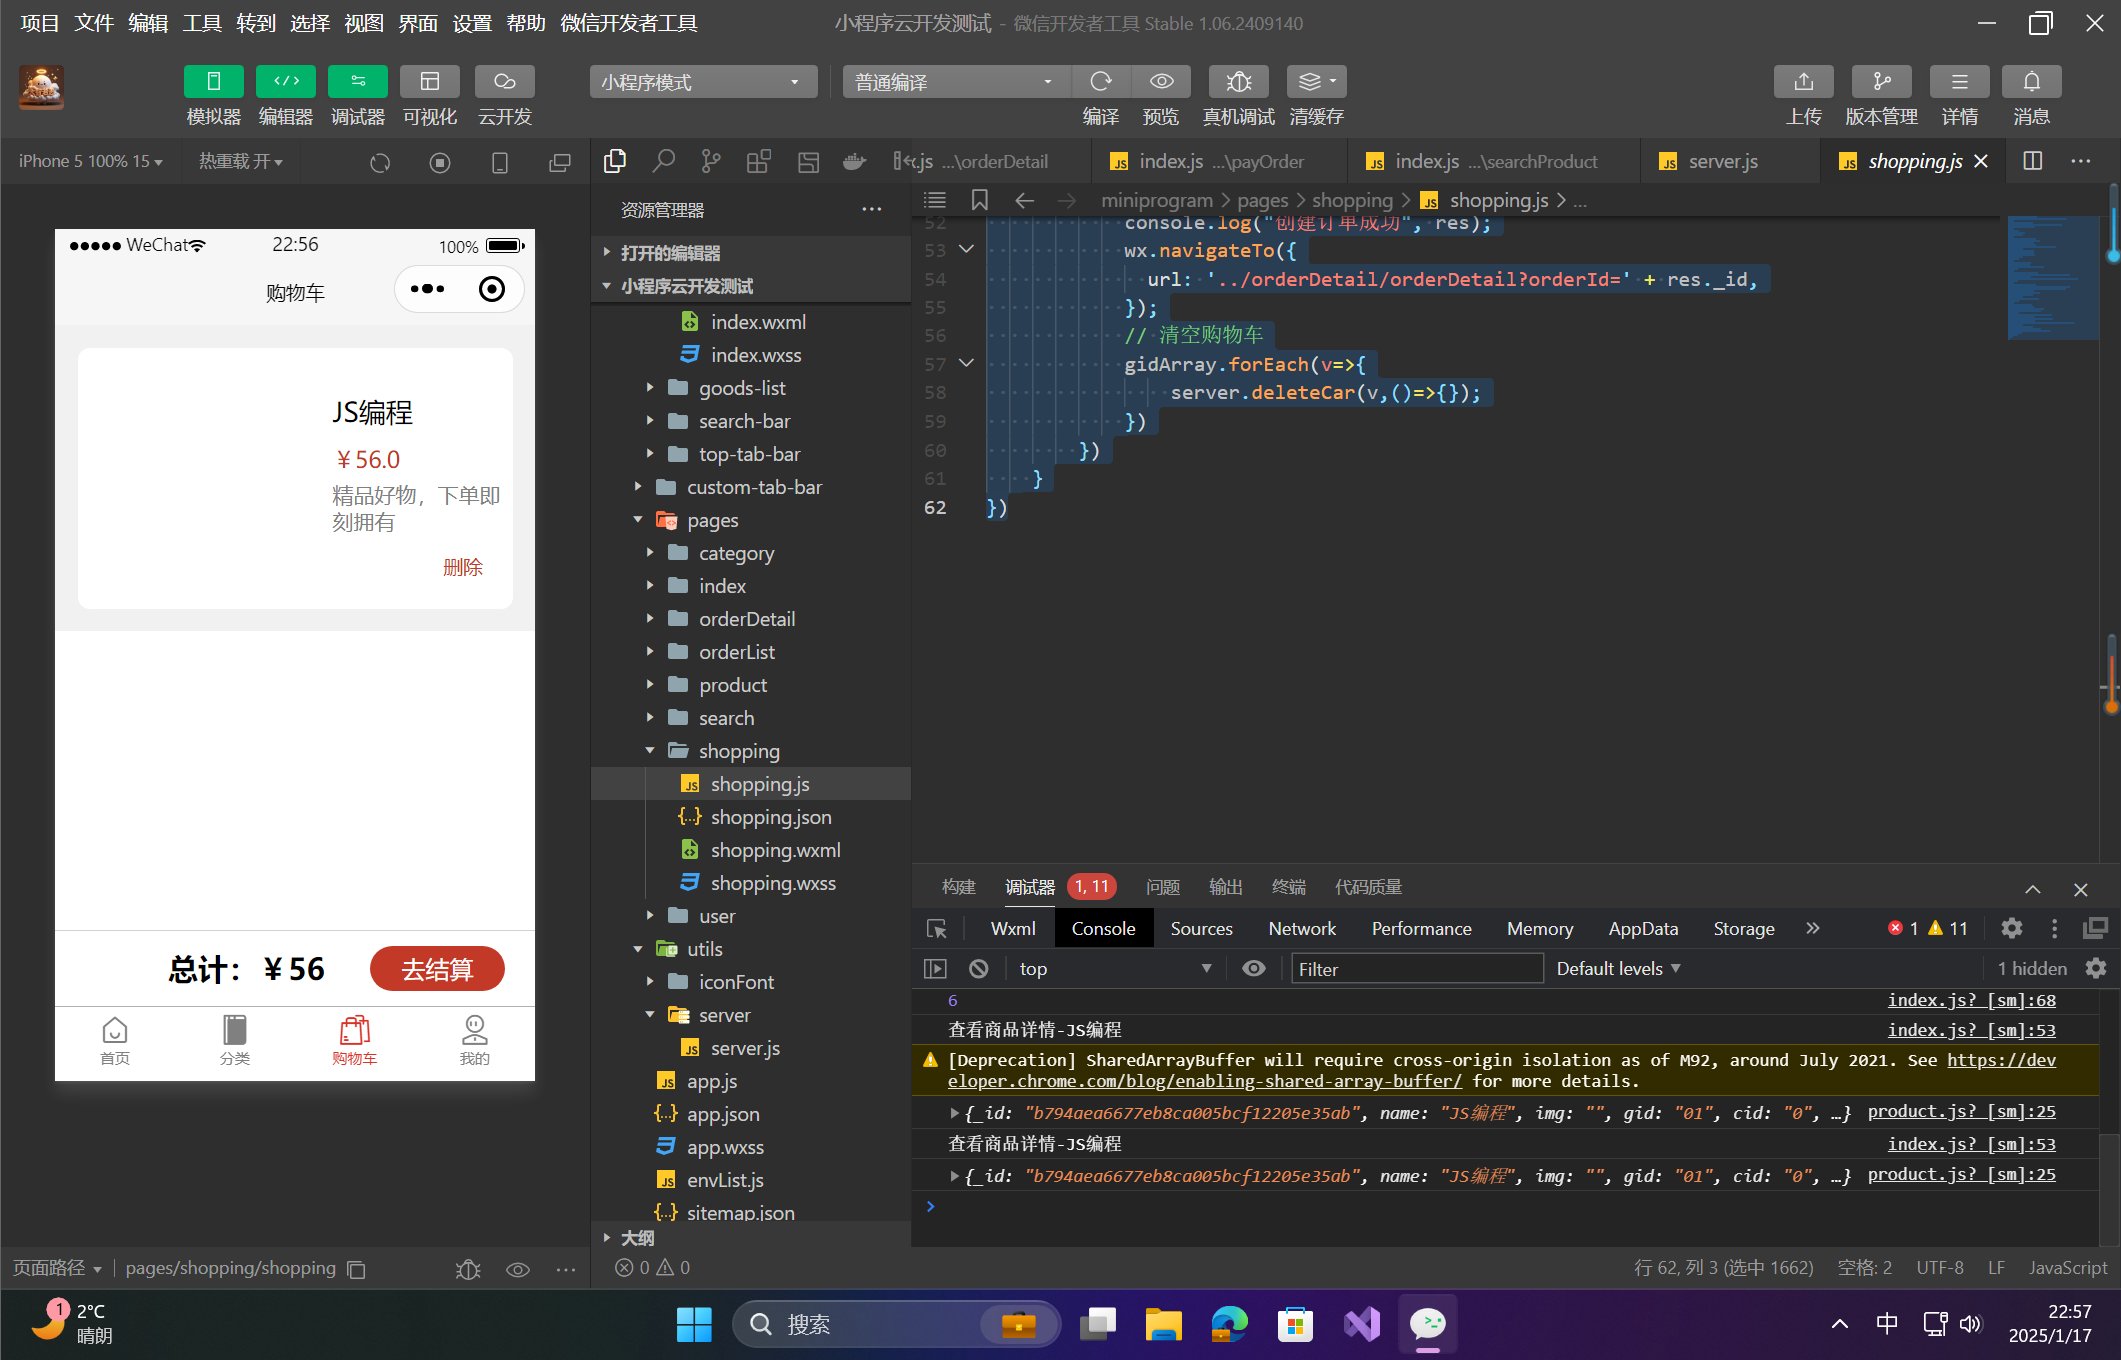
🦋1.4 购物车页面
☀️1.4.1 购物车页面框架 shopping.wxml
在购物车页面展示用户购物车中的商品,并提供删除商品、跳转到商品详情和结算按钮。
<!--pages/shopping/shopping.wxml-->
<view style="background-color: #f1f1f1; overflow: hidden;">
    <view class="item" wx:for="{{datas}}" wx:key="index" bindtap="goDetail" data-index="{{index}}">
        <view class="left">
            <image src="{{item.detail.img}}"></image>
        </view>
        <view class="right">
            <view class="title">{{item.detail.name}}</view>
            <view class="price">¥{{item.detail.price}}</view>
            <view class="desc">精品好物,下单即刻拥有</view>
            <view class="delete" catchtap="delete" data-index="{{index}}">删除</view>
        </view>
    </view>
    <view wx:if="{{datas.length == 0}}" class="empty">
        <view class="button" bindtap="goHome">去选商品</view>
        <view class="title">购物车内没有商品,快去添加吧~</view>
    </view>
    <view class="bar">
        <view class="btn" bindtap="toOrder">去结算</view>
        <view class="total">总计:¥{{total}}</view>
    </view>
</view>
☀️1.4.2 购物车页面样式 shopping.wxss
为购物车页面添加样式,确保页面的美观和功能性。
/* pages/shopping/shopping.wxss */

.item {
    display: flex;
    flex-direction: row;
    margin: 15px;
    background-color: white;
    border-radius: 8px;
    overflow: hidden;
}

.left image {
    width: 150px;
    height: 150px;
    margin: 10px;
}

.right {
    margin-top: 30px;
    font-size: 18px;
    position: relative;
    flex: 1;
}

.price {
    color: #c33927;
    font-size: 15px;
    margin-top: 10px;
}

.delete {
    color:#c33927;
    font-size: 13px;
    position: absolute;
    right: 20px;
    bottom: 20px;
}

.desc {
    font-size: 14px;
    color: gray;
    margin-right: 5px;
    margin-top: 5px;
}

.empty {
    height: 400px;
    background-color: white;
    padding-top: 200px;
    text-align: center;
}

.empty .title {
    margin-top: 20px;
    color: gray;
}

.empty .button {
    background-color: #c33927;
    height: 40px;
    color: white;
    font-size: 20px;
    line-height: 40px;
    width: 200px;
    border-radius: 10px;
    margin: 0 auto;
}

.bar {
    display: flex;
    flex-direction: row-reverse;
    background-color: white;
    border-top: solid 1px #d1d1d1;
    height: 50px;
    position: fixed;
    bottom: 50px;
    left: 0px;
    right: 0px;
}

.total {
    line-height: 50px;
    margin-right: 30px;
    font-weight: bold;
    font-size: 20px;
}

.btn {
    height: 30px;
    line-height: 30px;
    background-color: #c33927;
    border-radius: 15px;
    color: white;
    width: 90px;
    text-align: center;
    margin-top: 10px;
    margin-right: 20px;
}
☀️1.4.3 购物车页面逻辑 shopping.js
在购物车页面中,我们需要获取购物车信息、删除商品以及跳转到订单页面的功能。
// pages/shopping/shopping.js
const server = require('../../utils/server/server').server;
Page({
    onShow: function () {
        this.getTabBar().setData({selectedIndex:2});
        this.requestData();
    },
    data: {
        datas:[],
        total:0
    },
    requestData:function() {
        server.getCarInfo(res=>{
            let count = 0;
            res.forEach(v=>{
                count += Number(v.detail.price);
            });
            this.setData({
                datas:res,
                total:count
            });
        });
    },
    goHome:function() {
        wx.switchTab({
          url: '/pages/index/index',
        })
    },
    goDetail:function(event) {
        let index = Number(event.currentTarget.dataset.index);
        wx.navigateTo({
          url: `../product/product?gid=${this.data.datas[index].gid}`,
        })
    },
    delete:function(event) {
        let index = Number(event.currentTarget.dataset.index);
        server.deleteCar(this.data.datas[index].gid,res=>{
            wx.showToast({
              title: '删除成功',
              icon:"none"
            });
            this.requestData();
        });
    },
    toOrder:function() {
        let gidArray = [];
        this.data.datas.forEach(v=>{
            gidArray.push(v.gid);
        });
        server.createOrder(gidArray,(res)=>{
            // 跳转订单详情
            console.log("创建订单成功", res);
            wx.navigateTo({
              url: '../orderDetail/orderDetail?orderId=' + res._id,
            });
            // 清空购物车
            gidArray.forEach(v=>{
                server.deleteCar(v,()=>{});
            })
        })
    }
})
🔎2.订单相关功能开发
你提到的流程包括了两个关键的云函数:创建订单(createOrder)和获取订单详情(orderDetail),以及如何在小程序中处理这两个功能,具体来说如何在商品详情页或购物车页面中实现购买并跳转到订单详情页面。
🦋2.1 云函数开发
☀️2.1.1 创建订单云函数:createOrder
这个云函数的主要任务是接收用户传递的商品ID(gids),查询数据库中相应的商品信息,计算总价,并生成一个新的订单。
const cloud = require('wx-server-sdk')
cloud.init({
  env: '' // 填写您的云环境ID
})
const db = cloud.database();
const _ = db.command;
exports.main = async (event, context) => {
    const wxContext = cloud.getWXContext()
    let openId =  wxContext.OPENID;
    let gids = event.gids;
    let address = "尚未选择地址";
    let productC = db.collection("shop_product");
    let data = await productC.where({
        gid:_.in(gids)
    }).get();
    let gArray = data.data;
    let sum = 0;
    let title = "";
    let imgs = [];
    for (let j = 0; j < gArray.length; j++) {
        let v = gArray[j];
        sum += Number(v.price);
        title += v.name + ' ';
        imgs.push(v.img);
    }
    let collection = db.collection("shop_order");
    return collection.add({
        data:{
            gids:gids,
            openId:openId,
            state:0,
            stateText:"待支付",
            freight:0,
            address:address,
            sum:sum,
            img:imgs,
            title:title
        }
    });
}
在这个云函数中,我们首先根据传入的商品ID(gids)查询对应的商品信息,然后计算总价,并将所有相关信息(包括商品名称、图片、价格等)封装成一个订单,存储在数据库中。
☀️2.1.2 获取订单详情云函数:orderDetail
这个云函数根据订单ID查询具体的订单详情,并将订单中的商品信息与对应的商品数据一同返回。
const cloud = require('wx-server-sdk')
cloud.init({
  env: '' // 填写您的云环境ID
})
const db = cloud.database();
const _ = db.command;
exports.main = async (event, context) => {
    let orderId = event.orderId;
    let orderDoc = await db.collection("shop_order").doc(orderId).get();
    console.log(orderDoc);
    let order = orderDoc.data;
    console.log(order);
    let productC = db.collection("shop_product");
    let data = await productC.where({
        gid:_.in(order.gids)
    }).get();
    let  gArray = data.data;
    order.gArray = gArray;
    return order;
}
在这个云函数中,我们根据传入的订单ID查询订单详情,然后通过订单中的商品ID(gids)查询商品的详细信息,并将商品数据与订单信息一起返回。
🦋2.2 小程序端 server.js 实现
// utils/server/server.js
const server = {
    createOrder:function(gids, callback) {
        wx.cloud.callFunction({
            name:"createOrder",
            data:{
                gids:gids
            }
        }).then(res=>{
            callback(res.result);
        }).catch(error=>{
            wx.showToast({
              title: `创建订单失败`,
              icon:"none"
            })
            console.log(error);
        });
    },
    orderDetail:function(orderId, callback) {
        wx.cloud.callFunction({
            name:"orderDetail",
            data:{
                orderId:orderId
            }
        }).then(res=>{
            callback(res.result);
        }).catch(error=>{
            wx.showToast({
              title: `获取订单详情失败`,
              icon:"none"
            })
            console.log(error);
        });
    },
};

module.exports = { server };
🦋2.4 订单详情页面
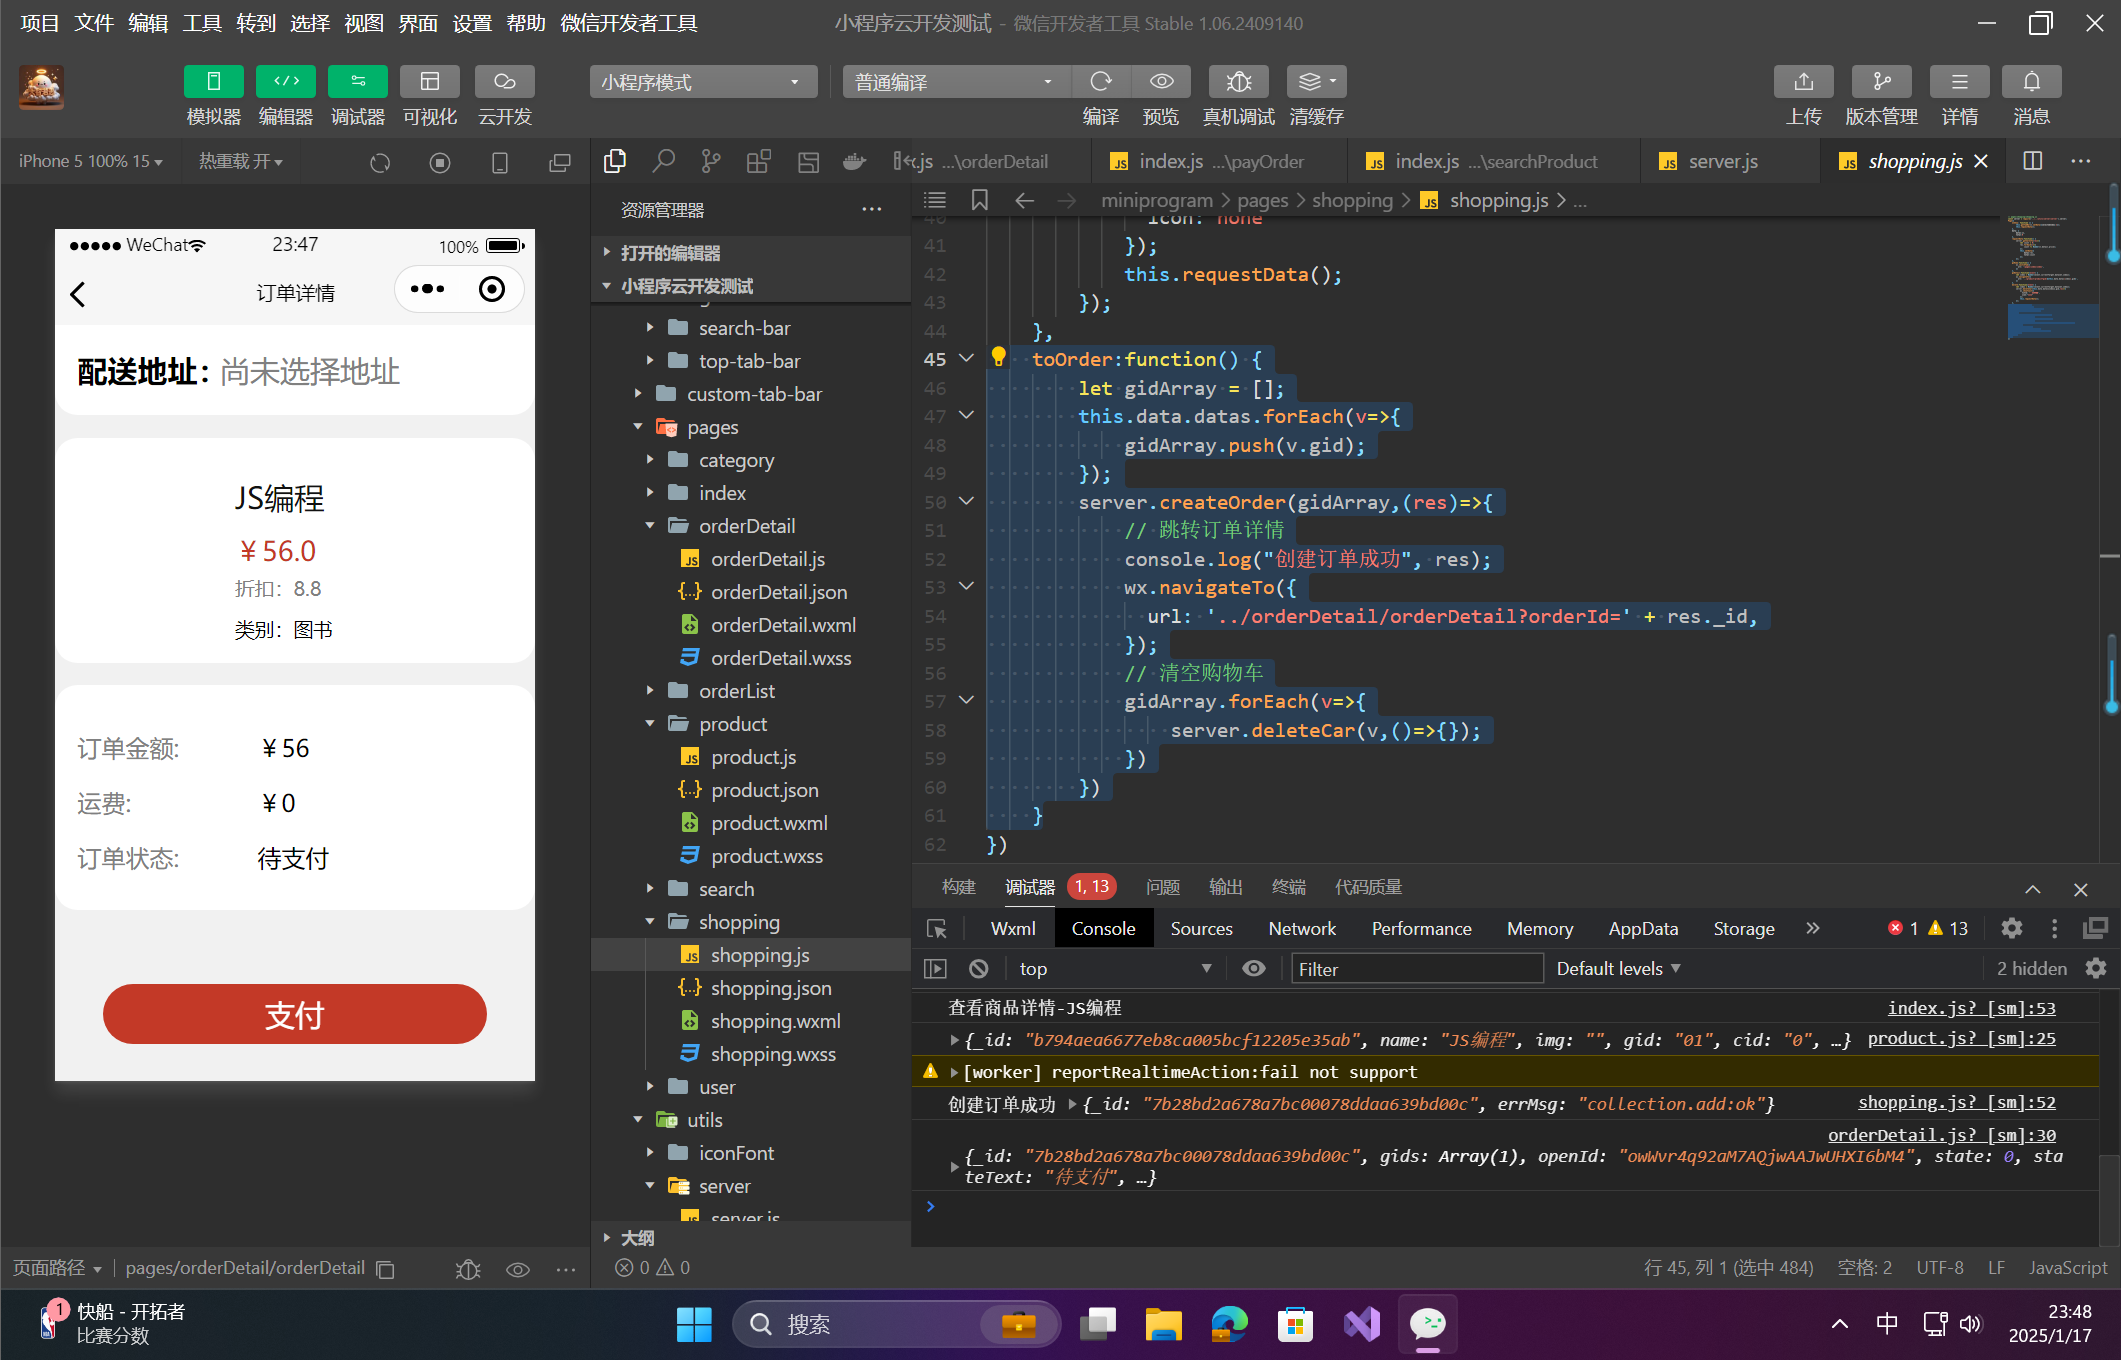
☀️1.4.1 订单详情页面框架 orderDetail.wxml
<!--pages/orderDetail/orderDetail.wxml-->
<view class="container">
    <view class="address">
        <text class="address-t1">配送地址:</text>
        <text class="address-t2">{{orderDetail.address ? orderDetail.address : "选择地址"}}</text>
    </view>
    <view class="products">
        <view bindtap="goProduct" class="item" wx:for="{{orderDetail.gArray}}" wx:key="index" data-index="{{index}}">
            <view class="left">
                <image src="{{item.img}}"></image>
            </view>
            <view class="right">
                <view class="title">{{item.name}}</view>
                <view class="price">¥{{item.price}}</view>
                <view class="discount">折扣:{{item.discount}}</view>
                <view class="cate">类别:{{item.cname}}</view>
            </view>
        </view>
    </view>
    <view class="orderInfo">
        <view class="item">
            <text class="title">订单金额:</text>
            <text class="value">¥{{orderDetail.sum}}</text>
        </view>
        <view class="item">
            <text class="title">运费:</text>
            <text class="value">¥{{orderDetail.freight}}</text>
        </view>
        <view class="item">
            <text class="title">订单状态:</text>
            <text class="value">{{orderDetail.stateText}}</text>
        </view>
    </view>
    <view class="button" wx:if="{{orderDetail.state == 0}}" bindtap="pay">支付</view>
</view>
☀️2.4.2 订单详情页面样式 orderDetail.wxss
/* pages/orderDetail/orderDetail.wxss */
.container {
    background-color: #f1f1f1;
    height: 100%;
    position: absolute;
    width: 100%;
}

.address {
    height: 60px;
    line-height: 60px;
    padding-left: 15px;
    background-color: white;
    border-bottom-left-radius: 15px;
    border-bottom-right-radius: 15px;
}

.address-t1 {
    font-weight: bold;
    font-size: 20px;
    width: 100px;
}

.address-t2 {
    position: absolute;
    font-size: 20px;
    color: gray;
    text-overflow:ellipsis;
    white-space:nowrap;
    word-break:keep-all;
    overflow: hidden;
    right: 20px;
    left: 110px;
}

.products {
    margin-top: 15px;
    margin-bottom: 15px;
    border-radius: 15px;
    background-color: white;
    overflow: hidden;
}

.item {
    margin-bottom: 10px;
    margin-top: 16px;
    display: flex;
    flex-direction: row;
}

.left image {
    width: 120px;
    height: 120px;
}

.right .title {
    font-size: 20px;
    color: #111111;
    margin-top: 10px;
}

.right .price {
    margin-top: 10px;
    font-size: 18px;
    color:#c33927
}

.right .discount {
    font-size: 13px;
    color:gray;
    margin-top: 5px;
}

.right .cate {
    font-size: 13px;
    margin-top: 10px;
}

.orderInfo {
    background-color: white;
    border-radius: 15px;
    padding: 15px;
    margin-bottom: 50px;
}

.orderInfo .item .title {
    width: 120px;
    color: gray;
}

.button {
    background-color: #c33927;
    height: 40px;
    line-height: 40px;
    text-align: center;
    width: 80%;
    border-radius: 20px;
    font-size: 20px;
    color: white;
    position: fixed;
    bottom: 25px;
    left: 10%;
}
☀️2.4.3 订单详情页面逻辑 orderDetail.js
// pages/orderDetail/orderDetail.js
const server = require('../../utils/server/server').server;
Page({

    /**
     * 页面的初始数据
     */
    data: {
        orderId:"",
        orderDetail:{}
    },

    /**
     * 生命周期函数--监听页面加载
     */
    onLoad(options) {
        this.data.orderId = options.orderId;
        this.requestData();
    },

    goProduct(event) {
        let index = Number(event.currentTarget.dataset.index);
        wx.navigateTo({
            url: `../product/product?gid=${this.data.orderDetail.gArray[index].gid}`,
        })
    },

    requestData() {
        server.orderDetail(this.data.orderId, res => {
            console.log(res);
            this.setData({
                orderDetail:res
            });
        });
    },
    pay() {
        server.pay(this.data.orderId, "用户选择的默认收货地址", ()=>{
            wx.showToast({
              title: '支付成功',
              icon:"none"
            });
            this.requestData();
        })
    }
})
最后,在商品详情页购买商品时,用户点击“购买”按钮后,系统会创建订单并跳转到订单详情页。为了实现这个功能,可以在 product.js 文件中完善 buy 方法,如下所示:
buy() {
    server.createOrder([this.data.gid],(res)=>{
        // 跳转订单详情
        console.log("创建订单成功", res);
        wx.navigateTo({
          url: '../orderDetail/orderDetail?orderId=' + res._id,
        });
    })
},
类似地,购物车页面的结算功能也很相似,可以通过以下代码在 shopping.js 文件中实现 toOrder 方法:
toOrder:function() {
    let gidArray = [];
    this.data.datas.forEach(v=>{
        gidArray.push(v.gid);
    });
    server.createOrder(gidArray,(res)=>{
        // 跳转订单详情
        console.log("创建订单成功", res);
        wx.navigateTo({
          url: '../orderDetail/orderDetail?orderId=' + res._id,
        });
        // 清空购物车
        gidArray.forEach(v=>{
            server.deleteCar(v,()=>{});
        })
    })
}
通过上述代码,在用户完成购买后,系统会创建订单并跳转到订单详情页。在购物车页面,用户结算时,会创建包含所有选中商品的订单,并跳转到订单详情页,同时清空购物车。
运行这段代码后,你可以选择一些商品进行购买,效果如图所示。
🔎3.地址选择和支付功能开发
🦋3.1 地址选择
在小程序中,地址选择可以直接调用微信的收货地址接口。为了使用这个功能,需要先在小程序管理后台开通对应的权限。具体步骤如下:
- 登录小程序管理后台,进入 开发 > 开发管理 > 接口设置 模块。
- 在接口设置中,开通 获取用户收货地址 的功能,参考图。
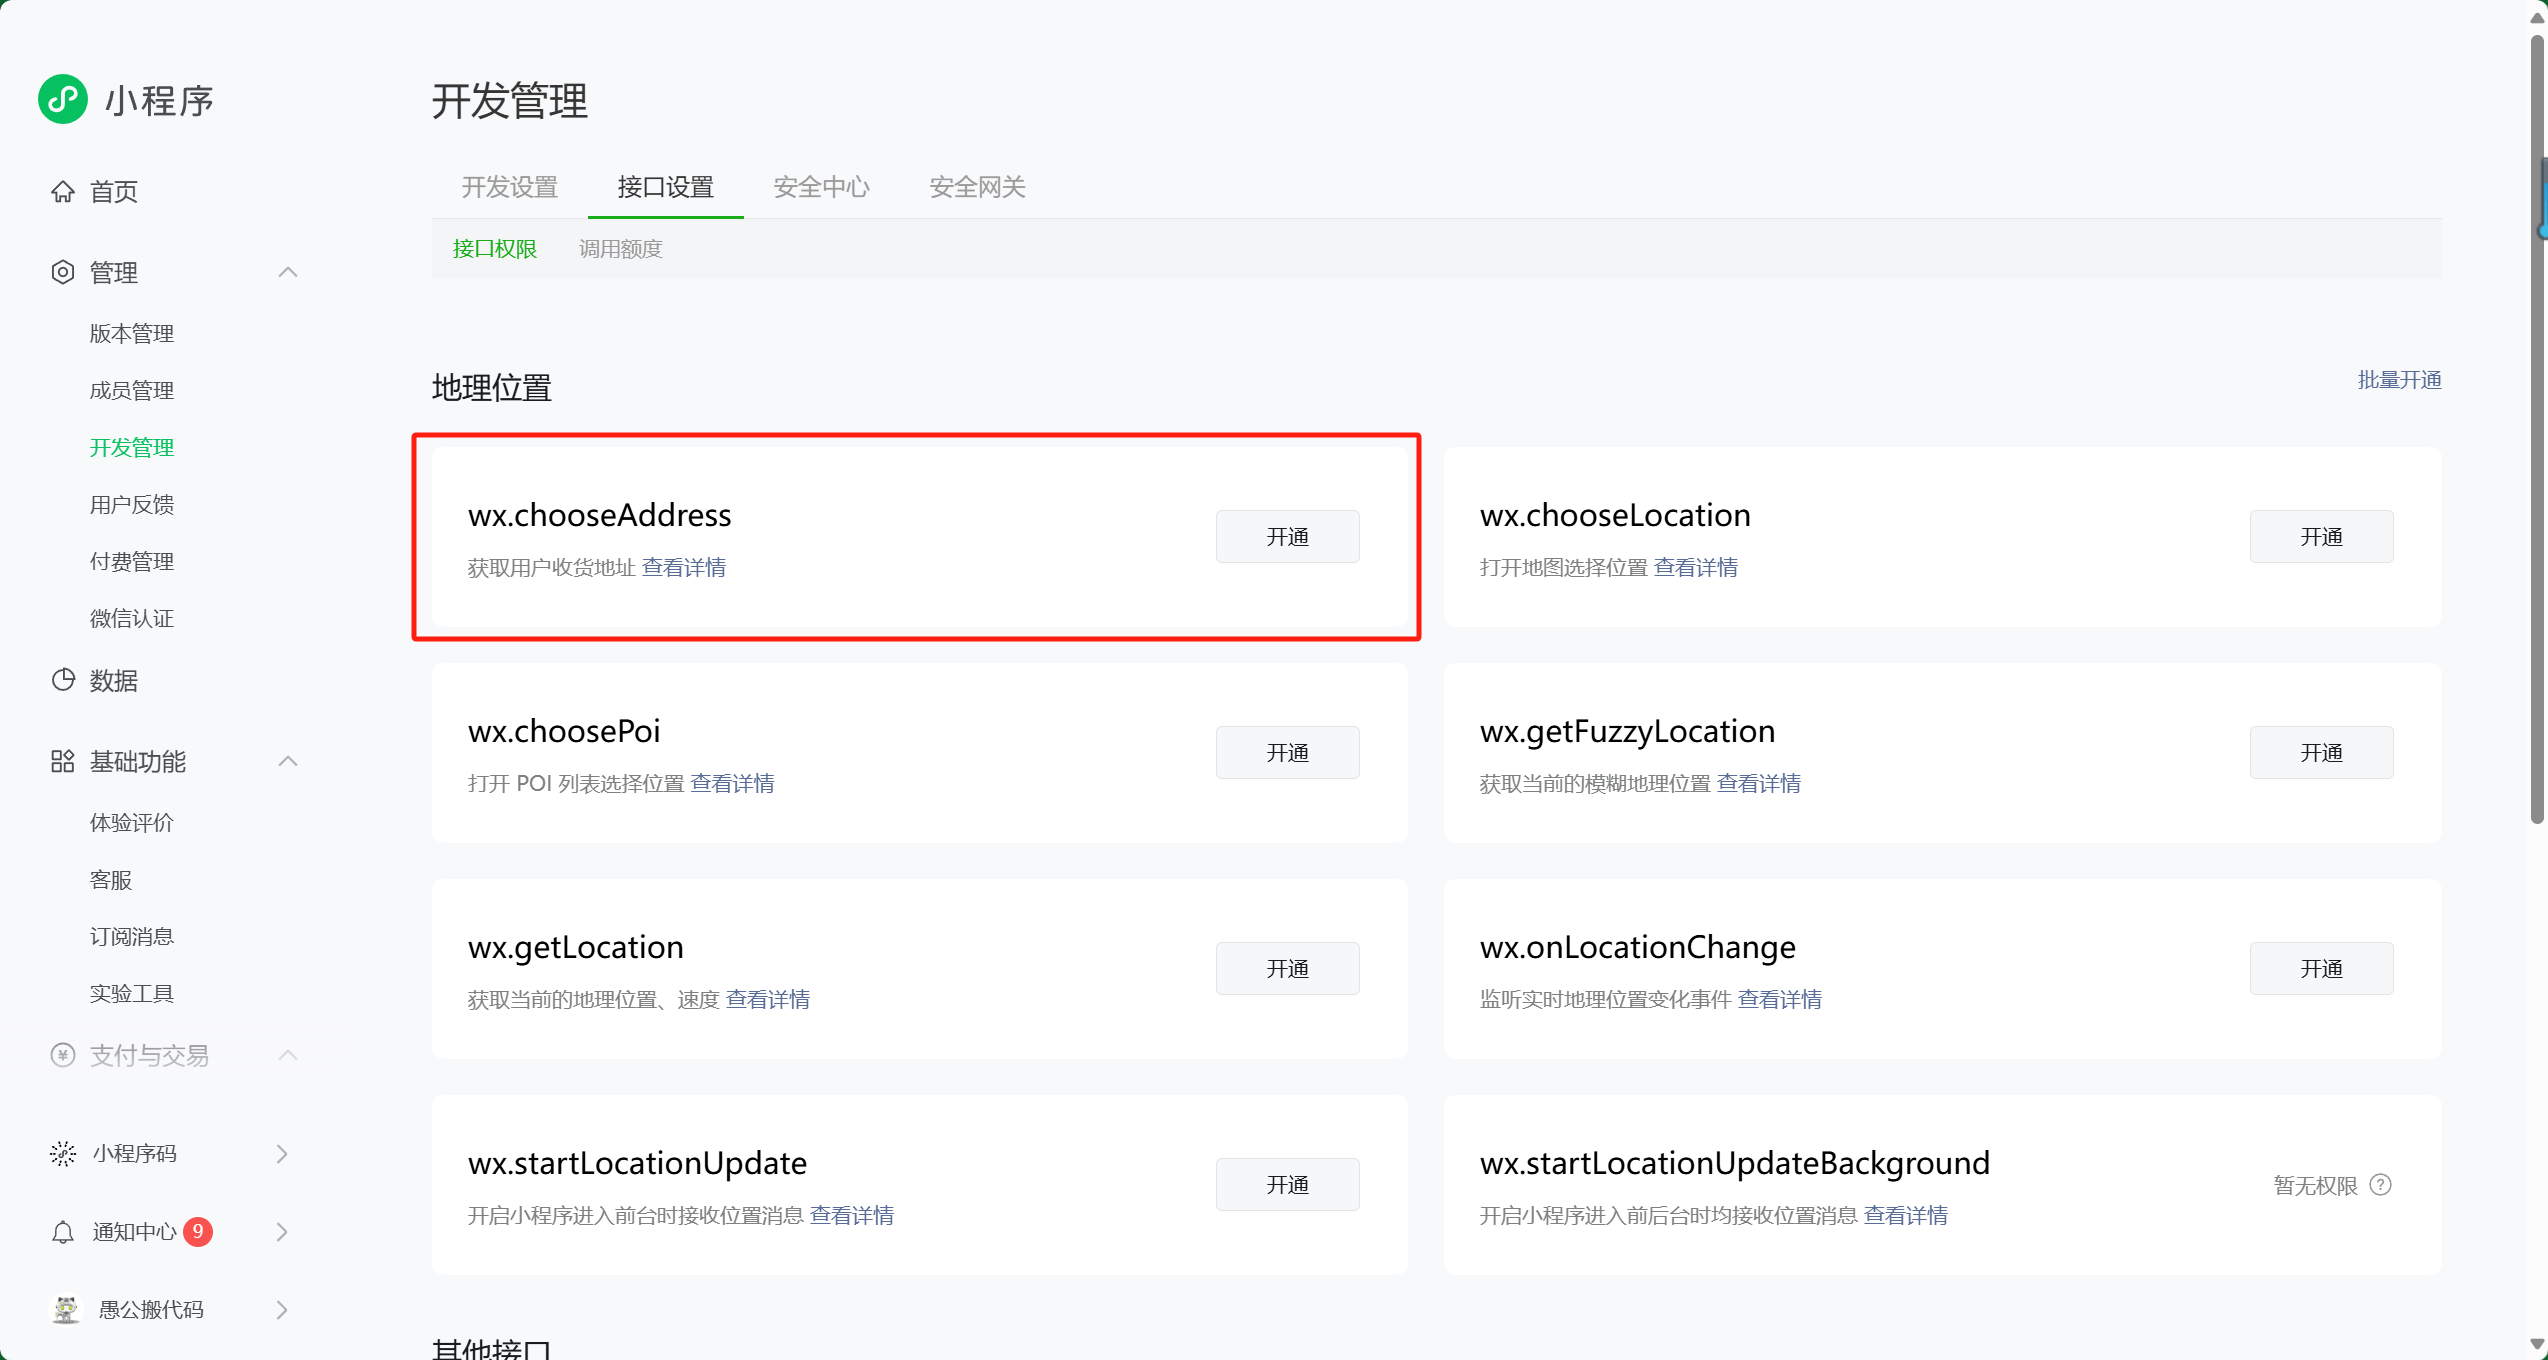
在申请开通时,需要填写申请原因并上传小程序截图或录屏。完成申请后,即可使用 wx.chooseAddress 接口直接获取用户的收货地址,这一过程非常简便,因此不再详细介绍。
🦋3.2 支付功能
本节重点开发订单的支付功能。支付过程可以直接接入微信支付,具体的接入方式可以参考微信支付的文档:微信支付API文档。
然而,本示例中为了简化流程,采用模拟支付成功的方式,即默认点击支付后直接模拟支付成功,后续只需要更新订单状态即可。
☀️3.2.1 创建 payOrder 云函数
首先,在 cloudfunctions 云函数目录下新建一个名为 payOrder 的云函数,代码如下:
const cloud = require('wx-server-sdk')
cloud.init({
  env: '' // 填写您的云环境ID
})
const db = cloud.database();
exports.main = async (event, context) => {
    let orderId = event.orderId;
    let address = event.address;
    return db.collection("shop_order").doc(orderId).update({
        data:{
            state:1,
            stateText:"待发货",
            address:address
        }
    });
}
该云函数用于模拟支付成功,支付完成后更新订单状态为 “待发货” 并记录收货地址。
☀️3.2.2 server.js 中的支付方法
在 server.js 中,添加一个方法来调用云函数进行支付操作:
pay:function(orderId, address, callback) {
    wx.cloud.callFunction({
        name:"payOrder",
        data:{
            orderId:orderId,
            address:address
        }
    }).then(res=>{
        callback(res.result);
    }).catch(error=>{
        wx.showToast({
          title: `订单支付失败`,
          icon:"none"
        })
        console.log(error);
    });
},
该方法会调用 payOrder 云函数,传入订单ID和收货地址,模拟支付操作,并根据返回结果更新订单状态。
☀️3.2.3 订单详情页的支付功能
在订单详情页中,我们可以使用上面定义的 pay 方法来模拟支付过程。代码如下:
pay() {
    server.pay(this.data.orderId, "用户选择的默认收货地址", ()=>{
        wx.showToast({
          title: '支付成功',
          icon:"none"
        });
        this.requestData();
    })
}
当用户点击支付按钮时,调用 pay 方法进行支付,支付成功后,页面会自动刷新,支付按钮消失,订单状态更新为 “待发货”。
🦋3.3 模拟支付与订单状态
在真实的业务场景中,订单的状态会更加丰富,如:已过期、已发货、配送中等。本示例中,订单状态更新为 “待发货”。为了实现过期订单的自动处理,只需创建一个定时触发的云函数,将超时的订单状态更新为 “已过期”。
对于更复杂的物流状态(如发货、配送中等),需要借助第三方物流接口支持,本示例中未展示相关内容。

- 点赞
- 收藏
- 关注作者
评论(0)