OpenCvSharp从入门到实践-(02)图像处理的基本操作
图像处理的基础操作
图像处理最基本的操作,包括读取图像、显示图像、保存图像、获取图像属性等
1、读取图像
OpenCvSharp提供了用于读取图像的Cv2.ImRead方法,函数如下:
public static Mat ImRead(string fileName, ImreadModes flags = ImreadModes.Color)
参数说明:
Mat:是ImRead方法的返回值,返回的是读取到的图像。
fileName:Name of file to be loaded.
要读取图像的完整的文件名。例如,要读取当前项目下的test.jpg,fileName的值为"test.jpg"(双引号为英文格式)。
flags:Specifies color type of the loaded image
读取图像颜色类型的标记,当flags的默认值为ImreadModes.Color时,表示读取的是彩色图像,此时的flags值可以省略,当flags的值为ImreadModes.Grayscale时,表示读取的是灰度图像(如果读取的是彩色图像,也可以将彩色图转换为灰度图)。
1.1、读取当前目录下的图像
在我们的测试Demo下,有一张test.jpg的图像,如下图
我们使用ImRead方法读取,再使用Dump方法查询像素值。代码如下:
2、显示图像
相比上图中秘密麻麻的数字,将图像显示出来,效果会更加直观,我们需要使用Cv2.ImShow、Cv2.WaitKey、Cv2.DestroyAllWindows。
2.1、Cv2.ImShow 用于显示图像。
函数如下:
public static void ImShow(string winName, Mat mat)
参数说明:
winName:显示图像的窗口名称。
mat:要实现的图像。
2.2、Cv2.WaitKey方法用于等待用户按下键盘上按键的时间。
用户按下键盘上的任意按键时,将执行Cv2.WaitKey方法,并且获取Cv2.WaitKey方法的返回值。其函数如下:
public static int WaitKey(int delay = 0)
摘要:
Waits for a pressed key.
参数:
delay:
Delay in milliseconds. 0 is the special value that means ”forever”
返回结果:
Returns the code of the pressed key or -1 if no key was pressed before the specified
time had elapsed.
2.3、Cv2.DestroyAllWindows方法用于销毁所有正在显示图像的窗口。
其函数为:
public static void DestroyAllWindows()
2.4实例1-显示图像
代码如下:
Mat mat = Cv2.ImRead("test.jpg");
Cv2.ImShow("test.jpg", mat);
Cv2.WaitKey();
Cv2.DestroyAllWindows();
效果
2.4实例2-显示灰度图像
代码如下:
Mat mat = Cv2.ImRead("test.jpg",ImreadModes.Grayscale);
Cv2.ImShow("test.jpg", mat);Cv2.WaitKey();
Cv2.DestroyAllWindows();
效果
3、保存图像
OpenCvSharp提供Cv2.ImWrite方法,用于按照指定路径保存图像。其函数为:
public static bool ImWrite(string fileName, Mat img, int[]? prms = null)
摘要:
Saves an image to a specified file.
参数:
fileName:
Name of the file.
img:
Image to be saved.
prms:
Format-specific save parameters encoded as pairs
3.1实例1-保存图像
代码如下:
Mat mat = Cv2.ImRead("test.jpg");
Cv2.ImWrite("dst.jpg",mat);
效果
4、获取图像属性
处理图像过程中,经常需要获取图像的大小,类型等图像属性。OpenCvSharp提供了获取常用的属性的方法,如下:
Data
IntPtr类型的指针,指向Mat矩阵数据的首地址。一般不用。
Rows 或 Height
Mat矩阵的行数,也是图片的高度(像素)。
Cols 或 Width
Mat矩阵的列数,也是图片的宽度(像素)。
Size()
Size() 返回 Width,Height 组成的结构。
Dims
Mat矩阵的维度,若Mat是一个二维矩阵,则Dims=2,三维则Dims=3。
Channels()
Mat矩阵元素的通道数。
例如常见的RGB彩色图像,Channels =3;
灰度图像只有一个灰度分量信息,Channels =1。
Depth()
每一个像素中每一个通道的精度。
在Opencv中,Mat.Depth()得到的是一个 0~6 的数字,分别代表不同的位数,
对应关系如下:
CV_8U=0
CV_8S=1
CV_16U=2
CV_16S=3
CV_32S=4
CV_32F=5
CV_64F=6
其中U是unsigned的意思,S表示signed,也就是有符号和无符号数。
ElemSize() and ElemSize1()
矩阵中每一个元素的数据字节数(bytes)。
如果Mat中的数据类型是CV_8UC1,那么ElemSize = 1;
如果是CV_8UC3或CV_8SC3,那么 ElemSize = 3;
如果是CV_16UC3或者CV_16SC3,那么 ElemSize = 6;
可见,ElemSize是以字节为单位的;
ElemSize1() 就是通道1的数据字节数。有:
ElemSize1 = ElemSize / Channels
Step() and Step1()
Mat矩阵中每一行的步长(字节),即为每一行中所有元素的字节总量。
Step1() 是通道1的步长。有:
Step1 = Step / ElemSize1
Type()
Mat矩阵的类型,包含有矩阵中元素的类型以及通道数信息。
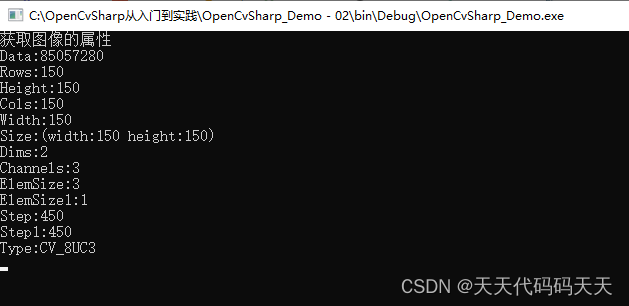
4.1实例1-获取图像属性
代码如下:
Mat mat = Cv2.ImRead("test.jpg");
Console.WriteLine("获取图像的属性");
Console.WriteLine("Data:" + mat.Data);
Console.WriteLine("Rows:" + mat.Rows);
Console.WriteLine("Height:" + mat.Height);
Console.WriteLine("Cols:" + mat.Cols);
Console.WriteLine("Width:" + mat.Width);
Console.WriteLine("Size:" + mat.Size());
Console.WriteLine("Dims:" + mat.Dims);
Console.WriteLine("Channels:" + mat.Channels());
Console.WriteLine("ElemSize:" + mat.ElemSize());
Console.WriteLine("ElemSize1:" + mat.ElemSize1());
Console.WriteLine("Step:" + mat.Step());
Console.WriteLine("Step1:" + mat.Step1());
Console.WriteLine("Type:" + mat.Type());
Console.ReadKey();
输出
- 点赞
- 收藏
- 关注作者


评论(0)