出行车票抢不到?图数据库为列车中转提供另一个选择

前言
假期来临前,很多热门旅游线路的直达火车票开票即售罄,虽然12306提供了中转换乘的方案,并且近期还在部分线路推出了车内换座,但实际能提供的换乘方案数量有限,而且有些方案换乘时要在中转车站停留比较长的时间,影响出游规划。
其实,火车的车站、车次等信息可以天然形成一个图结构,列车的运行、中转等都可以通过图相关的查询和算法解决。将车站车次信息入图,借助图数据库可以更方便地找到适合自己出游规划的最佳中转换乘方案。
最近《黑神话·悟空》大火带动了山西文旅,山西太原成为文旅的热门目的地。如下图所示是使用GES图数据库查询南京到山西太原的部分换乘车次。
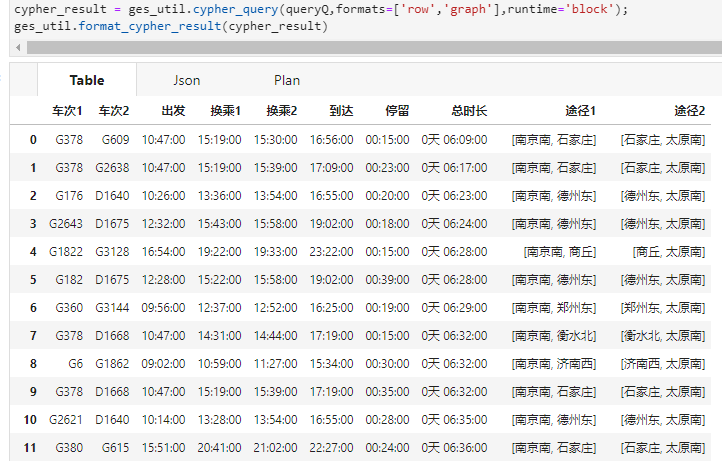
与12306官网以及某旅游app相比,直接使用图数据得到的最优换乘火车路线,总时长为6小时09分,比最快的直达列车快40分钟,比官方以及第三方提供的换乘路线分别快2小时以及40分钟。第三方的最快换乘路线位于图查询结果的第10位。了解一些基础的数据处理逻辑以及图数据库的基本原理,可以探索更优的换乘方案,让你在假期成功抵达各类热门取景地,使自己的出行快人一步。

注: 本文同步发布至华为云AI Gallery,文中所有代码皆可以在AI Gallery上运行:使用图引擎GES查询列车换乘方案。
数据准备
数据获取
本文不提供数据获取方案,全国火车车次等信息可以通过公开渠道获取,本文通过·知·乎·文章《火车最快中转方案搜索软件,支持多次中转、前K最短路径》中提供的链接,下载了列车时刻表.txt等车站车次信息,并进行了数据处理。如果你也下载了相同的数据,可以放在jupyter的train_raw_data目录下,下面将简述数据处理的过程。
数据建模
为了导入图数据库,需要定义一下车次数据的schema信息,我们使用如图所示结构来描述schema。
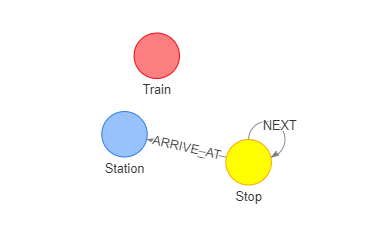
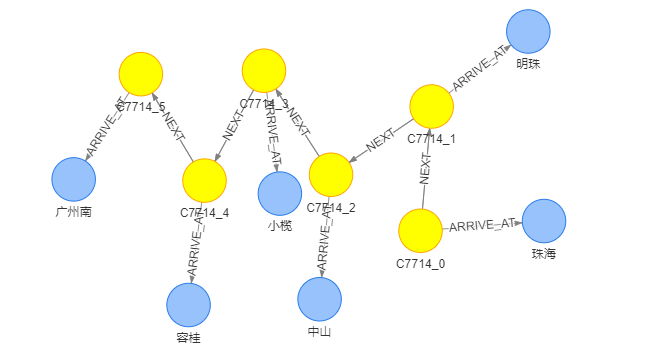
如图,定义火车站(Station)、火车到达(Stop)以及火车(Train)三种类型的节点,Stop节点代表列车的一次到达,每次到达都关联着一个车站。例如,对于C7714次车,其在图中是下列格式。
这样可以查询两个车站之间是否关联着连续的Stop节点,来查询两个城市之间是否有直达列车,通过(:Stop)–(:Station)–(:Stop)这样的Pattern,来描述一次换乘。
schema定义后需要整理成图数据库需要的schema格式,详情参考GES帮助文档-图数据库格式,具体整理好后的schema附在文末。
数据处理
数据处理的过程就是从原始数据中将车站、车次、列车等信息抽取出来。首先抽取车站信息:
mkdir -p graph_data/edge
mkdir -p graph_data/vertex
def read_files(path,skip_comment=False, skip_header=False):
    space_read = True if not skip_comment else False
    header_read = True if not skip_header else False
    with open(path, 'r') as f:
        for line in f.readlines():
            if not header_read:
                header_read = True
                continue
            if not space_read:
                if line == "\n":
                    space_read = True
                continue
            yield line

with open("graph_data/vertex/station.csv","w") as f:
    for line in read_files("train_raw_data/火车站经纬度.txt",False, True):
        names = line.split("\t")
        pos = names[1].split(",")
        f.write(names[0]+",Station,"+names[0]+","+pos[0]+","+pos[1])
而后定义一系列数据结构,将车次信息写在内存里。
class Stop:

    def __init__(self, station, arrives, departs):
        self.station = station
        self.arrives = arrives
        self.departs = departs

class Train:

    def __init__(self, trainNo):
        self.trainNo = trainNo
        self.stops = list()

currentTrain = None
trainList = list()

for line in read_files("train_raw_data/列车时刻表.txt",True, False):
    names = line.split("\t")
    if len(names) == 1:
        if currentTrain is not None and len(currentTrain.stops) > 0:
            trainList.append(currentTrain)
        currentTrain = Train(names[0].strip())
    else:
        currentTrain.stops.append(Stop(names[0].strip(), names[1].strip(), names[2].strip()))
if currentTrain is not None and len(currentTrain.stops) > 0:
    trainList.append(currentTrain)
最后生成车次相关的点集合。
with open("graph_data/vertex/train.csv","w") as f:
    for x in trainList:
        f.write(x.trainNo.strip() + ",Train," + x.trainNo.strip()+"\n")

with open("graph_data/vertex/stop.csv","w") as f:
    count = 0
    for t in trainList:
        trainNo = t.trainNo.strip()
        idx = 0
        for s in t.stops:
            dep = True if idx == 0 else False
            arr = True if idx == len(t.stops) - 1 else False
            arrive_time = "1970-01-01 " + s.arrives + ":00"
            depart_time = "1970-01-01 " + s.departs + ":00"
            f.write(trainNo + "_" + str(idx)+",Stop,"+ arrive_time + "," + depart_time + ","+ ("true" if dep else "false") + ","+ ("true" if arr else "false") + "," + trainNo + "," + s.station + "\n")
            idx = idx + 1
            count = count + 1
以及车次相关的边集合。
with open("graph_data/edge/next.csv","w") as f:
    for t in trainList:
        trainNo = t.trainNo
        for s in range(0, len(t.stops) - 1):
            f.write(trainNo + "_" + str(s) + "," + trainNo + "_" + str(s + 1) + ",NEXT\r\n")

with open("graph_data/edge/arrive_at.csv","w") as f:
    for t in trainList:
        trainNo = t.trainNo
        idx = 0
        for s in t.stops:
            f.write(trainNo + "_" + str(idx) + "," + s.station + ",ARRIVE_AT\r\n")
            idx = idx + 1
这样我们就得到了所需的图的原始数据格式。
创图和数据导入
下面将使用华为云图数据库 GES 对以上数据集进行探索和演示,需要将上述数据集上传至OBS、在GES 中创图并将刚刚生成的数据集导入。

可以点击图引擎服务-首页的立即购买创建一个图实例并导入数据,详细指导流程可参见华为图引擎文档-快速入门和华为云图引擎服务 GES 实战——创图,注意由于数据量较大,建议至少选择百万边规格进行购买,图数据库即开即停,使用完毕后停止图数据库则不会计费。
数据导入完毕后可以在图管理控制台执行各种探索,也可以继续本教程,在jupyter中连接GES服务。
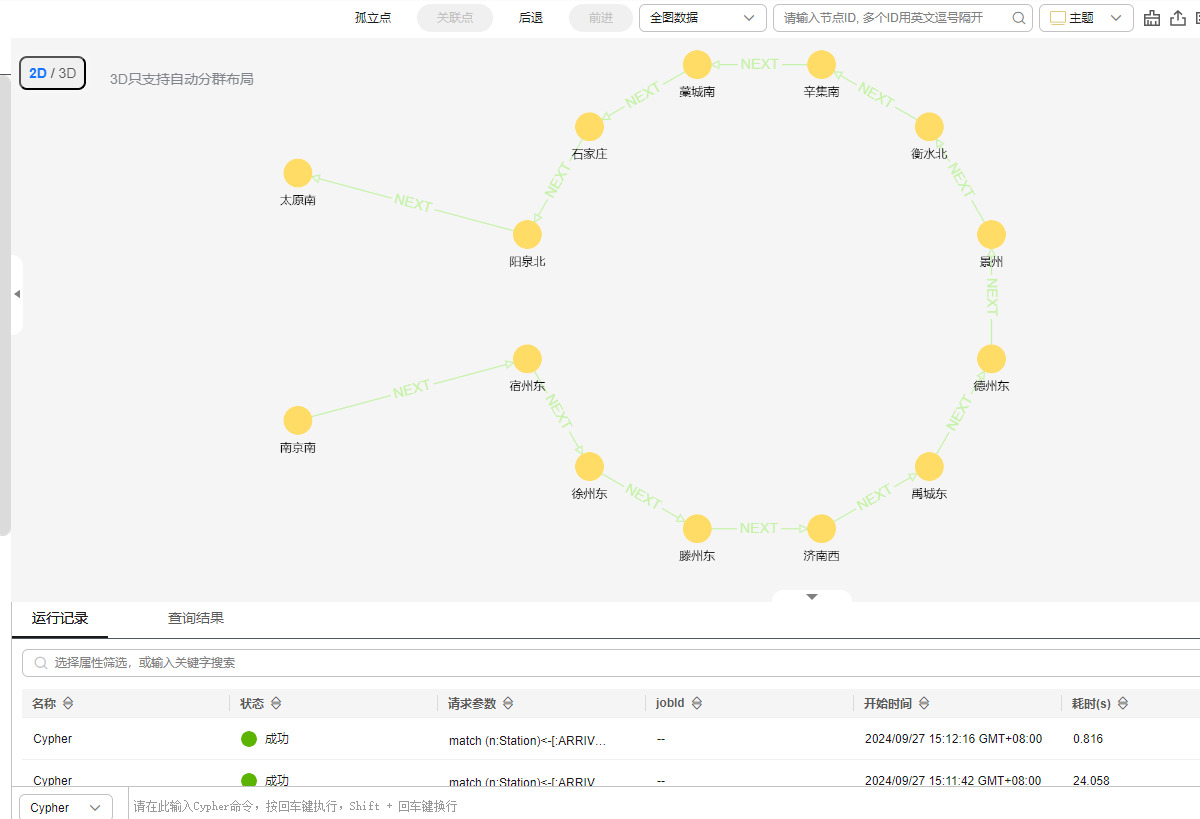
下图是导入相关数据后,在图控制台查看某列列车的途径信息:
需要注意的是,如果要在外网连接GES,需要绑定EIP,安全组开放80、443两个常用端口。
数据探索
依赖的软件包
首先通过moxing包从对象存储服务obs中下载ges4jupyter。ges4jupyter是jupyter连接GES服务的工具文件。文件中封装了使用 GES 查询的预置条件,包括配置相关参数和对所调用 API 接口的封装,如果你对这些不感兴趣,可直接运行而不需要了解细节,这对理解后续具体查询没有影响。
import moxing as mox
mox.file.copy('obs://obs-aigallery-zc/GES/ges4jupyter/beta/ges4jupyter.py', 'ges4jupyter.py')
mox.file.copy('obs://obs-aigallery-zc/GES/ges4jupyter/beta/ges4jupyter.html', 'ges4jupyter.html')
GESConfig的参数都是与调用 GES 服务有关的参数,依次为“公网访问地址”、“项目ID”、“图名”、“终端节点”、“IAM 用户名”、“IAM 用户密码”、“IAM 用户所属账户名”、“所属项目”,其获取方式可参考调用 GES 服务业务面 API 相关参数的获取。这里通过read_csv_config方法从配置文件中读取这些信息。如果没有配置文件,可以根据自己的需要补充下列字段。对于开启了https安全模式的图实例,参数port的值为443。
from ges4jupyter import GESConfig, GES4Jupyter, read_csv_config
eip = ''
project_id = ''
graph_name = ''
iam_url = ''
user_name = ''
password = ''
domain_name = ''
project_name = ''
port = 80
eip, project_id, graph_name, iam_url, user_name, password, domain_name, project_name, port = read_csv_config('local.csv')
config = GESConfig(eip, project_id, graph_name,
                    iam_url = iam_url,
                    user_name = user_name,
                    password = password,
                    domain_name = domain_name,
                    project_name = project_name,
                    port = port)
ges_util = GES4Jupyter(config, False);
查询对应列车车次
可以使用GES Cypher语言方便的检索两个站点之间的车次,例如,可以发送Cypher语句,检索南京南到太原之间的车次。
cypher_result = ges_util.cypher_query("""
match (n:Station)<-[:ARRIVE_AT]-(s:Stop) where id(n) in ['南京南']
match p=(s)-[:NEXT*1..30]->(s1) with s,s1,p
where s1.station contains '太原'
return s.trainNo as `车次`,
subString(toString(s.arrives),11) as `出发`,
subString(toString(s1.departs),11) as `到达`,
subString(toString(datetime(timestamp(s1.departs) - timestamp(s.arrives))),11) as `耗时`,
[x in nodes(p)|x.station] as `途径` limit 10
""",formats=['row','graph']);
ges_util.format_cypher_result(cypher_result)

也可以检索哪些车站可以直达太原,为了展示效果,在语句末尾取了limit。
cypher_result = ges_util.cypher_query("""
match (n:Station)<-[:ARRIVE_AT]-(s:Stop)
where id(n) in ['太原南']
match p1=(s)<-[:NEXT*1..30]-(s1) with distinct s1.station as station limit 15 return collect(station)
""",formats=['row','graph']);
ges_util.format_cypher_result(cypher_result)

查询列车中转换乘
有多种方式查询中转换乘,这里介绍两种:
方案一: 构造特殊的边表示换乘
目前不同Stop之间通过Label为NEXT的边连接,NEXT边连接的两个Stop代表同一列列车。可以根据换乘条件构造一些Label为TRANSFER的边,这样上文中的cypher语句就可以写作:
match (n:Station)<-[:ARRIVE_AT]-(s:Stop) where id(n) in ['北京南']
match p=(s)-[:NEXT|:TRANSFER*1..30]->(s1) with s,s1,p
where s1.station contains '杭州'
return s.trainNo as `车次`, subString(toString(s.arrives),11) as `出发`,subString(toString(s1.departs),11) as `到达`,subString(toString(datetime(timestamp(s1.departs) - timestamp(s.arrives))),11) as `耗时`, [x in nodes(p)|x.station] as `途径`
具体来说,需要定义一些换乘条件,例如:
- 需要限定在哪些车站换乘,如果是所有车站,可能对图的改动较多。
- 换乘有哪些时间限制,如上一班车到达时间早于下一班车发车时间,中间间隔多久?一般来说要大于15分钟才预留有足够的时间。
由于这种方法依赖于对图数据库的数据修改,并且会导致数据膨胀,所以本文暂不尝试。
方案二: 使用查询语言描述换乘
使用查询语言可以方便的描述换乘,但是带来的问题是由于描述换乘需要特定的Pattern,换乘操作在图中被建模为了一个两跳操作,所以查询会比较慢,但是通用性高。本文使用这种方法来描述换乘。
对于中转一次的列车,可以描述为下列pattern:
match (s1:Stop)-[ARRIVE_AT]->(m:Station)<-[:ARRIVE_AT]-(s2:Stop) where s1.departs < s2.arrives
由于换乘往往需要一定的时间,通过查询条件可以筛选两列到达和出发时间间隔时间在15分钟以上的换乘,这样pattern就变为了:
match (s1:Stop)-[ARRIVE_AT]->(m:Station)<-[:ARRIVE_AT]-(s2:Stop) where s1.departs < s2.arrives and timestamp(s2.departs) - timestamp(s1.arrives) >= 900
然后再拼接上两列列车运行的逻辑:
match (n:Station)<-[:ARRIVE_AT]-(s:Stop)
match p1=(s)-[:NEXT*1..15]->(s1)
match (s1:Stop)-[ARRIVE_AT]->(m:Station)<-[:ARRIVE_AT]-(s2:Stop) where s1.departs < s2.arrives and timestamp(s2.departs) - timestamp(s1.arrives) >= 900
match p2=(s2)-[:NEXT*1..15]->(s3)
最后加上始发站和和终点站的过滤条件,并return所需元素:
match (n:Station)<-[:ARRIVE_AT]-(s:Stop)
  where id(n) in ['南京南','南京']
  match p1=(s)-[:NEXT*1..15]->(s1)
  match (s1)-[ARRIVE_AT]->(m:Station)<-[:ARRIVE_AT]-(s2:Stop) where s1.departs < s2.arrives and timestamp(s2.departs) - timestamp(s1.arrives) >= 900
  match p2=(s2)-[:NEXT*1..15]->(s3) where  s3.station contains '太原'
with
  s1.trainNo as `车次1`,
  s2.trainNo as `车次2`,
  subString(toString(s.departs),11) as `出发`,
  subString(toString(s1.arrives),11) as `换乘1`,
  case when s.arrives <= s1.arrives and s2.arrives <= s3.arrives then '0天 ' else '1天 ' end as append,
  subString(toString(s2.arrives),11) as `换乘2`,
  subString(toString(s3.departs),11) as `到达`,
  subString(toString(datetime(timestamp(s2.departs) - timestamp(s1.arrives))),11) as `停留`,
  subString(toString(datetime(timestamp(s3.arrives) - timestamp(s.departs))),11) as `耗时`,
  [x in [nodes(p1)[0], nodes(p1)[-1]]|x.station] as `途径1`,
  [x in [nodes(p2)[0], nodes(p2)[-1]]|x.station] as `途径2`
return `车次1`,`车次2`,`出发`,`换乘1`,`换乘2`,`到达`,`停留`,append + `耗时` as `总时长`,`途径1`,`途径2`
  order by `总时长`,`停留` limit 30
实际查询过程中还要限制第一程不能经过第二程的终点,第二程不能经过第一程的终点等信息。
这里使用上述查询查询一下南京南到太原之间的换乘路径:
queryQ = """
match (n:Station)<-[:ARRIVE_AT]-(s:Stop)
where id(n) in ['南京南','南京']
match p1=(s)-[:NEXT*1..15]->(s1) where all(x in nodes(p1) where not x.station contains '太原')
match (s1)-[ARRIVE_AT]->(m:Station)<-[:ARRIVE_AT]-(s2:Stop) where s1.departs < s2.arrives and timestamp(s2.departs) - timestamp(s1.arrives) >= 900
match p2=(s2)-[:NEXT*1..15]->(s3)  where all(x in nodes(p2) where not x.station contains '南京') and s3.station contains '太原'
with
s1.trainNo as `车次1`,
s2.trainNo as `车次2`,
subString(toString(s.departs),11) as `出发`,
subString(toString(s1.arrives),11) as `换乘1`,
case when s.arrives <= s1.arrives and s2.arrives <= s3.arrives then '0天 ' else '1天 ' end as append,
subString(toString(s2.arrives),11) as `换乘2`,
subString(toString(s3.departs),11) as `到达`,
subString(toString(datetime(timestamp(s2.departs) - timestamp(s1.arrives))),11) as `停留`,
subString(toString(datetime(timestamp(s3.arrives) - timestamp(s.departs))),11) as `耗时`,
[x in [nodes(p1)[0], nodes(p1)[-1]]|x.station] as `途径1`,
[x in [nodes(p2)[0], nodes(p2)[-1]]|x.station] as `途径2` where `耗时` <> '00:00:00'
return `车次1`,`车次2`,`出发`,`换乘1`,`换乘2`,`到达`,`停留`,append + `耗时` as `总时长`,`途径1`,`途径2` order by `总时长`,`停留` limit 15
"""
cypher_result = ges_util.cypher_query(queryQ,formats=['row','graph'],runtime='block');
ges_util.format_cypher_result(cypher_result)

可以得到文章开头所示一样的结果。
如果考虑只想上午出发或者下午出发,可以加限制条件,例如只想上午11点前出发,可以加下列限制条件:
match (n:Station)<-[:ARRIVE_AT]-(s:Stop)
where id(n) in ['南京南','南京'] and timestamp(s.departs) < 11*60*60
可以发送一下语句看下结果:
queryQ = """
match (n:Station)<-[:ARRIVE_AT]-(s:Stop)
where id(n) in ['南京南','南京'] and timestamp(s.departs) < 11*60*60
match p1=(s)-[:NEXT*1..15]->(s1) where all(x in nodes(p1) where not x.station contains '太原')
match (s1)-[ARRIVE_AT]->(m:Station)<-[:ARRIVE_AT]-(s2:Stop) where s1.departs < s2.arrives and timestamp(s2.departs) - timestamp(s1.arrives) >= 900
match p2=(s2)-[:NEXT*1..15]->(s3)  where all(x in nodes(p2) where not x.station contains '南京') and s3.station contains '太原'
with
s1.trainNo as `车次1`,
s2.trainNo as `车次2`,
subString(toString(s.departs),11) as `出发`,
subString(toString(s1.arrives),11) as `换乘1`,
case when s.arrives <= s1.arrives and s2.arrives <= s3.arrives then '0天 ' else '1天 ' end as append,
subString(toString(s2.arrives),11) as `换乘2`,
subString(toString(s3.departs),11) as `到达`,
subString(toString(datetime(timestamp(s2.departs) - timestamp(s1.arrives))),11) as `停留`,
subString(toString(datetime(timestamp(s3.arrives) - timestamp(s.departs))),11) as `耗时`,
[x in [nodes(p1)[0], nodes(p1)[-1]]|x.station] as `途径1`,
[x in [nodes(p2)[0], nodes(p2)[-1]]|x.station] as `途径2` where `耗时` <> '00:00:00'
return `车次1`,`车次2`,`出发`,`换乘1`,`换乘2`,`到达`,`停留`,append + `耗时` as `总时长`,`途径1`,`途径2` order by `总时长`,`停留` limit 15
"""
cypher_result = ges_util.cypher_query(queryQ,formats=['row','graph'],runtime='block');
ges_util.format_cypher_result(cypher_result)

还可以定制中转站,例如只想在德州换乘:
match (s1)-[ARRIVE_AT]->(m:Station)<-[:ARRIVE_AT]-(s2:Stop) where s1.departs < s2.arrives and timestamp(s2.departs) - timestamp(s1.arrives) >= 900 and m.name contains '德州'
修改查询语句后,效果如下:
queryQ = """
match (n:Station)<-[:ARRIVE_AT]-(s:Stop)
where id(n) in ['南京南','南京'] and timestamp(s.departs) < 11*60*60
match p1=(s)-[:NEXT*1..15]->(s1) where all(x in nodes(p1) where not x.station contains '太原')
match (s1)-[ARRIVE_AT]->(m:Station)<-[:ARRIVE_AT]-(s2:Stop) where s1.departs < s2.arrives and timestamp(s2.departs) - timestamp(s1.arrives) >= 900 and m.name contains '德州'
match p2=(s2)-[:NEXT*1..15]->(s3)  where all(x in nodes(p2) where not x.station contains '南京') and s3.station contains '太原'
with
s1.trainNo as `车次1`,
s2.trainNo as `车次2`,
subString(toString(s.departs),11) as `出发`,
subString(toString(s1.arrives),11) as `换乘1`,
case when s.arrives <= s1.arrives and s2.arrives <= s3.arrives then '0天 ' else '1天 ' end as append,
subString(toString(s2.arrives),11) as `换乘2`,
subString(toString(s3.departs),11) as `到达`,
subString(toString(datetime(timestamp(s2.departs) - timestamp(s1.arrives))),11) as `停留`,
subString(toString(datetime(timestamp(s3.arrives) - timestamp(s.departs))),11) as `耗时`,
[x in [nodes(p1)[0], nodes(p1)[-1]]|x.station] as `途径1`,
[x in [nodes(p2)[0], nodes(p2)[-1]]|x.station] as `途径2` where `耗时` <> '00:00:00'
return `车次1`,`车次2`,`出发`,`换乘1`,`换乘2`,`到达`,`停留`,append + `耗时` as `总时长`,`途径1`,`途径2` order by `总时长`,`停留` limit 15
"""
cypher_result = ges_util.cypher_query(queryQ,formats=['row','graph'],runtime='block');
ges_util.format_cypher_result(cypher_result)

可以看到返回的班次全部是途径德州的列车。
小结
对比12306官网,使用图数据库查询得到的换乘方案种类更多,在时间上也更快,大家可以根据自己的出行安排以及在售车次的车票情况,选择适合自己的最佳中转换乘方案。
附录:
使用的schema(也可到链接使用华为图引擎GES查询列车中转换乘-schema 进行下载):
<?xml version="1.0" encoding="ISO-8859-1"?>
<PMML version="3.0"
  xmlns="http://www.dmg.org/PMML-3-0"
  xmlns:xsi="http://www.w3.org/2001/XMLSchema_instance" >
  <labels>
    <label name="default">
    </label>

	<label name="Station">
        <properties>
            <property name="name" cardinality="single" dataType="string"/>
			<property name="x" cardinality="single" dataType="float"/>
			<property name="y" cardinality="single" dataType="float"/>
        </properties>
    </label>
	<label name="Location">
        <properties>
            <property name="name" cardinality="single" dataType="string"/>
        </properties>
    </label>
	<label name="Stop">
        <properties>
            <property name="arrives" cardinality="single" dataType="date"/>
			<property name="departs" cardinality="single" dataType="date"/>
			<property name="departure" cardinality="single" dataType="bool"/>
			<property name="terminal" cardinality="single" dataType="bool"/>
			<property name="trainNo" cardinality="single" dataType="string"/>
            <property name="station" cardinality="single" dataType="string"/>
        </properties>
    </label>
	<label name="Train">
        <properties>
            <property name="name" cardinality="single" dataType="string"/>
        </properties>
    </label>
	<label name="NEXT">
        <properties>
        </properties>
    </label>
	<label name="TRANSFER">
        <properties>
        </properties>
    </label>
	<label name="DEPARTURE">
        <properties>
        </properties>
    </label>
	<label name="TERMINAL">
        <properties>
        </properties>
    </label>
	<label name="ARRIVE_AT">
        <properties>
        </properties>
    </label>
	<label name="LOCATED_IN">
        <properties>
        </properties>
    </label>
  </labels>
</PMML>

- 点赞
- 收藏
- 关注作者
评论(0)