(k8s-king-king)实战案例——Samba和NFS服务配置实战
3. 实战案例——Samba和NFS服务配置实战
3.1 案例目标
(1)掌握Samba服务的配置和使用方法;
(2)掌握NFS的配置和使用方法。
3.2 案例分析
(1)规划节点
Samba服务器的节点规划,见表3-1。
表3-1 IP地址信息
| 设备 | 虚拟机名称 | IP地址 |
|---|---|---|
| 文件共享服务器 | server | 10.24.2.9/16 |
| 客户端 | client | 10.24.2.6/16 |
(2)基础准备
最小化CentOS 7.5虚拟机一台,CetnOS 7.5系统ISO镜像。
3.3 案例实施
(1)两个节点分别修改为对应的主机名:
[root@localhost ~]# hostnamectl set-hostname server
//单击实验环境中的刷新按钮(由3个箭头组成的环形),重新连接虚拟机
[root@server ~]#
[root@localhost ~]# hostnamectl set-hostname client
//单击实验环境中的刷新按钮(由3个箭头组成的环形),重新连接虚拟机
[root@client ~]#
(2)使用yum命令安装Samba服务软件包,操作如下所示:
[root@server ~]# curl -O  http://mirrors.douxuedu.com/cloud/CentOS-7-x86_64-DVD-1804.iso
[root@server ~]# mkdir /opt/centos
[root@servert ~]# mount -o loop CentOS-7-x86_64-DVD-1804.iso /opt/centos/
mount: /dev/loop0 is write-protected, mounting read-only
[root@server ~]# mv /etc/yum.repos.d/* /media/
[root@server ~]# vi /etc/yum.repos.d/local.repo
//按i进入编辑模式,输入以下代码
[centos]
name=centos
baseurl=file:///opt/centos
gpgcheck=0
enanbled=1
//按ESC键输入:wq命令保存退出
[root@server ~]# yum install -y vsftpd
Dependencies Resolved
=================================================================================================
 Package              Arch                 Version                    Repository            Size
=================================================================================================
Installing:
 vsftpd               x86_64               3.0.2-22.el7               centos               169 k
Transaction Summary
=================================================================================================
Install  1 Package
Total download size: 169 k
Installed size: 348 k
Downloading packages:
Running transaction check
Running transaction test
Transaction test succeeded
Running transaction
  Installing : vsftpd-3.0.2-22.el7.x86_64                                                    1/1
  Verifying  : vsftpd-3.0.2-22.el7.x86_64                                                    1/1
Installed:
  vsftpd.x86_64 0:3.0.2-22.el7
Complete!
[root@server ~]# vi /etc/vsftpd/vsftpd.conf
anon_root=/opt                                         //在第一行添加代码
[root@server ~]# systemctl restart vsftpd
[root@server ~]# yum install samba* -y
...
Installed:
  samba.x86_64 0:4.7.1-6.el7                    samba-client.x86_64 0:4.7.1-6.el7
  samba-client-libs.x86_64 0:4.7.1-6.el7        samba-common.noarch 0:4.7.1-6.el7
  samba-common-libs.x86_64 0:4.7.1-6.el7        samba-common-tools.x86_64 0:4.7.1-6.el7
  samba-krb5-printing.x86_64 0:4.7.1-6.el7      samba-libs.x86_64 0:4.7.1-6.el7
  samba-python.x86_64 0:4.7.1-6.el7             samba-winbind.x86_64 0:4.7.1-6.el7
  samba-winbind-modules.x86_64 0:4.7.1-6.el7
Dependency Installed:
  avahi-libs.x86_64 0:0.6.31-19.el7                    cups-libs.x86_64 1:1.6.3-35.el7
  libaio.x86_64 0:0.3.109-13.el7                       libarchive.x86_64 0:3.1.2-10.el7_2
  libldb.x86_64 0:1.2.2-1.el7                          libsmbclient.x86_64 0:4.7.1-6.el7
  libtalloc.x86_64 0:2.1.10-1.el7                      libtdb.x86_64 0:1.3.15-1.el7
  libtevent.x86_64 0:0.9.33-2.el7                      libwbclient.x86_64 0:4.7.1-6.el7
  pyldb.x86_64 0:1.2.2-1.el7                           pytalloc.x86_64 0:2.1.10-1.el7
  python-dns.noarch 0:1.12.0-4.20150617git465785f.el7  python-tdb.x86_64 0:1.3.15-1.el7
  python-tevent.x86_64 0:0.9.33-2.el7
Complete!
(3)进入Samba主配置文件所在目录,备份主配置文件,并对其参数内容进行相应修改,具体设置的说明见表3-2:
表3-2 Samba具体参数设置说明
| 参数内容 | 说明 |
|---|---|
| 访问方式 | 需要提供用户名及口令验证,使用smbpasswd验证方式 |
| 宿主目录访问 | 各用户只能在共享中查看自己的宿主目录,无法查看到他人的目录 |
| 访问用户 | smbuser1,smbuser2,smbuser3 |
| 自定义共享目录 | 共享名为sharing,路径为/mnt/file |
| 自定义共享目录访问方式 | 允许smbuser1和smbuser2用户进行访问,smbuser3用户则禁止访问 |
具体操作如下所示:
① 先进入主配置目录,并对主配置文档进行备份:
[root@server ~]# cd /etc/samba/
[root@server samba]# cp -p smb.conf smb.conf.bak
② 编辑主配置文档smb.conf
[root@server samba]# vi /etc/samba/smb.conf
按i进入vi命令进入编辑器后,在末尾添加如下参数内容:
[share]
        comment = a share direcotry
        path = /share
        browseable = yes
        writable = yes
        public = yes
	read only = no
	hosts allow = 10.24.0.0/16       //注意网段根据实际IP地址设置
③ 按ESC键输入:wq命令保存退出,启动Samba服务(分别启动smb和nmb),并创建自定义共享目录/share且赋予权限,操作如下:
[root@server samba]# systemctl start smb nmb
[root@server samba]# systemctl enable smb nmb
Created symlink from /etc/systemd/system/multi-user.target.wants/smb.service to /usr/lib/systemd/system/smb.service.
Created symlink from /etc/systemd/system/multi-user.target.wants/nmb.service to /usr/lib/systemd/system/nmb.service.
[root@server samba]# mkdir /share
[root@server samba]# echo "hello word" >> /share/hello.txt
[root@server samba]# cat /share/hello.txt
hello word
[root@server samba]# cd
[root@server ~]# chmod -R 777 /share/
④ 关闭防火墙,使得用户可以访问:
[root@server ~]# systemctl stop firewalld && systemctl disable firewalld
Failed to stop firewalld.service: Unit firewalld.service not loaded.
⑤ 临时关闭SELinux功能:
[root@server ~]# setenforce 0
setenforce: SELinux is disabled
⑥ 指定root用户,用于客户端登陆服务器:
[root@server ~]# smbpasswd -a root
New SMB password:              //(密码设置:000000)
Retype new SMB password:       //(密码设置:000000)
Added user root.
⑦ 配置/etc/hosts文件,添加最下面两行(server和client线上地址注意修改):
[root@server ~]# vi /etc/hosts
127.0.0.1   localhost localhost.localdomain localhost4 localhost4.localdomain4
::1         localhost localhost.localdomain localhost6 localhost6.localdomain6

10.24.2.9 server      //IP地址根据实际情况修改虚拟机IP
10.24.2.6 client      //IP地址根据实际情况修改虚拟机IP
⑧ 测试
● Windows客户机测试(此部分在本机环境实验,线上环境跳过此步骤):
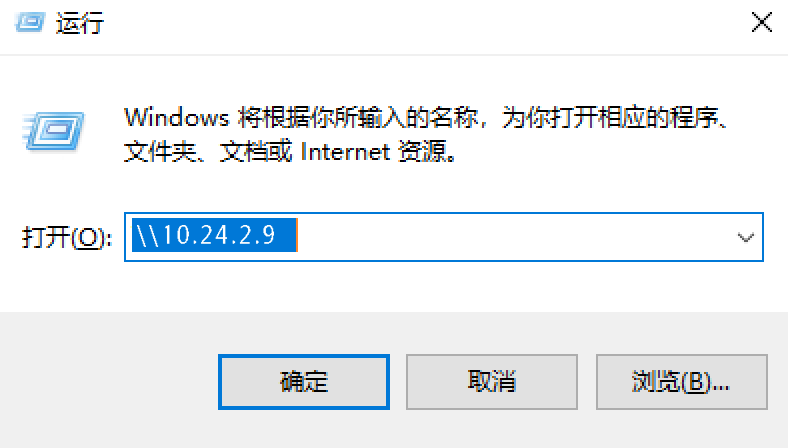
现在,我们就可以从Windows中访问Linux的共享目录了,使用Win+R快捷键调出命令运行栏,在文本输入框中输入“\\10.24.2.9”,访问方式如图3-1所示:

图3-1 运行访问
这里需要输入我们的用户名smbuser1和密码123,如图3-2所示:

图3-2 输入用户名和密码
我们现在在共享目录中,就可以看到共享资源了,如图3-3所示:

图3-3 共享目录
如果需要在Windows系统中切换不同的用户访问Samba,我们需要先手动关闭已经打开的共享目录,再删除共享缓存连接(使用net use * /del /命令),操作如图3-4所示:

图3-4 删除共享缓存连接
● Linux客户机测试(此部分线上环境可以验证):
配置/etc/hosts文件,在最后添加如下两行:
[root@client ~]# vi /etc/hosts
//按i进入编辑模式,输入以下代码
127.0.0.1   localhost localhost.localdomain localhost4 localhost4.localdomain4
::1         localhost localhost.localdomain localhost6 localhost6.localdomain6
10.24.2.9 server   //IP地址根据实际情况修改虚拟机IP
10.24.2.6 client   //IP地址根据实际情况修改虚拟机IP
//按ESC键输入:wq命令保存退出
关闭防火墙:
[root@client ~]# systemctl stop firewalld && systemctl disable firewalld
临时关闭SELinux核心防护功能:
[root@client ~]# setenforce 0
安装Samba工具和cifs-utils工具(用于后续挂载文件):
[root@client ~]# mv /etc/yum.repos.d/* /media/
[root@client ~]# vi /etc/yum.repos.d/local.repo
//按i进入编辑模式,输入以下代码
[centos]
name=centos
baseurl=ftp://10.24.2.9/centos   //IP地址根据实际情况修改为server节点地址
gpgcheck=0
enanbled=1
//按ESC键输入:wq命令保存退出
[root@client ~]# yum install -y samba* cifs-utils
创建a.txt测试文件并连接服务器端,进行上传与下载测试:
[root@client ~]# touch a.txt
[root@client ~]# echo aaa > a.txt
[root@client ~]# smbclient //10.24.2.9/share -U root
Enter SAMBA\root's password:              //(密码设置:000000)
Try "help" to get a list of possible commands.
smb: \> put a.txt    //从客户端上传文件到服务器端,验证写权限
putting file hello.txt as \hello.txt (2.7 kb/s) (average 2.7 kb/s)
smb: \> get hello.txt   //从服务器端下载文件到客户端,验证读权限
getting file \a.txt of size 4 as a.txt (2.0 KiloBytes/sec) (average 2.0 KiloBytes/sec)
smb: \> quit
[root@client ~]# ll
total 8
-rw-r--r-- 1 root root  4 Jan 20 05:13 a.txt
-rwxrwxrwx 1 root root 11 Jan 20 05:12 hello.txt
然后登入server端,进入/share目录查看上传的文件是否存在:
[root@server ~]# cd /share/
[root@server share]# ls
a.txt hello.txt
//可以看到,存在一个上传的a.txt文件
客户端挂载Samba共享文件夹到/database目录:
[root@client ~]# mkdir /database
[root@client~]# mount -t cifs -o username="root",password="000000" //10.24.2.9/share /database/
[root@client ~]# df -h
Filesystem         Size  Used Avail Use% Mounted on
/dev/vda1           40G  1.1G   39G   3% /
devtmpfs           1.9G     0  1.9G   0% /dev
tmpfs              1.9G     0  1.9G   0% /dev/shm
tmpfs              1.9G   17M  1.9G   1% /run
tmpfs              1.9G     0  1.9G   0% /sys/fs/cgroup
tmpfs              379M     0  379M   0% /run/user/0
//10.24.2.9/share   40G  1.1G   39G   3% /database
测试挂载结果:
[root@client ~]# cd /database/
[root@client database]# ls
a.txt  hello.txt
[root@client database]# touch aaa
[root@client database]# ls
aaa  a.txt  hello.txt
登陆server端验证挂载同步情况:
[root@server share]# ls
aaa a.txt hello.txt
至此,我们就完成了Samba跨平台共享服务。
(4)如果共享资源的主机和访问资源的客户机都安装的是Linux系统,我们还可以通过安装NFS服务来实现共享资源访问的功能,客户机可以将服务端的共享资源通过TCP/IP协议直接挂载至本地目录下,就可以实现共享资源的访问,这样更为便捷。
● 首先,我们在服务器端开始安装NFS服务:NFS服务配置实战-实操.mp4
① 使用yum来安装NFS软件包,操作如下:
[root@server ~]# yum install -y nfs-utils* rpcbind
...
Loaded plugins: fastestmirror
Loading mirror speeds from cached hostfile
Package 1:nfs-utils-1.3.0-0.54.el7.x86_64 already installed and latest version
Package rpcbind-0.2.0-44.el7.x86_64 already installed and latest version
Nothing to do                                      //线上环境已安装NFS软件包
② 安装结束后,创建NFS共享所需的目录,操作如下:
[root@server ~]# mkdir /home/nfsdata
③ 关闭防火墙和SELinux核心保护功能:
[root@server ~]# systemctl stop firewalld && systemctl disable firewalld
[root@server ~]# setenforce 0
现在我们需要将共享参数写入NFS服务配置文件中,这里我们将/mnt/nfsdata目录共享给10.24.2.0/23网络中的所有主机访问,并拥有读写权限等设置,操作如下:
[root@server ~]# vim /etc/exports
/home/nfsdata 10.24.0.0/16(rw,sync,no_root_squash)
[root@server ~]# exportfs -r   //生效配置文件
以上权限设置可以参考表2-3中的内容来理解。
④ 编辑hosts文件(如果samba服务做过主机映射,则该步骤省略):
[root@server ~]# echo 10.24.2.9 server >> /etc/hosts
[root@server ~]# echo 10.24.2.6 client >> /etc/hosts
⑤ 启动NFS的相关服务(共有2个,分别是rpcbind和nsf-server.server):
[root@server ~]# systemctl start rpcbind nfs  //先启动rpcbind
[root@server ~]# systemctl enable rpcbind nfs //才能启动NFS
⑥ 启动完成后,我们可以使用showmount命令查看NFS服务提供的远程共享内容,命令格式及操作如下所示:
[root@server ~]# showmount -e 10.24.2.9
Export list for 10.24.2.9:
/nfs/data 10.24.0.0/16
● 然后,需要在客户端开始安装NFS相关服务,进行测试:
① 使用yum来安装NFS软件包,操作如下:
[root@client ~]# yum install -y nfs-utils rpcbind
Loaded plugins: fastestmirror
Loading mirror speeds from cached hostfile
Package 1:nfs-utils-1.3.0-0.54.el7.x86_64 already installed and latest version
Package rpcbind-0.2.0-44.el7.x86_64 already installed and latest version
Nothing to do
② 客户机上挂载服务端的/nfs/data共享资源目录到本地目录/mnt/nfsdata,实现服务端资源本地化浏览,操作如下所示:
[root@client ~]# mkdir /mnt/nfsdata
[root@client ~]# showmount -e 10.24.2.9
Export list for 10.24.2.9:
/nfs/data 10.24.0.0/16
[root@client ~]# mount -t nfs 10.24.2.9:/home/nfsdata /mnt/nfsdata
③ 使用命令查看系统挂载信息
[root@client ~]# df -Th

图3-5 查看挂载信息
在挂载成功后,就可以将这个挂载目录作为本地目录进行读写操作了。至此,我们就完成了NFS(网络文件系统)服务的部署。
- 点赞
- 收藏
- 关注作者


评论(0)