Spring Cloud实战案例 │ 简易天气预报系统

1、实现天气服务提供者项目weatherbasic
1●新建项目并添加依赖
新建项目weatherbasic,确保在文件pom.xml的和之间添加了Eureka Client、Web、Lombok等依赖。
2●创建类、接口并修改配置文件
依次在包com.bookcode下创建vo、service、controller等子包,并在包com.bookcode.vo中创建类Forecast、Weather、WeatherResponse、Yesterday,在包com.bookcode.service中创建接口WeatherDataService和impl子包,在包com.bookcode.service.impl中创建类WeatherDataServiceImpl,在包com.bookcode.controller中创建类WeatherController,并修改这些类和接口的代码。
修改在目录src/main/resources下的配置文件application.properties。
2、实现天气服务消费者项目weatherclient
1●新建项目并添加依赖
新建项目weatherclient,确保在文件pom.xml的和和之间添加了Eureka Client、Thymeleaf、Lombok、Web依赖。
2●创建类
依次在包com.bookcode下创建entity、service、controller、utils等子包,并在包com.bookcode.entity中创建类City、CityList、Forecast、Weather、Yesterday,在包com.bookcode.service中创建类CityDataService、CallWeatherService、WeatherReportService,在包com.bookcode.controller中创建类CallWeatherController、WeatherReportController,在包com.bookcode.utils中创建类XmlBuilder,并修改这些类的代码。
3●新建文件和修改配置文件
在目录src/main/resources下创建文件citylist.xml,在目录src/main/resources/templates下创建文件report.html,并修改这些文件的代码。
修改在目录src/main/resources下的配置文件application.properties。
3、程序运行结果
依次运行项目mweathereurekaserver、weatherbasic(服务名称为microweatherservice,端口为8762)、weatherclient(端口为8764)。
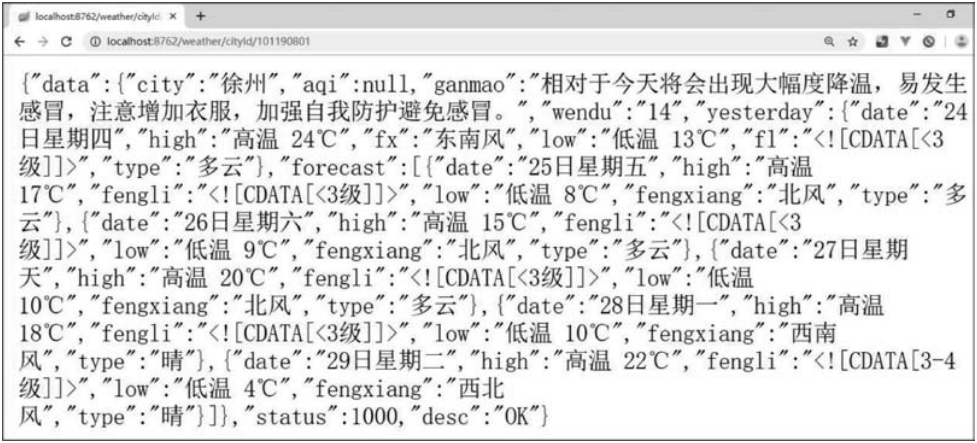
在浏览器中输入localhost:8762/weather/cityId/101190801,结果如图1所示。

■ 图1 在浏览器中输入localhost:8762/weather/cityId/101190801的结果
在浏览器中输入localhost:8764/cityId/101190801,结果如图2所示。对比图1和图2可以发现两者数据(天气服务内容)完全相同。

■ 图2 在浏览器中输入localhost:8764/cityId/101190801的结果
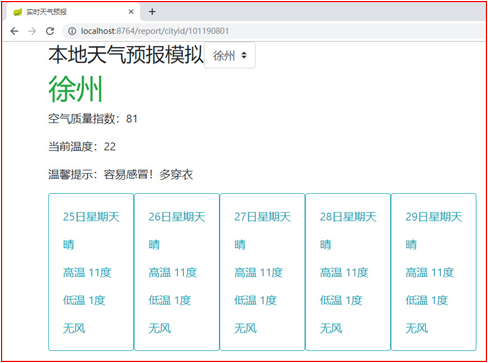
在浏览器中输入localhost:8764/report/cityId/101190801,结果如图3所示。

■ 图3 在浏览器中输入localhost:8764/report/cityId/101190801的结果
大家可以通过天气服务消费者项目weatherclient体会到访问远程Spring Cloud微服务和实现本地服务的差异。与本系统类似的代码可以参考网址https://github.com/LuckyShawn/spring-cloud-weather
- 点赞
- 收藏
- 关注作者


评论(0)