【2023 · CANN训练营第一季】应用开发深入讲解——第二章 模型推理

学习目标
在这里插入图片描述
学习资源
内存管理
模型推理
第1节 AscendCL运行资源管理
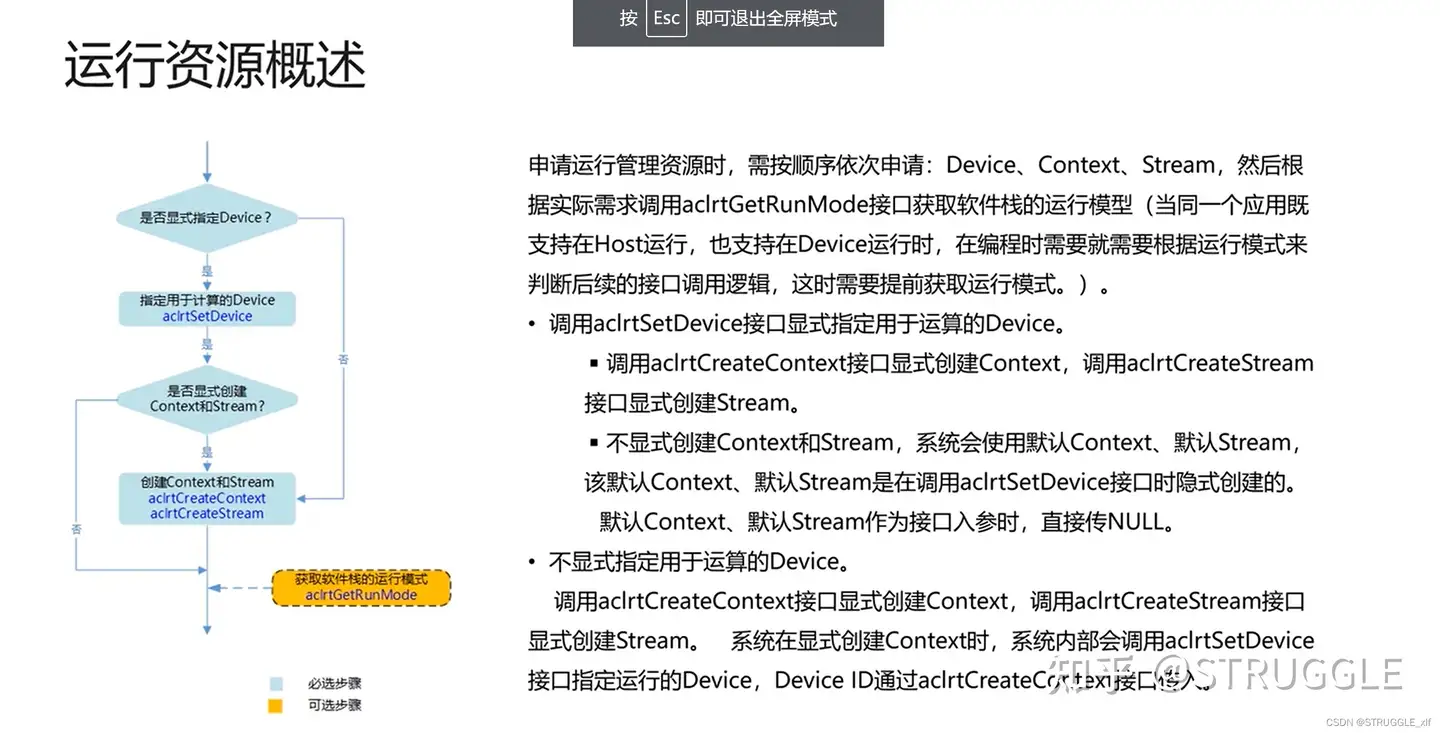
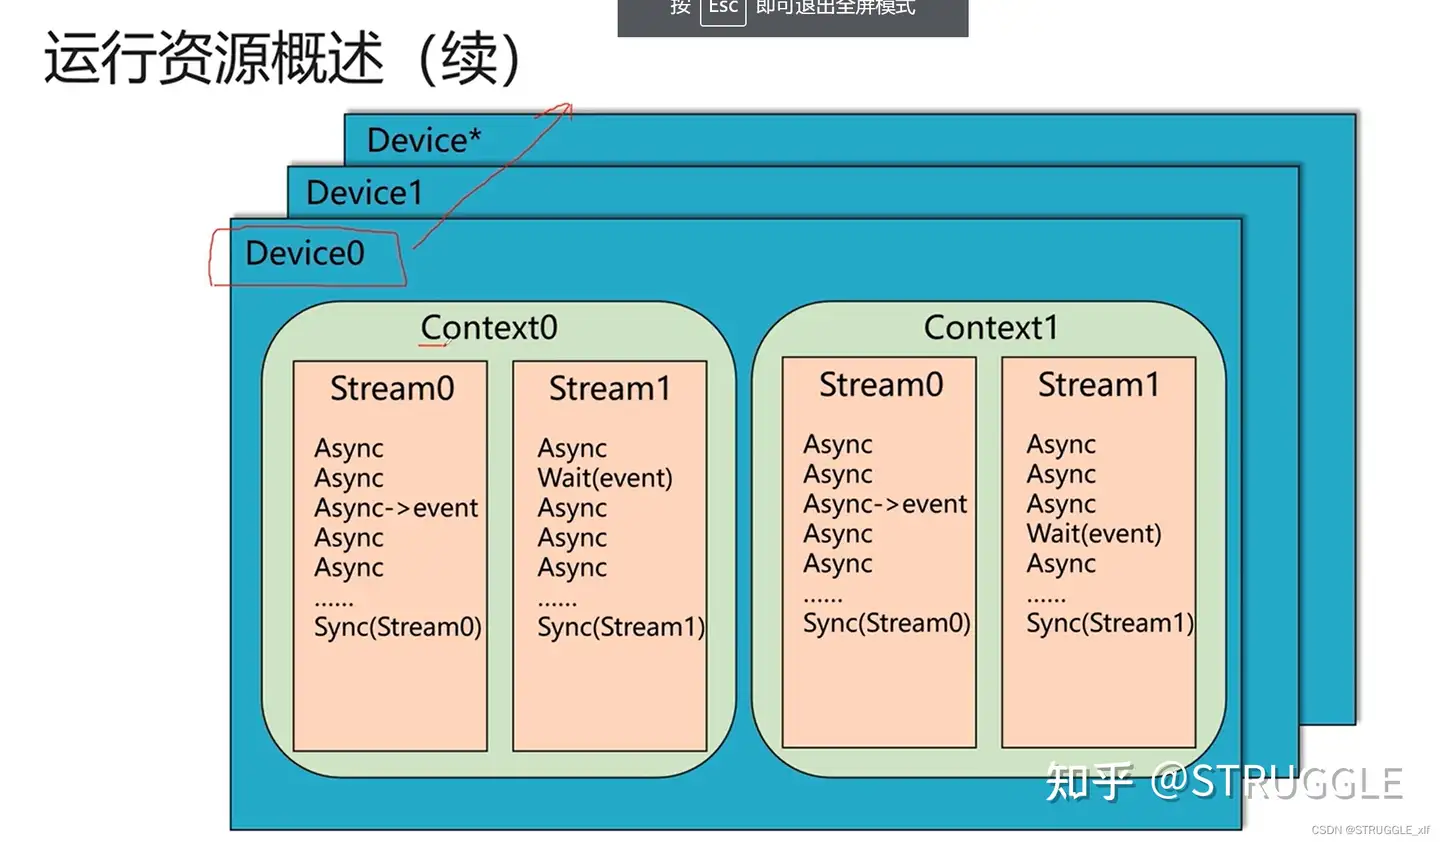
运行资源管理概述
在这里插入图片描述
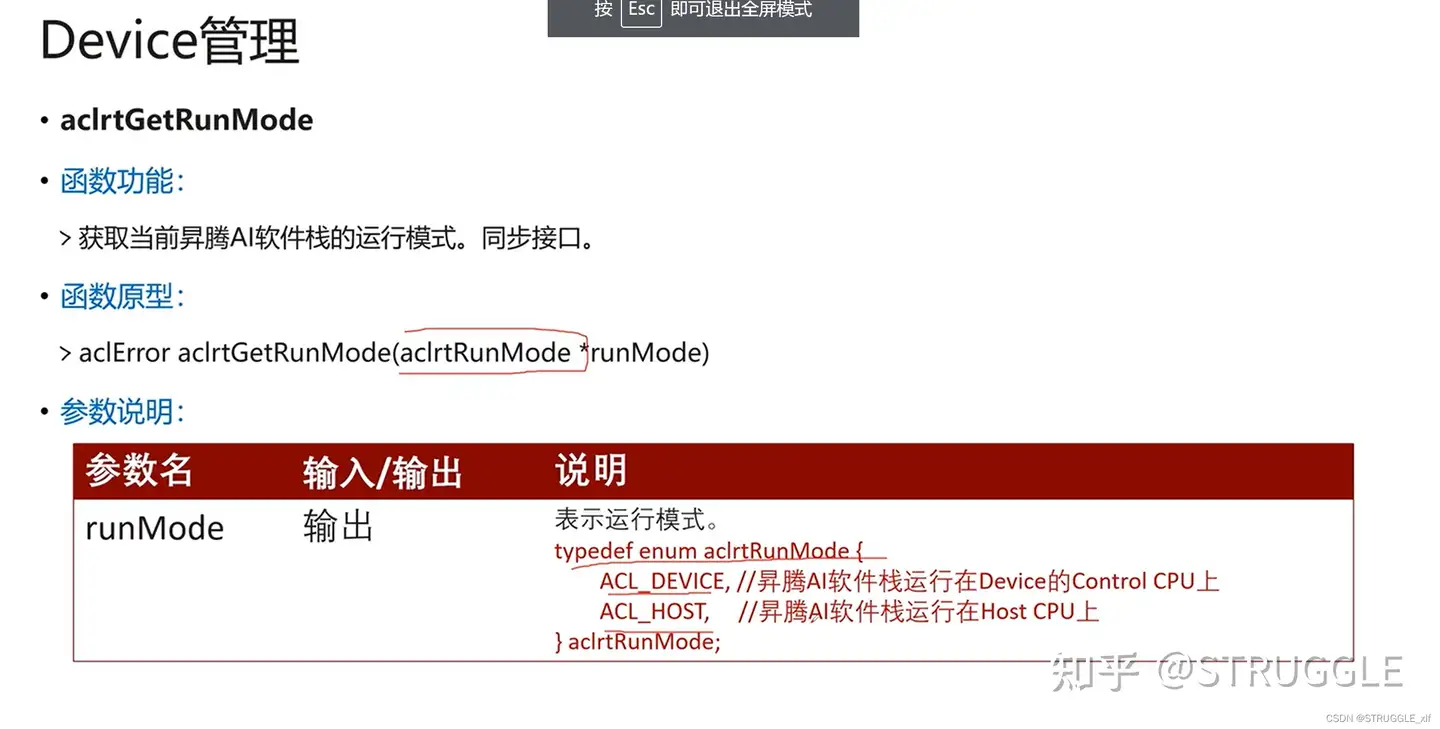
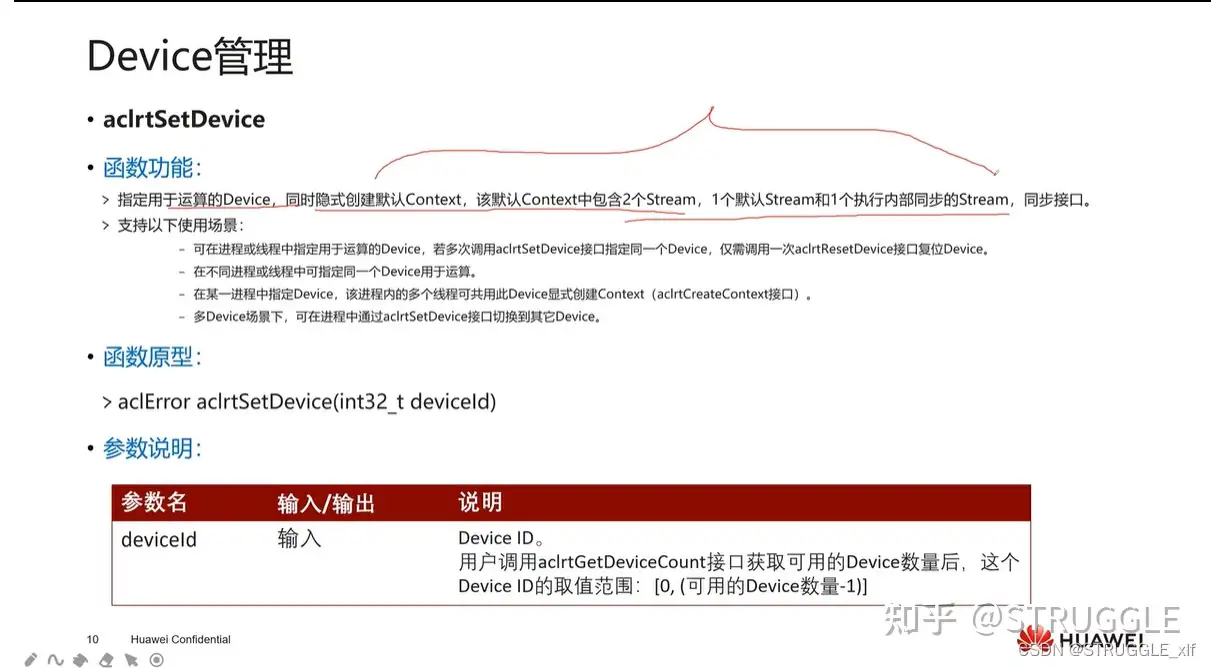
申请运行管理资源时,需按顺序依次申请: Device 、 Context 、 Stream ,然后根据实际需求调用 aclrtGetRunMode 接口获取软件栈的运行模型(当同一个应用既支持在 Host 运行,也支持在 Device 运行时,在编程时需要就需要根据运行模式来判断后续的接口调用逻辑,这时需要提前获取运行模式。)。 ·调用 aclrtSetDevice 接口显式指定用于运算的 Device 。
指定用于计算的 Device aclrtSetDevice ■调用 aclrtCreateContext 接口显式创建 Context ,调用 aclrtCreateStream 接口显式创建 Stream 。 .不显式创建 Context 和 Stream ,系统会使用默认 Context 、默认 Stream ,该默认 Context 、默认 Stream 是在调用 aclrtSetDevice 接口时隐式创建的。默认 Context 、默认 Stream 作为接口入参时,直接传 NULL 。
是否显式创建 Context 和 Stream ? 创建 Context 和 Stream acirtCreateContext aclrtCreateStream .不显式指定用于运算的 Device 。 调用 aclrtCreateContext 接口显式创建 Context ,调用 aclrtCreateStream 接口显式创建 Stream 。系统在显式创建 Context 时,系统内部会调用 aclrtSetDevice 接口指定运行的 Device , Device ID 通过 aclrtCreateContext 接口传入。
在这里插入图片描述
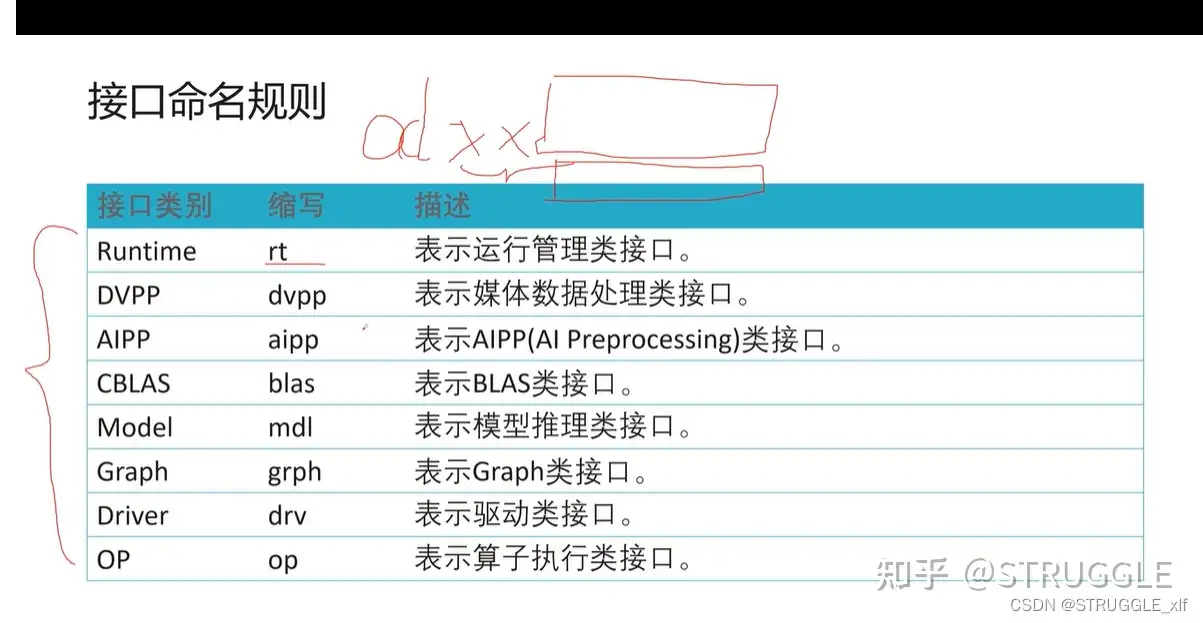
接口命名规则
在这里插入图片描述
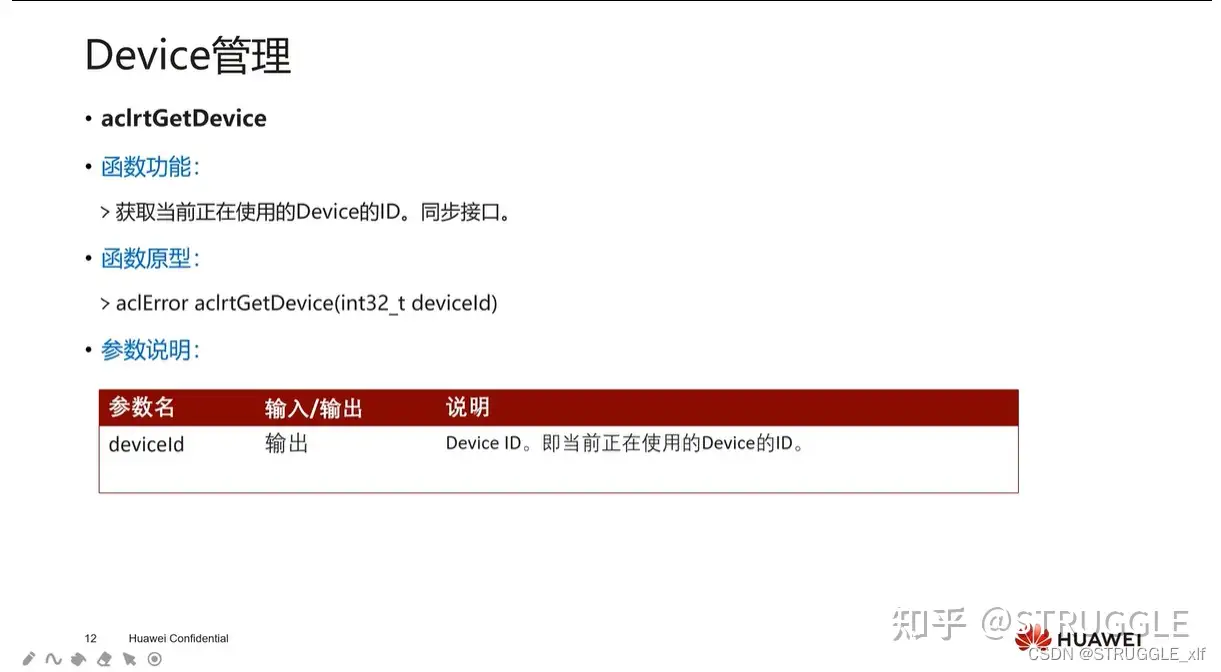
Device 管理
- 获取当前设备数量
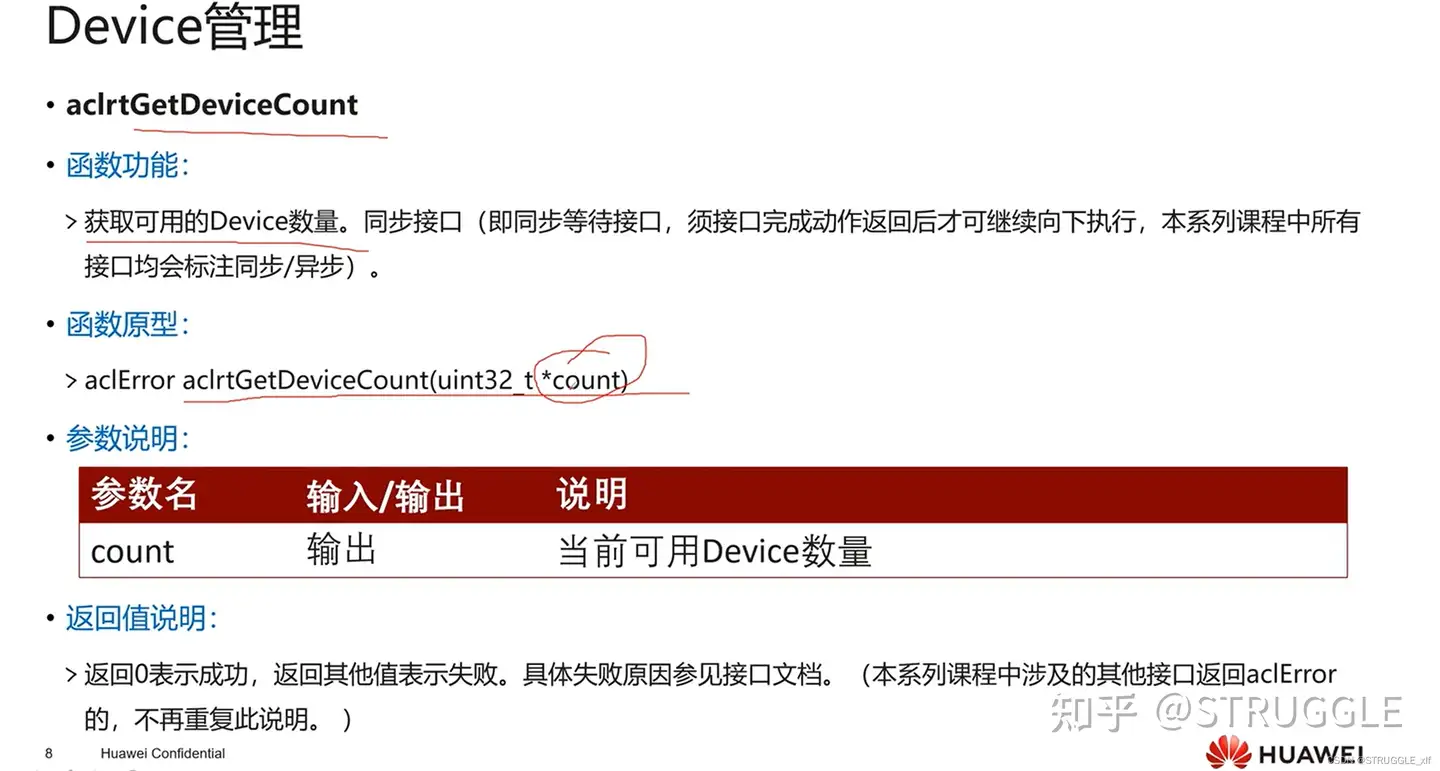
在这里插入图片描述
在这里插入图片描述
在这里插入图片描述
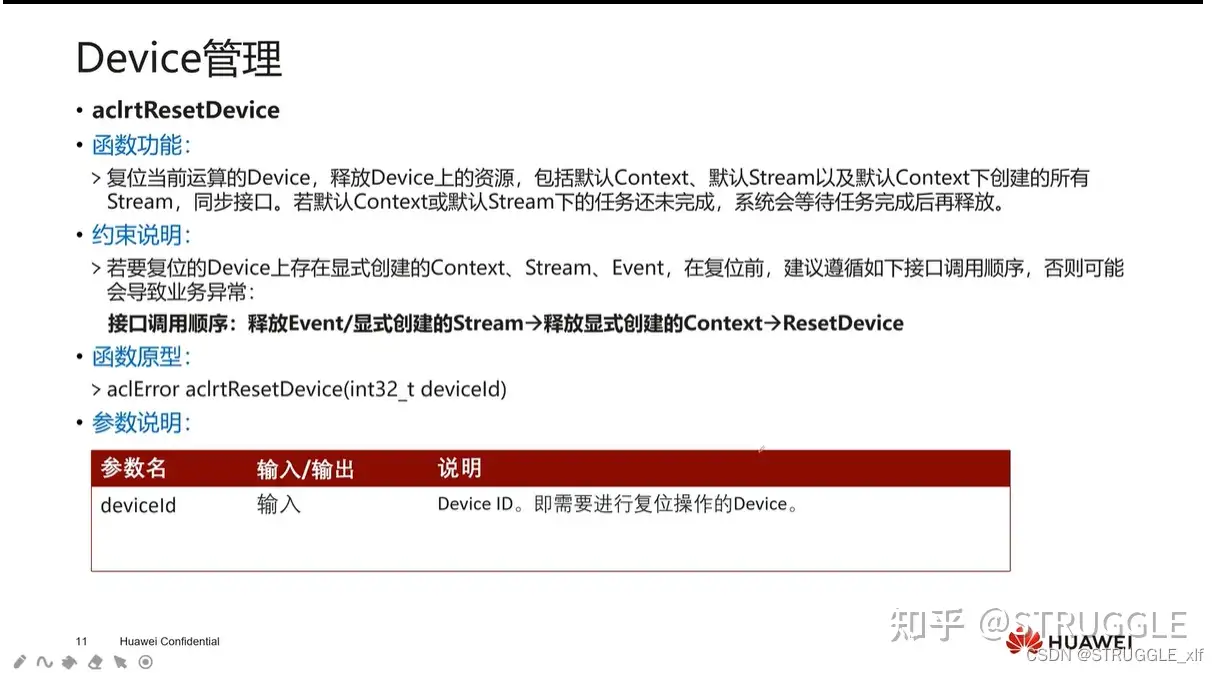
释放device资源,要注意释放顺序
在这里插入图片描述
在这里插入图片描述
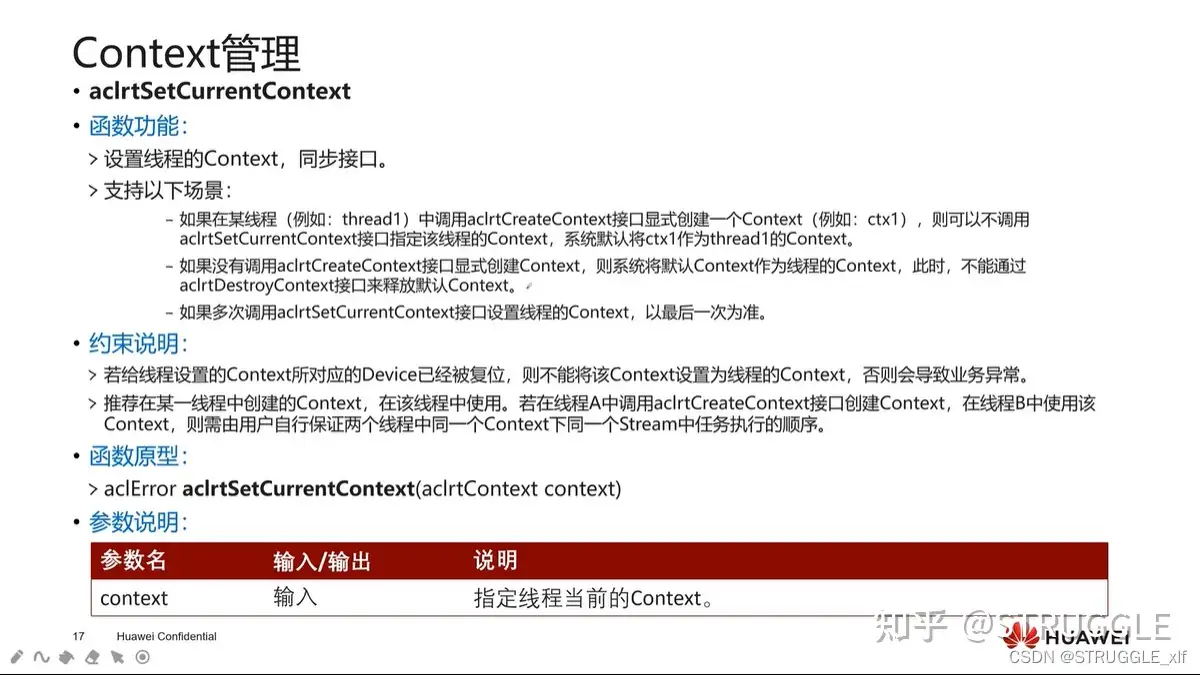
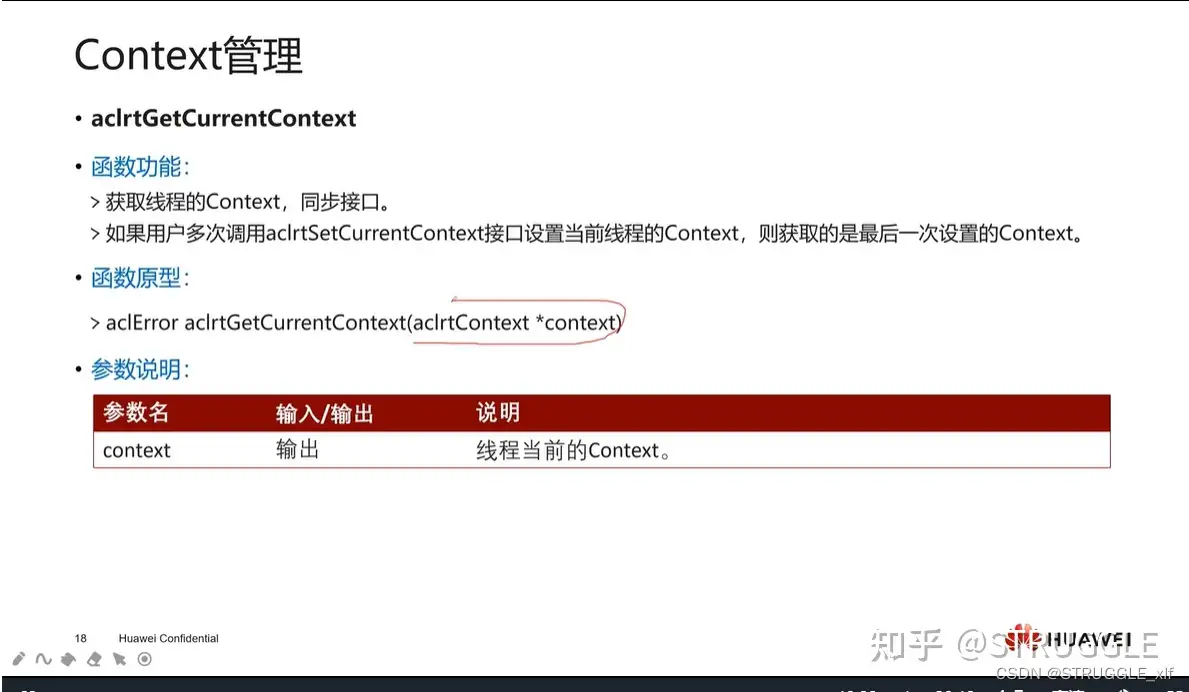
Context 管理
在这里插入图片描述
在这里插入图片描述
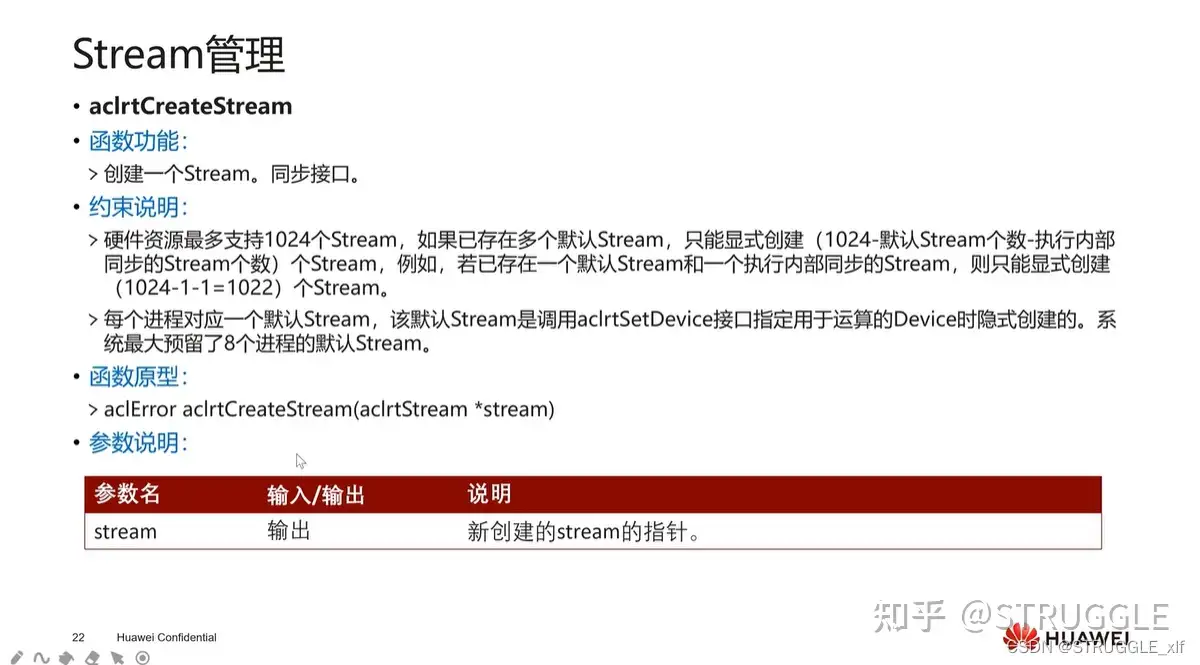
Stream管理
·原理介绍: >在 ACL 中, Stream 是一个任务队列,应用程序通过 Stream 来管理任务的并行,一个 Stream 内部的任务保序执行,即 Stream 根据发送过来的任务依次执行;不同 Stream 中的任务并行执行。一个默认 Context 下会挂一个默认 Stream ,如果不显式创建 Stream ,可使用默认 Stream 。
创建
在这里插入图片描述

在这里插入图片描述
第2节 AscendCL 内存管理&数据传输
. ACL 是有一套自己的内存管理逻辑的,任何用于参与 ACL 运算的内存( Device 侧)都不能是 C / C ++原生内存管理接口( Malloc 、 new )申请的内存,而是调用 ACL 提供的内存管理专用接口 .回忆一下: ACL 在设备的管理上,是要区分 Host 和 Device 的(还记得 aclrtGetRunMode 接口吗?),所有的加速计算最终都是要在 Device 上执行的,也就是说所有的数据(数据集、模型等)最终都会在 Device 侧参与计算,这里分两种场景:
Host & Device 分设,如Atlas300场景(虽然在同一台机器上,但是是通过 PCle 接口交互的,本质上是两个设备),此时数据、模型都在 host 侧加载,然后将这些数据传输到 device 侧进行计算,计算完毕后将结果回传至 host 侧进行使用 Host & Device 合设,如Atlas200Dk场景,此时不区分 Host 与 Device ,只有 Device ,数据、模型都在 device 上直接加载、计算、使用 ·本模块就是要跟大家分享如何在 Host 侧和 Device 侧分别申请内存,并将数据在两端进行传输(复制)。
Host侧内存的申请&释放
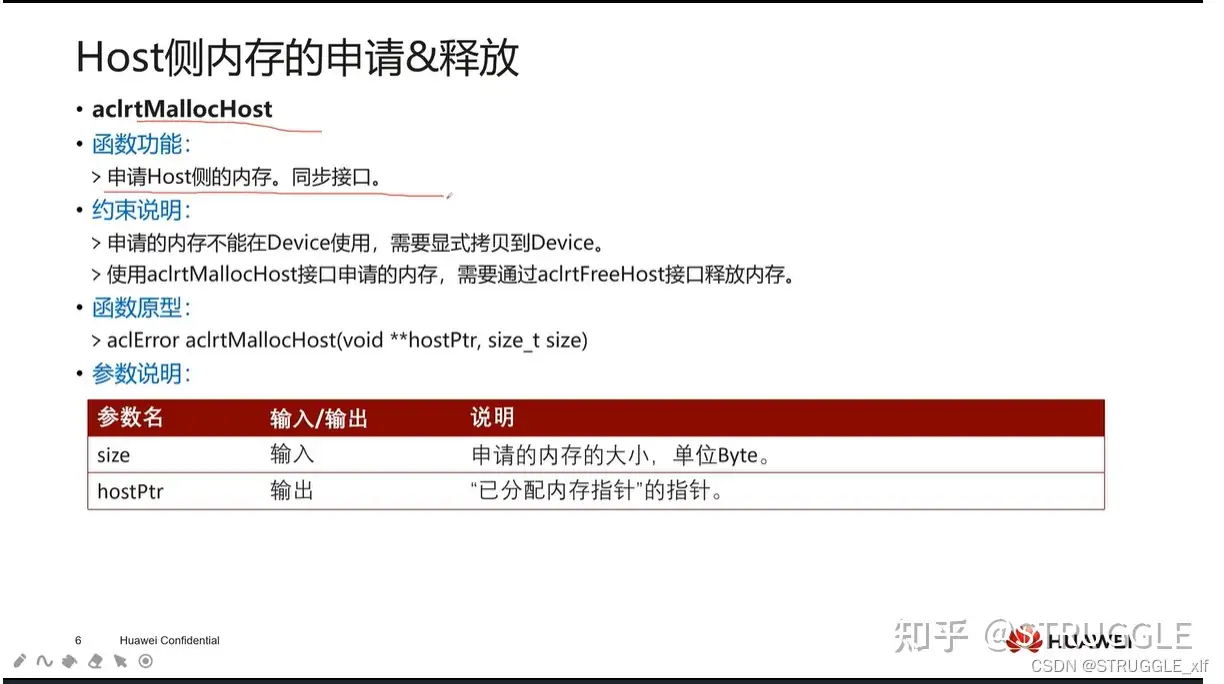
在这里插入图片描述
Device侧内存的申请及释放
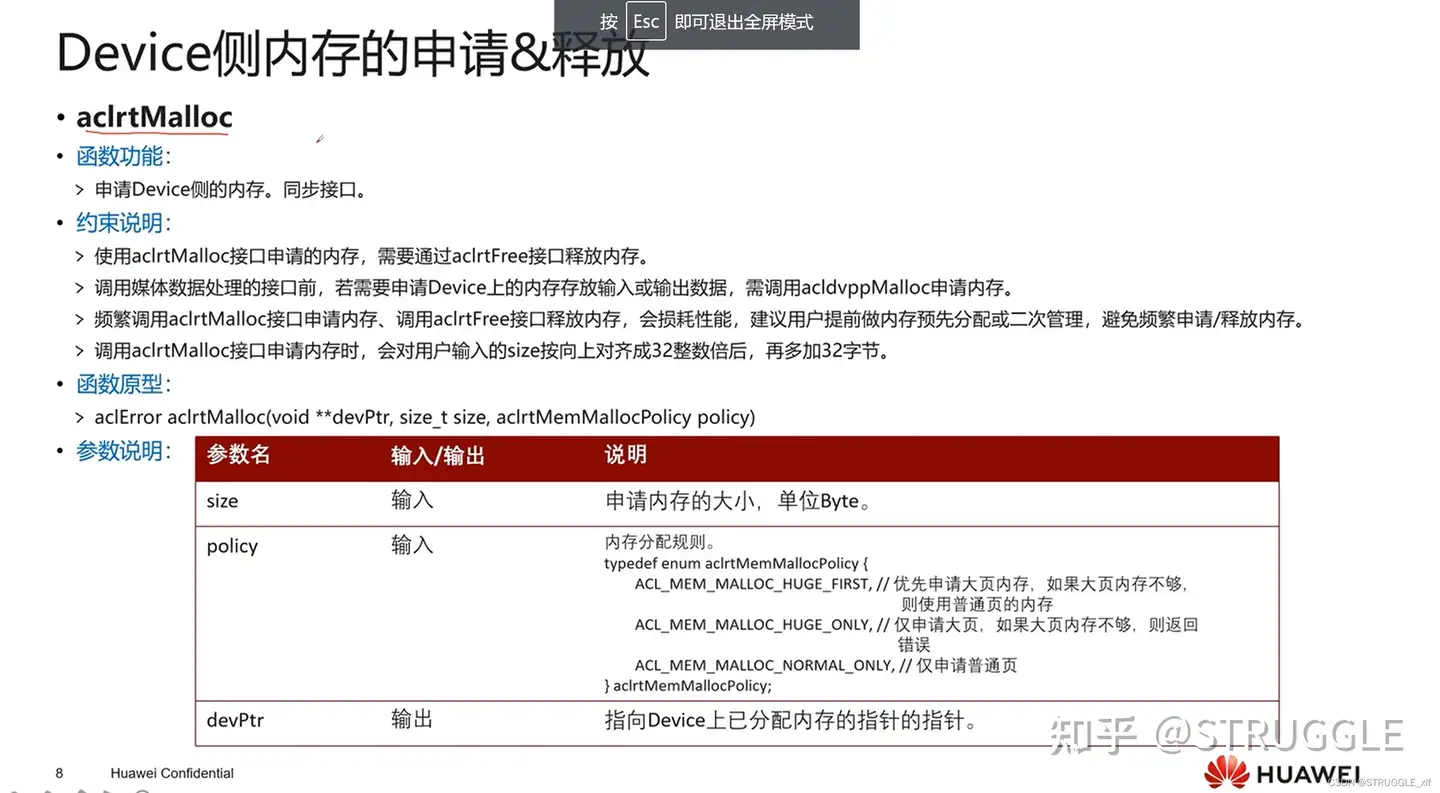
在这里插入图片描述
在这里插入图片描述
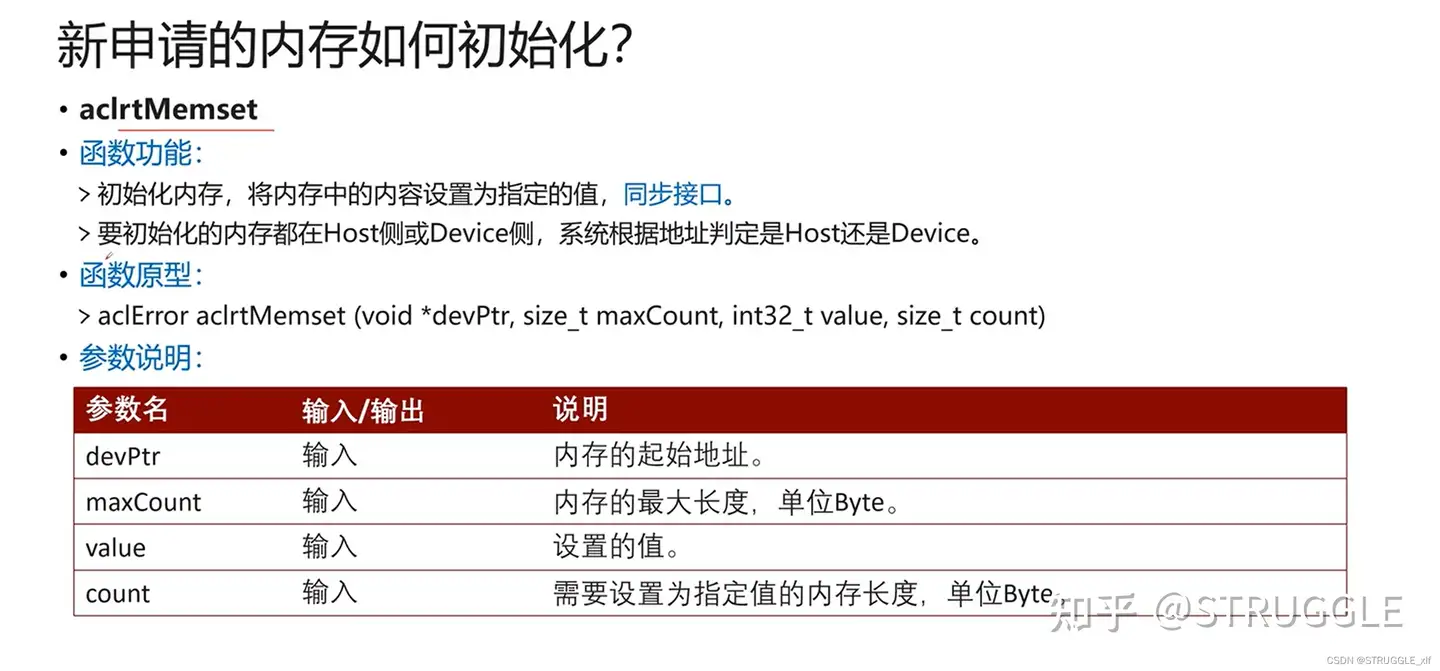
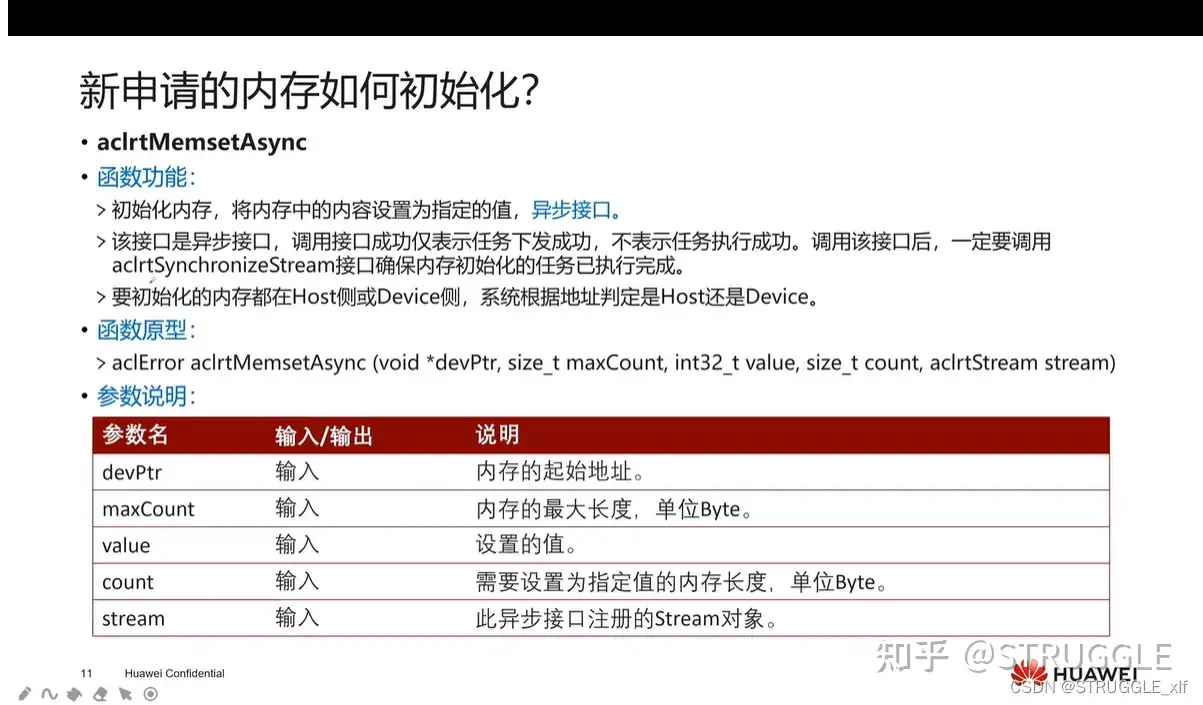
异步内存初始化
在这里插入图片描述
AscendCL 模型加载与执行
模型推理三大流程
在这里插入图片描述
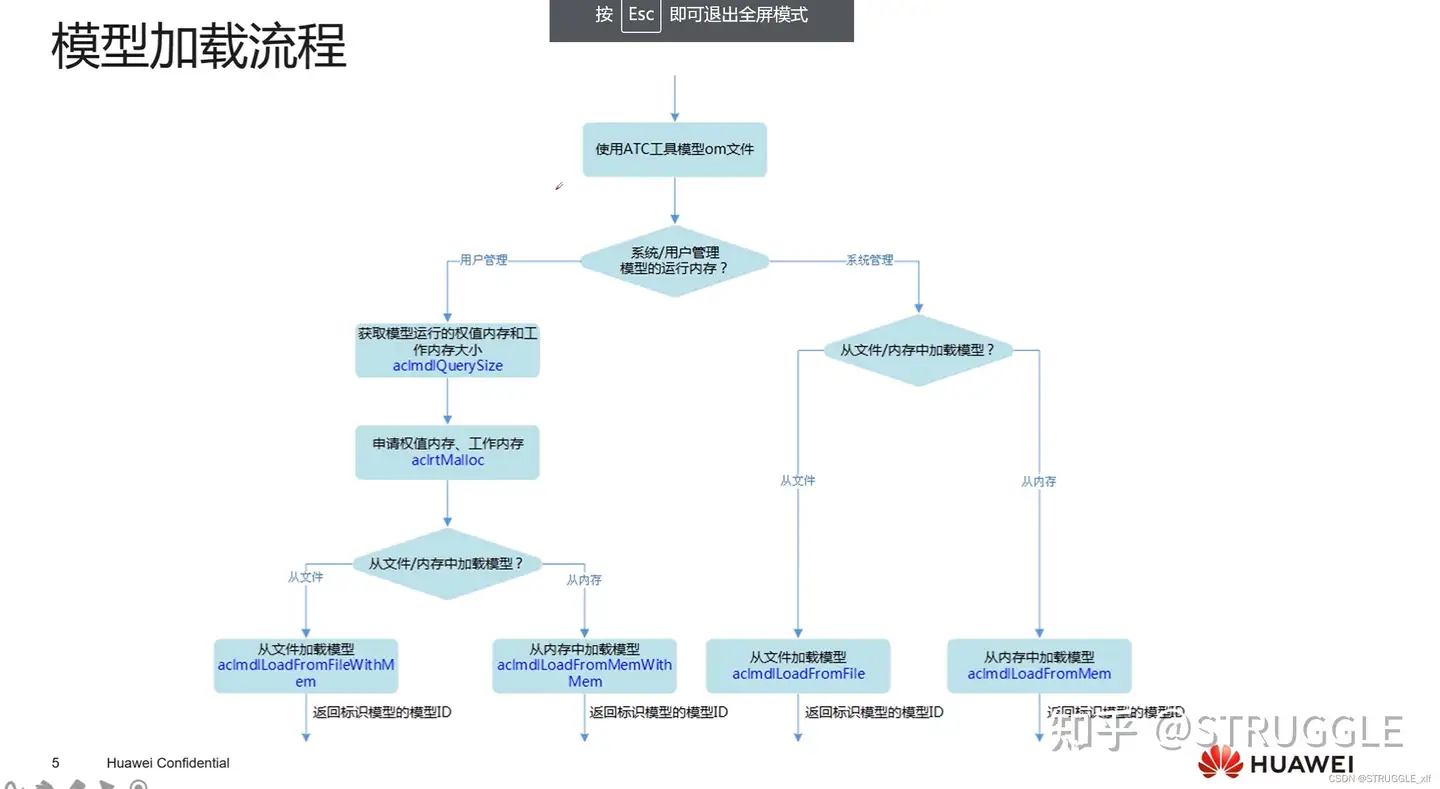
模型推理整体流程
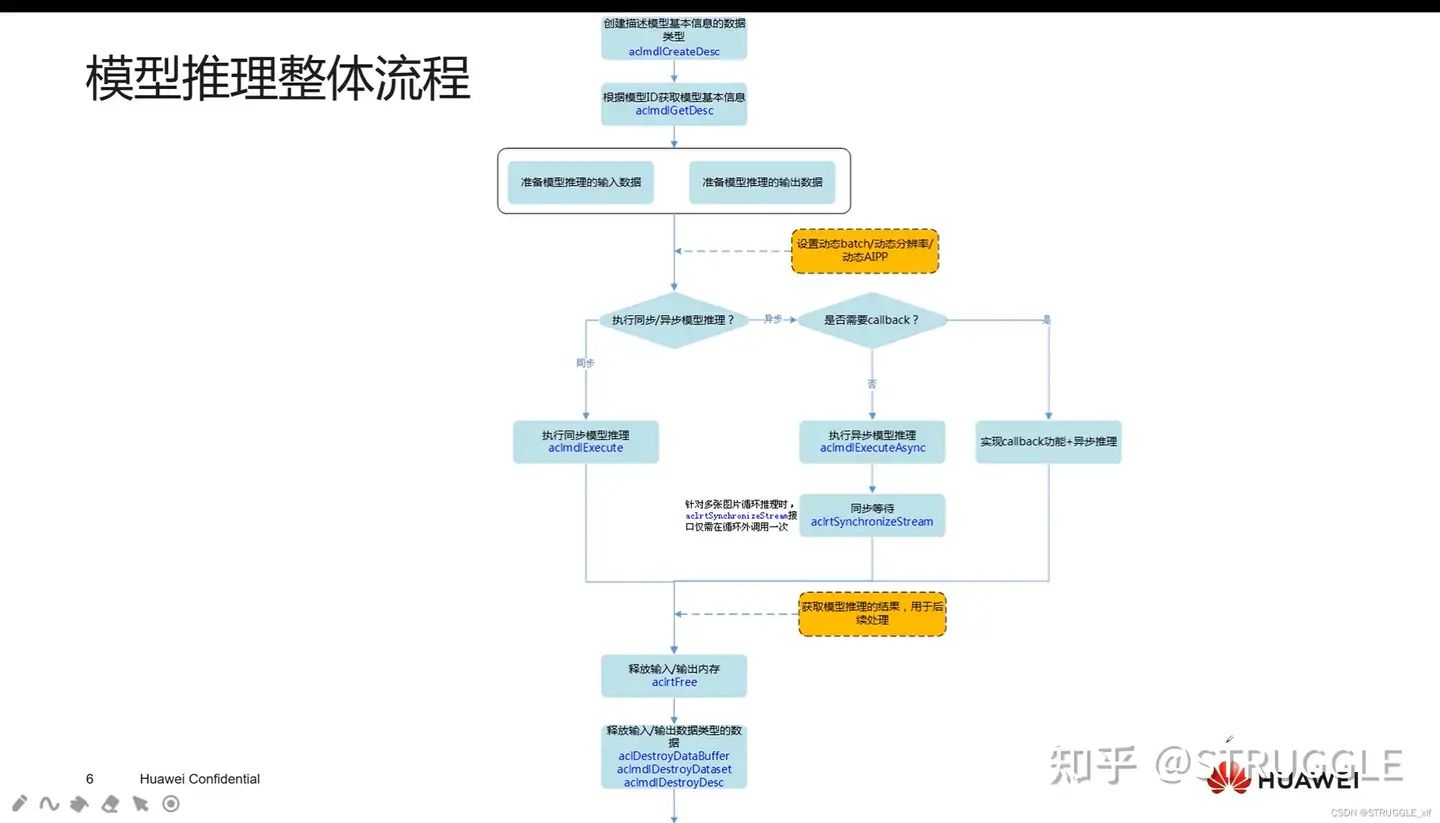
在这里插入图片描述
准备推理输入、输出数据
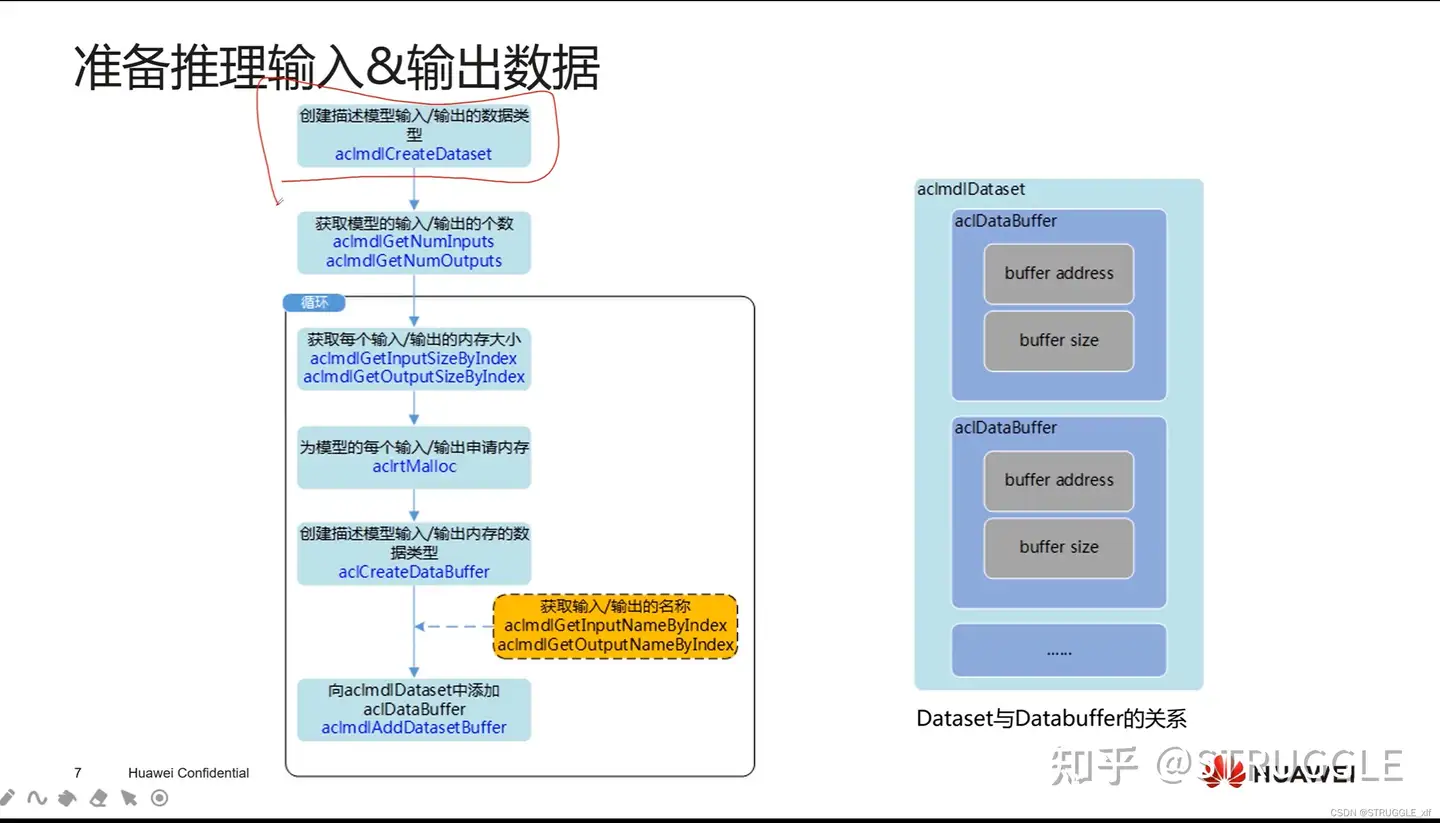
在这里插入图片描述
自动管理内存场景
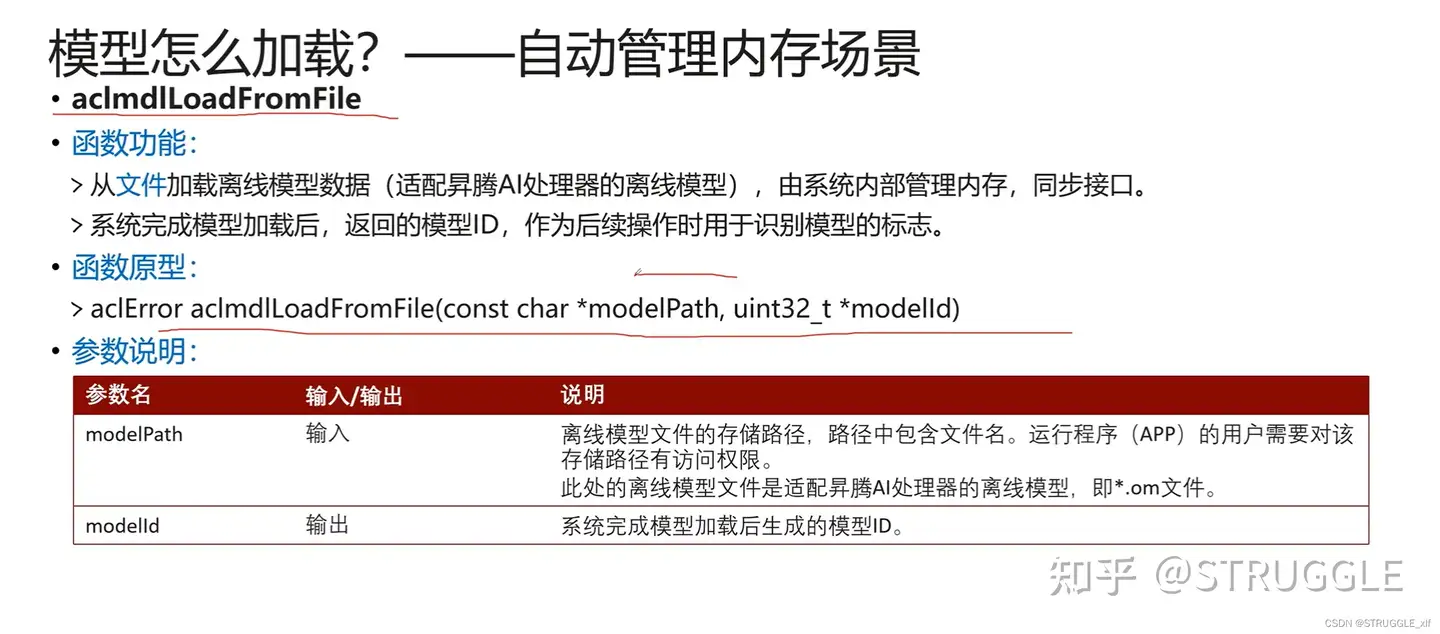
在这里插入图片描述
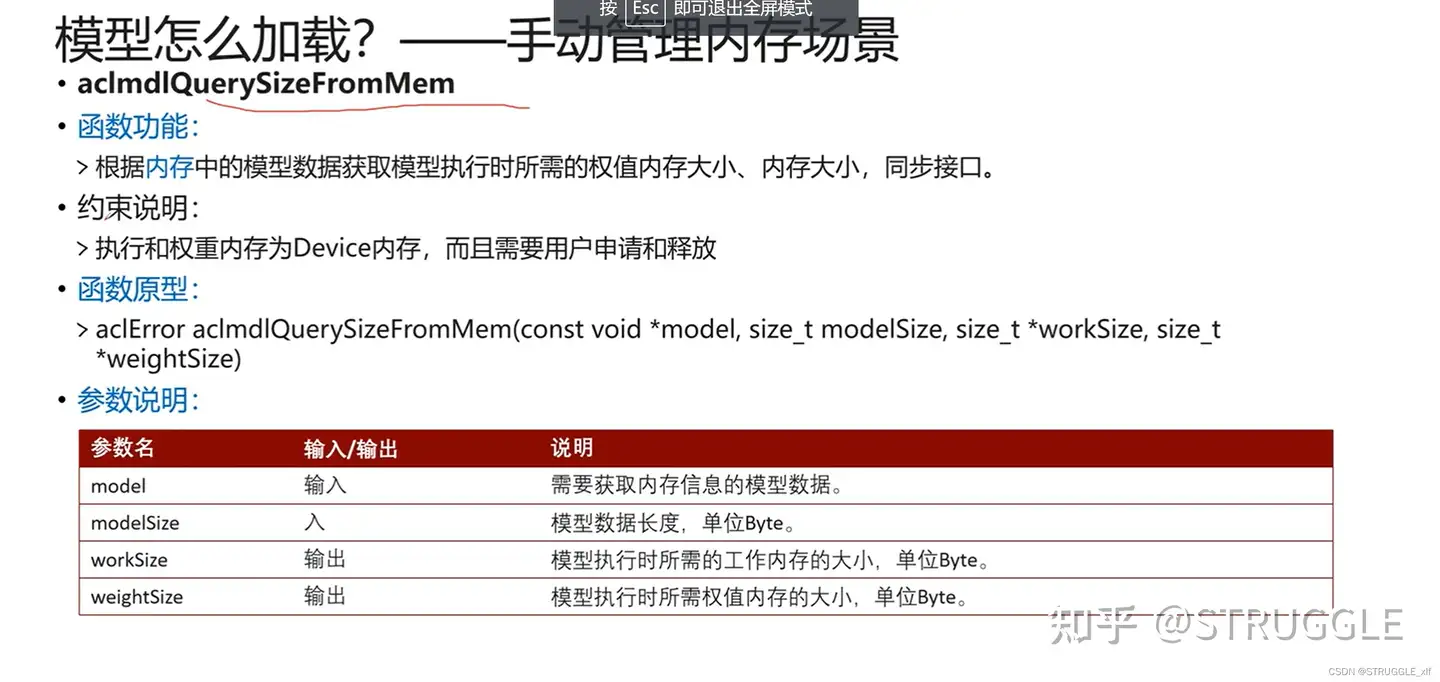
手动管理内存场景
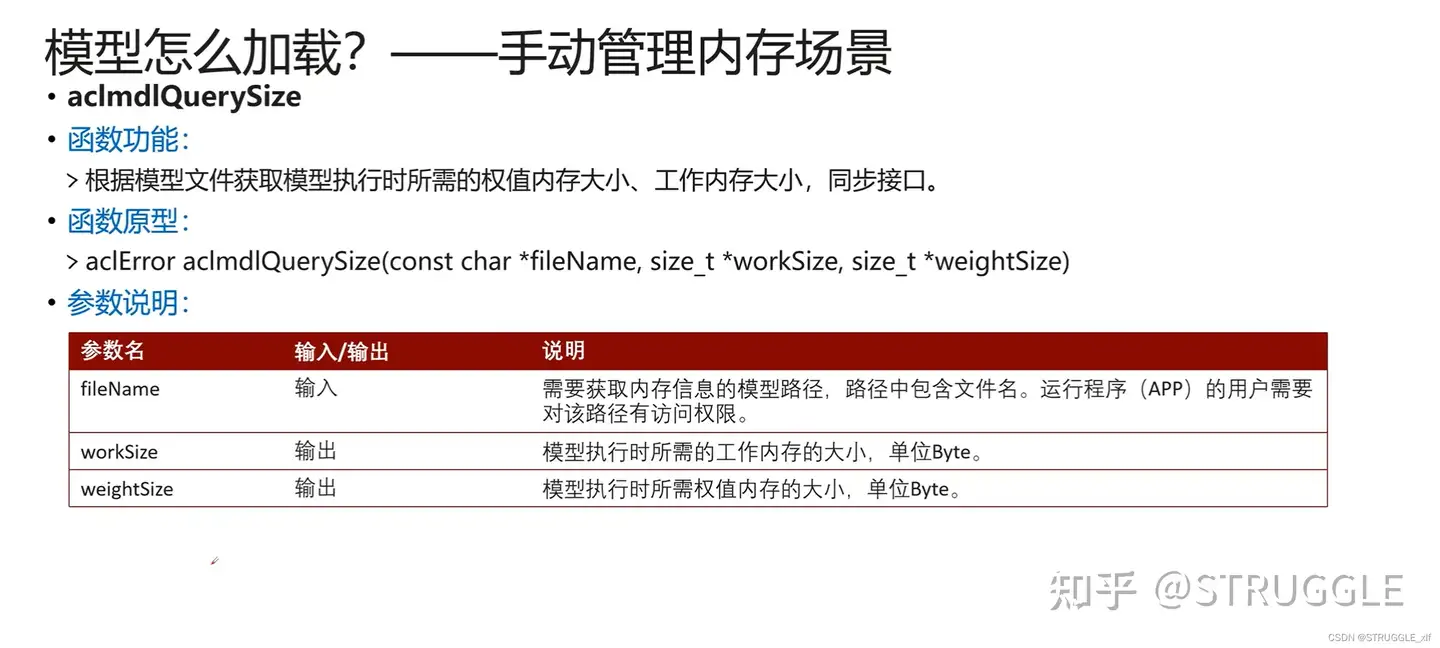
在这里插入图片描述
在这里插入图片描述
模型卸载
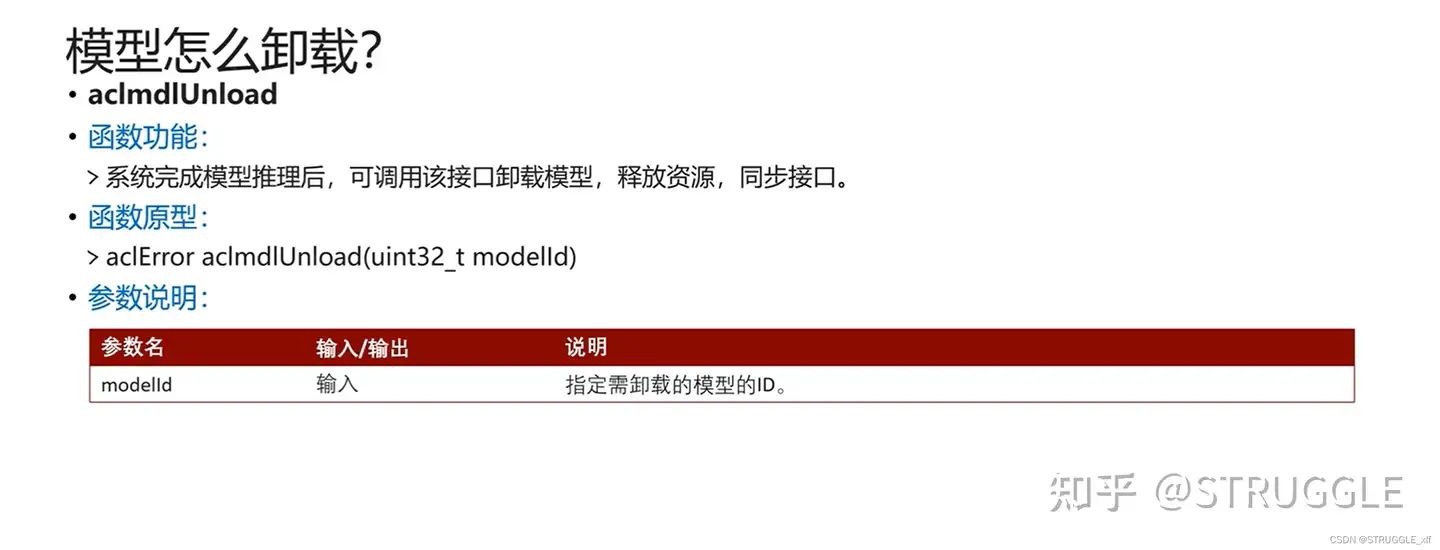
在这里插入图片描述
获取模型描述信息
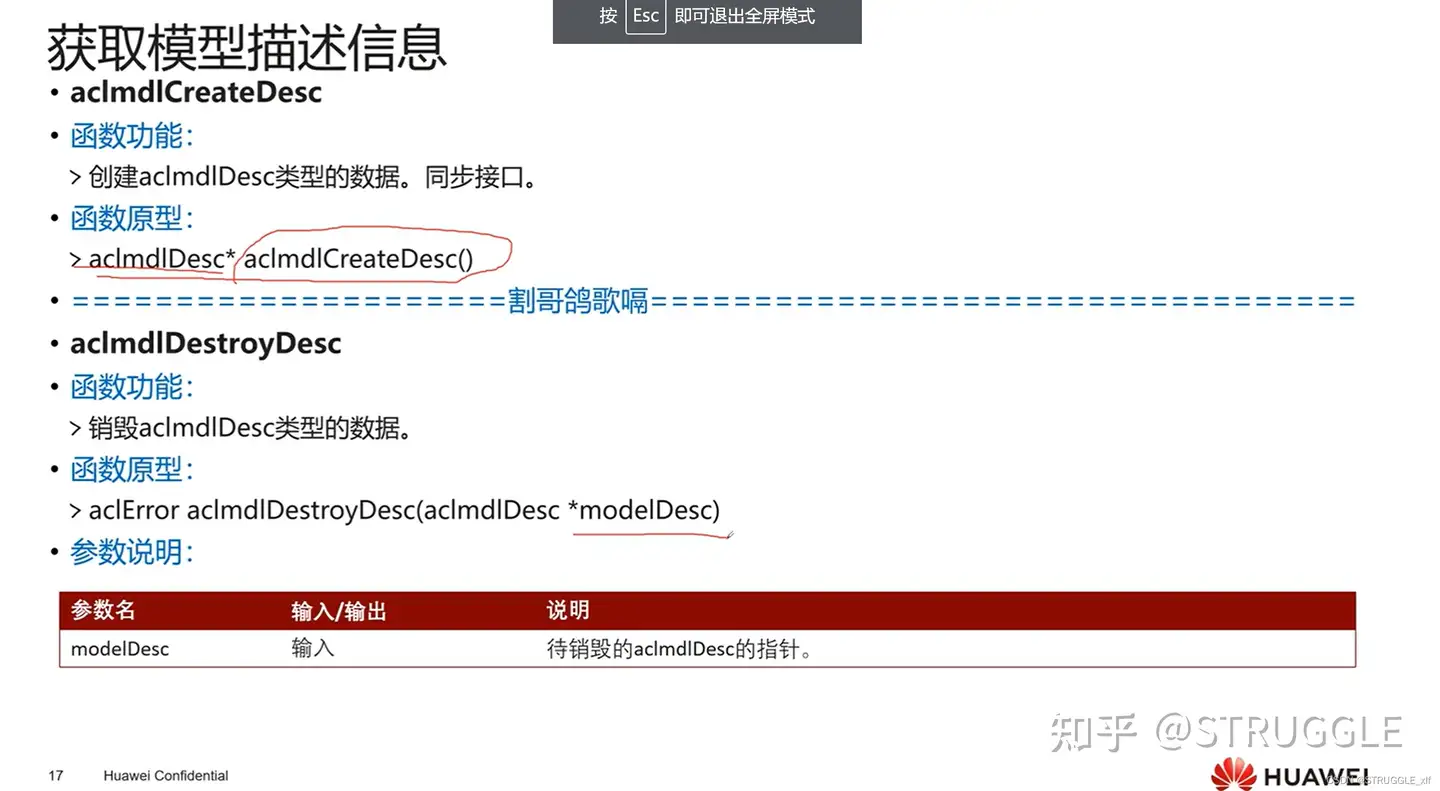
在这里插入图片描述
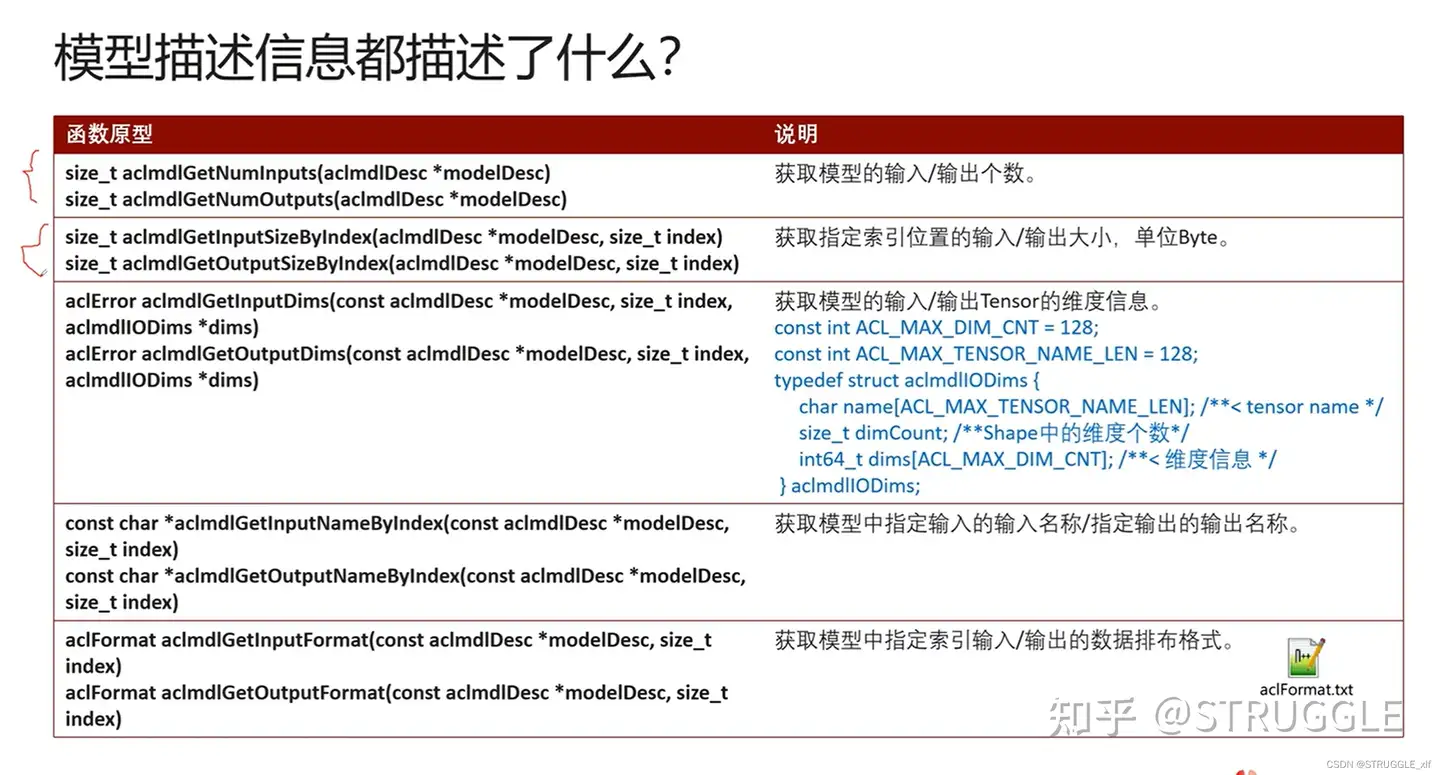
在这里插入图片描述

在这里插入图片描述
模型推理执行接口——同步
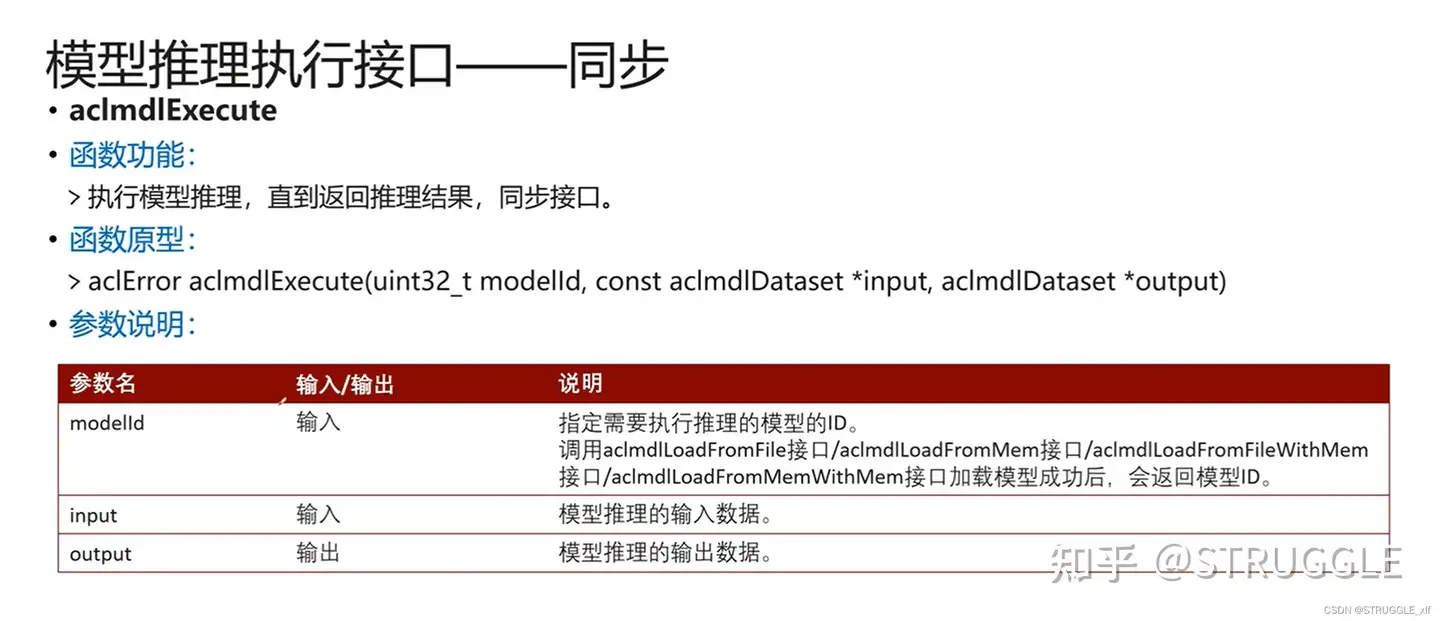
在这里插入图片描述
模型推理执行接口——异步
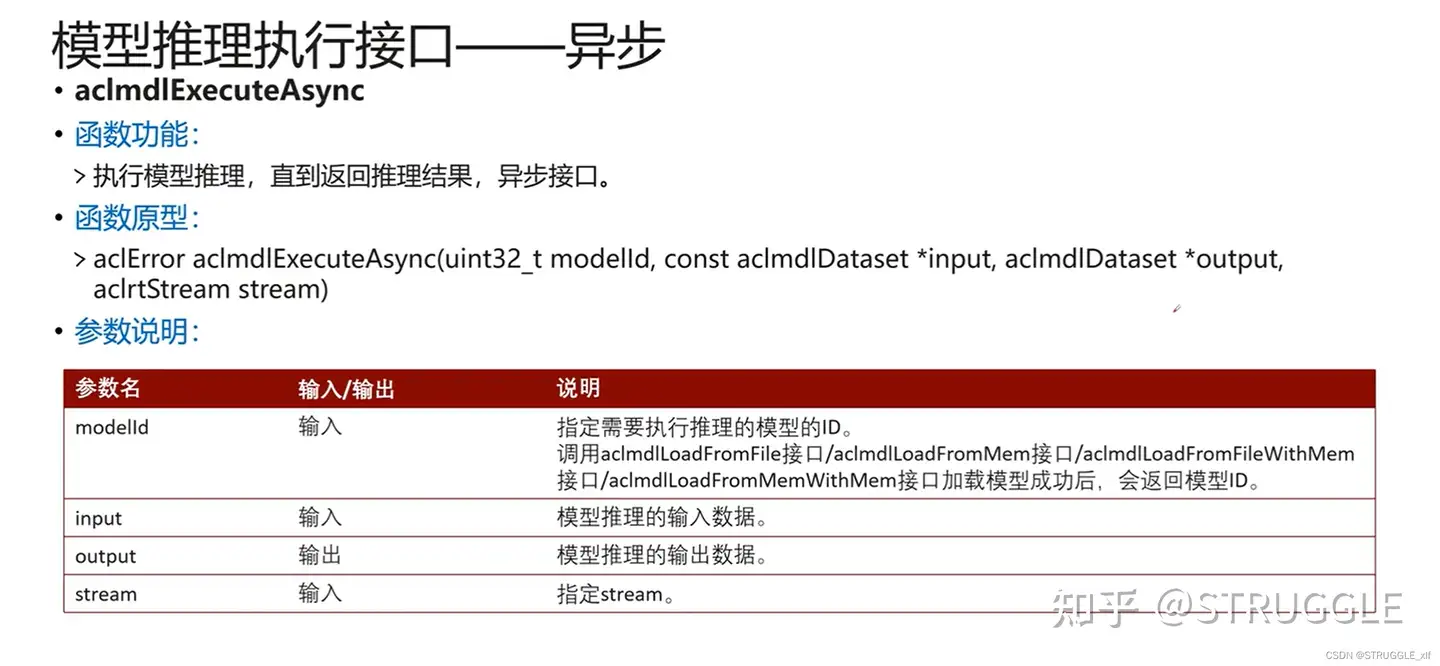
在这里插入图片描述
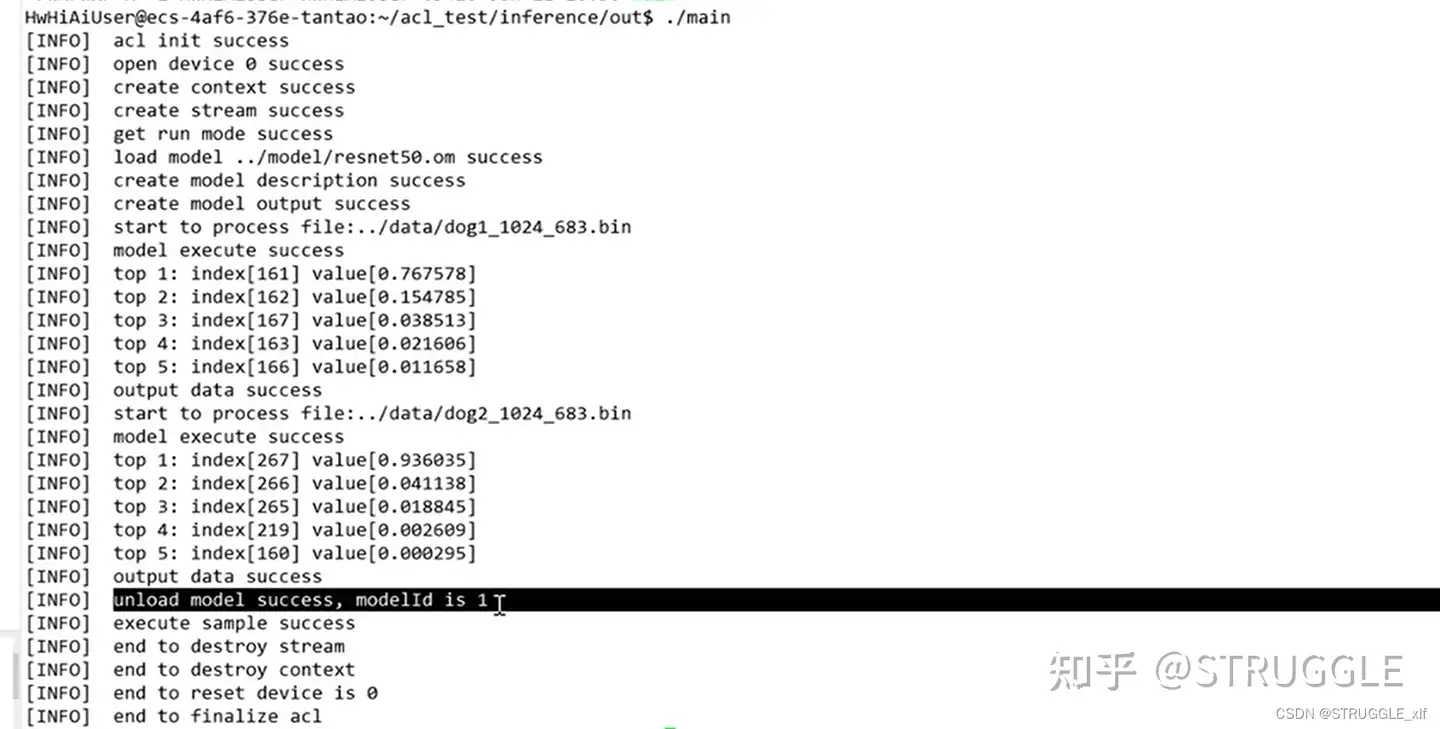
案例演示

- 点赞
- 收藏
- 关注作者
评论(0)