【ModelArts Course7-2】Custom Image to Train & Deploy from Github

ModelArts - Using Custom Image to Train and Deploy a Model from Github
Part 2: Write Inference Code and Deploy it as a Real-Time Service
1 Inference and Visualization
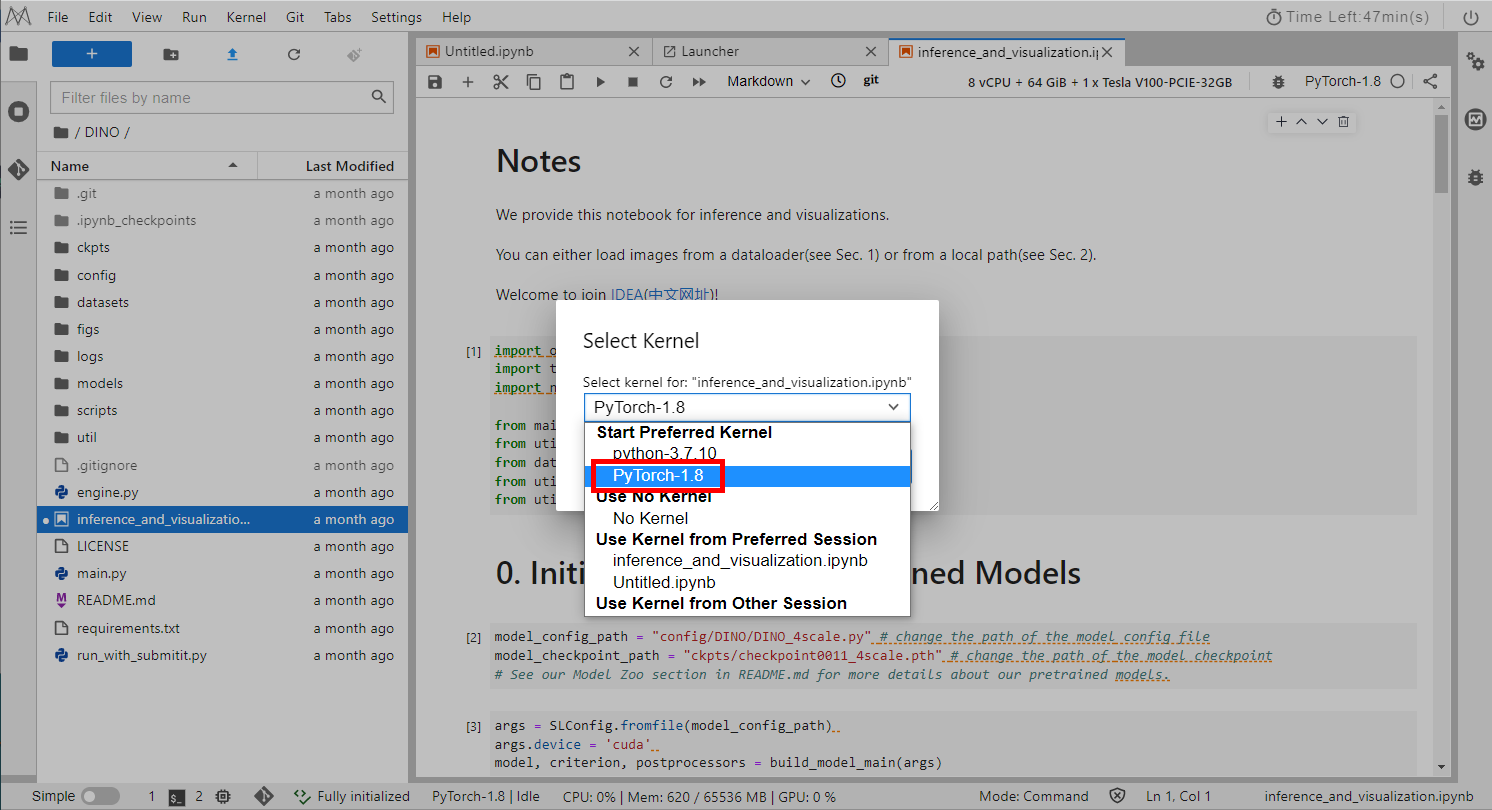
Open inference_and_visualization.ipynb in the DINO directory and select Kernel Pytorch-1.8, as shown below.
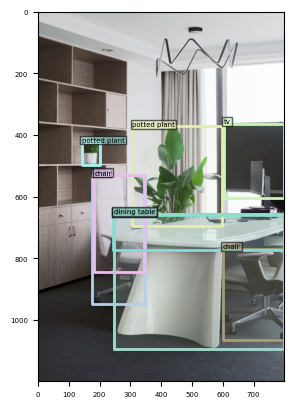
Run the code step by step to view the inference result.
2 Write Inference Code
After running the inference and visualization part of DINO, you can write inference code, create an AI model as an AI application in ModelArts and quickly deploy the AI application as a real-time inference service. The following figure shows the process.
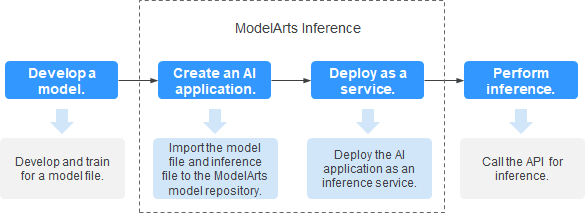
◉ Model development: It can be performed in the ModelArts service or in your local development environment.
◉ Create AI applications: Import model files, configuration files, and inference files to the model repository of ModelArts for version management and build AI applications that can be run.
◉ Deployment service: Deploy AI applications in the resource pool as container instances and register externally accessible inference APIs.
◉ Inference: Invoking inference APIs is added to your application and AI inference capabilities are integrated into business processes.
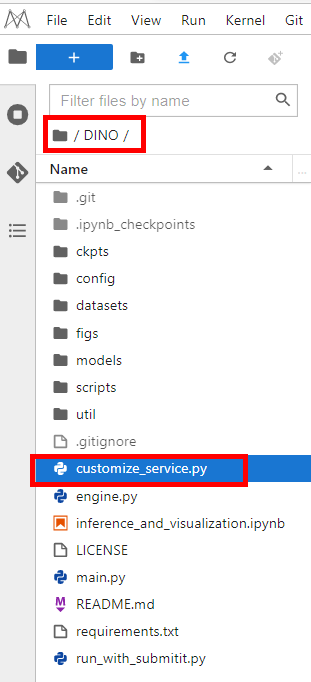
In the Notebook-DINO directory, create a file named customize_service.py. you can refer to inference_and_visualization.ipynb to write the inference code. For details, refer to Specifications for Writing Model Inference Code.
2.1 Import package
- Add a child model class to the model inference code file
customize_service.py. The child model class inherits the parent class PTServingBaseService of the model PyTorch type. The import statement is as follows:
from model_service.pytorch_model_service import PTServingBaseService
- Import the required inference packages to
customize_service.pyby referring toinference_and_visualization.ipynb.
import os
import torch
import json
from io import BytesIO
from collections import OrderedDict
from PIL import Image
from util.slconfig import SLConfig
from main import build_model_main
from util import box_ops
import datasets.transforms as T
2.2 Rewriting Method
- Rewrite Initialization Method
This method is used to initialize and load the pre-training model. First, you need to build a class that inherits PTServingBaseService, defines the model configuration file path and model path, and loads the parameter information and coco names in the configuration file.
class CustomizeService(PTServingBaseService):
    def __init__(self, model_name, model_path):

        root = os.path.dirname(os.path.abspath(__file__))
        model_config_path = os.path.join(root, "config/DINO/DINO_4scale.py")
        model_checkpoint_path = os.path.join(root, "ckpts/checkpoint0011_4scale.pth")
        self.model_config_path = model_config_path
        self.model_checkpoint_path = model_checkpoint_path

        args = SLConfig.fromfile(self.model_config_path)
        args.device = 'cuda' if torch.cuda.is_available() else 'cpu'

        self.model, criterion, self.postprocessors = build_model_main(args)
        checkpoint = torch.load(self.model_checkpoint_path, map_location='cpu')
        self.model.load_state_dict(checkpoint['model'])
        _ = self.model.eval()

        #load coco names
        jsonfile = os.path.join(root,"util/coco_id2name.json")
        with open(jsonfile) as f:
            id2name = json.load(f)
            self.id2name = {int(k): v for k, v in id2name.items()}
        self.transform = T.Compose([
            T.RandomResize([800], max_size=1333),
            T.ToTensor(),
            T.Normalize([0.485, 0.456, 0.406], [0.229, 0.224, 0.225])
        ])
        self.resize_scale = 0.0
        self.image = None
- Rewrite Preprocessing Method
This method preprocesses a custom image. data imported through the API for pre-processing, actual inference request, and post-processing can be multipart/form-data or application/json.
The input parameter data is of the multipart/form-data type. First, the image is loaded and converted to RGB format image. then preprocess the image, the PIL image is randomly adjusted to target size in the shape list, the PIL image is converted to tensor, and finally the tensor image is normalized with mean and standard deviation.
def _preprocess(self, data):
    preprocessed_data = {}
    for k, v in data.items():  # The value of k is fixed to images.
        for file_name, file_content in v.items():
            image = Image.open(file_content).convert("RGB")
            long_side = max(image.size)
            # transform images
            self.image, _ = self.transform(image, None)
            self.resize_scale = max(self.image.size()) / float(long_side)
            preprocessed_data[k] = self.image
    return preprocessed_data
- Rewrite Inference Method
Transfers processed image data into the model, return scores, labels, and location information.
def _inference(self, data):
    image = data["images"]
    # predict images
    output = self.model.cuda()(image[None].cuda())
    output = self.postprocessors['bbox'](output, torch.Tensor([[1.0, 1.0]]).cuda())[0]
    # print(output)
    return output
The output structure is as follows:
{
"scores":tensor([0.6153, 0.6056, 0.5966, ...]),
"labels":tensor([72, 64, 64, ...]),
"boxes":tensor([[0.7530, 0.3022, 0.9996, 0.5029], [], ...)
}
- Rewrite Post-Processing Method
This method performs post-processing operations on the inferred output data, setting thresholds to filter the scores and boorders, removes redundant boxes, and processes the coordinate information. The inference result is returned in the form of JSON, where detection_classes is the label of each detection box, detection_boxes is the four-point coordinate (y_min, x_min, y_max, x_max) of each detection box, and detection_scores is the confidence level of each detection box.
def _postprocess(self, data):
    thershold = 0.3  # set a thershold
    scores = data['scores']
    labels = data['labels']
    boxes = box_ops.box_xyxy_to_cxcywh(data['boxes'])
    select_mask = scores > thershold
    box_label = [self.id2name[int(item)] for item in labels[select_mask]]
    pred_dict = {
        'boxes': boxes[select_mask],
        'size': torch.Tensor([self.image.shape[1], self.image.shape[2]]),
        'box_label': box_label
    }

    H, W = pred_dict['size'].tolist()
    polygons = []
    for box in pred_dict['boxes'].cpu():
        unnormbbox = box * torch.Tensor([W, H, W, H])
        unnormbbox[:2] -= unnormbbox[2:] / 2
        unnormbbox /= self.resize_scale
        [bbox_x, bbox_y, bbox_w, bbox_h] = unnormbbox.tolist()
        polygons.append([int(bbox_y), int(bbox_x), int(bbox_y + bbox_h), int(bbox_x + bbox_w)])  #Coordinate order [y1, x1, y2, x2]

    result = OrderedDict()
    result['detection_classes'] = box_label
    result['detection_scores'] = [round(v, 4) for v in scores[select_mask].tolist()]
    result['detection_boxes'] = polygons

    return result
After writing the inference script, click CRTL+S to save it.
3 Model Packaging
Add a cell to the ipynb file created before, copy the following code, and pack the inference code and model file to the specified directory.
import os
import shutil

def copy_data(src_dir, dst_dir):
    """
    Copy all content in the src_dir source directory to the dst_dir target directory.
    """
    if not os.path.exists(dst_dir):
        os.makedirs(dst_dir)
    if os.path.exists(src_dir):
        for item in os.listdir(src_dir):
            fp = os.path.join(src_dir, item)
            dst_path = os.path.join(dst_dir, item)
            if not item.startswith('.'):
                if os.path.isfile(os.path.join(src_dir, item)):
                    shutil.copy(fp, dst_path)
                else:
                    copy_data(fp, dst_path)

source_path = "DINO"
target_path  = "/home/ma-user/infer/model/1"
copy_data(source_path,target_path)
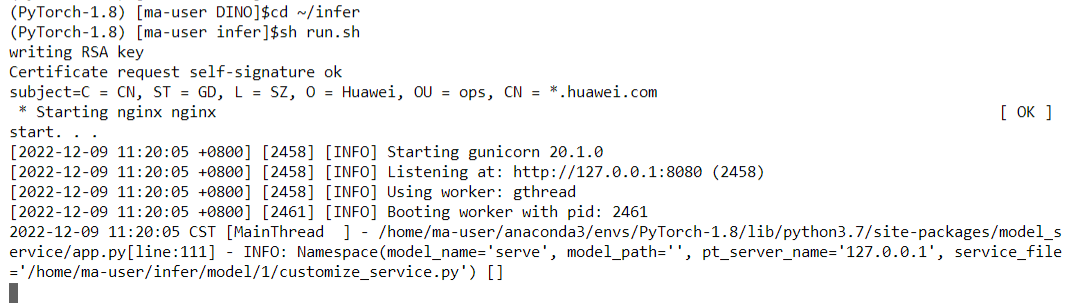
4 Local Invocation
Access the terminal and enter the following command to switch to the infer directory and start the local inference code.
cd ~/infer
sh run.sh
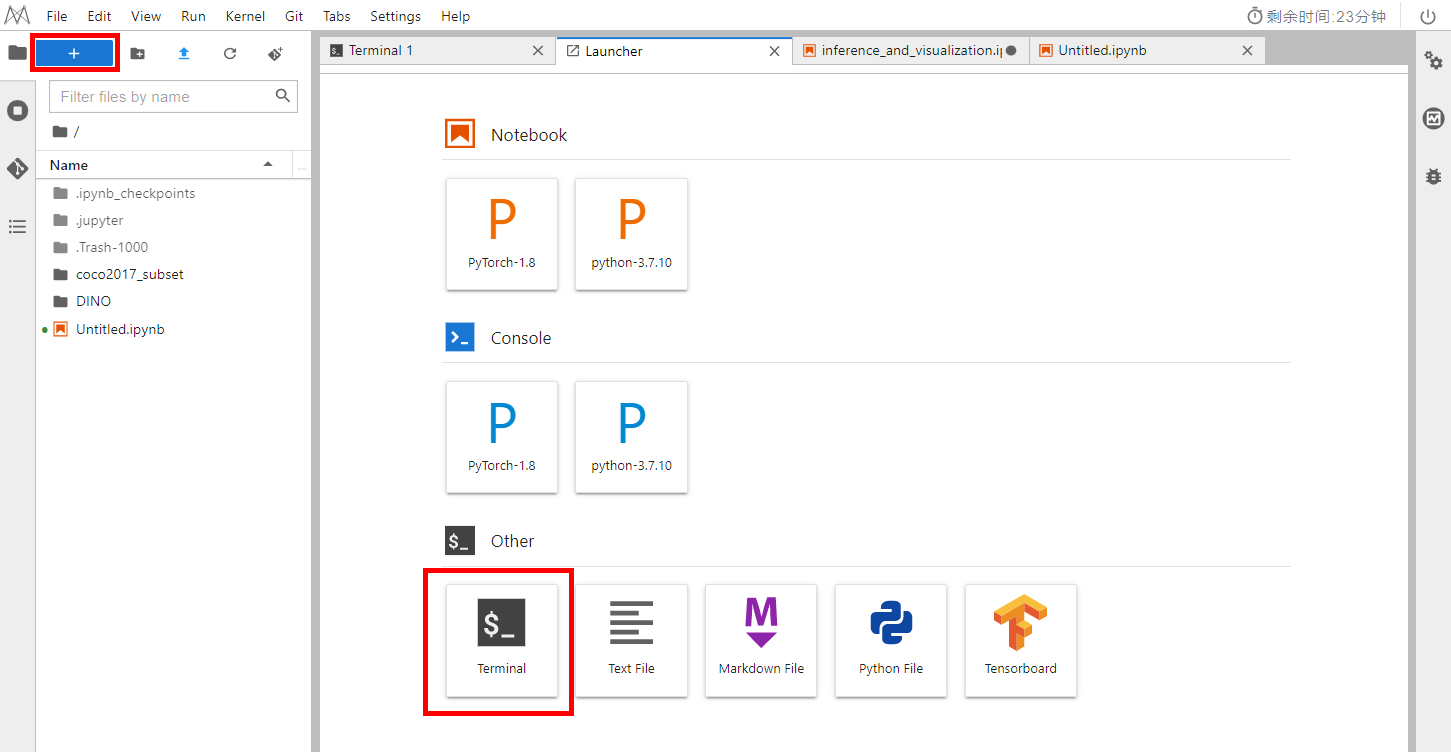
Click New Laucher in the upper right corner to open a new terminal.
Enter the following command in the new terminal to invoke the test inference code by importing the local image for inference verification:
curl -kv -F 'images=@/home/ma-user/infer/model/1/figs/idea.jpg' -X POST http://127.0.0.1:8080/
The inference result is as follows. The label, size, and border position information of the image is returned.

5 Saving the Image
We need to package the inference code into the image, so save the image again as before.
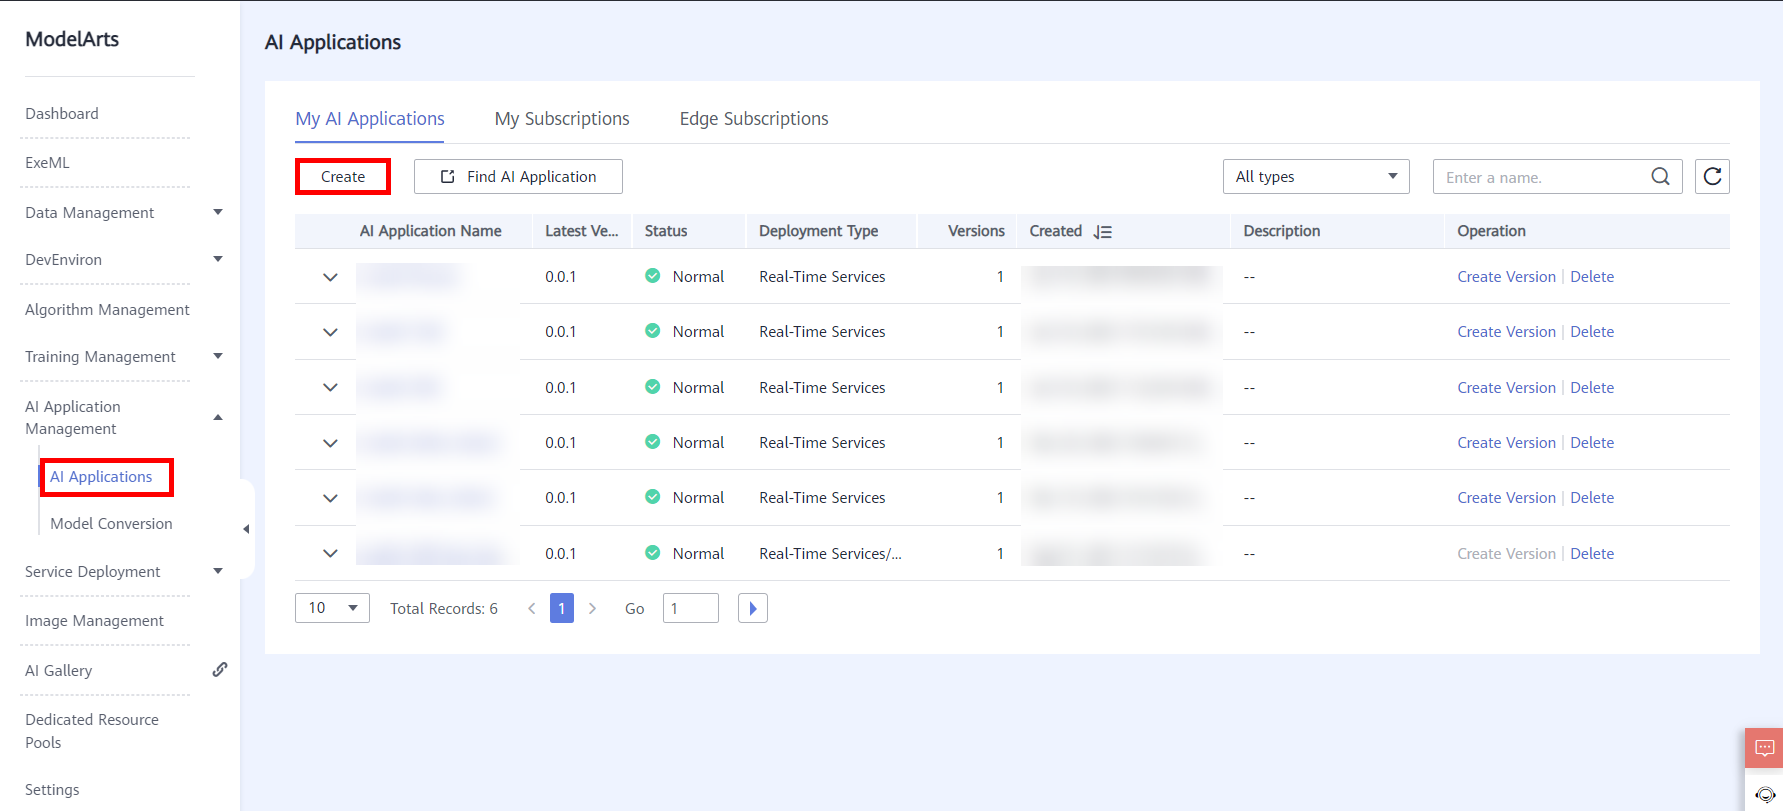
6 Create an AI application and Deploy it as an Real-Time Service
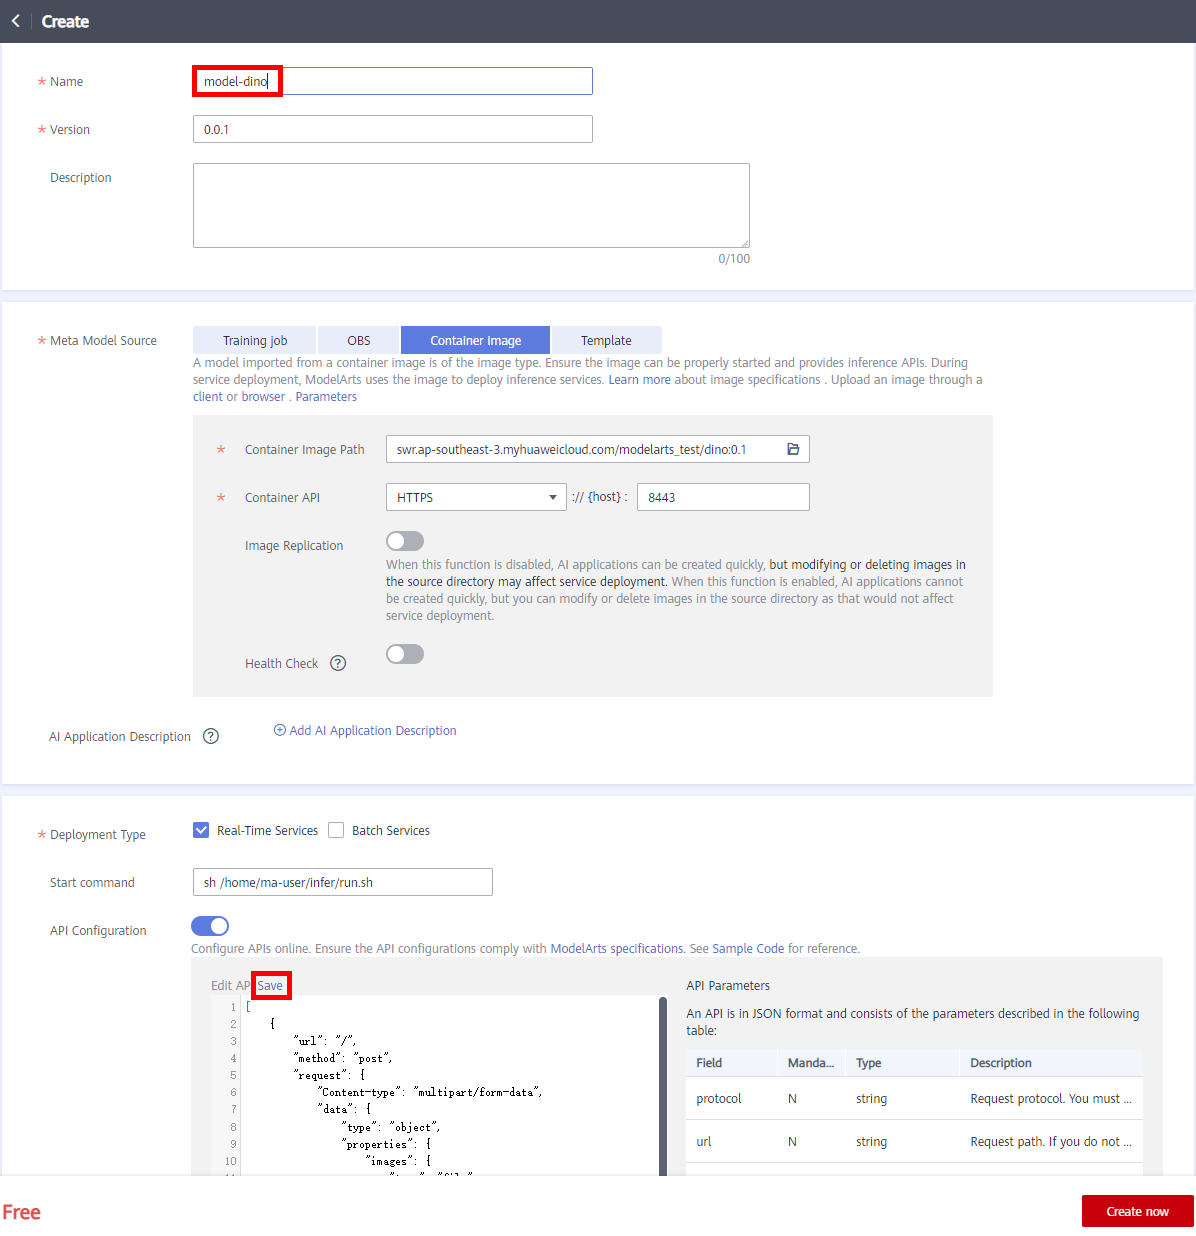
Choose AI Application Management > AI Application > My AI Application and click Create.
The following shows the configuration parameters.
● Name: User-defined, for example, model-dino
● Version: default
● Meta Model Source: Container image
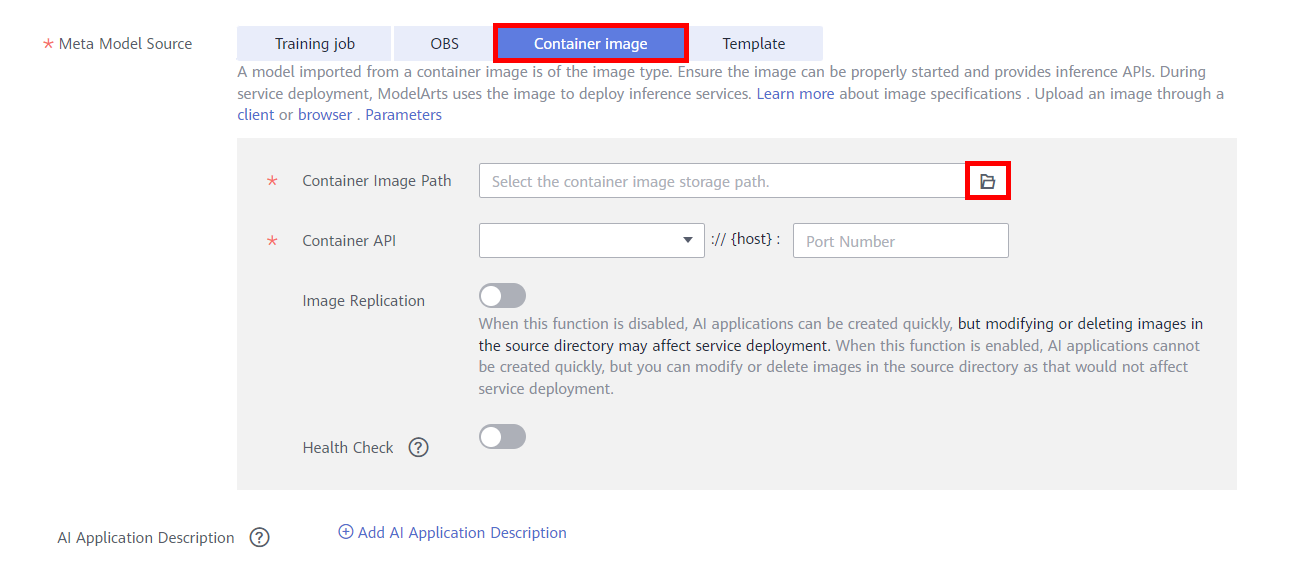
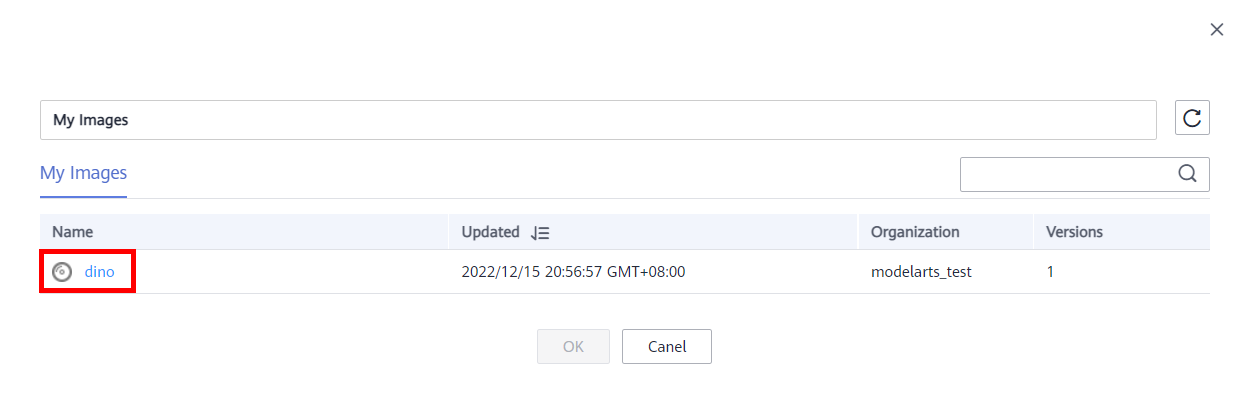
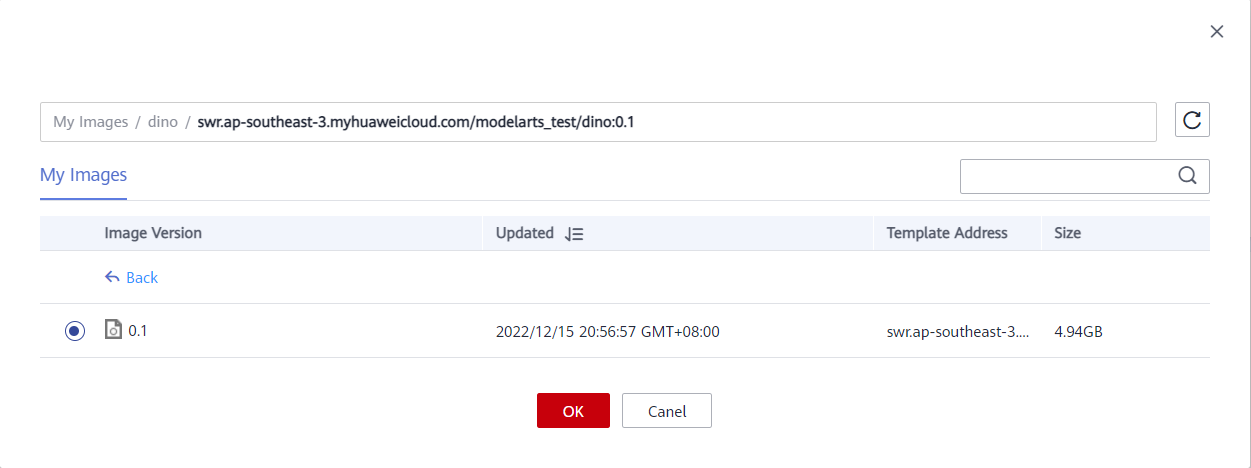
● Container Image Path: Click the file icon on the right and select the saved image and version.
● Container API: HTTPS, port number: 8443
● Deployment Type: Real-time Service
● Start Command: sh /home/ma-user/infer/run.sh
● API Configuration: Enable, edit API in the lower part, and then click Save.
The API is defined in JSON array format and should contain the following fields:
url      --> Request path. If this parameter is not set, the default value is /.
method   --> request method. If this parameter is not set, the default value is post.
request  --> Request body parameters and type definitions
response --> Definition of parameters and types in the return body
The request and response fields Content-type are defined as multipart/form-data. The input parameter of the request body is an image, and the output parameter of the response body is the image label, size, and border position. For details, refer to Model Configuration File Description . For details about the API configuration, see the following table.
[{
    "url": "/",
    "method": "post",
    "request": {
        "Content-type": "multipart/form-data",
        "data": {
            "type": "object",
            "properties": {
                "images": {
                    "type": "file"
                }
            }
        }
    },
    "response": {
        "Content-type": "multipart/form-data",
        "data": {
            "type": "object",
            "properties": {
                "detection_boxes": {
                    "type": "list",
                    "items": [{
                        "type": "list",
                        "minItems": 4,
                        "maxItems": 4,
                        "items": [{
                            "type": "number"
                        }]
                    }]
                },
                "detection_scores": {
                    "type": "list",
                    "items": [{
                        "type": "number"
                    }]
                },
                "detection_classes": {
                    "type": "list",
                    "items": [{
                        "type": "string"
                    }]
                }
            }
        }
    }
}]
Click Create now and wait until the AI application status changes from Building to Normal.
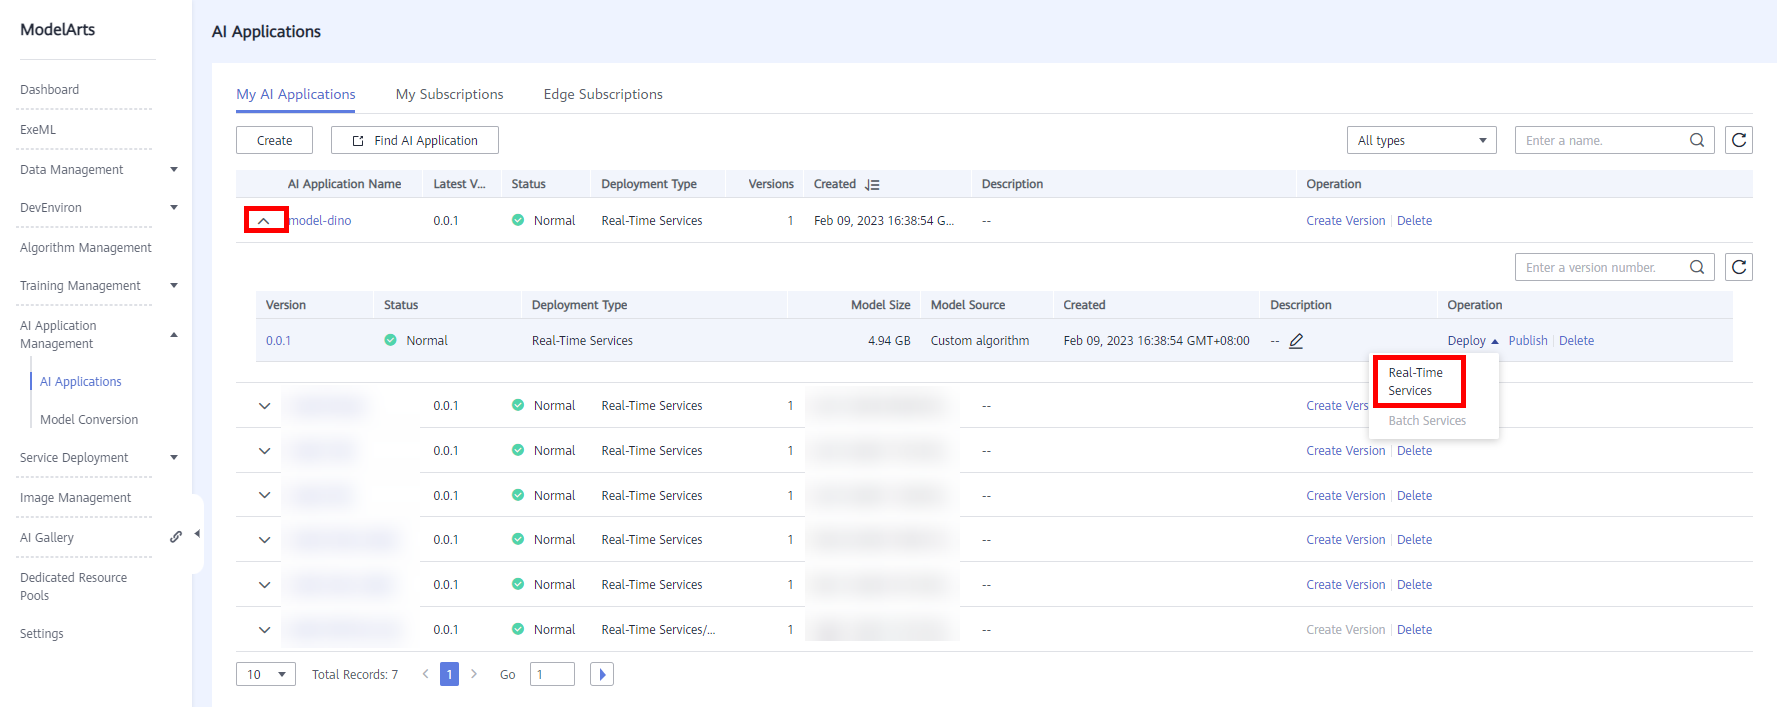
After an AI application is created, the system returns to the AI application list, selects the AI application created in the previous step, quickly deploys the AI application as a web service, and provides real-time test UI and monitoring functions. Click the drop-down button on the left and click Deploy > Real-time Services in the Operation column.
On the Deploy page, set key parameters by referring to the following description:
● Name: service-dino
● Resource Pool: Public Resource Pool.
Select AI Application and Configuration: The imported model is automatically selected for AI Application and Version.
● Specifications: GPU: 1 * T4 (16GB) | CPU: 8 vCPUs 32GB
Keep the default values for other parameters.
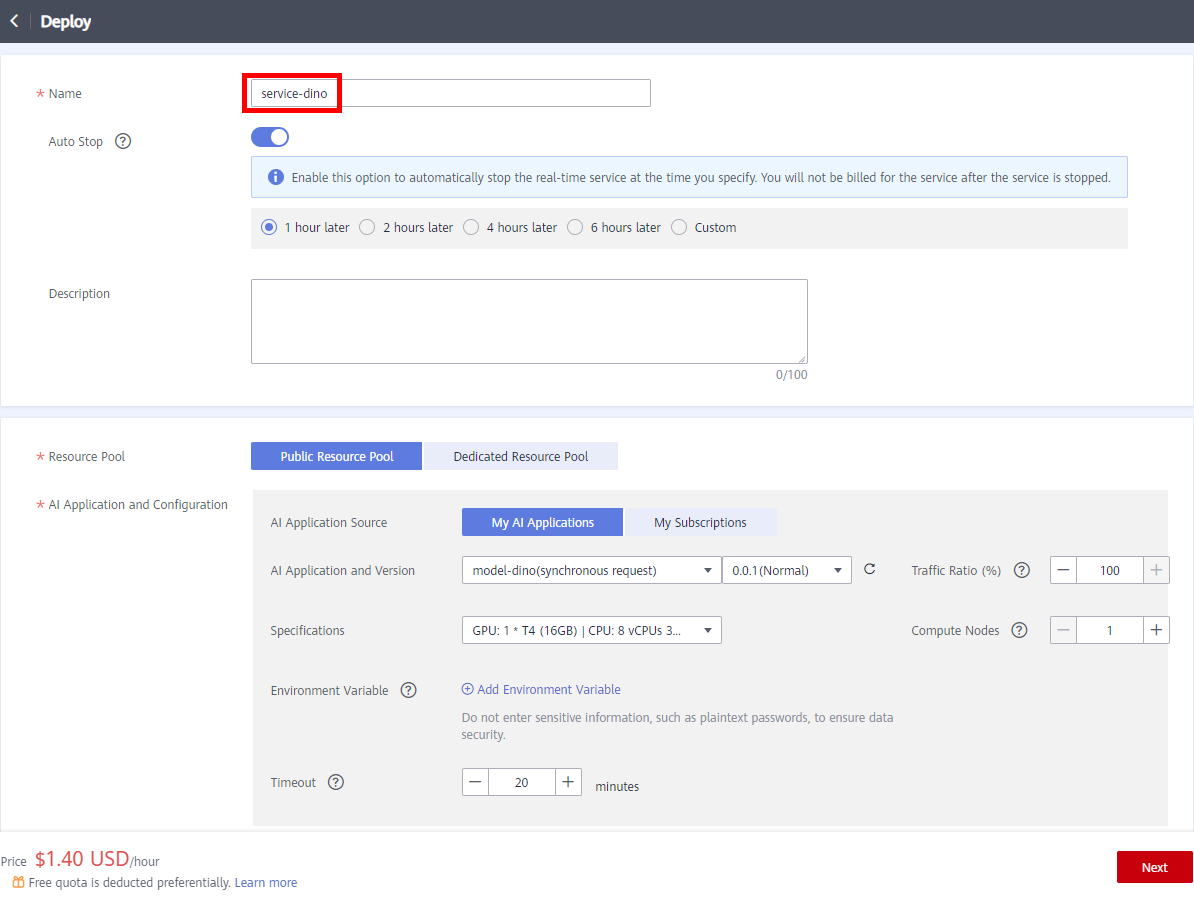
After the parameters are set, click Next > Submit as prompted. You can back to Real-Time Service List and wait until the service deployment is complete. When the service status changes to Running, the service deployment is successful.
7 Use Real-Time Services to Predict Images
After the Real-Time Services is deployed, you can click the service name to access the service details page and download test_image.
After the download is complete, click the Prediction tab on the Real-Time Service Deployment page, click Upload, and then click Predict.


- 点赞
- 收藏
- 关注作者
评论(0)