SpringSecurity记住登录实现
【摘要】 一、记住登录流程 二、实现原理SpringSecurity认证成功之后,先向浏览器的cookie中存储一个加密串,数据库中存的是cookie的加密串和用户信息的串。 三、实现步骤 2.1 创建数据库表其实可以通过查看源码直接建表。如下图所示,你也可以直接将源码中的sql语句复制,然后再建表。这里我们使用自己的sql语句建表。CREATE TABLE `persistent_logins` ...
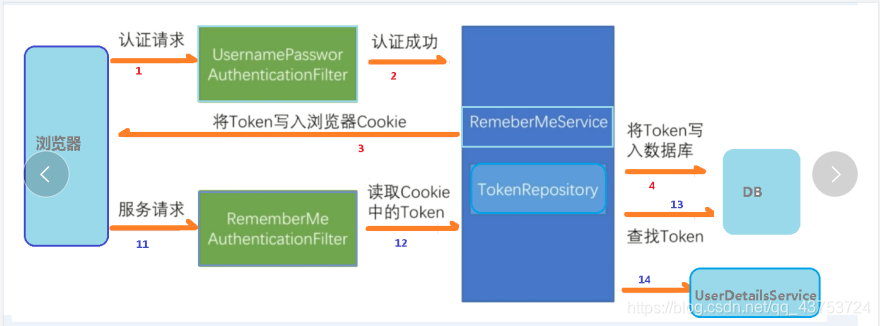
一、记住登录流程

二、实现原理

SpringSecurity认证成功之后,先向浏览器的cookie中存储一个加密串,数据库中存的是cookie的加密串和用户信息的串。
三、实现步骤
2.1 创建数据库表
其实可以通过查看源码直接建表。如下图所示,你也可以直接将源码中的sql语句复制,然后再建表。

这里我们使用自己的sql语句建表。
CREATE TABLE `persistent_logins` (
 `username` varchar(64) NOT NULL,
 `series` varchar(64) NOT NULL,
 `token` varchar(64) NOT NULL,
 `last_used` timestamp NOT NULL DEFAULT CURRENT_TIMESTAMP ON UPDATE
CURRENT_TIMESTAMP,
 PRIMARY KEY (`series`)
) ENGINE=InnoDB DEFAULT CHARSET=utf8;
2.2 配置类,注入数据源,配置操作数据库对象
完整配置类如下:
package com.atguigu.springsecuritydemo1.config;

import org.springframework.beans.factory.annotation.Autowired;
import org.springframework.context.annotation.Bean;
import org.springframework.context.annotation.Configuration;
import org.springframework.security.config.annotation.authentication.builders.AuthenticationManagerBuilder;
import org.springframework.security.config.annotation.web.builders.HttpSecurity;
import org.springframework.security.config.annotation.web.configuration.WebSecurityConfigurerAdapter;
import org.springframework.security.core.userdetails.UserDetailsService;
import org.springframework.security.crypto.bcrypt.BCryptPasswordEncoder;
import org.springframework.security.crypto.password.PasswordEncoder;
import org.springframework.security.web.authentication.rememberme.JdbcTokenRepositoryImpl;
import org.springframework.security.web.authentication.rememberme.PersistentTokenRepository;

import javax.sql.DataSource;

@Configuration
public class SecurityConfigTest extends WebSecurityConfigurerAdapter {

    @Autowired
    private UserDetailsService userDetailsService;
    //注入数据源
    @Autowired
    private DataSource dataSource;
    //配置对象
    @Bean
    public PersistentTokenRepository persistentTokenRepository(){
        JdbcTokenRepositoryImpl jdbcTokenRepository=new JdbcTokenRepositoryImpl();
        jdbcTokenRepository.setDataSource(dataSource);
//        jdbcTokenRepository.setCreateTableOnStartup(true);
        return jdbcTokenRepository;
    }

    @Override
    protected void configure(AuthenticationManagerBuilder auth) throws Exception {
        auth.userDetailsService(userDetailsService).passwordEncoder(password());
    }

    @Bean
    PasswordEncoder password(){
       return new BCryptPasswordEncoder();
    }

    @Override
    protected void configure(HttpSecurity http) throws Exception {
        //退出配置
        http.logout().logoutUrl("/logout")
                .logoutSuccessUrl("/test/hello")
                .permitAll();

        //配置没有权限访问自定义跳转的页面
        http.exceptionHandling().accessDeniedPage("/unauth.html");
        http.formLogin()             //自定义自己编写的登陆页面
            .loginPage("/login.html")    //登录页面设置
            .loginProcessingUrl("/user/login") //登录访问路径
            .defaultSuccessUrl("/success.html").permitAll()    //登录成功之后,跳转路径
            .and().authorizeRequests()
               //设置哪些路径可以直接访问,不需要认证
                .antMatchers("/","/test/hello","/user/login").permitAll()
                //当前登录的用户,只有具有admins权限才可以访问这个路径
               //1、hasAuthority方法
               //.antMatchers("/test/index").hasAuthority("admins")
               //2、hasAnyAuthority方法
               //.antMatchers("/test/index").hasAnyAuthority("admins,manager")
               //3、hasRole方法  ROLE_sale
               .antMatchers("/test/index").hasRole("sale")
                //4、hasAnyRole方法

            .anyRequest().authenticated()
                //配置自动登录
                .and().rememberMe().tokenRepository(persistentTokenRepository())
                .tokenValiditySeconds(60)   //设置有效时长,单位:秒
                .userDetailsService(userDetailsService);

//            .and().csrf().disable();    //关闭csrf防护
    }
}
application.properties(这里自己改下)
server.port=8111
#数据库连接配置
spring.datasource.driver-class-name=com.mysql.cj.jdbc.Driver
spring.datasource.url=jdbc:mysql://localhost:3306/demo?&useSSL=false&serverTimezone=UTC&allowPublicKeyRetrieval=true
spring.datasource.username=root
spring.datasource.password=123456
2.3 配置类配置自动登录
这里上一步的完整代码已经包含了

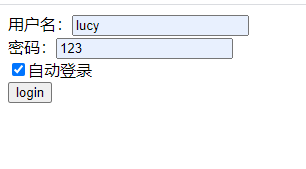
2.4 登录前端页面login.html
注意:checkbox的name的值必须为remember-me,这springsecurity源码中封装好的
<!DOCTYPE html>
<html lang="en">
<head>
    <meta charset="UTF-8">
    <title>Title</title>
</head>
<body>
    <form action="/user/login" method="post">
        用户名:<input type="text" name="username"/>
        <br>
        密码:<input type="text" name="password"/>
        <br>
        <input type="checkbox" name="remember-me"/>自动登录
        <br>
        <input type="submit" value="login"/>
    </form>
</body>
</html>
四、运行测试
启动项目后,先访问localhost:8111/login.html

输入数据库中存在的用户名和密码 lucy 123并勾选自动登录

点击login(打开控制台)

可以看到新增了一条cookie,remember-me
数据库中也新增了一条记录:

这是随便测试一个controller:http://localhost:8111/test/index

关闭浏览器再访问也是一样的效果,自动登录功能成功实现。
【版权声明】本文为华为云社区用户原创内容,未经允许不得转载,如需转载请自行联系原作者进行授权。如果您发现本社区中有涉嫌抄袭的内容,欢迎发送邮件进行举报,并提供相关证据,一经查实,本社区将立刻删除涉嫌侵权内容,举报邮箱:
cloudbbs@huaweicloud.com
- 点赞
- 收藏
- 关注作者


评论(0)