Java测试框架——JUnit详解(4&5)
JUnit是Java编程语言的单元测试框架,用于编写和运行可重复的自动化测试,也是当下主流的Java测试框架
前言
如果有对单元测试还不熟悉的小伙伴可以看一下我的这篇文章——浅谈单元测试,本文我们主要针对JUnit 来讲解Java中的常用单元测试关于JUnit4和5的区别可以参考这篇文章,从JUnit 4迁移到JUnit 5:重要的区别和好处。
何为JUnit?
JUint是Java编程语言的单元测试框架,用于编写和运行可重复的自动化测试
JUnit的好处(来自百度百科):
-
简单易用:JUnit 的 API 非常简单,开发人员可以轻松地编写和执行单元测试。
-
可维护:单元测试是可重复执行的,因此在修改代码时,可以通过运行单元测试来确保修改后的代码不会破坏已有的功能。
-
可扩展:JUnit 提供了一些扩展点,使开发人员可以根据自己的需要扩展它。
-
可集成:JUnit 可以与大多数流行的 Java IDE 和构建工具集成,开发人员可以在开发过程中轻松地执行单元测试。
-
社区支持:JUnit 拥有庞大的用户群和开发团队,因此如果遇到问题,可以得到很好的帮助。
官方资料
学习一个东西,最好的办法就是去看官方文档:

junit4官网
junit5官网
下面我根据官网和自己常用测试,来讲解JUnit
JUnit4
常用注解和断言
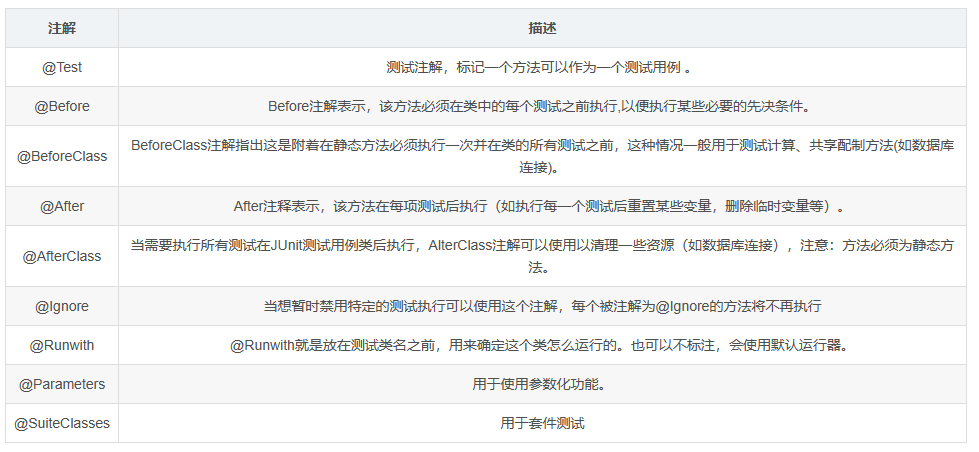
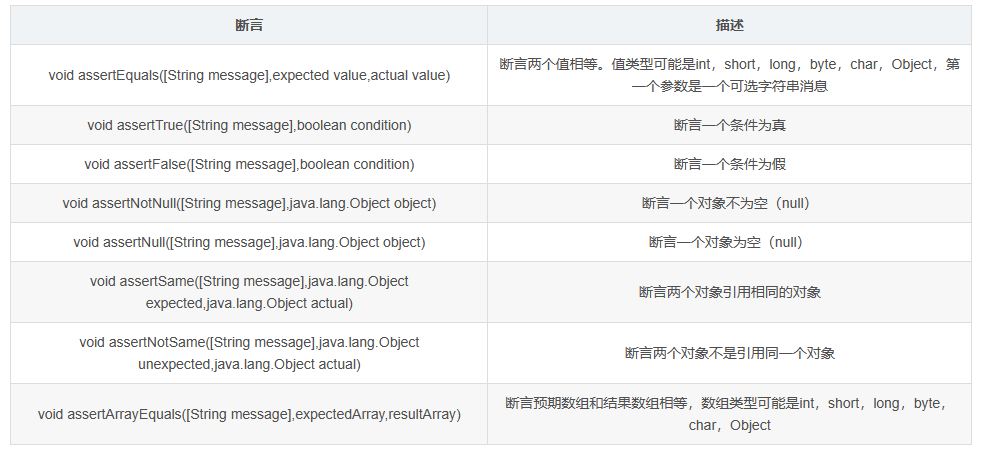
代码测试搭建一个JUnit测试环境
这是一个springboot项目,为了后续的SpringBoot2+H2+Mockito测试,读者也可以做一个maven项目
项目搭建:
maven包引入
<dependency>
            <groupId>junit</groupId>
            <artifactId>junit</artifactId>
            <version>4.12</version>
            <scope>test</scope>
        </dependency>
完整pom.xml
<?xml version="1.0" encoding="UTF-8"?>
<project xmlns="http://maven.apache.org/POM/4.0.0" xmlns:xsi="http://www.w3.org/2001/XMLSchema-instance"
         xsi:schemaLocation="http://maven.apache.org/POM/4.0.0 https://maven.apache.org/xsd/maven-4.0.0.xsd">
    <modelVersion>4.0.0</modelVersion>
    <parent>
        <groupId>org.springframework.boot</groupId>
        <artifactId>spring-boot-starter-parent</artifactId>
        <version>2.7.7</version>
        <relativePath/> <!-- lookup parent from repository -->
    </parent>
    <groupId>com.example</groupId>
    <artifactId>test</artifactId>
    <version>0.0.1-SNAPSHOT</version>
    <name>test</name>
    <description>test</description>
    <properties>
        <java.version>17</java.version>
    </properties>
    <dependencies>

        <dependency>
            <groupId>org.springframework.boot</groupId>
            <artifactId>spring-boot-starter</artifactId>
        </dependency>

        <dependency>
            <groupId>org.projectlombok</groupId>
            <artifactId>lombok</artifactId>
            <optional>true</optional>
        </dependency>
        <dependency>
            <groupId>org.springframework.boot</groupId>
            <artifactId>spring-boot-starter-test</artifactId>
            <scope>test</scope>
        </dependency>
        <dependency>
            <groupId>junit</groupId>
            <artifactId>junit</artifactId>
            <version>4.12</version>
            <scope>test</scope>
        </dependency>
    </dependencies>

    <build>
        <plugins>
            <plugin>
                <groupId>org.springframework.boot</groupId>
                <artifactId>spring-boot-maven-plugin</artifactId>
                <configuration>
                    <excludes>
                        <exclude>
                            <groupId>org.projectlombok</groupId>
                            <artifactId>lombok</artifactId>
                        </exclude>
                    </excludes>
                </configuration>
            </plugin>
        </plugins>
    </build>

</project>
测试@Test
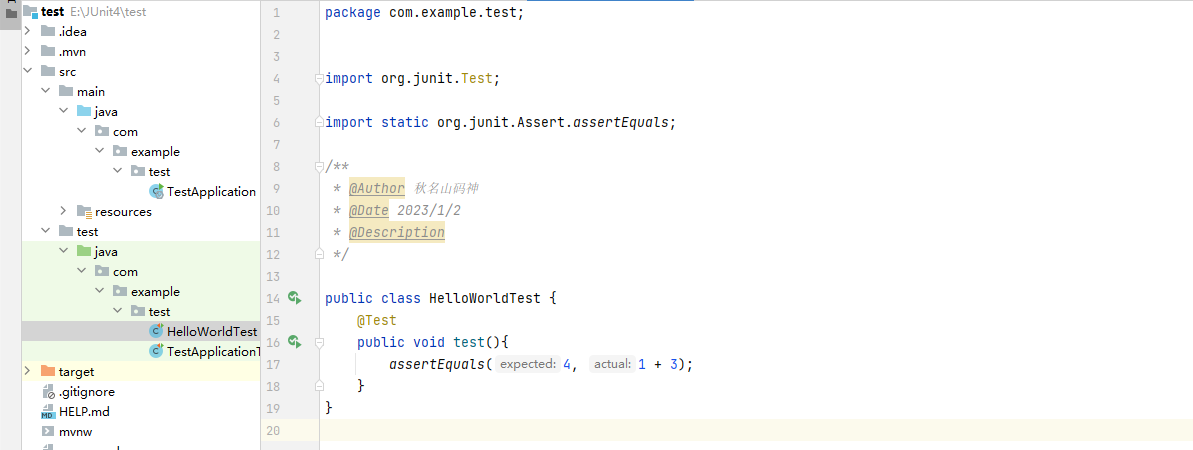
package com.example.test;
import org.junit.Test;
import static org.junit.Assert.assertEquals;

/**
 * @Author 秋名山码神
 * @Date 2023/1/2
 * @Description
 */

public class HelloWorldTest {
    @Test
    public void test(){
        assertEquals(4, 1 + 3);
    }
}
执行结果:

@Test注解在方法上标记方法为测试方法,以便构建工具和 IDE 能够识别并执行它们。JUnit 4 需要测试方法为public,这和Junit 5 有差别。
生命周期
@Before,@BeforeClass,@After,@AfterClass

package com.example.test;

import org.junit.*;
/**
 * @Author 秋名山码神
 * @Date 2023/1/2
 * @Description
 */
public class LifeCycleTest {
    @BeforeClass
    public static void beforeClass() {
        System.out.println("in before class");
    }

    @AfterClass
    public static void afterClass() {
        System.out.println("in after class");
    }

    @Before
    public void before() {
        System.out.println("in before");
    }

    @After
    public void after() {
        System.out.println("in after");
    }

    @Test
    public void testCase1() {
        System.out.println("in test case 1");
    }

    @Test
    public void testCase2() {
        System.out.println("in test case 2");
    }
}

忽略测试
package com.example.test;

import org.junit.Test;
import org.junit.Ignore;
/**
 * @Author 秋名山码神
 * @Date 2023/1/2
 * @Description
 */
public class IgnoreTest {
    @Ignore
    @Test
    public void Ignore(){
        System.out.println("IgnoreTest...");
    }
}
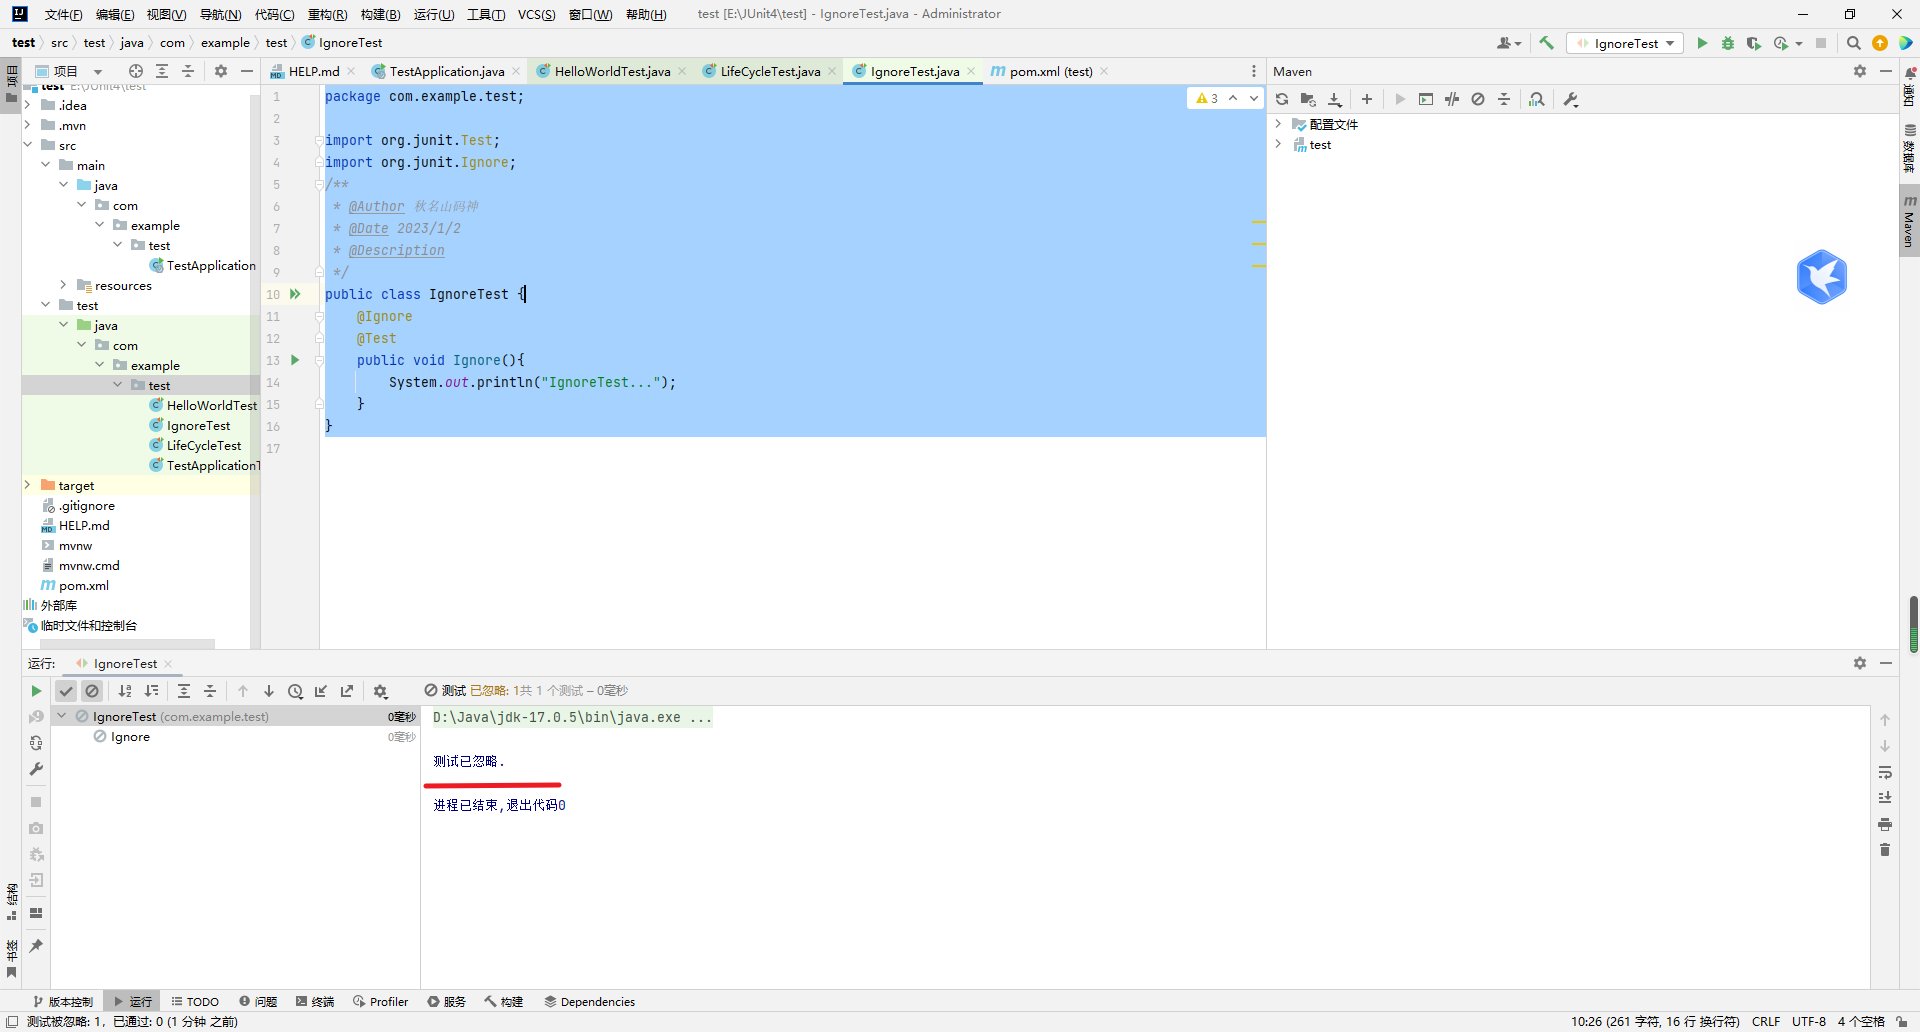
断言测试
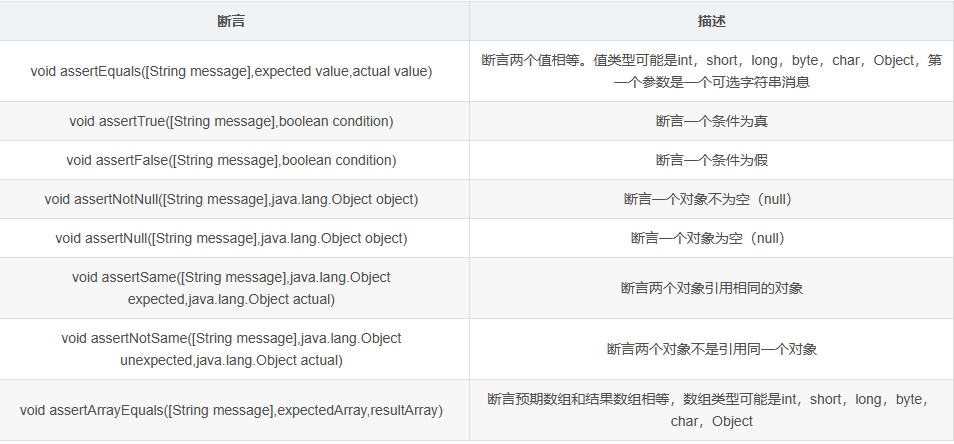
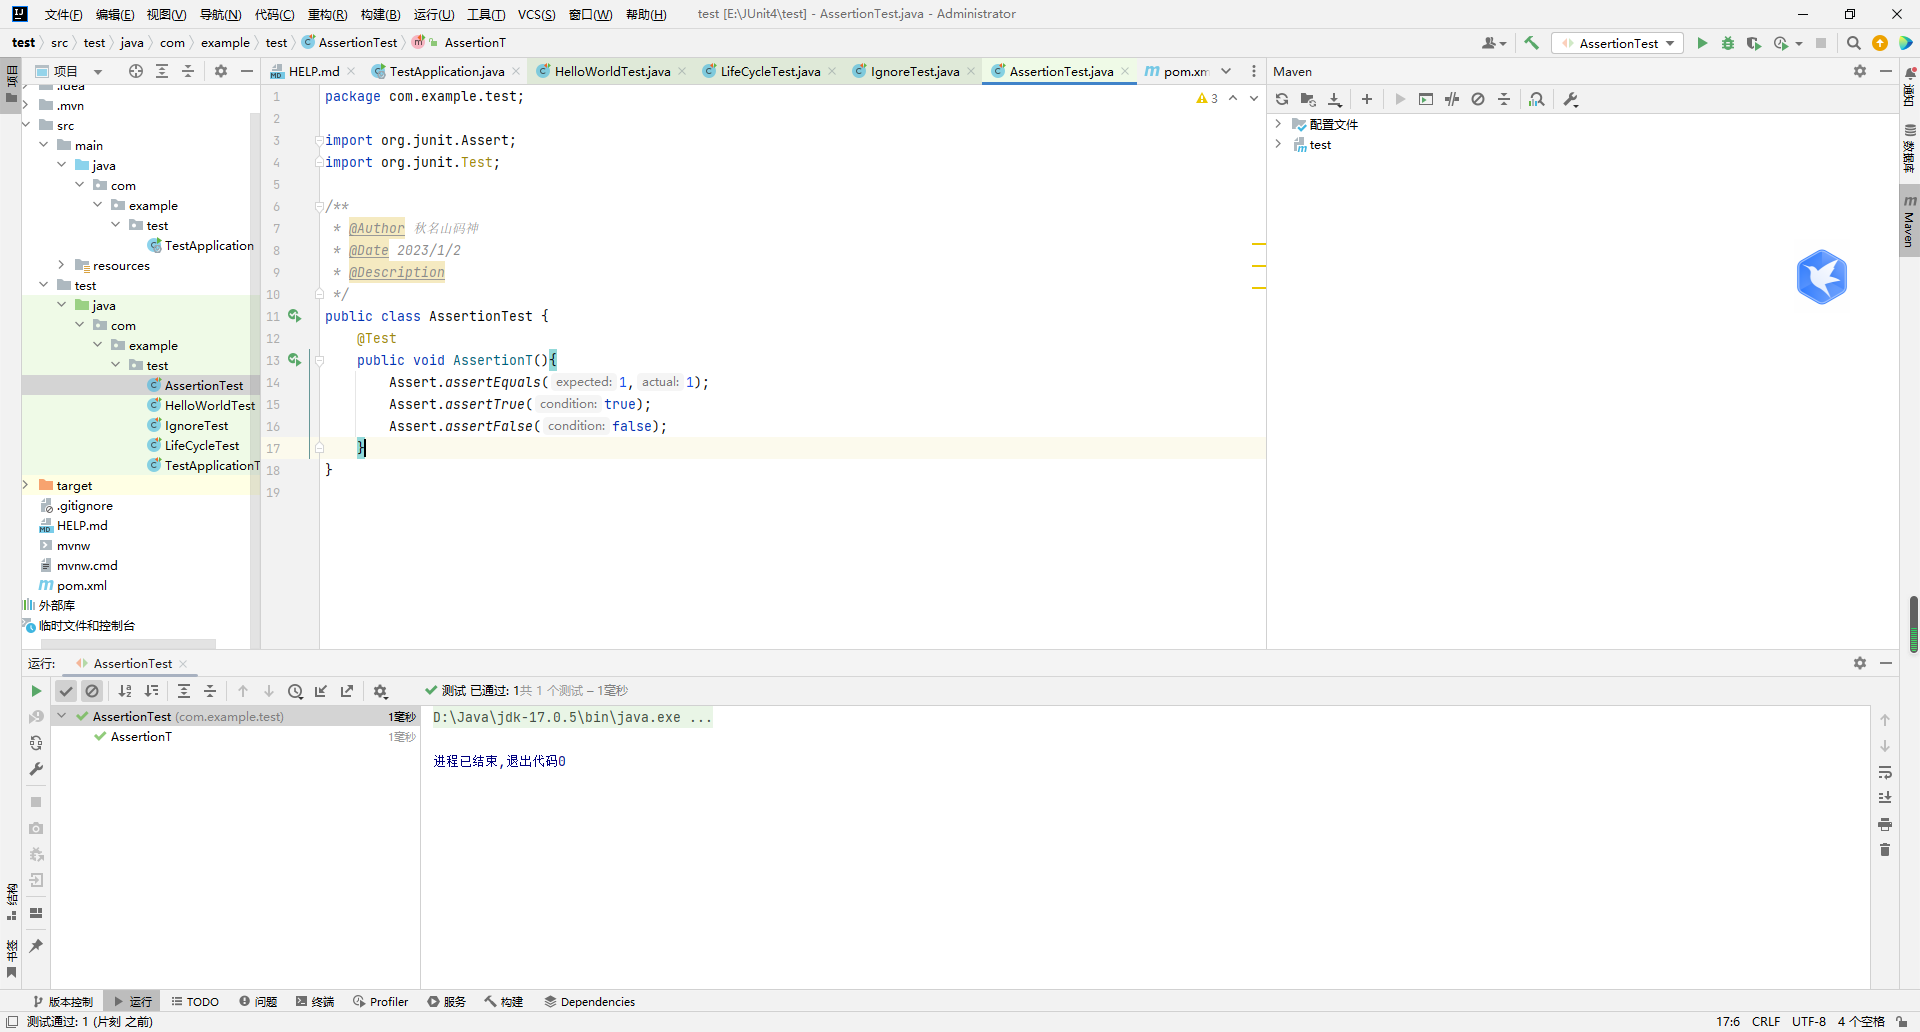
我们简单测试三个方法,后面的读者有兴趣可以自行测试,代码如下:
package com.example.test;

import org.junit.Assert;
import org.junit.Test;

/**
 * @Author 秋名山码神
 * @Date 2023/1/2
 * @Description
 */
public class AssertionTest {
    @Test
    public void AssertionT(){
        Assert.assertEquals(1,1);
        Assert.assertTrue(true);
        Assert.assertFalse(false);
    }
}
异常测试
@Test注解还提供了追踪异常的选择,expected 参数和 @Test 注释一起使用。
@Test(expected):用来指示期望抛出的异常类型。
如果有读者不知道Java中异常的类型可以参考我之前写过的这篇文章:java处理异常这一篇就够了
package com.example.test;

import org.junit.Test;

/**
 * @Author 秋名山码神
 * @Date 2023/1/2
 * @Description
 */
public class AbnormalTest {
    @Test(expected = NullPointerException.class)
    public void Abnomal(){
        int a = 0;
        System.out.println(1/a);
    }
}

测试时间
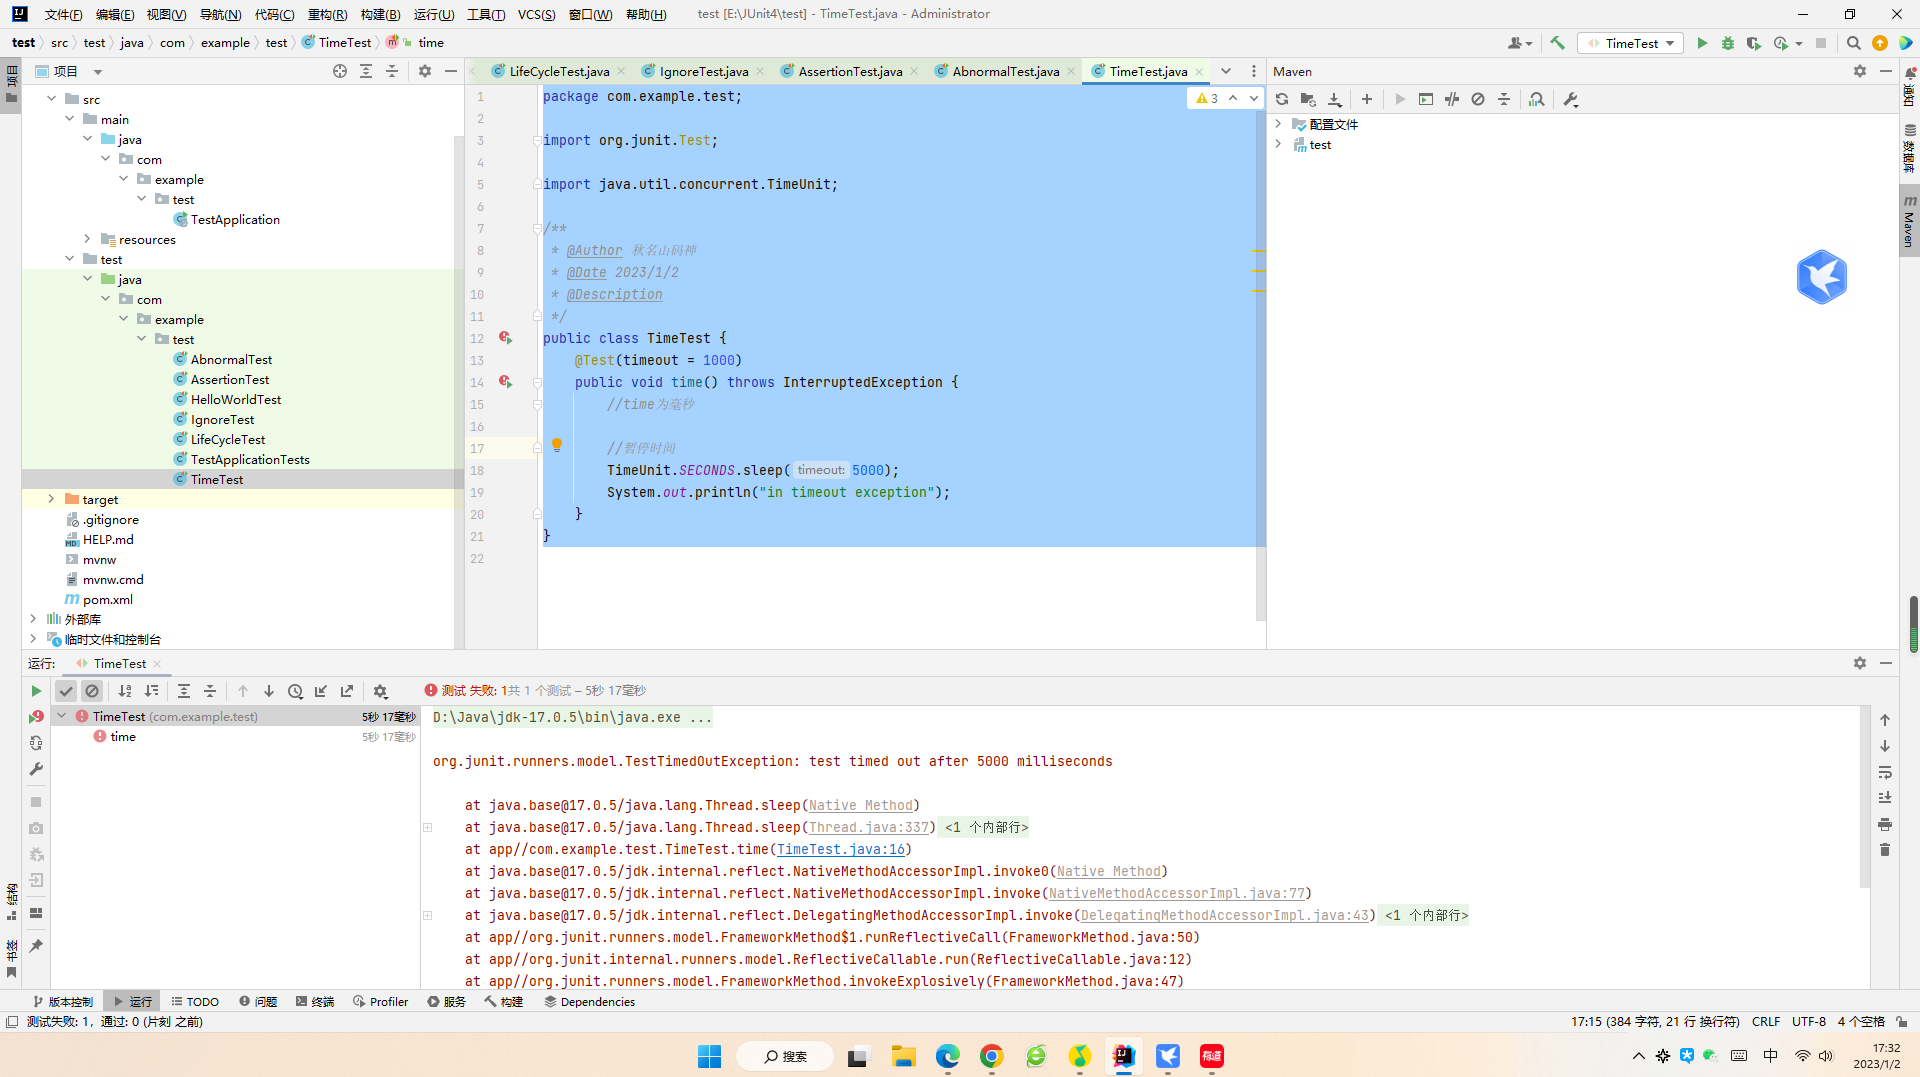
简单的来说,就是JUnit中提供了一个如果测试时间超时的时候,也默认是测试失败,这个时间我们可以自己指定,@Test(timeout)
package com.example.test;

import org.junit.Test;

import java.util.concurrent.TimeUnit;

/**
 * @Author 秋名山码神
 * @Date 2023/1/2
 * @Description
 */
public class TimeTest {
    @Test(timeout = 1000)
    public void time() throws InterruptedException {
        //time为毫秒

        //暂停时间
        TimeUnit.SECONDS.sleep(5000);
        System.out.println("in timeout exception");
    }
}
套件测试
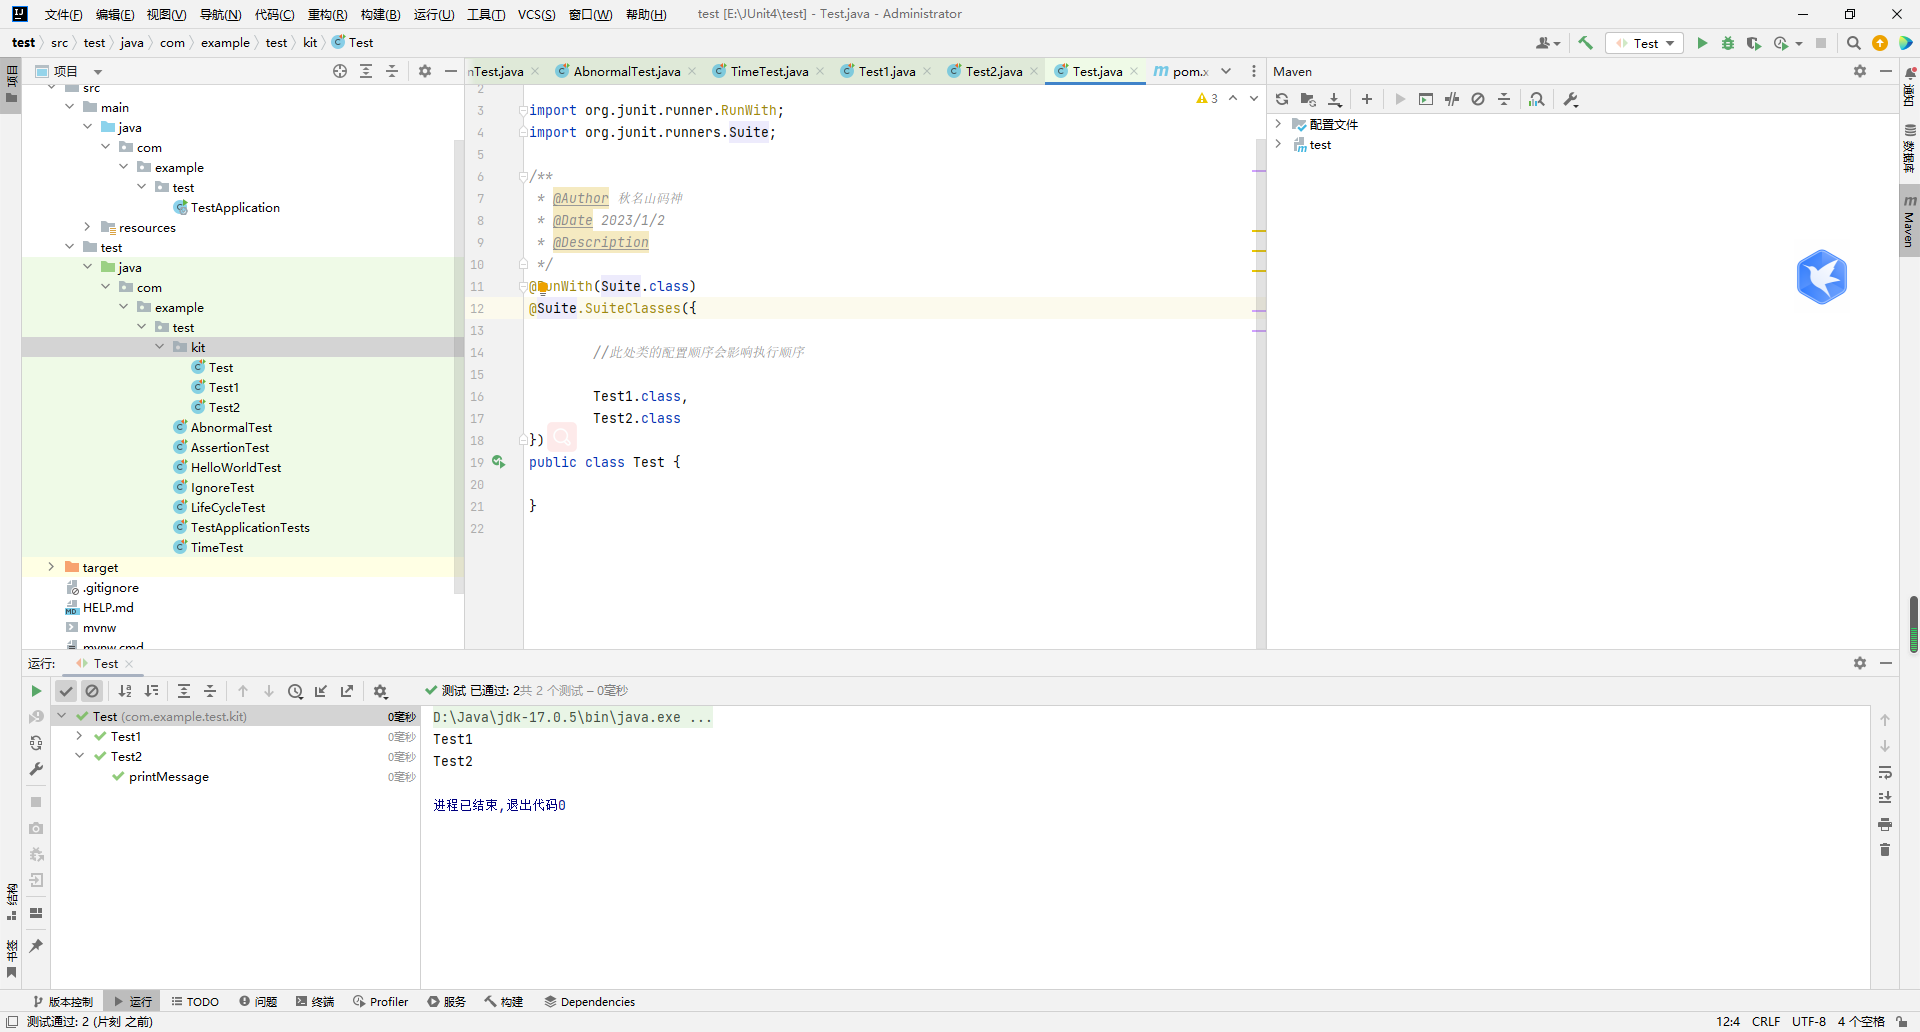
指捆绑了几个单元测试用例并运行起来,JUnit中,@RunWith和@Suite是用来运行套件测试的
package com.example.test.kit;

import org.junit.Test;

/**
 * @Author 秋名山码神
 * @Date 2023/1/2
 * @Description
 */
public class Test1 {
    @Test
    public void printMessage(){
        System.out.println("Test1");
    }
}
package com.example.test.kit;

import org.junit.Test;

/**
 * @Author 秋名山码神
 * @Date 2023/1/2
 * @Description
 */
public class Test2 {
    @Test
    public void printMessage(){
        System.out.println("Test2");
    }
}
package com.example.test.kit;

import org.junit.runner.RunWith;
import org.junit.runners.Suite;

/**
 * @Author 秋名山码神
 * @Date 2023/1/2
 * @Description
 */
@RunWith(Suite.class)
@Suite.SuiteClasses({

        //此处类的配置顺序会影响执行顺序

        Test1.class,
        Test2.class
})
public class Test {

}
JUnit5
熟悉JUnit4,转变到JUnit5是十分容易的,并且JUnit 5可以使用Vintage库运行JUnit 4测试,这意味着对于JUnit4的项目你可以不用迁移测试,从而继续使用JUnit4的测试代码。
JUnit5对比JUnit4的好处
- JUnit 5利用了Java 8或更高版本的特性,例如lambda函数,使测试更强大,更容易维护。
- JUnit 5为描述、组织和执行测试添加了一些非常有用的新功能。例如,测试得到了更好的显示名称,并且可以分层组织。
- JUnit 5被组织成多个库,所以只将你需要的功能导入到你的项目中。通过Maven和Gradle等构建系统,包含合适的库很容易。
- JUnit 5可以同时使用多个扩展,这是JUnit 4无法做到的(一次只能使用一个runner)。这意味着你可以轻松地将Spring扩展与其他扩展(如你自己的自定义扩展)结合起来。
JUnit4 转变到JUnit5
- 将你的库和构建系统从JUnit 4更新到JUnit 5。确保在你的测试运行时路径中包含 junit-vintage-engine 工件,以允许你现有的测试执行。
- 使用新的JUnit 5构造开始构建新的测试。
- (可选)将JUnit测试用例转换为JUnit 5的测试用例。
导包的改变
maven改变:
<!-- https://mvnrepository.com/artifact/org.junit.jupiter/junit-jupiter-api -->
<dependency>
    <groupId>org.junit.jupiter</groupId>
    <artifactId>junit-jupiter-api</artifactId>
    <version>5.9.1</version>
    <scope>test</scope>
</dependency>
JUnit 5 使用新的 org.junit.jupiter 包。例如,org.junit.junit.Test变成了org.junit.jupiter.api.Test。
注解的改变

首先我们发现名称进行了改变,@Before变成了@BeforeEach等等……
其中@Test还将不再支持参数,这意味这JUnit4中,@Test(expected = Exception.class),不再支持,替换为:
@Test(expected = Exception.class)
public void testThrowsException() throws Exception {
    // ...
    //4
}
@Test
void testThrowsException() throws Exception {
    Assertions.assertThrows(Exception.class, () -> {
        //...
        //5
    });
}
扩展JUnit
在JUnit5中提供了@ExtendWith 注解,是可重复的,例如在JUnit4中添加Spring框架构建测试:
@RunWith(SpringJUnit4ClassRunner.class)
public class MyControllerTest {
    // ...
}
而在JUnit5中:
@ExtendWith(SpringExtension.class)
class MyControllerTest {
    // ...
}
新功能:
显示名称。使用JUnit 5,你可以在类和方法中添加@DisplayName注释。这个名称在生成报告时使用,这使得描述测试的目的和追踪失败更容易,比如说:
@DisplayName("Test MyClass")
class MyClassTest {
    @Test
    @DisplayName("Verify MyClass.myMethod returns true")
    void testMyMethod() throws Exception {
        // ...
    }
}
断言:
断言。JUnit 5引入了一些新的断言,比如以下这些:
assertIterableEquals()使用equals()对两个迭代项进行深度验证。
assertLinesMatch()验证两个字符串列表是否匹配;它接受期望参数中的正则表达式。
assertAll() 将多个断言分组在一起。附加的好处是所有的断言都会被执行,即使单个断言失败。
assertThrows()和 assertDoesNotThrow()取代了 @Test 注释中的预期属性。
嵌套测试。JUnit 4中的测试套件是很有用的,但JUnit 5中的嵌套测试更容易设置和维护,它们能更好地描述测试组之间的关系,比如说:
@DisplayName("Verify MyClass")
class MyClassTest {
    MyClass underTest;

    @Test
    @DisplayName("can be instantiated")
    public void testConstructor() throws Exception {
        new MyClass();
    }
    @Nested
    @DisplayName("with initialization")
    class WithInitialization {
        @BeforeEach
        void setup() {
            underTest = new MyClass();
            underTest.init("foo");
        }

        @Test
        @DisplayName("myMethod returns true")
        void testMyMethod() {
            assertTrue(underTest.myMethod());
        }
    }
}
测试的参数化
测试参数化在JUnit 4中就已经存在,有内置的库如JUnit4Parameterized或第三方库如JUnitParams等。在JUnit 5中,参数化测试完全内置,并采用了JUnit4Parameterized和JUnitParams等一些最好的特性。例子:
@ParameterizedTest
@ValueSource(strings = {"foo", "bar"})
@NullAndEmptySource
void myParameterizedTest(String arg) {
    underTest.performAction(arg);
}
其格式看起来像JUnitParams,其中参数直接传递给测试方法。注意,要测试的值可以来自多个不同的来源。这里,我只用了一个参数,所以使用@ValueSource很方便。@EmptySource和@NullSource分别表示你要在要运行的值列表中添加一个空字符串和一个空值(如果你使用这两个值,你可以把它们组合在一起,如上所示)。还有其他多个值源,比如@EnumSource和@ArgumentsSource(一种自定义值提供者)。如果你需要一个以上的参数,也可以使用@MethodSource或@CsvSource。
在JUnit 5中添加的另一个测试类型是@RepeatedTest,在这里,一个测试被重复指定次数的测试。
最后还是建议大家参考一下:junit5官网
参考文章
网络:
https://blog.csdn.net/qq_34264849/article/details/88243278
https://zhuanlan.zhihu.com/p/144763642
- 点赞
- 收藏
- 关注作者


评论(0)