css伪元素::before和::after用法详解
一、前言
CSS3为了区分伪类和伪元素,伪元素采用双冒号写法。
-
常见伪类——
:hover,:link,:active,:target,:not(),:focus。 -
常见伪元素——
::first-letter,::first-line,::before,::after,::selection。
::before和::after下特有的content,用于在css渲染中向元素头部或尾部添加内容。
这些添加不会出现在实际DOM结构中,不会改变文档内容,不可复制,仅仅是在css渲染层加入。
所以不要用::before或::after展示有实际意义的内容,尽量使用它们显示修饰性内容,例如图标。
举例:网站有些联系电话,希望在它们前加一个icon☎,就可以使用::before伪元素,如下:
<!DOCTYPE html>
<meta charset="utf-8" />
<style type="text/css">
    .phoneNumber::before {
    content:'\260E';
    font-size: 15px;
}
</style>
<p class="phoneNumber">110</p>
上面所列特殊字符的html,js和css的写法是不同的,具体可查看html特殊字符的html,js,css写法汇总。
css伪元素,之所以被称为伪元素,是因为他们不是真正的页面元素,html没有对应的元素,但是其所有用法和表现行为与真正的页面元素一样,可以对其使用诸如页面元素一样的css样式,表面上看上去貌似是页面的某些元素来展现,实际上是css样式展现的行为,因此被称为伪元素。如下图,是伪元素在html代码机构中的展现,可以看出无法伪元素的结构无法审查。
css有一系列的伪元素,本文主要详述::before和::after元素的使用。
二、伪元素::before和::after用法
这个两个伪元素在真正页面元素内部之前和之后添加新内容(当然了,可以对伪元素应用定位可以置于任何位置)。可以用以下例子来说明:
<p>wonyun!</p>
<style>
    p:before{content: "hello "}
    p:after{content: "you are handsome!"}
</style>
上面例子从技术角度看,等价于下面的html结构:
<p>
    <span>hello </span>
    wonyun!
    <span> you are handsome!</span>
</p>
由此可知:伪元素::before和::after添加的内容默认是inline元素;这个两个伪元素的content属性,表示伪元素的内容,设置::before和::after时必须设置其content属性,否则伪元素就不起作用。那么问题来了,content属性的值可以有哪些内容呢,具体有以下几种情况:
- 字符串,字符串作为伪元素的内容添加到主元素中.
注意⚠️:字符串中若有
html字符串,添加到主元素后不会进行html转义,也不会转化为真正的html内容显示,而是会原样输出。
attr(attr_name), 伪元素的内容跟主元素的某个属性值进行关联,及其内容为主元素的某指定属性的值。
注意⚠️:content必须有值,至少是空。
好处:可以通过js动态改变主元素的指定属性值,这时伪元素的内容也会跟着改变,可以实现某些特殊效果,如图片加载失败用一段文字替换。
-
url()/uri(), 引用外部资源,例如图片; -
counter(), 调用计数器,可以不使用列表元素实现序号问题。
三、::before 和 ::after 特点
上面说了,伪元素是通过样式来达到元素效果的,也就是说伪元素不占用dom元素节点,引用::before和::after伪元素的主要特点如下:
-
伪元素不属于文档,所以js无法操作它;
-
伪元素属于主元素的一部分,因此点击伪元素触发的是主元素的click事件;
前面说块级元素才能有::before和::after,其实是不妥的,大部分行级元素也可以设置伪元素,但是像img可替换元素,因为其外观和尺寸有外部资源决定,那么如果外部资源正确加载,就会替换掉其内部内容,这时伪元素也会被替换掉,但是当外部资源加载失败时,设置的伪元素是可以起作用的。
基于伪元素的特点可以知道其优缺点:
优点
- 减少dom节点数;
- 让css帮助解决部分js问题,让问题变得简单;
缺点
- 不利于SEO;
- 无法审查元素,不利于调试;
四、::before 和 ::after 常见使用场景
4.1 清除浮动
清除浮动是前端最常见的问题,有一种做法是使用一个空的页面元素如div来清除浮动,但是这种做法增加毫无语义的页面元素,而且占用dom节点。更可取的做法是利用伪元素来清除浮动:
<div class="l-form-row">
    <div class="l-form-label"></div>
    ....
</div>
<style>
    .l-form-row:after {
        clear: both;
        content: "\0020";
        display: block;
        height: 0;
        overflow: hidden
    }
</style>
这样,class=l-form-row的元素内部任何浮动都能清除掉,不用额外添加无意义的元素。
4.2 利用attr()来实现某些动态功能
在页面中常见这种问题,页面上加载的图片在无法加载时会显示一个破损图片,直接影响页面的美观;

那么可以通过伪元素配合样式能够让未加载的图片看起来真的像破裂的效果,如下图所示:

<img>是一个替换元素,其外观和尺寸是由外部资源来决定的,当外部图片资源加载失败时其会显示破裂图片和alt文字,尺寸仅由其自身内容决定。
这时<img>元素可以使用伪元素::before和::after,因为其元素内容没有被替换;利用attr()来获取图片alt属性值作为伪元素::after的content内容来替换img的内容,并运用适当的样式从而完成:图片加载成功时显示正常的图片,加载失败时显示图片破裂效果的样式,具体代码参考:
img{
    min-height: 50px;
    position: relative;
 }
 img:before: {
     content: " ";
     display: block;
     position: absolute;
     top: -10px;
     left: 0;
     height: calc(100% + 10px);
     width: 100%;
     backgound-color: rgb(230, 230,230);
     border: 2px dotted rgb(200,200,200);
     border-radius: 5px;
 }
 img: {
     content: '\f127" " Broken Image of " attr(alt);
     display: block;
     font-size: 16px;
     font-style: normal;
     font-family: FontAwesome;
     color: rgb(100,100,100)
     position: absolute;
     top: 5px;
     left: 0;
     width: 100%;
     text-align: center;
 }
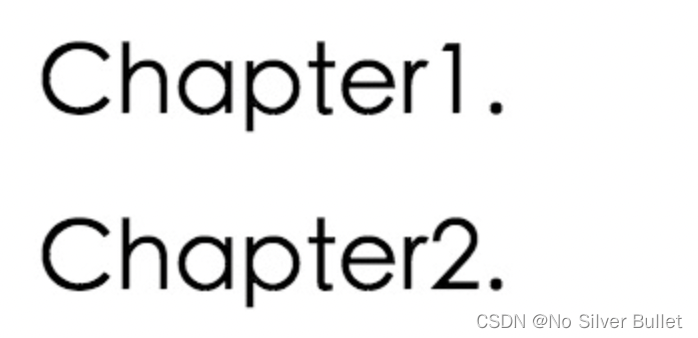
4.3 与counter()结合实现序号问题,而不用使用列表元素
具体还要结合css的 counter-increment 和 counter-reset 属性的用法 。
代码如下:
<h2></h2>
<h2></h2>
<style>
    body {counter-reset:section;}
    h2:before {
        counter-increment: section;
        content: "Chapter"  counter(section) ".";
    }
</style>
结果如下:

4.4 超链接特效
举例:配合 CSS定位实现一个鼠标移上去,超链接出现方括号的效果。
<meta charset="utf-8" />
<style type="text/css">
	body{
	    background-color: #425a6c;
	}
    a {
    position: relative;
    display: inline-block;
    outline: none;
    color: #fff;
    text-decoration: none;
    font-size: 32px;
    padding: 5px 20px;
}
a:hover::before, a:hover::after { position: absolute; }
a:hover::before { content: "\5B"; left: -10px; }
a:hover::after { content: "\5D"; right:  -10px; }
</style>
<a>鼠标移上去出现方括号</a>
4.5 特效使用
利用这两个伪元素,可以实现各种效果,如放大镜、叉叉、箭头、三角符等,也可轻易实现如下效果
代码实现如下:
a {
	position: relative;
	display: inline-block;
	outline: none;
	text-decoration: none;
	color: #000;
	font-size: 32px;
	padding: 5px 10px;
}

a:hover::before, a:hover::after { position: absolute; }
a:hover::before { content: "\5B"; left: -20px; }
a:hover::after { content: "\5D"; right:  -20px; }
代码实现如下:
table{overflow: hidden;}
td, th{
    padding: 10px;
    position: relative;
    outline: 0;
}
td:hover::after,
th:hover::after {
      content: '';
      background-color: lightblue;
      position: absolute;
      left: 0;
      height: 10000px;
      top: -5000px;
      width: 100%;
      z-index: -1;
}

td:hover::before {
      background-color: lightblue;
      content: '';
      height: 100%;
      top: 0;
      left: -5000px;
      position: absolute;
      width: 10000px;
      z-index: -1;
}
具体代码:
.empty__bg {
     display: inline-block;
     width: 95px;
     height: 92px;
     background: url(http://7tszky.com1.z0.glb.clouddn.com/FvD_sYY4Fmp_yKS0E07H-5jhuKTB) no-repeat;
     background-size: 95px 92px;
     position: relative;
     margin-bottom: 16px;/*注意这里需要留好位置放置after元素(它是absolute进去的)*/
 }
 .empty__bg:after {
     content: "暂无学习计划";
     display: block;
     font-size: 14px;
     line-height: 24px;
     text-align: center;
     width: 100%;
     color: #909090;
     position: absolute;
     top: 100%;
     left: 0;
 }
}
上述可以实现扩大可点击区域,这对应手机用户来说更加友好一些,否则用户点击不会触发相应的事件;具体代码实现如下:
.play-cover {position: relative}
.play-cover:before{
   content: "";
   display: block;
   position: absolute;
   width: 0;
   height: 0;
   border-left: 8px solid white;
   border-top: 5px solid transparent;
   border-bottom: 5px solid transparent;
   margin-left: 9px;
   margin-bottom: 7px;
   z-index: 5;
}
.play-cover:after{
   content: '';
   display: block;
   position: absolute;
   width: 20px;
   height: 20px;
   border: 2px solid white;
   background: rgba(0, 0, 0, .6);
   border-radius: 12px;
   background-clip: padding-box;
}
CSS美化radio和checkbox的样式magic-check,就是利用伪元素::before和::after来实现的;
具体是为每个真正的表单元素radio和checkbox搭配一个label,然后隐藏真正的radio和checkbox,label元素单击的时候隐藏的radio或者checkbox实际上是处于checked状态,这跟label的具体用法有关;利用label的伪元素::before和::after来实现美化radio和checkbox。
下面是checkbox的美化的css代码:
.magic-checkbox {
     position: absolute;
     display: none;  //先隐藏真正的checkboxbox
}
.magic-checkbox + label {//为与checkbox搭配的label使用样式
     position: relative; //相对定位,方便其内容的伪元素进行定位
     display: block; //块元素
     padding-left: 30px;
     cursor: pointer;
     vertical-align: middle;
}
.magic-checkbox + label:before { //label添加:before伪元素,用于生成一个带边界的正方形,模拟复选框的轮廓
       position: absolute;
       top: 0;
       left: 0;
       display: inline-block;
       width: 20px;
       height: 20px;
       content: '';
       border: 1px solid #c0c0c0;
       border-radius: 3px;
   }
//为checkbox添加:after伪元素,作用是生成一个√图形,模拟checkbox选中状态,未选中状态下会被隐藏
.magic-checkbox + label:after {
    top: 2px;
    left: 7px;
    box-sizing: border-box;
    width: 6px;  //实现√图形很简单:设置一个长方形,去掉其上边界和左边界,剩下的2个边界旋转45度就得到√形状
    height: 12px;
    transform: rotate(45deg);
    border-width: 2px;
    border-style: solid;
    border-color: #fff;
    border-top: 0;
    border-left: 0;
    position: absolute;
    display: none; //√形状先隐藏
    content: '';
}
//单击label,隐藏的checkbox为checked状态,这时设置checked状态下搭配label的:before伪元素背景和边界颜色
.magic-checkbox:checked + label:before {
      animation-name: none;
      border: #3e97eb;
      background: #3e97eb;
  }
//checked状态的checkbox搭配的label伪元素:after此时设置显示,那么√就显示出来了
 .magic-checkbox:checked + label:after {
      display: block;
 }
- 点赞
- 收藏
- 关注作者


评论(0)