Ajax&Fetch学习笔记 01、ajax
@[toc]
前言
本篇博客是Ajax&Fetch中的ajax学习,若文章中出现相关问题,请指出!
所有博客文件目录索引:博客目录索引(持续更新)
一、认识Ajax
1.1、介绍Ajax
Ajax(Asyncchronous JavaScript and XML):异步JavaScript和XML的简写。
- Ajax中的异步:可以异步地向服务器发送请求,在等待响应的过程中,不会阻塞当前页面,浏览器可以做自己的事情。直到成功响应后,浏览器才会开始处理响应数据。
传输的内容:原本前后端进行传输的是XML(可扩展标记语言),如今不怎么使用了,比较常用的就是JSON.
目的:在不重新加载整个页面的情况下,对页面的某个部分进行更新!
1.2、Ajax的基本使用(含测试)
四步骤如下:
<script>
    const url = "https://www.imooc.com/api/http/search/suggest?words=js";
    //1、创建xhr对象
    const xhr = new XMLHttpRequest();

    //4、监听事件,处理响应(为了更好的兼容性写在open()方法前)
    //onreadystatechange:监听事件。也可以使用写成xhr.addEventLisener('readystatechange',()=>{},false)
    xhr.onreadystatechange = () => {
        console.log(xhr.readyState);
        //xhr.readyState监听状态有四个,监听开始到结束该函数会执行4次,直到4表示执行完,这里直接过滤掉前面三种状态
        if (xhr.readyState != 4) return;

        //若是状态码为200-300之间表示响应正常或者说是重定向(未修改)
        if ((xhr.status >= 200 && xhr.status < 300) || xhr.status == 304) {
            //打印响应的内容(字符串形式)
            console.log(xhr.responseText);
        }
    }

    //2、准备发送请求(参数1:请求方式。参数2:请求地址。参数3:是否异步,这里为true)
    //请求方式如:GET、POST、PUT、delete
    xhr.open("GET", url, true);

    //3、发送请求,参数为请求体携带的数据
    xhr.send(null);
</script>

补充:
1、其他变量,如xhr.statusText表示HTTP状态说明。
2、readyState的五个状态(状态0不会调用函数)。
0:未初始化,尚未调用open()
1:启动。已经调用open(),但尚未调用send()
2:发送,已经调用send(),但尚未接收到响应
3、接收,已经接收到部分响应数据。
4、完成,已经接收到全部响应数据,而且已经可以在浏览器中使用了!
3、对于readystatechange事件最好放在open()方法之前来进行定义!!!
二、请求方式(含携带数据与数据编码)
2.1、GET请求
携带数据
GET请求不能通过请求体来携带数据,但是可以通过请求头来携带。
说明:对于GET请求,在send()中填写参数实际是无效的,不会将请求参数传递出去。
携带方式:直接在请求路径后面写?key=value&key1=value1来表示请求参数。

- 或者你还可以使用form表单提交方式,点击提交按钮会自动拼接form表单中带有name的表单元素到url请求路径中发送请求。
数据编码
为什么要进行编码?
- 若是想要传递请求参数为中文的,尽量对其进行编码,否则后端可能会无法解析(不同的浏览器也会对中文进行编码,不过编码方式可能会不同。所以我们对于中文字体尽量自己去编码来进行传递请求参数)。
如何编码?
- 使用
encodeURIComponent()API来进行编码。解码为:decodeURIComponent
//直接对请求参数来进行编码即可!!!
const url = `https://www.imooc.com/api/http/search/suggest?words=${encodeURIComponent('学习')}`;

2.2、POST
携带数据
如何携带数据?
- 写在请求路径后。
- 对于Ajax发送POST请求,可以将指定的请求参数写在
send()方法中作为参数放置在请求体里。
携带方式:
//① 直接写在请求路径后
const url = `https://www.imooc.com/api/http/search/suggest?words=${encodeURIComponent('学习')}`;
.......

//2、准备发送请求
xhr.open("POST", url, true);

//3、发送请求,参数为请求体携带的数据
//② 写在send()方法中,通过指定格式携带。
//第一种形式是key=value&key1=value1;第二种形式就是将对象转换为json字符串进行传递,后端来进行转换为对象。
xhr.send("username=changlu&sex=男");
- 其他方式也是通过form表单来进行POST请求,表单元素信息都是通过请求体来携带传输。

数据编码
同样也是使用encodeURIComponent()来进行编码。
示例:
xhr.send(`username=changlu&sex=${encodeURIComponent('男')}`);

三、xhr深入学习
xhr指的就是js中的XmlHttpRequest。
3.1、xhr属性
3.1.1、responseType(影响response与responseText)
使用时机:在send()前。
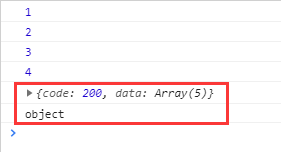
当我们不对responseType属性做任何赋值时,response与responseText都能够得到响应字符串string类型。
- 默认实际你就可以看做是赋值
responseType="text"
当赋值为json时,responseText无法获取,response属性就会自动转为json对象(你可以看做内部进行了JSON.parse(response),直接进行了转化)
兼容性:IE6-9不支持,IE10支持。
示例:
<script>
    const url = "https://www.imooc.com/api/http/search/suggest?words=js";
    const xhr = new XMLHttpRequest();

    xhr.onreadystatechange = () => {
        console.log(xhr.readyState);
        if (xhr.readyState != 4) return;

        if ((xhr.status >= 200 && xhr.status < 300) || xhr.status == 304) {
            //此时responseText无法获取,若是获取就会报错
            // console.log(xhr.responseText);
            // console.log(typeof xhr.responseText);
            // 2、打印response
            console.log(xhr.response);
            console.log(typeof xhr.response);
        }
    }

    //1、设置响应类型为json类型
    xhr.responseType = "json";

    xhr.open("GET", url, true);
    xhr.send(null);
</script>

3.1.2、timeout属性(设置超时时间)
属性:timeout,ms单位。
效果:若是在指定时间内没有得到响应该次请求就会自动终止结束。
兼容性:IE6-7不支持,IE8支持。
示例:
当我们对xhr对象设置30ms,如:xhr.timeout = 30;,接着响应后端的接口一旦超时请求就会终止。

3.1.3、withCredentials属性(指定使用Ajax发送请求时是否携带Cookie)
概念:使用Ajax发送请求,默认情况下,同域时会携带Cookie;跨域时则不会携带cookie发送。
使用方式:xhr.withCredentials = true,默认是false,在send()前。
效果:设置为true之后,进行跨域请求时会携带当前域下的所有cookie,但是最终能否成功过跨域携带cookie,还是要看服务器那里的设置。
兼容性:IE6-9不支持,IE10支持。
示例
我们当前域下有cookie如下:

接着我们使用ajax发送请求到慕课网(跨域),当前并没有设置withCredentials属性,默认是不会携带cookie的。

紧接着我们设置withCredentials属性为true,再次尝试发送ajax请求:
可以很清楚的看到进行跨域请求时携带了Cookie,但是可以看到本次请求并没有得到响应结果,并且我们得到了一个警告:凭证不支持由于同源策略禁止读取。


结论:要是想能够跨域携带cookie,那么需要服务器端设置指定响应header,并且指定发送源地址发出的响应浏览器才会验证通过,从而完成前后端的响应。
3.2、xhr方法
3.2.1、abort()(终止当前请求)
使用时机:在send()方法后调用,也可以之前最好就是在后面调用。
效果:onreadystatechange只会监听到两次,并且得到的响应状态码为0;
示例
<script>
    const url = "https://www.imooc.com/api/http/search/suggest?words=js";
    const xhr = new XMLHttpRequest();

    xhr.onreadystatechange = () => {
        console.log(xhr.readyState);
        if (xhr.readyState != 4) return;

        console.log("xhr.status=>", xhr.status);
        if ((xhr.status >= 200 && xhr.status < 300) || xhr.status == 304) {
            //打印响应的内容(字符串形式)
            console.log(xhr.responseText);
            console.log(xhr.response);
            console.log(typeof xhr.response);
            console.log(JSON.parse(xhr.response));
        }
    }

    xhr.open("GET", url, true);
    xhr.send(null);
    // 终止请求
    xhr.abort();
</script>

3.2.2、setRequestHeader(设置请求头部属性)
方式:xhr.setRequestHeader(头部字段的名称,头部字段的值)。
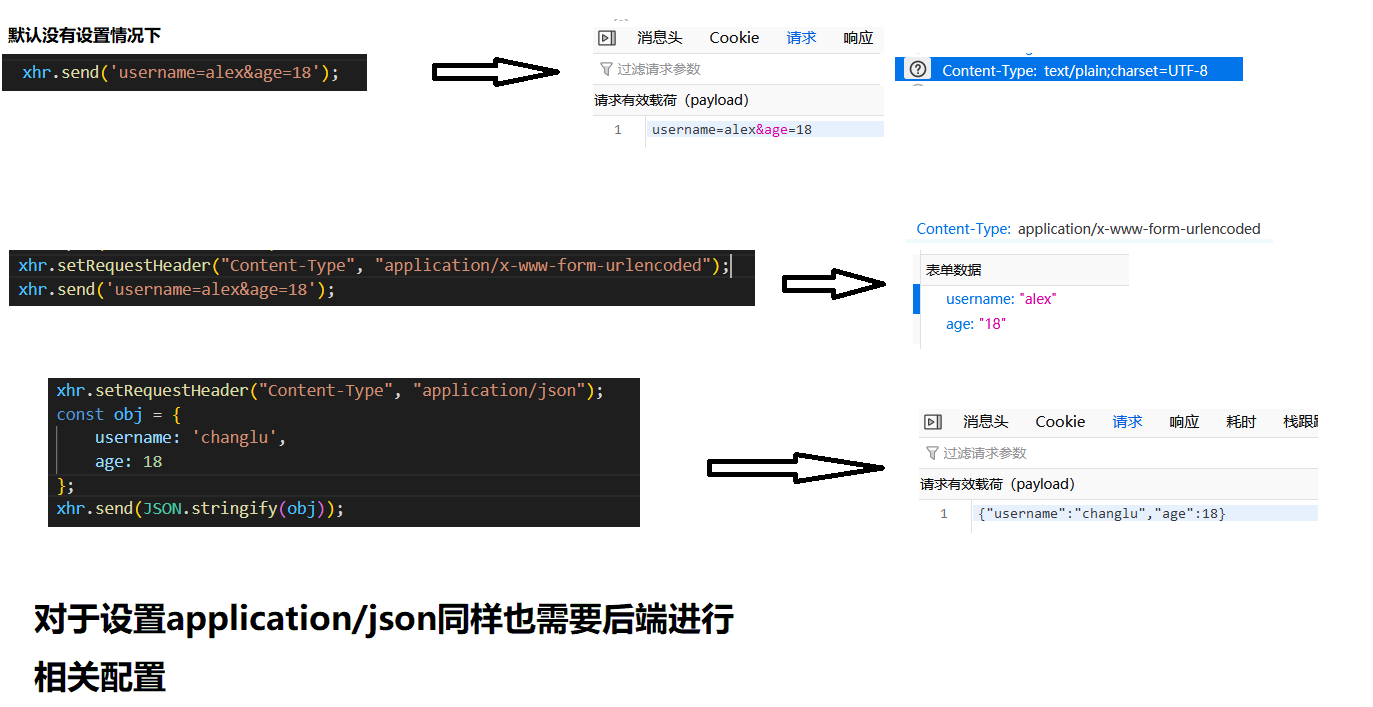
目的:一般用来设置Content-Type字段,该字段用于告诉服务器浏览器当前发送的是什么数据,你可以进行根据该类型来进行解析。
//下面两种都是应用于POST请求中请求体的格式
第一种:username=changlu&password=1  => ('Content-Type','application/x-www-form-urlencoded')
第二种(JSON字符串,将对象解析成JSON字符串的):JSON.stringify(obj) => ('Content-Type','application/json')
示例1:表单示例
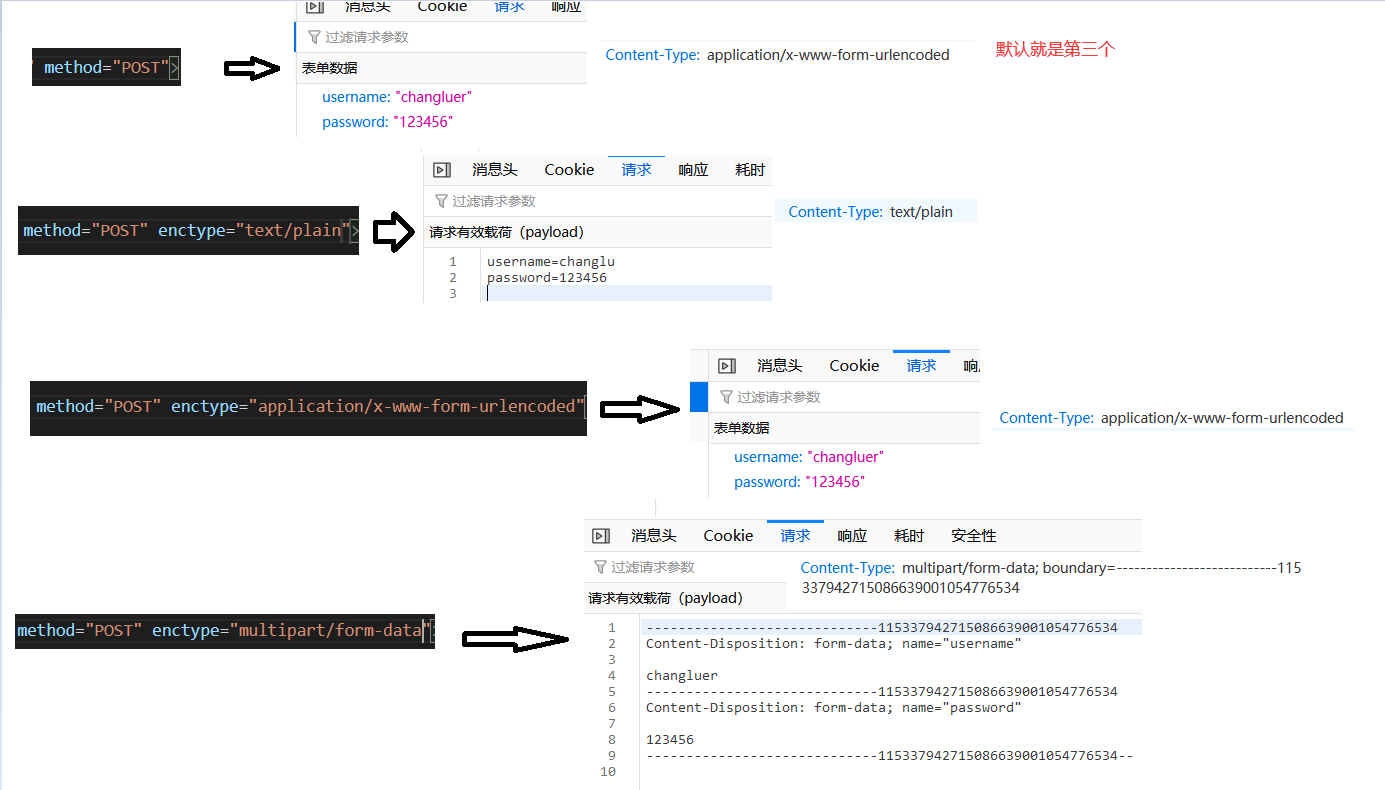
<form action="https://www.imooc.com/api/http/search/suggest?words=js" method="POST" enctype="text/plain">
    用户名:<input type="text" name="username">
    密码:<input type="password" name="password">
    <input type="submit">
</form>
当form表单发送GET请求时,请求体不会携带任何数据,对于请求参数会通过key=value&key1=value1形式添加至url路径后。
当form表单发送POST请求时,若是不设置entype属性(指定请求体的属性),默认是application/x-www-form-urlencoded(即Content-Type)。

示例2:ajax发送请求
我们可以将请求体的内容作为参数放置在send()方法中,接着来设置对应的发送的ContentType。

说明:如今一般都是将json字符串来作为传输的形式,所以我们一般都设置为json即可!!!
3.3、xhr事件
3.3.1、onload事件(响应数据时触发)
时机:响应数据时触发,与之前的onreadystatechange区别就是其只会在xhr.readyState=4的时候进行响应,而不是每个状态都响应。也就是说我们可以直接使用其来代替onreadystatechange。
兼容性:IE6-8不支持该事件。
示例
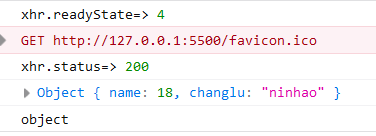
需求:load事件代替代替readystatechange,并且设置返回类型为JSON对象。
<script>
    const url = "./hello.json";
    // 1、创建xhr对象
    const xhr = new XMLHttpRequest();

    // 4、数据响应(readyState=4)时执行(仅仅执行一次)
    xhr.onload = () => {
        console.log("xhr.readyState=>", xhr.readyState);
        console.log("xhr.status=>", xhr.status);
        if ((xhr.status >= 200 && xhr.status < 300) || xhr.status == 304) {
            // 由于设置了响应类型,默认得到json对象
            console.log(xhr.response);
            console.log(typeof xhr.response);
        }
    };
    // 2、发送请求时的相关设置
    xhr.open("GET", url, true);
    // 设置响应类型为json,
    xhr.responseType = "json";
    // 3、发送请求
    xhr.send();
</script>

-
//监听load事件还可以使用addEventListener
xhr.addEventListener('load',()=>{
    console.log("xhr.readyState=>", xhr.readyState);
    console.log("xhr.status=>", xhr.status);
    if ((xhr.status >= 200 && xhr.status < 300) || xhr.status == 304) {
        // 由于设置了响应类型,默认得到json对象
        console.log(xhr.response);
        console.log(typeof xhr.response);
    }
},true);//这种方式能够设置监听还是冒泡阶段响应
3.3.2、onerror事件(请求发生错误时触发)
效果:请求发生错误时触发。
兼容性:IE10开始支持
示例
//故意将路径写错
const url = "https://www.iimooc.com/api/http/search/suggest?words=js";
...
//编写监听错误方法
xhr.onerror = () => {
    console.log("error");
};

3.3.3、onabort事件(调用abort()终止请求时触发)
触发情况:调用abort()终止请求时就会监听到。
兼容性:IE10开始兼容。
示例
...
xhr.onabort = () => {
    console.log("onabort监听事件触发!");
}
...
xhr.send();
xhr.abort();

3.3.4、ontimeout事件(请求一旦超时触发)
触发情况:请求超时后触发。
兼容性:IE8开始支持
示例
...
//监听超时事件
xhr.ontimeout = () => {
    console.log("监听到超时!");
}
...
xhr.timeout = 30;
xhr.send();

- 点赞
- 收藏
- 关注作者


评论(0)