SpringBoot入门篇 04、连接数据库(多种整合方式)

@[toc]
前言
本篇博客是根据【狂神说Java】SpringBoot最新教程IDEA版通俗易懂 整理的学习笔记,若文章中出现相关问题,请指出!
所有博客文件目录索引:博客目录索引(持续更新)
前提准备
安装mysql5.7(或者其他):mysql5.7安装教程
IDEA连接mysql
IDEA右边点击Database—+号—选择mysql

填写对应信息

点击测试,可能会出现错误,见下方
出现下方描述即为测试成功!
接下来我们在schema中选择对应数据库即可。
错误①
Server returns invalid timezone. Go to 'Advanced' tab and set 'serverTimezone' prope
原因:MySQL驱动jar中的默认时区是UTC
解决方案:在上面的Advanced选项里,填写对应的时区值为Asia/Shanghai

重新连接即可!!!
一、整合JDBC
代码实现
对于数据访问层,无论是SQL(关系型数据库)还是NOSQL(非关系型数据库),springboot底层都是采用Spring Data的方式进行统一处理。
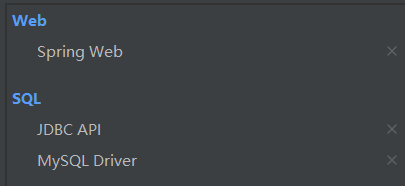
创建一个springboot项目,启动器选择如下
application.yaml配置:
spring:
  datasource:
    username: root
    password: 123456
    # 若是时区报错则添加参数:serverTimezone=Asia/Shanghai&
    url: jdbc:mysql://localhost:3306/mybatis?useUnicode=true&characterEncoding=utf-8
    # 使用com.mysql.jdbc.Driver测试datasource.getClass()表示过时,可使用com.mysql.cj.jdbc.Driver
    driver-class-name: com.mysql.cj.jdbc.Driver
JDBCController:简单测试增删改查
package com.changlu.controller;

import org.springframework.beans.factory.annotation.Autowired;
import org.springframework.jdbc.core.JdbcTemplate;
import org.springframework.web.bind.annotation.PathVariable;
import org.springframework.web.bind.annotation.RequestMapping;
import org.springframework.web.bind.annotation.RestController;
import java.util.List;
import java.util.Map;

/**
 * @ClassName JDBCController
 * @Author ChangLu
 * @Date 2021/1/4 16:06
 */

@RestController
public class JDBCController {

    @Autowired
    private JdbcTemplate jdbcTemplate;

    //查询数据库的所有信息(查)
    //没有实体类,数据库中的信息如何获取? springboot已经直接封装好了
    @RequestMapping("/userList")
    public List<Map<String,Object>> userList(){
        String sql = "select * from user";
        //queryForList()方法放入指定查询sql语句即可查询
        List<Map<String, Object>> maps = jdbcTemplate.queryForList(sql);
        return maps;
    }

    //增加一条记录(增)
    @RequestMapping("/addUser")
    public String update(){
        String sql = "insert into user(name,pwd,perms) values('林儿','987654','user:add')";
        jdbcTemplate.update(sql);
        return "addUser success!";
    }

    //根据指定id来修改数据库的信息(改)
    @RequestMapping("/updateUser/{id}")
    public String update(@PathVariable("id")Integer id){
        String sql = "update mybatis.user set name=?,pwd=? where id="+id;
        //需要封装属性
        Object[] objects = new Object[2];
        objects[0] = "林林";
        objects[1] = "99999";
        jdbcTemplate.update(sql,objects);
        return "updateUser success!";

    }

    //根据id来删除指定记录(删)
    @RequestMapping("/delUser/{id}")
    public String delUser(@PathVariable("id")Integer id){
        String sql = "delete from mybatis.user where id=?";
        jdbcTemplate.update(sql,id);
        return "delUser success!";
    }

}
启动项目之后,在浏览器中进行请求测试,如下进行增删改查:
http://localhost:8080/userList
http://localhost:8080/updateUser/4
http://localhost:8080/delUser/4
原理分析
yaml配置
通过点击yaml配置的数据,我们跳转到DataSourceProperties类中
根据其推测查看一下DataSourceAutoConfiguration这个自动配置类,果然在自动装配时绑定了对应配置类,接着只需通过yaml进行配置
@Configuration(proxyBeanMethods = false)
@ConditionalOnClass({ DataSource.class, EmbeddedDatabaseType.class })
@ConditionalOnMissingBean(type = "io.r2dbc.spi.ConnectionFactory")
@EnableConfigurationProperties(DataSourceProperties.class)
@Import({ DataSourcePoolMetadataProvidersConfiguration.class, DataSourceInitializationConfiguration.class })
public class DataSourceAutoConfiguration {
    ...
}
Controller分析
这里使用的是JdbcTemplate这个模板类,我们直接通过使用@Autowired获取到bean对象,为什么可以直接获取到呢?
看一下JdbcTemplateConfiguration这个配置类,看到@Bean我们就知道到该模板类是一个javaConfig
@Configuration(proxyBeanMethods = false)
@ConditionalOnMissingBean(JdbcOperations.class)
class JdbcTemplateConfiguration {

   @Bean
   @Primary
   JdbcTemplate jdbcTemplate(DataSource dataSource, JdbcProperties properties) {
      JdbcTemplate jdbcTemplate = new JdbcTemplate(dataSource);
      JdbcProperties.Template template = properties.getTemplate();
      ...
   }
再看该自动装配类JdbcTemplateAutoConfiguration,其中就使用@Import引进了上面的配置类
@Configuration(proxyBeanMethods = false)
@ConditionalOnClass({ DataSource.class, JdbcTemplate.class })
@ConditionalOnSingleCandidate(DataSource.class)
@AutoConfigureAfter(DataSourceAutoConfiguration.class)
@EnableConfigurationProperties(JdbcProperties.class)
//看这里进行了引入
@Import({ JdbcTemplateConfiguration.class, NamedParameterJdbcTemplateConfiguration.class })
public class JdbcTemplateAutoConfiguration {

}
看完了源码,我们回到JdbcTemplate上,其实该模板类的底层封装了JDBC的操作,使用了Statement以及JDBCUtils来进行数据库的操作。查询使用queryForList(),其他直接就使用update()。
可以查阅文章:jdbcTemplate源码解析
二、整合Druid数据源
前提介绍
Druid是阿里巴巴开源平台上一个数据库连接池的实现,结合了C3P0、DBCP、PROXOOL等DB池的优点,同时加入了日志监控。
Druid可以很好的监控DB池连接和SQL执行的情况,天生就是针对监控而生的DB连接池。
使用说明
pom.xml引入依赖:
<!--引入Druid的starter启动器-->
<dependency>
    <groupId>com.alibaba</groupId>
    <artifactId>druid-spring-boot-starter</artifactId>
    <version>1.1.10</version>
</dependency>

<!--引入log4j-->
<dependency>
    <groupId>log4j</groupId>
    <artifactId>log4j</artifactId>
    <version>1.2.17</version>
</dependency>
yaml配置文件中修改type类型为Druid,以及添加一些额外配置:
spring:
  datasource:
    username: root
    password: 123456
    # 若是时区报错则添加参数:serverTimezone=Asia/Shanghai&
    url: jdbc:mysql://localhost:3306/mybatis?useUnicode=true&characterEncoding=utf-8
    # 使用com.mysql.jdbc.Driver测试datasource.getClass()表示过时,可使用com.mysql.cj.jdbc.Driver
    driver-class-name: com.mysql.cj.jdbc.Driver
    # 更改Druid类型即可
    type: com.alibaba.druid.pool.DruidDataSource

    #SpringBoot默认是不注入这些的,需要自己绑定
    #druid数据源专有配置
    initialSize: 5
    minIdle: 5
    maxActive: 20
    maxWait: 60000
    timeBetweenEvictionRunsMillis: 60000
    minEvictableIdleTimeMillis: 300000
    validationQuery: SELECT 1 FROM DUAL
    testWhileIdle: true
    testOnBorrow: false
    testOnReturn: false
    poolPreparedStatements: true

    #配置监控统计拦截的filters,stat:监控统计、log4j:日志记录、wall:防御sql注入
    #如果允许报错,java.lang.ClassNotFoundException: org.apache.Log4j.Properity
    #则导入log4j 依赖就行
    filters: stat,wall,log4j
    maxPoolPreparedStatementPerConnectionSize: 20
    useGlobalDataSourceStat: true
    connectionProperties: druid.stat.mergeSql=true;druid.stat.slowSqlMillis=500
编写自定义配置类DruidConfig:
- 这里首先配置Druid的数据源
- 接着配置监控,添加账号密码
- 也可以配置filter,对是否拦截指定内容进行更改
@Configuration
public class DruidConfig {

    @ConfigurationProperties(prefix = "spring.datasource")
    @Bean
    public DataSource druidDataSource(){
        return new DruidDataSource();
    }

    //后台监控 web.xml
    //springboot内置了servlet,没有web.xml,所以使用ServletRegistrationBean
    @Bean
    public ServletRegistrationBean statViewServlet(){
        ServletRegistrationBean<StatViewServlet> bean = new ServletRegistrationBean<>(new StatViewServlet(), "/druid/*");
        //增加配置
        Map<String, String> initParameters = new HashMap<>();
        //固定为loginUsername以及loginPassword
        initParameters.put("loginUsername","admin");
        initParameters.put("loginPassword","123456");

        //默认就是允许所有访问
        initParameters.put("allow","");

        //禁止谁能访问  initParameters.put("changlu","192.168.11.123");

        //后台需要有人登陆,账号密码配置
        bean.setInitParameters(initParameters);
        return bean;
    }

    //filter
    @Bean
    public FilterRegistrationBean webStatFilter(){
        FilterRegistrationBean<Filter> bean = new FilterRegistrationBean<>();
        bean.setFilter(new WebStatFilter());

        //过滤请求
        HashMap<String,String> initParameters = new HashMap<>();
        //指定内容不进行统计
        initParameters.put("exclusions","*.js,*.css,/druid/*");
        bean.setInitParameters(initParameters);
        return bean;
    }
}
测试:访问http://localhost:9999/druid/index.html即可
三、整合JPA
spingboot整合JPA,依赖于Hibernate,见资料区springboot-jpa
【1】引入jpa依赖以及mysql的驱动
<dependency>
    <groupId>org.springframework.boot</groupId>
    <artifactId>spring-boot-starter-data-jpa</artifactId>
</dependency>
<dependency>
    <groupId>mysql</groupId>
    <artifactId>mysql-connector-java</artifactId>
    <scope>runtime</scope>
</dependency>
【2】配置数据源以及jpa
spring:
  datasource:
    username: root
    password: 123456
    driver-class-name: com.mysql.cj.jdbc.Driver
    url: jdbc:mysql://localhost:3306/mybatis?setTimezone=UTC&useUnicode=true&characterEncoding=utf-8
  jpa:
    hibernate:
      ddl-auto: update # 连接数据库时会与其进行比对,自动更新数据库的表结构(生产环境确定了之后改为none)
    show-sql: true # 控制台显示SQL
【3】编写实体类,需要对应数据库中的字段名称
@Data
@AllArgsConstructor
@NoArgsConstructor
@Entity  //声明类为实体或表
public class User {

    @Id  //指定的类的属性,用于识别(一个表中的主键)
    @GeneratedValue //提供了主键的生成策略
    private Integer id;
    private String name;
    private String pwd;
    private String perms;

}
【4】编写dao接口
//第一个参数是指定的实体类
//第二个参数是对应实体类的主键
@Repository
public interface UserDao extends JpaRepository<User,Integer> {

        //方式二:解析方法名创建查询
        User findByName(String name);

        //方式三:自定义方法查询
        @Query("from User u where u.name=:name")
        User findUser(@Param("name")String name);
}
通过继承JpaRepository,并赋予两个泛型,即可使用其父类方法进行简单的CRUD,继承的方法如下:
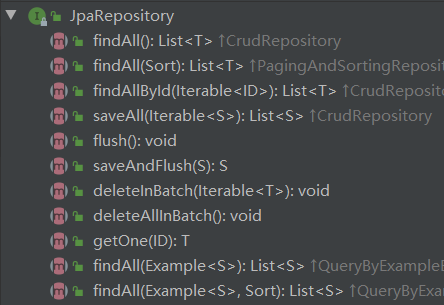
最后通过通过调用测试即可!!!
分页查询
//service层
@Override
public Page<Type> listType(Pageable pageable) {
    return repository.findAll(pageable);
}
参考文章
[2] JPA常用查询(实用)
[3] springboot操作数据库时找不到findOne(id:1)方法
findById(id).get():找不到会报异常findById(id).orElse(null)来返回,若是查找不到返回null,推荐使用

- 点赞
- 收藏
- 关注作者
评论(0)