SpringBoot入门篇 01、Springboot入门及配置(下)
2、yaml配置(推荐)
格式说明
yaml结构更加清晰,也是普通key: value键值对,对于:后的空格比较严格。
通过空格的缩进来控制层级关系,只要空格对齐则视为同一个级别,不能使用tab来代替空格。
大小写敏感,支持字面值,对象,数组三种数据结构,也支持复合结构
类型说明:
- 字面值:例如字符串(不加引号,单引号会转义字符)、布尔类型、数值、日期(支持yyyy/MM/dd HH:mm:ss)。
- 对象:键值对组成,如
key: value形式,:后必须有空格,每组键值对占用一行可以使用行内写法{k1: v1,k2: v2} - 数组:使用
- value形式组成,-后必须有空格,行内写法为[v1,v2,v3] - 复合结构:上面三组结构可以任意组合
yaml中格式:
# 字面量
name: changlu
date: 2020/12/21 14:17:20
# 字面量第二种方式
age:
 - 123

# 对象
student:
  name: changlu
  age: 15

# 对象的行内写法
student: {name: changlu,age: 15}

# 数组
pets:
  - cat
  - dog
  - pig

# 数组的行内写法
pets: [cat,dog,pig]

# map的行内写法  对应Map<String,Object> map
map: {k1: v1,k2: v2}

# List写法  对应List<String> list
list:
  - one,
  - two,
  - three
对应配置文件的实体类需要加上@Data以及@ToString
属性赋值
方式一:通过注解来进行赋值,通过@Value来进行赋值
@Component
public class Dog {
    @Value("旺财")
    private String name;
    @Value("3")
    private Integer age;

    无参/有参构造
    set/get方法
    toString()方法
}
方式二:对于一些配置来说,我们通过使用yaml来与实体类(组件)进行绑定值
注意你的pojo目录应当与启动类再同一个目录里
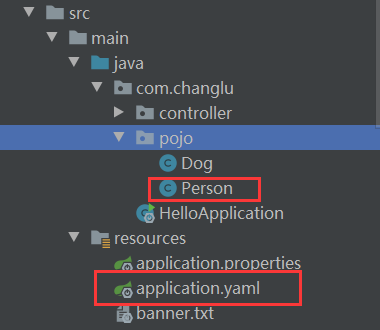
Person.class:
@Component  //创建bean实例
@ConfigurationProperties(prefix = "person") //通过找到application.yaml中person下的所有属性内容进行赋值
public class Person {
    private String name;
    private Integer age;
    private Boolean happy;
    private Date birthday;
    private Map<String, Object> maps;
    private List<Object> lists;
    private Dog dog;

    ...无参/有参 set/get方法
}
application.yaml:
person:
  name: changlu
  age: 18
  happy: false
  birthday: 2001/07/21
  maps: {k1: v1,k2: v2}
  lists:
    - cat
    - dog
    - monkey
  dog:
    name: hashiqi
    age: 10
问题:若是使用@ConfigurationProperties注解出现Generating Your Own Metadata by Using the Annotation Processor,
我们可以到对应官网查看解答:configuration-metadata-annotation-processor
解决:在pom.xml中配置,可能需要重启IDEA即可
<dependency>
    <groupId>org.springframework.boot</groupId>
    <artifactId>spring-boot-configuration-processor</artifactId>
    <optional>true</optional>
</dependency>
yaml其他使用方式
我们可以在yaml文件中使用一些类如
${}的springEL表达式来进行配置文件:
person:
  name: changlu${random.uuid}  # 可以使用spring的el表达式来自由设置
  age: ${random.int}
  happy: false
  birthday: 2001/07/21
  maps: {k1: v1,k2: v2}
  lists:
    - cat
    - dog
    - monkey
  dog:
    name: ${person.hello:hello}_wangcai  # 相当于三目运算符,若是不存在person,hello那么结果为hello_wangcai
    age: 10
结果:Person{name='changlubdde2a48-d5d4-49b2-a8a8-b9720b2c8539', age=-1136254345, happy=false, birthday=Sat Jul 21 00:00:00 CST 2001, maps={k1=v1, k2=v2}, lists=[cat, dog, monkey], dog=Dog{name='hello_wangcai', age=10}}
两个注入注解的比对说明

@ConfigurationProperties:批量注入
底层使用set方法来进行注入的,通过spring的前置处理器。
application.yml:
changlu:
  id: 18
  name: changlu
  url: https://e2tfu6fqrn.feishu.cn/docs/doccn0ZiE8u2oZ6OmPeBJP9lVec
自定义实体类:
@Component
@ConfigurationProperties(prefix = "changlu")  //根据前缀来进行批量注入
@ToString
@Setter
public class TestUser {
    private Integer id;
    private String name;
    private String url;
}

//测试
@SpringBootTest
class TestApplicationTests {

    @Autowired
    private TestUser testUser;

    @Test
    public void testSelect() {
        System.out.printf(testUser.toString());
    }

}

@Value:单个注入
底层是通过反射来注入到属性中的,在@ConfigurationProperties注入方式之前进行。
- 若是两个注解同时使用注入不同的数据内容,那么由于@ConfigurationProperties底层注入方式后注入,得到的结果就是@ConfigurationProperties对应注入值。(已进行测试)
yml配置属性就使用上面的。
@Component
@ToString
public class TestUser {
    @Value("${changlu.id}")
    private Integer id;
    @Value("${changlu.name}")
    private String name;
    @Value("${changlu.url}")
    private String url;
}

//测试
@SpringBootTest
class TestApplicationTests {

    @Autowired
    private TestUser testUser;

    @Test
    public void testSelect() {
        System.out.printf(testUser.toString());
    }

}

结论
通过上面实践,我们无论是使用yaml还是properties都可以通过一定的方法来获取到值,强烈推荐使用yaml。
情况1:若是我们在某个业务中,需要获取配置文件中的某个值,那么可以使用@Value()来确定单个属性值
情况2:若我们专门编写了一个JavaBean和配置文件进行映射,就直接使用@ConfigurationProperties!
3、JSR303数据校验
介绍及导入
@Validated:如果数据异常则会统一抛出异常,方便异常中心统一处理
使用@Validated注解,来开启下面的注解的使用:
pom.xml中导入依赖:
<!--导入JSR303校验相关的jar包-->
<dependency>
    <groupId>org.springframework.boot</groupId>
    <artifactId>spring-boot-starter-validation</artifactId>
</dependency>

常用功能介绍如下
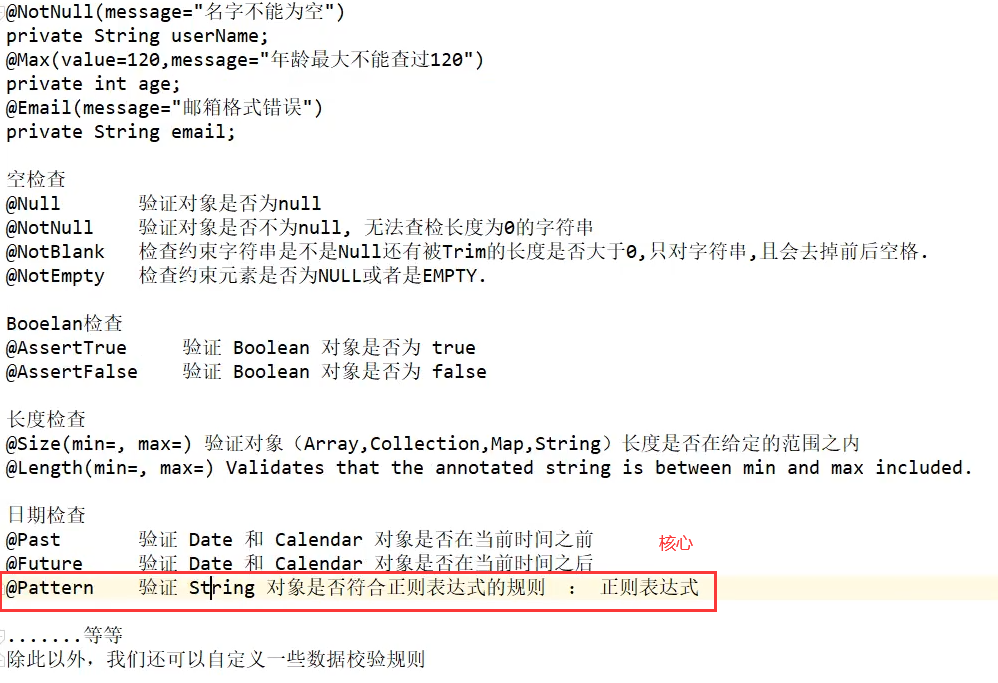
实际使用(@Email)
这里我们使用@Email来进行检验一下
@Component
@ConfigurationProperties(prefix = "person")
@Data
@ToString
@Validated //数据校验
public class Person {
    @Email
    private String name;
    private Integer age;
    private Boolean happy;

    ...set/get方法  无/有参构造  toString()方法
}
Application.yaml:
person:
  name: changlu${random.uuid}  # 可以使用spring的el表达式来自由设置
  age: ${random.int}
  happy: false
运行一下,看到校验的结果:

我们也可以自定义对应的提示信息,如@Email(message="您输入的不是合法的邮件地址!")

IDEA的FileEncoding问题
设置Settings中的File Encodings中的Encoding为UTF-8格式:防止之后打开项目中的配置文件有乱码情况

六、配置优先级及多环境配置
1、配置优先级
springboot启动会扫描对应下方位置的application.properties或者yaml文件作为springboot的默认配置文件
我们可以在项目的不同位置来进行配置springboot的配置文件,如下:classpath
- The classpath root
- The classpath
/configpackage - The current directory
- The
/configsubdirectory in the current directory - Immediate child directories of the
/configsubdirectory
具体说明可以见springboot官网:External Application Properties
说明:classpath指代三个路径 src/main/java src/main/resource 第三方jar包路径;directory指的就是项目
对于配置文件我们对于classpath一般都是放置在src/main/resource目录下的。
测试:我们将配置文件设置在不同的目录下设置不同的端口号来进行优先级测试,这里仅仅使用yaml配置文件,properties配置文件同理
测试后优先级如图:
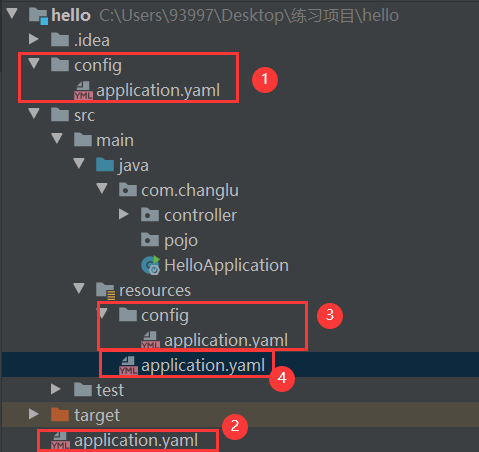
总结:
- 无论你是使用yaml还是properties在不同目录下其优先级与上图相同;
- 若是在同一个目录下有properties与yaml配置文件,yaml配置文件更加优先!
2、多环境配置
目的:对应实际开发中,我们对于一个项目会在多个环境下运行,如普通环境,测试环境,生产环境,那么我们应当事先进行多环境配置,根据对应环境来进行选择配置。
properties配置文件
此时我们对应多个环境准备了多个配置文件,那么如何进行配置来进行选择相应的配置文件呢?

我只要在properties中使用spring.profiles.active来进行动态加载对应配置文件,其值为application-xxx.properties后的xxx即可
server.port=8091
# 使用的是application-test.properties配置文件
spring.profiles.active=test
缺点:需要多个配置文件占空间
yaml配置文件
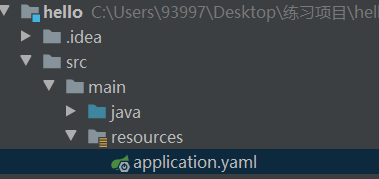
对于yaml我们只需要一个配置文件中设置即可,通过使用---来作为分隔表示为多版本:
- 其中
spring.profiles.active用来动态加载对应环境的配置,这里加载的就是下面的环境
server:
  port: 8091
spring:
  profiles:
    active: dev

---
server:
  port: 8092
spring:
  config:
    activate:
      on-profile: dev

---
server:
  port: 8093
spring:
  config:
    activate:
      on-profile: test
说明:在设置其他环境配置出现这个标志,原因是我们现在使用的是springboot 2.4.1版本,这个方式已经弃用,应当使用上面的最佳写法来设置环境名称。可查看文档:Config file processing in Spring Boot 2.4

七、自动装配原理
探索spring.factories
我们从spring.factories中进行探究其中的原理
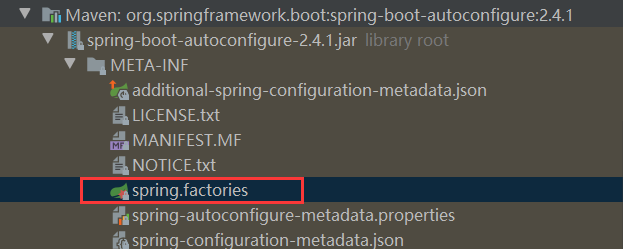
我们选择其中的一个Configuraction来进行分析:

// 表示一个配置类,都会被spring接管配置
@Configuration(proxyBeanMethods = false)
// 自动配置属性
@EnableConfigurationProperties(ServerProperties.class)
// spring的底层注解,根据不同的条件,判断当前配置或者类是否生效,下面能够使用许多@ConditionalOnxxx的注解
@ConditionalOnWebApplication(type = ConditionalOnWebApplication.Type.SERVLET)
// 系统中是否有指定的类
@ConditionalOnClass(CharacterEncodingFilter.class)
//系统中指定的属性是否有值
@ConditionalOnProperty(prefix = "server.servlet.encoding", value = "enabled", matchIfMissing = true)
public class HttpEncodingAutoConfiguration {
	...
}
我们点进上面@EnableConfigurationProperties(ServerProperties.class)中的ServerProperties.class类中查看:
@ConfigurationProperties(prefix = "server", ignoreUnknownFields = true)
public class ServerProperties {

   /**
    * Server HTTP port.
    */
   private Integer port;

   /**
    * Network address to which the server should bind.
    */
   private InetAddress address;
   ...
}
能够注意到该类使用了@ConfigurationProperties注解,是用来将对应配置文件的前缀的属性自动装配到类中的属性中去
我们看一下还有哪些@Conditional扩展注解
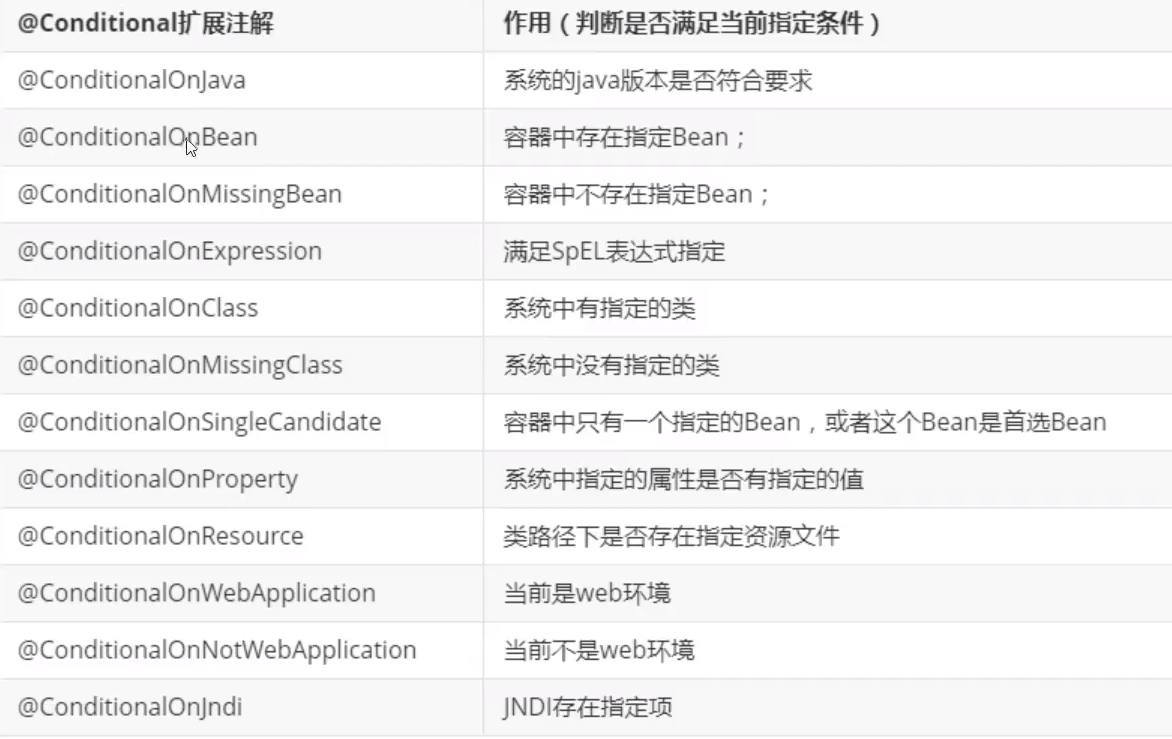
简而言之:
-
也就是说我们在配置文件中配置的一些值,其实是本来就写好的一个配置文件,在springboot程序启动时会首先默认加载那些配置类,接着那些配置类会去加载对应的配置文件,而我们之后仅仅只需要更改对应配置文件的值即可!!!!
-
通俗点就是我们原先需要在bean中手打的属性(property)封装成一个类,然后通过yaml文件注入,而我们在application.yaml文件中自定义这些property属性
精髓:
- springboot启动会加载大量的自动配置类
- 我们看我们所需要的功能有没有在SpringBoot默认写好的自动配置类当中
- 我们再来看这个自动配置类中到底配置了那些组件(若是要用的组件存在其中,我们就不需要手动来配置)
- 在容器中自动配置类添加组件的时候,会从properties类中获取某些属性。我们只需要在配置文件中指定这些属性的值即可!
xxxAutoConfiguration:自动配置类,用于给容器中添加组件
xxxProperties:封装配置文件中相关属性,与对应类来进行绑定
debug=true使用
在yaml中配置查看详细的自动配置报告,启动时看到日志输出,哪些自动配置类生效,哪些没有生效。

debug: true
启动程序来进行查看配置是否生效的日志信息:
============================
CONDITIONS EVALUATION REPORT
============================

# 第一类:已经配置且生效的配置类
Positive matches:
-----------------

   AopAutoConfiguration matched:
      - @ConditionalOnProperty (spring.aop.auto=true) matched (OnPropertyCondition)

   AopAutoConfiguration.ClassProxyingConfiguration matched:
      - @ConditionalOnMissingClass did not find unwanted class 'org.aspectj.weaver.Advice' (OnClassCondition)
      - @ConditionalOnProperty (spring.aop.proxy-target-class=true) matched (OnPropertyCondition)

   DispatcherServletAutoConfiguration matched:
      - @ConditionalOnClass found required class 'org.springframework.web.servlet.DispatcherServlet' (OnClassCondition)
      - found 'session' scope (OnWebApplicationCondition)

   DispatcherServletAutoConfiguration.DispatcherServletConfiguration matched:
      # 表示已经找到
      - @ConditionalOnClass found required class 'javax.servlet.ServletRegistration' (OnClassCondition)
      - Default DispatcherServlet did not find dispatcher servlet beans (DispatcherServletAutoConfiguration.DefaultDispatcherServletCondition)

...

# 第二类:没有匹配到,未生效的
Negative matches:
-----------------

   ActiveMQAutoConfiguration:
      Did not match:
         - @ConditionalOnClass did not find required class 'javax.jms.ConnectionFactory' (OnClassCondition)

   AopAutoConfiguration.AspectJAutoProxyingConfiguration:
      Did not match:
         - @ConditionalOnClass did not find required class 'org.aspectj.weaver.Advice' (OnClassCondition)

...

# 其余除外的类
Exclusions:
-----------

    None


# 无条件的类
Unconditional classes:
----------------------

    org.springframework.boot.autoconfigure.context.ConfigurationPropertiesAutoConfiguration
参考资料
- 点赞
- 收藏
- 关注作者


评论(0)