03、Netty学习笔记—(Netty组件学习)(中)

3.3.3、netty的Future示例(同步、异步)
案例目的:同样与3.3.2一样进行线程间取值。
import io.netty.channel.nio.NioEventLoopGroup;
import io.netty.util.concurrent.Future;
import io.netty.util.concurrent.GenericFutureListener;
import lombok.extern.slf4j.Slf4j;

import java.util.concurrent.Callable;
import java.util.concurrent.ExecutionException;

/**
 * @ClassName NettyFutureTest
 * @Author ChangLu
 * @Date 2022/1/5 19:55
 * @Description TODO
 */
@Slf4j
public class NettyFutureTest {

    public static void main(String[] args) throws ExecutionException, InterruptedException {
        final NioEventLoopGroup group = new NioEventLoopGroup();
        //注意这个Future是netty中的Future
        final Future<Integer> future = group.submit(new Callable<Integer>() {
            @Override
            public Integer call() throws Exception {
                log.debug("执行任务...");
                Thread.sleep(1000);
                return 666;
            }
        });
        log.debug("等待结果...");
        //方式一:同步取得结果(主线程阻塞获取)
//        log.debug("取值结果为:{}", future.get());
//        log.debug("取值结束!");

        //方式二:异步取得结果(执行任务线程来调用的回调方法)
        future.addListener(new GenericFutureListener<Future<? super Integer>>() {
            @Override
            public void operationComplete(Future<? super Integer> future) throws Exception {
                log.debug("取值结果为:{}", future.getNow());
            }
        });
        System.out.println("test...");
    }

}
效果:
同步方法执行

异步方法执行

结论:同步方法在main线程中取到值,在取到值之前main线程阻塞;异步方法是在执行任务线程中取到的值,在取到值之前main线程不阻塞!
3.3.4、netty的promise示例
描述:
1、前面的future不能主动来装数据
2、使用promise可以准确的知道数据是处理正常还是异常!
3、开发网络框架,例如RPC,Promise的重要性比较大
4、setSuccess()表示结果正确,setFailure(e)表示结果不正确会抛出异常!
案例目的:通过使用promise来去表示执行某个任务的结果是成功还是失败!主线程可以来进行接收。(线程间数据传递)
import io.netty.channel.EventLoop;
import io.netty.channel.nio.NioEventLoopGroup;
import io.netty.util.concurrent.DefaultPromise;
import lombok.extern.slf4j.Slf4j;

import java.util.concurrent.ExecutionException;

/**
 * @ClassName NettyPromiseTest
 * @Author ChangLu
 * @Date 2022/1/6 13:25
 * @Description Netty中的Promise使用:对某个业务处理结果设置成功或失败
 */
@Slf4j
public class NettyPromiseTest {

    public static void main(String[] args) throws ExecutionException, InterruptedException {
        final EventLoop eventLoop = new NioEventLoopGroup().next();
        final DefaultPromise<Integer> promise = new DefaultPromise<>(eventLoop);
        new Thread(()->{
            log.debug("开始执行任务...");
            try {
                Thread.sleep(1000);
            } catch (InterruptedException e) {
                e.printStackTrace();
            }
            //1、处理结果设置成功!
//            promise.setSuccess(100);
            //2、处理结果设置失败!
            try {
                int i = 10/0;
            }catch (Exception e){
//                e.printStackTrace();
                //在异常中设置失败结果
                promise.setFailure(e);
            }
        }).start();

        log.debug("等待任务结果...");
        //get()方法是一个阻塞方法。若是任务成功会直接返回值;若是任务失败会抛出异常
        log.debug("等待得到的结果为:{}",promise.get());
        log.debug("test...");
    }

}
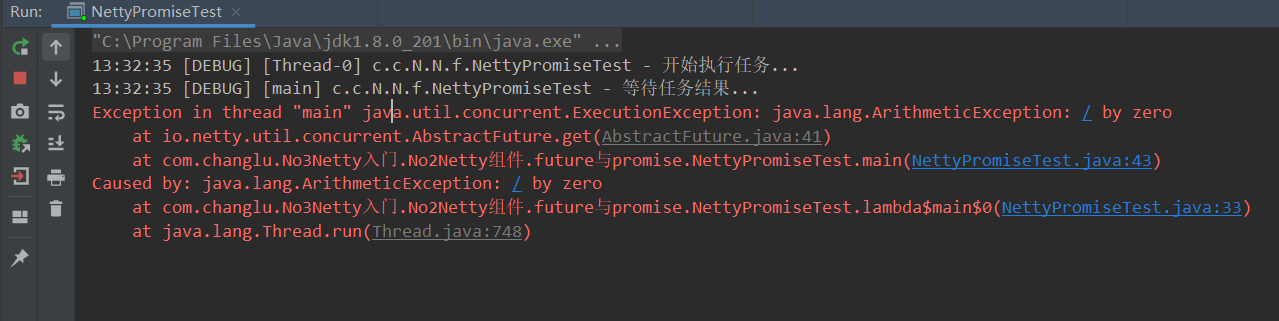
效果:
设置成功正常阻塞并接受到值
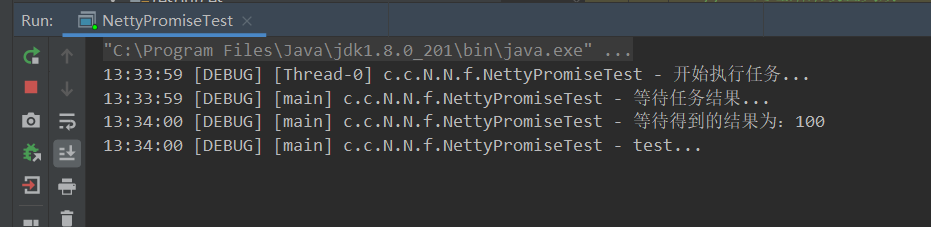
设置失败则会抛出异常
3.4、handler & pipeline
pipeline:类似于流水线,handler则是一道道工序,流动的内容就是要处理的数据。
handler:handler是最为重要的,之后编写一些业务我们都直接在handler中进行,并且在netty中包含了许多内置的handler给我们简化工作(例如netty提供的StringEncoder是OutBoundHandler,StringDecode是InBoundHandler,日志new LoggingHandler()若是使用了logback需要进行额外配置)。
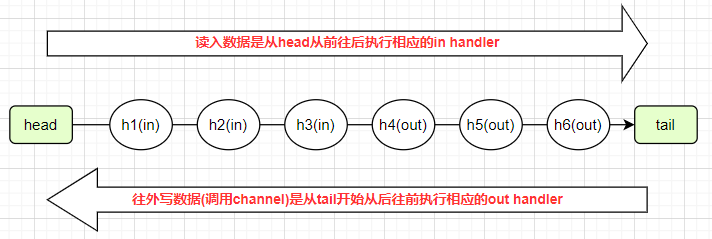
3.4.1、入站、出站handler执行顺序
addlast添加handler的位置实际上在head、tail handler中间
案例目的:对于in、outbound handler在进行addLast()添加后最终实际的执行顺序。
server:
import io.netty.bootstrap.ServerBootstrap;
import io.netty.channel.*;
import io.netty.channel.nio.NioEventLoopGroup;
import io.netty.channel.socket.nio.NioServerSocketChannel;
import io.netty.channel.socket.nio.NioSocketChannel;
import io.netty.handler.codec.string.StringDecoder;
import io.netty.handler.codec.string.StringEncoder;
import lombok.extern.slf4j.Slf4j;


/**
 * @ClassName PipelineTest
 * @Author ChangLu
 * @Date 2022/1/6 13:59
 * @Description Pipeline添加入站、出站handler:入站、出站时handler的执行顺序
 */
@Slf4j
public class O1PipelineTestServer {

    public static void main(String[] args) throws InterruptedException {
        new ServerBootstrap()
                .group(new NioEventLoopGroup(),new NioEventLoopGroup(2))
                .channel(NioServerSocketChannel.class)
                .childHandler(new ChannelInitializer<NioSocketChannel>() {
                    @Override
                    protected void initChannel(NioSocketChannel ch) throws Exception {
                        ch.pipeline().addLast(new StringDecoder());
                        ch.pipeline().addLast(new StringEncoder());
                        //添加入站事件
                        ch.pipeline().addLast("h1", new ChannelInboundHandlerAdapter(){
                            @Override
                            public void channelRead(ChannelHandlerContext ctx, Object msg) throws Exception {
                                log.debug("1(in)");
                                super.channelRead(ctx, msg);//调用下一条执行链:底层执行了ctx.fireChannelRead(msg);
                            }
                        });
                        ch.pipeline().addLast("h2", new ChannelInboundHandlerAdapter(){
                            @Override
                            public void channelRead(ChannelHandlerContext ctx, Object msg) throws Exception {
                                log.debug("2(in)");
                                super.channelRead(ctx, msg);//调用下一条执行链:底层执行了ctx.fireChannelRead(msg);
                            }
                        });
                        ch.pipeline().addLast("h3", new ChannelInboundHandlerAdapter(){
                            @Override
                            public void channelRead(ChannelHandlerContext ctx, Object msg) throws Exception {
                                log.debug("3(in)");
                                super.channelRead(ctx, msg);//调用下一条执行链:底层执行了ctx.fireChannelRead(msg);
                                //接收到数据之后来进行写数据(紧接着会触发出站handler)
                                ch.writeAndFlush("hello,client!");
//                                ch.writeAndFlush(ctx.alloc().buffer().writeBytes("hello,client".getBytes()));//或者直接自己将String转换为ByteBuf发送出去
                            }
                        });
                        //出站自定义的三道工序
                        ch.pipeline().addLast("h4", new ChannelOutboundHandlerAdapter(){
                            @Override
                            public void write(ChannelHandlerContext ctx, Object msg, ChannelPromise promise) throws Exception {
                                log.debug("4(out)");
                                super.write(ctx, msg, promise);
                            }
                        });
                        ch.pipeline().addLast("h5", new ChannelOutboundHandlerAdapter(){
                            @Override
                            public void write(ChannelHandlerContext ctx, Object msg, ChannelPromise promise) throws Exception {
                                log.debug("5(out)");
                                super.write(ctx, msg, promise);
                            }
                        });
                        ch.pipeline().addLast("h6", new ChannelOutboundHandlerAdapter(){
                            @Override
                            public void write(ChannelHandlerContext ctx, Object msg, ChannelPromise promise) throws Exception {
                                log.debug("6(out)");
                                super.write(ctx, msg, promise);
                            }
                        });
                    }
                })
                .bind(8080)
                .sync();
        log.debug("服务器启动成功!");
    }

}
client:
import io.netty.bootstrap.Bootstrap;
import io.netty.channel.*;
import io.netty.channel.nio.NioEventLoopGroup;
import io.netty.channel.socket.nio.NioSocketChannel;
import io.netty.handler.codec.string.StringDecoder;
import io.netty.handler.codec.string.StringEncoder;
import lombok.extern.slf4j.Slf4j;

import java.net.InetSocketAddress;
import java.util.Scanner;

/**
 * @ClassName O1Client
 * @Author ChangLu
 * @Date 2022/1/6 14:04
 * @Description client:用于向服务端发起请求,可以自由输入信息发送出去,q表示退出当前连接
 */
@Slf4j
public class O1Client {

    public static void main(String[] args) throws InterruptedException {
        final ChannelFuture future = new Bootstrap()
                .group(new NioEventLoopGroup())
                .channel(NioSocketChannel.class)
                .handler(new ChannelInitializer<NioSocketChannel>() {
                    @Override
                    protected void initChannel(NioSocketChannel channel) throws Exception {
                        channel.pipeline().addLast(new StringDecoder());
                        channel.pipeline().addLast(new StringEncoder());
                        channel.pipeline().addLast(new ChannelInboundHandlerAdapter() {
                            @Override
                            public void channelRead(ChannelHandlerContext ctx, Object msg) throws Exception {
                                log.debug("接收到来自 {} 数据:{}", ctx.channel(), msg);
                            }
                        });

                    }
                })
                .connect(new InetSocketAddress("localhost", 8080));
        //等待连接
        future.sync();
        final Channel channel = future.channel();
        log.debug("成功连接:{}", channel);
        log.debug("请输入消息或者q退出成功:");
        new Thread(()->{
            final Scanner scanner = new Scanner(System.in);
            while (true) {
                final String msg = scanner.nextLine();
                if ("q".equals(msg)){
                    channel.close();
                    break;
                }
                channel.writeAndFlush(msg);
            }
        }).start();

    }

}
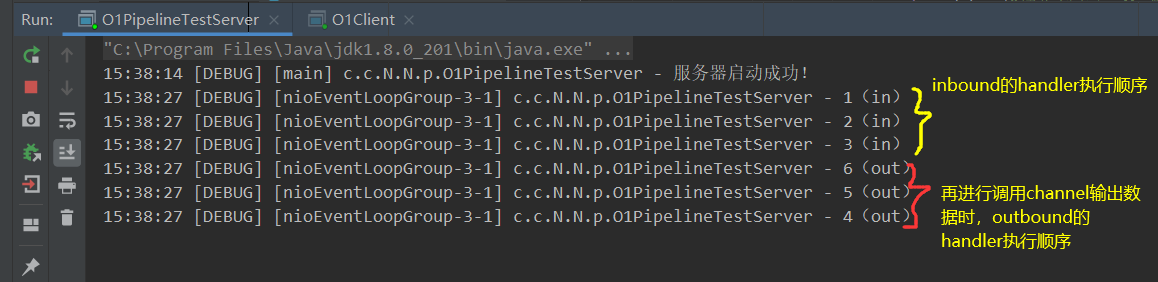
效果:

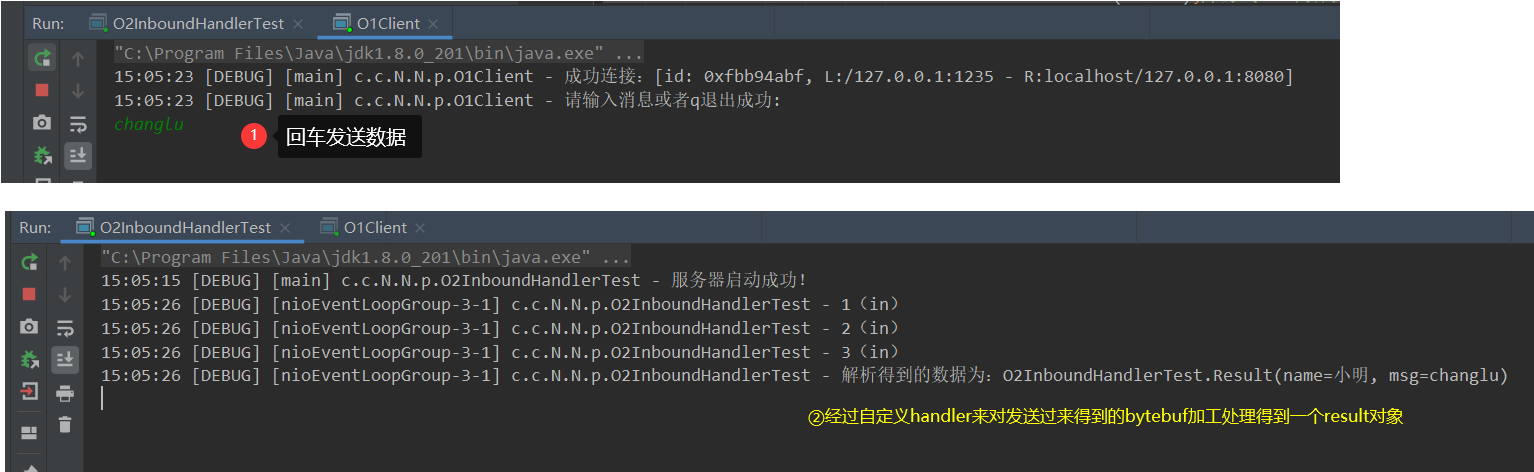
3.4.2、InBoundHandler案例(加工数据)
核心点:
1、若是想要InBoundHandler依次执行,那么需要调用一个super.channelRead(ctx, data);或ctx.fireChannelRead(data);来进行调用下一个handler,前者源码实际就是调用的后者!
2、handler之间可以传递数据,那么可以来使用多个handler可以进行对数据加工处理!
3、最后一个InBoundHandler不需要去调用super.channelRead了,因为已经是最后一个执行结果了!
案例目的:通过三个自定义InBoundHandler,来对Bytebuf 进行如Bytebuf -> String -> Result自定义对象进行加工处理。
server:
import io.netty.bootstrap.ServerBootstrap;
import io.netty.buffer.ByteBuf;
import io.netty.channel.*;
import io.netty.channel.nio.NioEventLoopGroup;
import io.netty.channel.socket.nio.NioServerSocketChannel;
import io.netty.channel.socket.nio.NioSocketChannel;
import lombok.AllArgsConstructor;
import lombok.Data;
import lombok.extern.slf4j.Slf4j;

/**
 * @ClassName O2InboundHandlerTest
 * @Author ChangLu
 * @Date 2022/1/6 14:56
 * @Description InboundHandler测试:handler之间传递规则,各个handler进行数据处理分工
 */
@Slf4j
public class O2InboundHandlerTest {

    public static void main(String[] args) throws InterruptedException {
        new ServerBootstrap()
                .group(new NioEventLoopGroup(),new NioEventLoopGroup(2))
                .channel(NioServerSocketChannel.class)
                .childHandler(new ChannelInitializer<NioSocketChannel>() {
                    @Override
                    protected void initChannel(NioSocketChannel ch) throws Exception {
                        //添加入站事件
                        //第一个handler:将ByteBuf => String
                        ch.pipeline().addLast("h1", new ChannelInboundHandlerAdapter(){
                            @Override
                            public void channelRead(ChannelHandlerContext ctx, Object msg) throws Exception {
                                log.debug("1(in)");
                                ByteBuf buf = (ByteBuf)msg;
                                final String data = buf.toString(Charsets.UTF_8);
                                super.channelRead(ctx, data);//方式一:执行下一个handler
                            }
                        });
                        //第二个handler:将String封装到Result对象中
                        ch.pipeline().addLast("h2", new ChannelInboundHandlerAdapter(){
                            @Override
                            public void channelRead(ChannelHandlerContext ctx, Object msg) throws Exception {
                                log.debug("2(in)");
                                final Result result = new Result("小明", (String) msg);
                                ctx.fireChannelRead(result);//方式二:同样执行下一个handler
                            }
                        });
                        //第三个handler:接受到Result对象输出
                        ch.pipeline().addLast("h3", new ChannelInboundHandlerAdapter(){
                            @Override
                            public void channelRead(ChannelHandlerContext ctx, Object msg) throws Exception {
                                log.debug("3(in)");
                                log.debug("解析得到的数据为:{}", msg);
                            }
                        });
                    }
                })
                .bind(8080)
                .sync();
        log.debug("服务器启动成功!");
    }

    @Data
    @AllArgsConstructor
    static class Result{
        private String name;
        private String msg;
    }

}
效果:客户端依旧使用的是3.4.1案例中的client
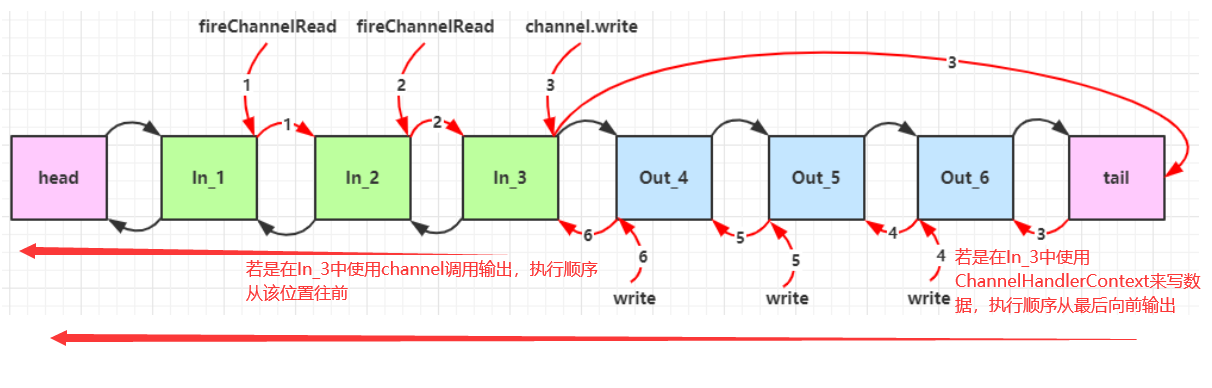
3.4.3、OutBoundHandler案例(不同对象发出数据效果不一致)
核心点:
1、执行OutBoundHandler的顺序是从后往前依次执行的,对于使用channel来写或者ChannelHandlerContext来写handler的处理也有区别。
2、通过ChannelHandlerContext来发送数据效果,实际会从当前的handler向前开始依次执行handler来进行数据的额外处理,若是原本在该handler之后的boundhandler就不会被执行到!
3、通过channel来写数据,一定会从tail(最后一个handler)开始向前依次执行OutBoundHandler。
4、发送数据一定要发出去bytebuf,若是直接writeAndFlush("字符串"),服务端不会接收到,除非再添加一个handler处理器也就是StringEncoder(),会将String转为ByteBuf。
案例目的:通过两种进行写数据的方法调用来看出对应其执行顺序!
import io.netty.bootstrap.ServerBootstrap;
import io.netty.channel.*;
import io.netty.channel.nio.NioEventLoopGroup;
import io.netty.channel.socket.nio.NioServerSocketChannel;
import io.netty.channel.socket.nio.NioSocketChannel;
import io.netty.handler.codec.string.StringDecoder;
import io.netty.handler.codec.string.StringEncoder;
import lombok.extern.slf4j.Slf4j;

/**
 * @ClassName O3OutBoundHandlerTest
 * @Author ChangLu
 * @Date 2022/1/6 15:19
 * @Description 出站处理器:ctx调用时outhandler执行顺序,普通channel输出数据时outhandler执行顺序
 */
@Slf4j
public class O3OutBoundHandlerTest {

    public static void main(String[] args) throws InterruptedException {
        new ServerBootstrap()
                .group(new NioEventLoopGroup(),new NioEventLoopGroup(2))
                .channel(NioServerSocketChannel.class)
                .childHandler(new ChannelInitializer<NioSocketChannel>() {
                    @Override
                    protected void initChannel(NioSocketChannel ch) throws Exception {
                        ch.pipeline().addLast(new StringDecoder());
                        ch.pipeline().addLast(new StringEncoder());
                        //添加入站事件
                        ch.pipeline().addLast("h1", new ChannelInboundHandlerAdapter(){
                            @Override
                            public void channelRead(ChannelHandlerContext ctx, Object msg) throws Exception {
                                log.debug("1(in)");
                                log.debug("收到数据,{}", msg);
                                super.channelRead(ctx, msg);
                                //向客户端写数据
                                //方式一:调用NioSocketChannel来进行发送数据。(从tail末尾向前依次执行outhandler)
//                                ch.writeAndFlush("hello,client!");
                                //方式二:调用ctx来进行发送数据。(从当前handler向前依次执行outhandler)
                                ctx.writeAndFlush("hello,client");
                            }
                        });
                        //出站自定义的三道工序
                        ch.pipeline().addLast("h4", new ChannelOutboundHandlerAdapter(){
                            @Override
                            public void write(ChannelHandlerContext ctx, Object msg, ChannelPromise promise) throws Exception {
                                log.debug("4(out)");
                                super.write(ctx, msg, promise);
                            }
                        });
                        ch.pipeline().addLast("h5", new ChannelOutboundHandlerAdapter(){
                            @Override
                            public void write(ChannelHandlerContext ctx, Object msg, ChannelPromise promise) throws Exception {
                                log.debug("5(out)");
                                super.write(ctx, msg, promise);
                            }
                        });
                        ch.pipeline().addLast("h6", new ChannelOutboundHandlerAdapter(){
                            @Override
                            public void write(ChannelHandlerContext ctx, Object msg, ChannelPromise promise) throws Exception {
                                log.debug("6(out)");
                                super.write(ctx, msg, promise);
                            }
                        });
                    }
                })
                .bind(8080)
                .sync();
        log.debug("服务器启动成功!");
    }

}
效果:

通过channel来发送数据效果
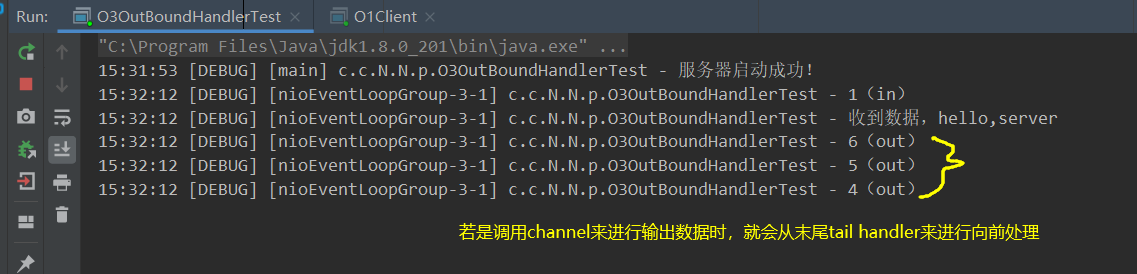
通过ctx,也就是ChannelHandlerContext发送数据效果:

3.5、EmbeddedChannel(快速测试入站、出站handler业务)
用途:为了能够快速进行测试业务代码,可以通过使用EmbeddedChannel来进行快速调用写入、输出!
案例目的:使用EmbeddedChannel来进行测试一下入站、出站handler的执行顺序。
import io.netty.buffer.ByteBufAllocator;
import io.netty.channel.ChannelHandlerContext;
import io.netty.channel.ChannelInboundHandlerAdapter;
import io.netty.channel.ChannelOutboundHandlerAdapter;
import io.netty.channel.ChannelPromise;
import io.netty.channel.embedded.EmbeddedChannel;
import lombok.extern.slf4j.Slf4j;

/**
 * @ClassName EmbeddedChannelTest
 * @Author ChangLu
 * @Date 2022/1/6 16:04
 * @Description EmbeddedChannel:工具类,能够快速测试我们所写的一些入站、出站handler执行顺序及过程
 */
@Slf4j
public class EmbeddedChannelTest {

    public static void main(String[] args) {
        final ChannelInboundHandlerAdapter h1 = new ChannelInboundHandlerAdapter(){
            @Override
            public void channelRead(ChannelHandlerContext ctx, Object msg) throws Exception {
                log.debug("1(in)");
                super.channelRead(ctx, msg);
            }
        };
        final ChannelInboundHandlerAdapter h2 = new ChannelInboundHandlerAdapter(){
            @Override
            public void channelRead(ChannelHandlerContext ctx, Object msg) throws Exception {
                log.debug("2(in)");
                super.channelRead(ctx, msg);
            }
        };
        final ChannelOutboundHandlerAdapter h3 = new ChannelOutboundHandlerAdapter() {
            @Override
            public void write(ChannelHandlerContext ctx, Object msg, ChannelPromise promise) throws Exception {
                log.debug("3(out)");
                super.write(ctx, msg, promise);
            }
        };
        final ChannelOutboundHandlerAdapter h4 = new ChannelOutboundHandlerAdapter() {
            @Override
            public void write(ChannelHandlerContext ctx, Object msg, ChannelPromise promise) throws Exception {
                log.debug("4(out)");
                super.write(ctx, msg, promise);
            }
        };

        //初始化EmbeddedChannel
        final EmbeddedChannel channel = new EmbeddedChannel(h1, h2, h3, h4);
        //模拟入站操作
//        channel.writeInbound(ByteBufAllocator.DEFAULT.buffer().writeBytes("hello,server".getBytes()));
        //模拟出站操作
        channel.writeOutbound(ByteBufAllocator.DEFAULT.buffer().writeBytes("hello,client".getBytes()));
    }

}
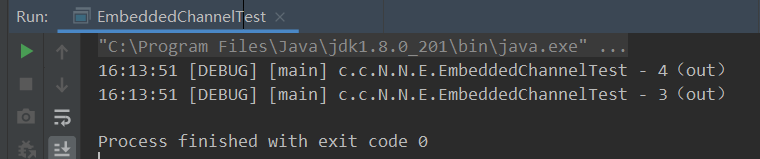
效果:
模拟入站输出:
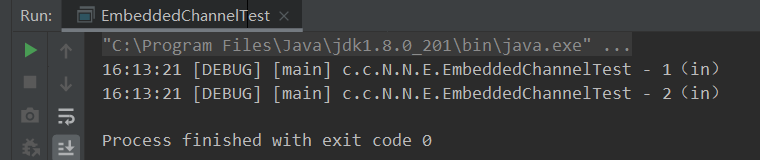
模拟出站输出:
3.6、ByteBuf
netty中的ByteBuf的容量可以动态扩容,相比较于在NIO中的ByteBuffer一旦指定初始容量之后就无法更改了!若是写入超过容量的数据则会出现覆盖的情况!
3.6.1、创建
创建与写入API:
//创建一个20字节容量的ByteBuf
final ByteBuf bytebuf = ByteBufAllocator.DEFAULT.buffer(20);
//进行写数据,具备自动扩容的功能!
bytebuf.writeBytes(builder.toString().getBytes());
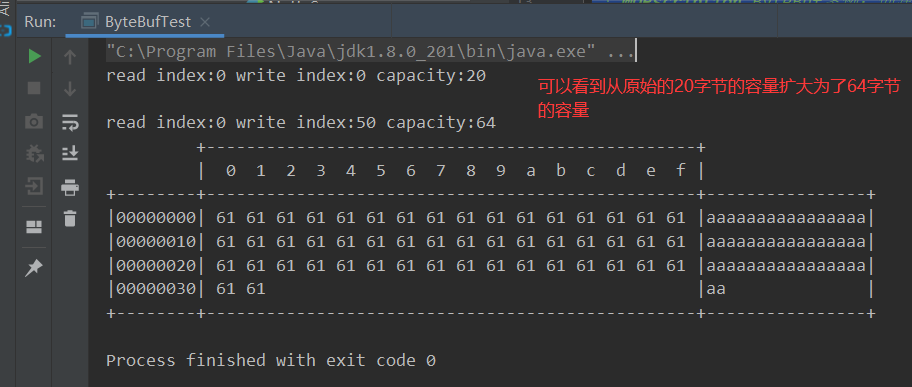
案例描述:向一个20字节容量的ByteBuf插入50个字节,测试是否会动态扩容
import io.netty.buffer.ByteBuf;
import io.netty.buffer.ByteBufAllocator;

import static io.netty.buffer.ByteBufUtil.appendPrettyHexDump;
import static io.netty.util.internal.StringUtil.NEWLINE;

/**
 * @ClassName ByteBufTest
 * @Author ChangLu
 * @Date 2022/1/6 16:28
 * @Description ByteBuf案例:创建
 */
public class ByteBufTest {

    public static void main(String[] args) {
        createByteBufDemo();
    }

    /**
     * ByteBuf创建:可进行自动扩容
     */
    public static void createByteBufDemo(){
        final ByteBuf bytebuf = ByteBufAllocator.DEFAULT.buffer(20);
//        System.out.println(bytebuf);//toString()的一些内容展示有限:PooledUnsafeDirectByteBuf(ridx: 0, widx: 0, cap: 20)
        log(bytebuf);
        final StringBuilder builder = new StringBuilder();
        for (int i = 0; i < 50; i++) {
            builder.append("a");
        }
        //向ByteBuffer中写入数据
        bytebuf.writeBytes(builder.toString().getBytes());
//        System.out.println(bytebuf);
        log(bytebuf);
    }

    /**
     * 工具类:用于方便查看ByteBuf中的具体数据信息
     * @param buffer
     */
    private static void log(ByteBuf buffer) {
        int length = buffer.readableBytes();
        int rows = length / 16 + (length % 15 == 0 ? 0 : 1) + 4;
        StringBuilder buf = new StringBuilder(rows * 80 * 2)
                .append("read index:").append(buffer.readerIndex())
                .append(" write index:").append(buffer.writerIndex())
                .append(" capacity:").append(buffer.capacity())
                .append(NEWLINE);
        appendPrettyHexDump(buf, buffer);
        System.out.println(buf.toString());
    }


}
3.6.2、直接内存 vs 堆内存
netty的默认情况下都会使用直接内存来作为ByteBuf的内存
堆内存与直接内存区别
堆内存的分配效率比较高,但是读写内存的效率比较低
直接内存分配效率比较低,但是读写效率高。直接内存使用的是系统内存
- 直接内存使用的是系统内存,若是从磁盘中读取文件时会将数据直接读入到系统内存,那么系统内存呢就会用直接内存的方式映射到java内存中,java里面访问的和操作系统访问的是同一块内存,那么就可以减少一次内存的复制,所以读取效率会高于堆内存。
- 堆内存会受到垃圾回收的影响,那么必然会对对象进行搬迁、复制等操作则会影响效率。
3.6.3、池化 vs 非池化
池化的最大意义在于可以重用 ByteBuf,优点有
- 没有池化,则每次都得创建新的 ByteBuf 实例,这个操作对直接内存代价昂贵,就算是堆内存,也会增加 GC 压力
- 有了池化,则可以重用池中 ByteBuf 实例,并且采用了与 jemalloc 类似的内存分配算法提升分配效率
- 高并发时,池化功能更节约内存,减少内存溢出的可能
在netty中的bytebuf支持池化管理,对于一些创建比较慢这样可以使用池的思想进行优化。
- 例如数据库连接十分耗时,可以使用数据库连接池来进行优化,用完后归还池则实现对象的重用了。
是否池化说明
4.1 之前,池化功能还不成熟,默认是非池化实现
4.1 以后,非 Android 平台默认启用池化实现,Android 平台启用非池化实现;windows平台默认是开辟的池化管理
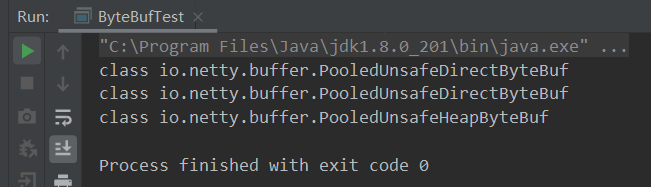
测试一下:版本是4.1.3,也就是4.1以后,默认是开启池化的
/**
     * 查看ByteBuf是否池化、采用的是直接内存或堆内存
     */
public static void seeByteBufClassDemo(){
    //buffer():默认是直接内存
    System.out.println(ByteBufAllocator.DEFAULT.buffer().getClass());
    //directBuffer():直接内存
    System.out.println(ByteBufAllocator.DEFAULT.directBuffer().getClass());
    //heapBuffer():堆内存
    System.out.println(ByteBufAllocator.DEFAULT.heapBuffer().getClass());
}
若是在4.1之后想使用非池化需要指定系统环境变量才程序运行时:
//-Dio.netty.allocator.type={unpooled|pooled}  设置非池化
-Dio.netty.allocator.type=unpooled

若是不想要通过配置参数,也可以调用指定的类Unpooled来生成非池化的字节缓冲区:
//class io.netty.buffer.UnpooledByteBufAllocator$InstrumentedUnpooledUnsafeHeapByteBuf
System.out.println(Unpooled.buffer().getClass());
3.6.4、ByteBuf组成
ByteBuf是netty基于nio中的ByteBuffer的封装改进。
特点:
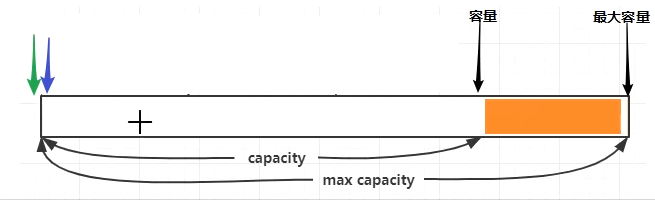
1、读写指针最开始都在 0 位置(图中两个颜色指针)。
2、规定了容量与最大容量:为了将来在容量不够时才去申请更多的内存,实现按需所取。
3、包含两个指针(读写指针):当进行写入数据的时候写指针向后移动,此时读指针与写指针这部分数据表示是可读部分。若是读取数据,读指针也会向后移动。那么也就是说写指针与读指针之间是未读取的数据。已经读过的部分则是废弃部分。
4、对于ByteBuf由四个部分组成:废弃部分(已读)、可读部分(未读)、可写字节(未写)、可扩容部分(等待容量满进行分配)
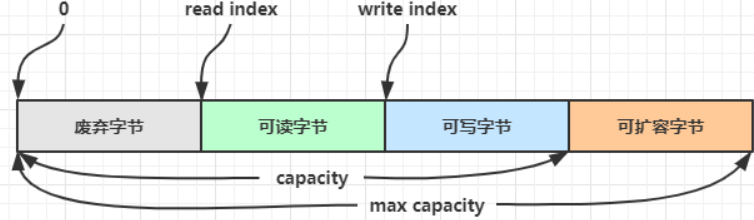
与ByteBuffer比较:相对于bytebuf只有一个指针,若是想要进行读需要切换到读模式,想要写要切换到写模式。用起来不方便。
两个方便进行了改进:①读和写使用了两个指针。②可以动态扩容。

- 点赞
- 收藏
- 关注作者
评论(0)