Redis应用 02、Springboot整合redis
@[toc]
前言
本篇博客是Redis的学习笔记,若文章中出现相关问题,请指出!
所有博客文件目录索引:博客目录索引(持续更新)
资料
Redis 命令参考:包含相关的参考文档
一、认识@EnableCaching与@Cacheable
1.1、理论介绍
spring为了方便缓存的使用,提供了一层缓存抽象,而譬如ehcache、redis等第三方缓存框架,spring则为它们提供了实现。
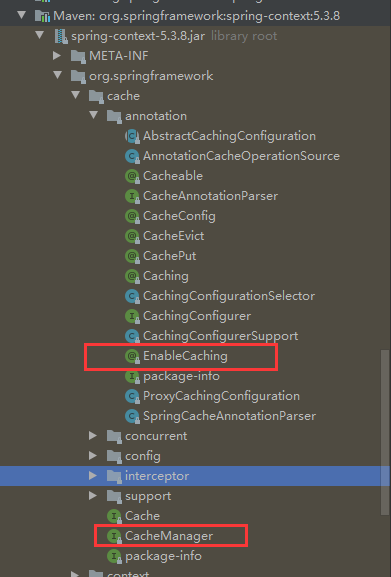
spring的缓存抽象主要依靠org.springframework.cache.Cache接口和org.springframework.cache.CacheManager接口。对于不同的缓存框架,对应不同的CacheManager实现。
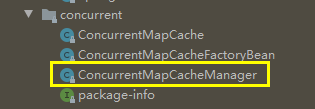
针对于Spring自己本身实现了ConcurrentMapCacheManager,对于缓存一般都是key,map形式,该CacheManager实现是将缓存数据存储在JDKConcurrentMap中。
在Spring-context模块中就提供了cache相关实现。
1.2、最佳实践(Spring的Cache管理器结合Redis进行方法级别存储)
准备
框架版本:springboot 2.5.2
在springboot中自动就会给我们引入spring、springmvc一些主流的第三方框架,并且能够帮助我们进行自动配置!使用起来也十分方便。
step1:在启动类上添加注解
@EnableCaching //表示开启缓存
step2:在指定的方法上添加@Cacheable,对方法的返回值进行缓存
//cacheNames:表示对应指定map的名称(说明我们要将本次缓存的内容放置到user对应的map集合里)
//key表示值为user对应map中entry的key值,方法的返回值则是该entry的value
@Cacheable(cacheNames = {"user"},key="targetClass.getName()+'.'+methodName+'.'+#id")
@Override
public User queryById(Integer id) {
    return userMapper.selectById(id);
}
此时我们就已经完成了配置,为了方便测试,通过自动注入来看一下默认Spring使用的是哪一个CacheManager实现类:
测试
测试请求:http://localhost:9999/user/2

此时我们就能够确定默认使用的是Spring自带的ConcurrentMapCacheManager
测试效果:
- 第一次请求访问时,会正常进入service方法中,并对数据库进行查询。
- 第二次请求访问,不会进入到servcie方法,而是直接从对应的缓存(ConcurrentMapCacheManager)中读取直接返回给controller。
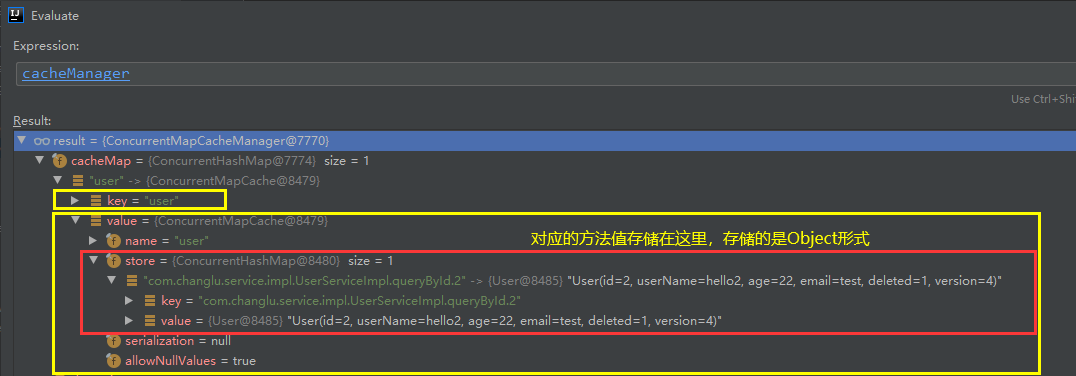
说明:通过该种方式我们能够将方法级别的返回值来优雅快速的存储到我们的redis中,简直是秒啊。
二、Springboot2整合redis使用lettuce连接池
说明:引入依赖之后默认使用jdk来进行序列化(JdkSerializationRedisSerializer),其底层就是使用的ObjectOutputstream来进行序列化。
- 默认会序列化转为byte[]数组来进行存储。
如下我们存储存储的是set("key1","changlu")此时就会出现乱码问题!

2.1、前提准备
实操
配置依赖:
<!--redis配置-->
<dependency>
    <groupId>org.springframework.boot</groupId>
    <artifactId>spring-boot-starter-data-redis</artifactId>
</dependency>
<!--若是springboot2.5.4,就需要引入下面的jar-->
<dependency>
    <groupId>org.apache.commons</groupId>
    <artifactId>commons-pool2</artifactId>
    <version>2.4.2</version>
</dependency>
分析
在该启动器依赖中使用了lettuce-core来替代之前使用jedis来进行连接redis。
在SpringBoot2.x之后,原本使用的jedis被替换为了lettuce。
jedis:采用直连,多个线程操作的话是不安全的,如果要避免不安全的情况,要使用JedisPool连接池,像BIO,又有其他问题。
lettuce:底层采用netty,实例可以在多个线程中进行共享,不存在线程不安全的情况,可以减少线程的数量,更像NIO模式
2.2、编写redis配置类(RedisConfig)
RedisTemplate:由于redistemplate默认序列化采用的是JDK序列化的方式,会转成byte[]数组来进行存储,就会出现乱码问题,所以我们这里对字符串的key、value以及hash的key、value分别做string字符串序列化与json序列化方式。根据实际需求来进行配置。
额外可配置(之后补充):LettuceConnectionFactory、CacheManager
import com.fasterxml.jackson.annotation.JsonAutoDetect;
import com.fasterxml.jackson.annotation.JsonTypeInfo;
import com.fasterxml.jackson.annotation.PropertyAccessor;
import com.fasterxml.jackson.databind.ObjectMapper;
import com.fasterxml.jackson.databind.jsontype.impl.LaissezFaireSubTypeValidator;
import org.springframework.context.annotation.Bean;
import org.springframework.context.annotation.Configuration;
import org.springframework.data.redis.connection.RedisConnectionFactory;
import org.springframework.data.redis.core.RedisTemplate;
import org.springframework.data.redis.serializer.Jackson2JsonRedisSerializer;
import org.springframework.data.redis.serializer.StringRedisSerializer;

/**
 * Redis的核心配置类
 * @author changlu
 * @date 2021/08/20 16:59
 **/
@Configuration
public class RedisConfig {

    //对RedisTemplate来进行配置
    @Bean
    public RedisTemplate<String, Object> redisTemplate(RedisConnectionFactory redisConnectionFactory) {
        //1.初始化一个redisTemplate
        RedisTemplate<String, Object> redisTemplate = new RedisTemplate<>();
        //2.序列话(一般用于key值)
        StringRedisSerializer stringRedisSerializer = new StringRedisSerializer();
        //3.引入json串的转化类(一般用于value的处理)
        Jackson2JsonRedisSerializer jackson2JsonRedisSerializer = new Jackson2JsonRedisSerializer(Object.class);
        //3.1、设置ObjectMapper的访问权限
        ObjectMapper objectMapper=new ObjectMapper();
        objectMapper.setVisibility(PropertyAccessor.ALL, JsonAutoDetect.Visibility.ANY);
        //3.2指定序列化输入类型,就是将数据库里的数据按照一定类型存储到redis缓存中。
        //objectMapper.enableDefaultTyping(ObjectMapper.DefaultTyping.NON_FINAL);//最近升级SpringBoot,发现enableDefaultTyping方法过期过期了。可以使用下面的方法代替
        objectMapper.activateDefaultTyping(LaissezFaireSubTypeValidator.instance,
                ObjectMapper.DefaultTyping.NON_FINAL,
                JsonTypeInfo.As.WRAPPER_ARRAY);
        jackson2JsonRedisSerializer.setObjectMapper(objectMapper);
        //4、创建连接
        redisTemplate.setConnectionFactory(redisConnectionFactory);
        //4.1、redis的key值序列化
        redisTemplate.setKeySerializer(stringRedisSerializer);
        //4.2、redis的value值序列化
        redisTemplate.setValueSerializer(jackson2JsonRedisSerializer);
        //4.3、对于hash 的key进行序列化
        redisTemplate.setHashKeySerializer(stringRedisSerializer);
        //4.4、对于hash 的value进行序列化
        redisTemplate.setHashValueSerializer(jackson2JsonRedisSerializer);
        return redisTemplate;
    }


}
2.3、实操测试
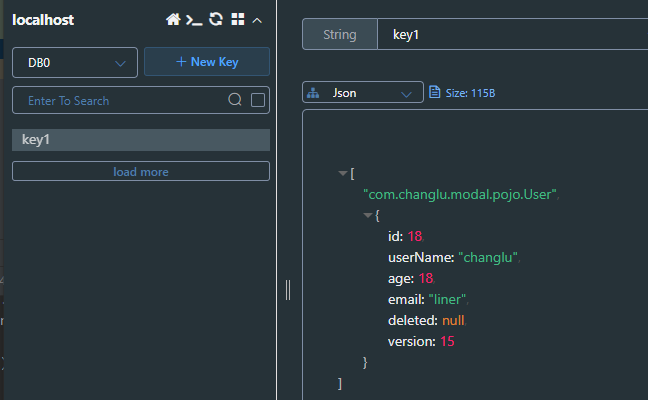
这里我们方便测试直接来存储string的key与value:
@SpringBootTest
class TestApplicationTests {

    @Autowired
    private RedisTemplate redisTemplate;

    @Test
    public void test() {
        RedisConnection connection = (RedisConnection) redisTemplate.getConnectionFactory().getConnection();
        System.out.println(connection.ping());
        connection.flushDb();
        //字符串操作
        redisTemplate.opsForValue().set("key1",new User(18L,"changlu",18,"liner",15));
        System.out.println(redisTemplate.opsForValue().get("key1"));
    }

}

三、redisTemplate
redisTemplate常用方法
redisTemplate.opsForValue();  //操作字符串
redisTemplate.opsForHash();   //操作hash
redisTemplate.opsForList();   //操作list
redisTemplate.opsForSet();    //操作set
redisTemplate.opsForZSet();   //操作有序set
其他方法:
expire(key,time,unit)  //对指定key设置失效时间
getExpire(key):获取指定的key的失效时间
参考文章
[1]. Java|SpringBoot整合Redis—fhzmWJ:一个女生写的,专栏也有深度
[2]. springboot整合redis
1.2 Spring Cache缓存管理器与redis集合,将方法的返回值存储到redis中
- 带你读懂@EnableCaching的源码:分析了@EnableCaching 源码分析,包含其中CacheManager如何生效的原由关键因素。
- Spring中@Import注解的作用
springboot2整合redis使用lettuce连接池(解决lettuce连接池无效问题):最详细的redis配置类编写
6397ac5003ae84c26fc&scene=21#wechat_redirect)
springboot2整合redis使用lettuce连接池(解决lettuce连接池无效问题):最详细的redis配置类编写
- 点赞
- 收藏
- 关注作者


评论(0)