《SpringBoot篇》14.@AutoConfigureMockMvc测试类实现Web层测试

【摘要】 其实使用PostMan或者PostApi等软件测试效果是一样的,但是又不能不知道可以在测试类中实现,就当拓展知识了解吧。之后我会写一篇关于各种测试软件不同点的博客,可以关注一下。
陈老老老板 说明:学习一些新的技术栈,边学习边总结,各位一起加油。需要注意的地方都标红了,还有资源的分享. 一起加油。
说明:其实使用PostMan或者PostApi等软件测试效果是一样的,但是又不能不知道可以在测试类中实现,就当拓展知识了解吧。之后我会写一篇关于各种测试软件不同点的博客,可以关注一下。
1.测试类实现Web层测试
说明:本文是在springboot项目中实现的哦。
(1)在测试类上添加@AutoConfigureMockMvc
@SpringBootTest()
@AutoConfigureMockMvc
class DemoApplicationTests {

    @Test
    void WebFindTest() {

    }
}
(2)在SpringBootTest注解中添加参数webEnvironment = SpringBootTest.WebEnvironment.RANDOM_PORT
@SpringBootTest(webEnvironment = SpringBootTest.WebEnvironment.RANDOM_PORT)
//开启虚拟MVC调用
@AutoConfigureMockMvc
public class WebTest {

    @Test
    void testWeb(@Autowired MockMvc mvc) {
    }
}
注:这里WebEnvironment几个参数的含义:
- MOCK:根据当前设置确认是否启动web环境,例如使用了Servlet的API就启动web环境,属于适配性的配置
- DEFINED_PORT:使用自定义的端口作为web服务器端口
- RANDOM_PORT:使用随机端口作为web服务器端口( 建议使用,防止端口冲突)
- NONE:不启动web环境
(3)引入MockMvc对象创建访问请求
注:测试可以发现请求成功,测试发送请求可以成功但是无法看到结果,在下一步就可以看到了。
注:web层Controller代码
package com.example.demo.controller;

import com.example.demo.pojo.Admin;
import com.example.demo.repository.AdminRepository;
import org.springframework.beans.factory.annotation.Autowired;
import org.springframework.web.bind.annotation.GetMapping;
import org.springframework.web.bind.annotation.ResponseBody;
import org.springframework.web.bind.annotation.RestController;

import java.util.List;

@RestController
public class WebController {

    @GetMapping("findWeb")
    @ResponseBody
    public String finall(){

        return "Web测试成功";
    }
}
注:测试类代码
package com.example.demo;

import org.junit.jupiter.api.Test;
import org.springframework.beans.factory.annotation.Autowired;
import org.springframework.boot.test.autoconfigure.web.servlet.AutoConfigureMockMvc;
import org.springframework.boot.test.context.SpringBootTest;
import org.springframework.test.web.servlet.MockMvc;
import org.springframework.test.web.servlet.request.MockHttpServletRequestBuilder;
import org.springframework.test.web.servlet.request.MockMvcRequestBuilders;

@SpringBootTest(webEnvironment = SpringBootTest.WebEnvironment.RANDOM_PORT)
@AutoConfigureMockMvc
class DemoApplicationTests {

    //引入MockMvc类型对象
    @Autowired
    private MockMvc mvc;

    @Test
    void WebFindTest() throws Exception {

        //http://localhost:8080/findWeb
        //创建虚拟请求
        //前面的服务器IP地址和端口使用的是当前虚拟的web环境,无需指定,仅指定请求的具体路径即可
        MockHttpServletRequestBuilder builder = MockMvcRequestBuilders.get("/findWeb");
        //这里需要抛出异常
        mvc.perform(builder);
    }
}
测试成功效果:

(4)实现请求结果对比
注: 响应对比有四种类型,响应状态匹配、响应体匹配(非json数据格式)、响应体匹配(json数据格式,开发中的主流使用方式)、响应头信息匹配。
a.响应状态匹配
package com.example.demo;

import org.junit.jupiter.api.Test;
import org.springframework.beans.factory.annotation.Autowired;
import org.springframework.boot.test.autoconfigure.web.servlet.AutoConfigureMockMvc;
import org.springframework.boot.test.context.SpringBootTest;
import org.springframework.test.web.servlet.MockMvc;
import org.springframework.test.web.servlet.ResultActions;
import org.springframework.test.web.servlet.ResultMatcher;
import org.springframework.test.web.servlet.request.MockHttpServletRequestBuilder;
import org.springframework.test.web.servlet.request.MockMvcRequestBuilders;
import org.springframework.test.web.servlet.result.MockMvcResultMatchers;
import org.springframework.test.web.servlet.result.StatusResultMatchers;

@SpringBootTest(webEnvironment = SpringBootTest.WebEnvironment.RANDOM_PORT)
@AutoConfigureMockMvc
class DemoApplicationTests {

    //引入MockMvc类型对象
    @Autowired
    private MockMvc mvc;

    @Test
    void WebFindTest() throws Exception {

        //http://localhost:8080/findWeb
        //创建虚拟请求
        //前面的服务器IP地址和端口使用的是当前虚拟的web环境,无需指定,仅指定请求的具体路径即可
        MockHttpServletRequestBuilder builder = MockMvcRequestBuilders.get("/findWeb");
        //这里需要抛出异常
        //获取返回值
 		ResultActions perform = mvc.perform(builder);

        //设定预期值 与真实值进行比较,成功测试通过,失败测试失败
        //定义本次调用的预期值
        StatusResultMatchers status = MockMvcResultMatchers.status();
        //预计本次调用时成功的:状态200
        ResultMatcher ok = status.isOk();
        //添加预计值到本次调用过程中进行匹配
        perform.andExpect(ok);
    }
}
b.响应体匹配(非json数据格式)
package com.example.demo;

import org.junit.jupiter.api.Test;
import org.springframework.beans.factory.annotation.Autowired;
import org.springframework.boot.test.autoconfigure.web.servlet.AutoConfigureMockMvc;
import org.springframework.boot.test.context.SpringBootTest;
import org.springframework.test.web.servlet.MockMvc;
import org.springframework.test.web.servlet.ResultActions;
import org.springframework.test.web.servlet.ResultMatcher;
import org.springframework.test.web.servlet.request.MockHttpServletRequestBuilder;
import org.springframework.test.web.servlet.request.MockMvcRequestBuilders;
import org.springframework.test.web.servlet.result.ContentResultMatchers;
import org.springframework.test.web.servlet.result.MockMvcResultMatchers;
import org.springframework.test.web.servlet.result.StatusResultMatchers;

@SpringBootTest(webEnvironment = SpringBootTest.WebEnvironment.RANDOM_PORT)
@AutoConfigureMockMvc
class DemoApplicationTests {

    //引入MockMvc类型对象
    @Autowired
    private MockMvc mvc;

    @Test
    void WebFindTest() throws Exception {

        //http://localhost:8080/findWeb
        //创建虚拟请求
        //前面的服务器IP地址和端口使用的是当前虚拟的web环境,无需指定,仅指定请求的具体路径即可
        MockHttpServletRequestBuilder builder = MockMvcRequestBuilders.get("/findWeb");

        //这里需要抛出异常
        //获取返回值
        ResultActions perform = mvc.perform(builder);

        //设定预期值 与真实值进行比较,成功测试通过,失败测试失败
        //定义本次调用的预期值
        ContentResultMatchers content = MockMvcResultMatchers.content();
        //预计本次调用时成功的:状态200
        ResultMatcher resultMatcher = content.string("Web测试成功");

        //添加预计值到本次调用过程中进行匹配
        perform.andExpect(resultMatcher);
    }
}
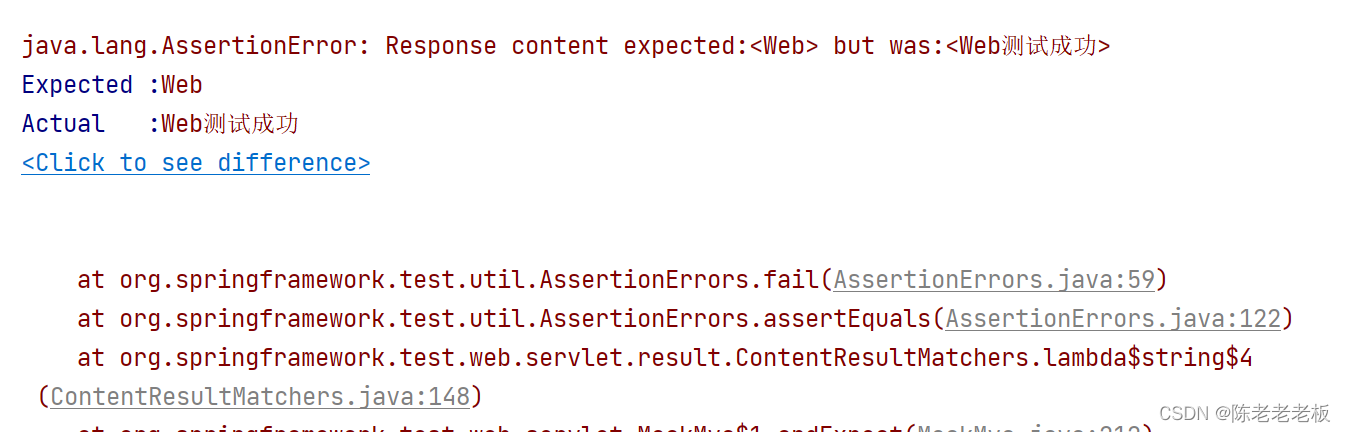
测试成功将会访问成功,给大家看一下失败的样式:(会报错)
c.响应体匹配(json数据格式,开发中的主流使用方式)
Controller类也要改成返回Json
package com.example.demo.controller;

import org.springframework.web.bind.annotation.GetMapping;
import org.springframework.web.bind.annotation.ResponseBody;
import org.springframework.web.bind.annotation.RestController;

@RestController
public class WebController {

    @GetMapping("findWeb")
    @ResponseBody
    public String finall(){

        return "{\"name\" : Web测试成功}";
    }
}
注意测试类Json写法:
package com.example.demo;

import org.junit.jupiter.api.Test;
import org.springframework.beans.factory.annotation.Autowired;
import org.springframework.boot.test.autoconfigure.web.servlet.AutoConfigureMockMvc;
import org.springframework.boot.test.context.SpringBootTest;
import org.springframework.test.web.servlet.MockMvc;
import org.springframework.test.web.servlet.ResultActions;
import org.springframework.test.web.servlet.ResultMatcher;
import org.springframework.test.web.servlet.request.MockHttpServletRequestBuilder;
import org.springframework.test.web.servlet.request.MockMvcRequestBuilders;
import org.springframework.test.web.servlet.result.ContentResultMatchers;
import org.springframework.test.web.servlet.result.MockMvcResultMatchers;
import org.springframework.test.web.servlet.result.StatusResultMatchers;

@SpringBootTest(webEnvironment = SpringBootTest.WebEnvironment.RANDOM_PORT)
@AutoConfigureMockMvc
class DemoApplicationTests {

    //引入MockMvc类型对象
    @Autowired
    private MockMvc mvc;

    @Test
    void WebFindTest() throws Exception {

        //http://localhost:8080/findWeb
        //创建虚拟请求
        //前面的服务器IP地址和端口使用的是当前虚拟的web环境,无需指定,仅指定请求的具体路径即可
        MockHttpServletRequestBuilder builder = MockMvcRequestBuilders.get("/findWeb");

        //这里需要抛出异常
        //获取返回值
        ResultActions perform = mvc.perform(builder);

        //设定预期值 与真实值进行比较,成功测试通过,失败测试失败
        //定义本次调用的预期值
        ContentResultMatchers content = MockMvcResultMatchers.content();
        //这里注意Json写法格式
        ResultMatcher result = content.json("{\"name\":Web测试成功}");
        //添加预计值到本次调用过程中进行匹配
        perform.andExpect(result);

    }
}
d.响应头信息匹配
package com.example.demo;

import org.junit.jupiter.api.Test;
import org.springframework.beans.factory.annotation.Autowired;
import org.springframework.boot.test.autoconfigure.web.servlet.AutoConfigureMockMvc;
import org.springframework.boot.test.context.SpringBootTest;
import org.springframework.test.web.servlet.MockMvc;
import org.springframework.test.web.servlet.ResultActions;
import org.springframework.test.web.servlet.ResultMatcher;
import org.springframework.test.web.servlet.request.MockHttpServletRequestBuilder;
import org.springframework.test.web.servlet.request.MockMvcRequestBuilders;
import org.springframework.test.web.servlet.result.ContentResultMatchers;
import org.springframework.test.web.servlet.result.HeaderResultMatchers;
import org.springframework.test.web.servlet.result.MockMvcResultMatchers;
import org.springframework.test.web.servlet.result.StatusResultMatchers;

@SpringBootTest(webEnvironment = SpringBootTest.WebEnvironment.RANDOM_PORT)
@AutoConfigureMockMvc
class DemoApplicationTests {

    //引入MockMvc类型对象
    @Autowired
    private MockMvc mvc;

    @Test
    void WebFindTest() throws Exception {

        //http://localhost:8080/findWeb
        //创建虚拟请求
        //前面的服务器IP地址和端口使用的是当前虚拟的web环境,无需指定,仅指定请求的具体路径即可
        MockHttpServletRequestBuilder builder = MockMvcRequestBuilders.get("/findWeb");

        //这里需要抛出异常
        //获取返回值
        ResultActions perform = mvc.perform(builder);
        //响应头
        HeaderResultMatchers header = MockMvcResultMatchers.header();
        ResultMatcher contentType = header.string("Content-Type", "text/plain;charset=UTF-8");
        perform.andExpect(contentType);

    }
}
(4)校验总结
注: 平时都是三种校验一起,(Json与非Json只能一种)
package com.example.demo;

import org.junit.jupiter.api.Test;
import org.springframework.beans.factory.annotation.Autowired;
import org.springframework.boot.test.autoconfigure.web.servlet.AutoConfigureMockMvc;
import org.springframework.boot.test.context.SpringBootTest;
import org.springframework.test.web.servlet.MockMvc;
import org.springframework.test.web.servlet.ResultActions;
import org.springframework.test.web.servlet.ResultMatcher;
import org.springframework.test.web.servlet.request.MockHttpServletRequestBuilder;
import org.springframework.test.web.servlet.request.MockMvcRequestBuilders;
import org.springframework.test.web.servlet.result.ContentResultMatchers;
import org.springframework.test.web.servlet.result.HeaderResultMatchers;
import org.springframework.test.web.servlet.result.MockMvcResultMatchers;
import org.springframework.test.web.servlet.result.StatusResultMatchers;

@SpringBootTest(webEnvironment = SpringBootTest.WebEnvironment.RANDOM_PORT)
@AutoConfigureMockMvc
class DemoApplicationTests {

    //引入MockMvc类型对象
    @Autowired
    private MockMvc mvc;

    @Test
    void WebFindTest() throws Exception {

        //http://localhost:8080/findWeb
        //创建虚拟请求
        //前面的服务器IP地址和端口使用的是当前虚拟的web环境,无需指定,仅指定请求的具体路径即可
        MockHttpServletRequestBuilder builder = MockMvcRequestBuilders.get("/findWeb");

        //这里需要抛出异常
        //获取返回值
        ResultActions perform = mvc.perform(builder);

        //设定预期值 与真实值进行比较,成功测试通过,失败测试失败
        //定义本次调用的预期值
        //响应状态
        StatusResultMatchers status = MockMvcResultMatchers.status();
        ResultMatcher ok = status.isOk();
        perform.andExpect(ok);

        //响应头
        HeaderResultMatchers header = MockMvcResultMatchers.header();
        ResultMatcher contentType = header.string("Content-Type", "text/plain;charset=UTF-8");
        perform.andExpect(contentType);

        //返回的响应体
        ContentResultMatchers content = MockMvcResultMatchers.content();
        ResultMatcher result = content.json("{\"name\":Web测试成功}");
        perform.andExpect(result);

    }
}
2.补充测试层实现数据回滚
说明:使用@Transactional,@Rollback(true)防止执行测试类产生垃圾数据。
package com.example.demo;

import com.example.demo.pojo.Admin;
import com.example.demo.repository.AdminRepository;
import org.junit.jupiter.api.Test;
import org.springframework.beans.factory.annotation.Autowired;
import org.springframework.boot.test.autoconfigure.web.servlet.AutoConfigureMockMvc;
import org.springframework.boot.test.context.SpringBootTest;
import org.springframework.test.annotation.Rollback;
import org.springframework.test.web.servlet.MockMvc;
import org.springframework.test.web.servlet.ResultActions;
import org.springframework.test.web.servlet.ResultMatcher;
import org.springframework.test.web.servlet.request.MockHttpServletRequestBuilder;
import org.springframework.test.web.servlet.request.MockMvcRequestBuilders;
import org.springframework.test.web.servlet.result.HeaderResultMatchers;
import org.springframework.test.web.servlet.result.MockMvcResultMatchers;
import org.springframework.transaction.annotation.Transactional;

import java.util.Date;

@SpringBootTest()
@Transactional
@Rollback
class RollbackTests {

    @Autowired
    private AdminRepository adminRepository;

    @Test
    void WebFindTest()  {
        Admin admin  = new Admin();
        admin.setPassword("123");
        adminRepository.save(admin);
    }
}
3.补充测试用例数据随机
说明: 在配置文件中设置数据为随机,配合@ConfigurationProperties实现随机值注入
test:
  book:
    id: ${random.int}
    id2: ${random.int(10)}
    type: ${random.int!5,10!}
    name: ${random.value}
    uuid: ${random.uuid}
    publishTime: ${random.long}
@Component
@Data
@ConfigurationProperties(prefix = "test.book")
public class BookCase {
    private int id;
    private int id2;
    private int type;
    private String name;
    private String uuid;
    private long publishTime;
}
总结:这篇是对测试类进行知识补充,多了解一下,总是没有坏处的。希望对您有帮助,感谢阅读
结束语:裸体一旦成为艺术,便是最圣洁的。道德一旦沦为虚伪,便是最下流的。
勇敢去做你认为正确的事,不要被世俗的流言蜚语所困扰。

【声明】本内容来自华为云开发者社区博主,不代表华为云及华为云开发者社区的观点和立场。转载时必须标注文章的来源(华为云社区)、文章链接、文章作者等基本信息,否则作者和本社区有权追究责任。如果您发现本社区中有涉嫌抄袭的内容,欢迎发送邮件进行举报,并提供相关证据,一经查实,本社区将立刻删除涉嫌侵权内容,举报邮箱:
cloudbbs@huaweicloud.com
- 点赞
- 收藏
- 关注作者
评论(0)