玩转Spring-自定义Spring Starter
1 什么是Spring Starter
摘自官网
Starters are a set of convenient dependency descriptors that you can include in your application. You get a one-stop shop for all the Spring and related technologies that you need without having to hunt through sample code and copy-paste loads of dependency descriptors. For example, if you want to get started using Spring and JPA for database access, include the spring-boot-starter-data-jpa dependency in your project.
翻译下:
启动器是一组方便的依赖项描述符,您可以在应用程序中包含它们。您可以获得所需的所有Spring和相关技术的一站式服务,而无需查找示例代码和复制-粘贴大量依赖描述符。例如,如果您想开始使用Spring和JPA进行数据库访问,请在您的项目中包含Spring -boot-starter-data- JPA依赖项。
2 自定义Starter的Hello World
2.1 自定义Spring Starter的一般流程
(1)新建Spring Boot项目
(2)添加依赖
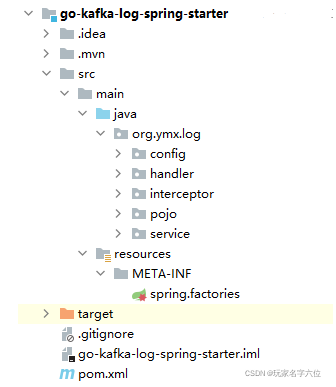
(3)调整项目结构
(4)自定义Configuration配置类
(5)增加spring.factories文件,指定自动配置类
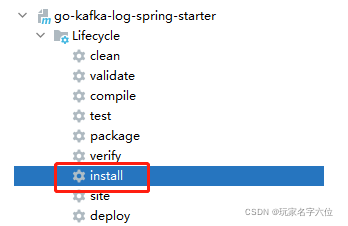
(6)maven install安装到本地仓库
(7)其他项目引入使用
下面我们就来一一的实现下:
2.2 具体流程
2.2.1 新建Spring Boot项目
<parent>
    <groupId>org.springframework.boot</groupId>
    <artifactId>spring-boot-starter-parent</artifactId>
    <version>2.1.4.RELEASE</version>
    <relativePath/>
</parent>

<groupId>org.ymx</groupId>
<artifactId>go-kafka-log-spring-starter</artifactId>
<version>0.0.1-RELEASE</version>
2.2.2 添加依赖
<!--引入web依赖,下文自定义拦截器使用-->
<dependency>
    <groupId>org.springframework.boot</groupId>
    <artifactId>spring-boot-starter-web</artifactId>
</dependency>
<!--自定义starter需要的依赖 autoconfigure-->
<dependency>
    <groupId>org.springframework.boot</groupId>
    <artifactId>spring-boot-autoconfigure</artifactId>
</dependency>
<!--自定义starter需要的依赖 configuration-processor-->
<dependency>
    <groupId>org.springframework.boot</groupId>
    <artifactId>spring-boot-configuration-processor</artifactId>
    <optional>true</optional>
</dependency>
<!-- lombok-->
<dependency>
    <groupId>org.projectlombok</groupId>
    <artifactId>lombok</artifactId>
    <optional>true</optional>
</dependency>
2.2.3 调整项目结构
一般就是:
- 删除主启动类
- 删除test包
- 删除主配置文件

2.2.4 自定义Configuration配置类
LogAutoConfig.java
@Configuration
@EnableConfigurationProperties({ConfigProperties.class})
@ConditionalOnProperty(prefix = "go.kafka.log", name = "enable", havingValue = "true")
public class LogAutoConfig {

    @Autowired
    private ConfigProperties configProperties;

    @Bean(name = "logService")
    public LogService getLogService() {
        LogService logService = new LogService();
        logService.setConfigProperties(configProperties);
        return logService;
    }
}
ConfigProperties.java
@Component
@ConfigurationProperties("go.kafka.log")
public class ConfigProperties {
    private String name;

    public String getName() {
        return name;
    }

    public void setName(String name) {
        this.name = name;
    }
}
LogService.java
public class LogService {

    private ConfigProperties configProperties;

    public String getName() {
        return configProperties.getName();
    }

    public void setConfigProperties(ConfigProperties configProperties) {
        this.configProperties = configProperties;
    }

    public String hello() {
        return "Hello " + getName() + "!";
    }

}
2.2.5 增加spring.factories文件,指定自动配置类
spring.factories
org.springframework.boot.autoconfigure.EnableAutoConfiguration=\
org.ymx.log.config.LogAutoConfig
2.2.6 maven install安装到本地仓库

2.2.7 测试
新建Spring Boot项目
<dependency>
    <groupId>org.ymx</groupId>
    <artifactId>go-kafka-log-spring-starter</artifactId>
    <version>0.0.1-RELEASE</version>
</dependency>
application.properties
server.port=8888
go.kafka.log.name=Spring Starter
go.kafka.log.enable=true
HelloController.java
@RestController
public class HelloController {

    @Resource
    private LogService logService;

    @GetMapping("/hello")
    public String hello() {
        return logService.hello();
    }
}
测试:

3 自定义Starter实现拦截器
3.1 编写自定义拦截器
@Component
public class LogInterceptor implements HandlerInterceptor {

    @Override
    public boolean preHandle(HttpServletRequest request, HttpServletResponse response, Object handler) throws Exception {
        System.out.println("----------------------"+request.getMethod()+"----------------------");
        return true;
    }

    @Override
    public void postHandle(HttpServletRequest request, HttpServletResponse response, Object handler, ModelAndView modelAndView) throws Exception {
        System.out.println("----------------------"+request.getMethod()+"----------------------");
        HandlerInterceptor.super.postHandle(request, response, handler, modelAndView);
    }

    @Override
    public void afterCompletion(HttpServletRequest request, HttpServletResponse response, Object handler, Exception ex) throws Exception {
        HandlerInterceptor.super.afterCompletion(request, response, handler, ex);
    }
}
3.2 starter增加配置类
@Configuration
@ConditionalOnProperty(prefix = "go.kafka.log.interception", name = "enable", havingValue = "true")
public class LogInterceptorConfig implements WebMvcConfigurer {

    @Override
    public void addInterceptors(InterceptorRegistry registry) {
        registry.addInterceptor(new LogInterceptor())
                .addPathPatterns("/**") ;
    }
}
3.3 调用方增加配置文件内容,主启动类增加注解
配置文件:
go.kafka.log.enable=true
主启动类:
@SpringBootApplication
@ComponentScans(value = {@ComponentScan("org.ymx.log"),@ComponentScan("com.example.demo")})
public class DemoApplication {

    public static void main(String[] args) {
        SpringApplication.run(DemoApplication.class, args);
    }

}
3.4 测试
访问任意url

4 自定义Starter实现全局异常处理
4.1 编写starter全局异常处理类
@RestControllerAdvice
public class LogAdviceHandler {

    @ExceptionHandler(value = NullPointerException.class)
    public String exceptionHandlerJwt(NullPointerException e) {
        e.printStackTrace();
        return "error----NullPointerException";
    }

    @ExceptionHandler(value = Exception.class)
    public String exceptionHandler(Exception e) {
        e.printStackTrace();
        return "error----Exception";
    }
}
4.2 调用方制造异常测试
@GetMapping("/ex")
public String ex() {
    String str = null;
    str.equals("2");
    return "22";
}
测试结果:

5 总结几个重要的注解
-
@ConditionalOnProperty(prefix = “go.kafka.log”, name = “enable”, havingValue = “true”)
prefix为配置文件中的前缀,
name为配置的名字
havingValue是与配置的值对比值,当两个值相同返回true,配置类生效. -
@EnableConfigurationProperties({ConfigProperties.class})
使@ConfigurationProperties()注解生效
-
@ConfigurationProperties(“go.kafka.log”)
见文章:https://blog.csdn.net/Mr_YanMingXin/article/details/119249740
-
@ComponentScans(value = {@ComponentScan(“org.ymx.log”),@ComponentScan(“com.example.demo”)})
扫描的bean的路径,这里是扫描starter的路径加上本项目的路径
- 点赞
- 收藏
- 关注作者


评论(0)