SpringBoot集成Rabbit使用TopicRabbit指定发送集合
【摘要】
Rabbitmq中绑定
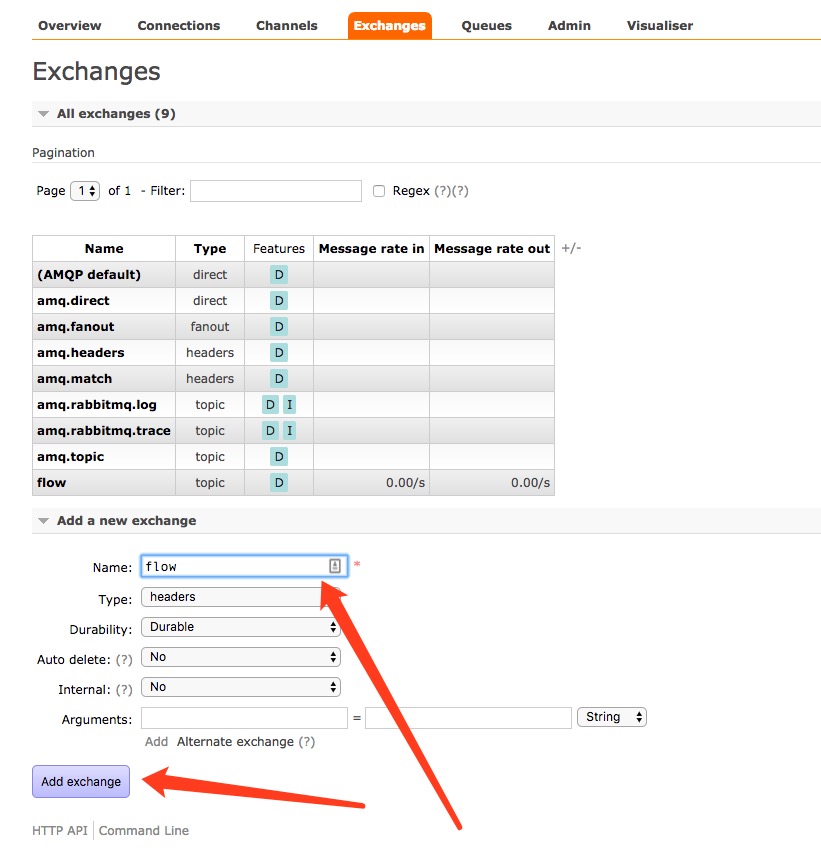
exchange:flow
routing-key:user
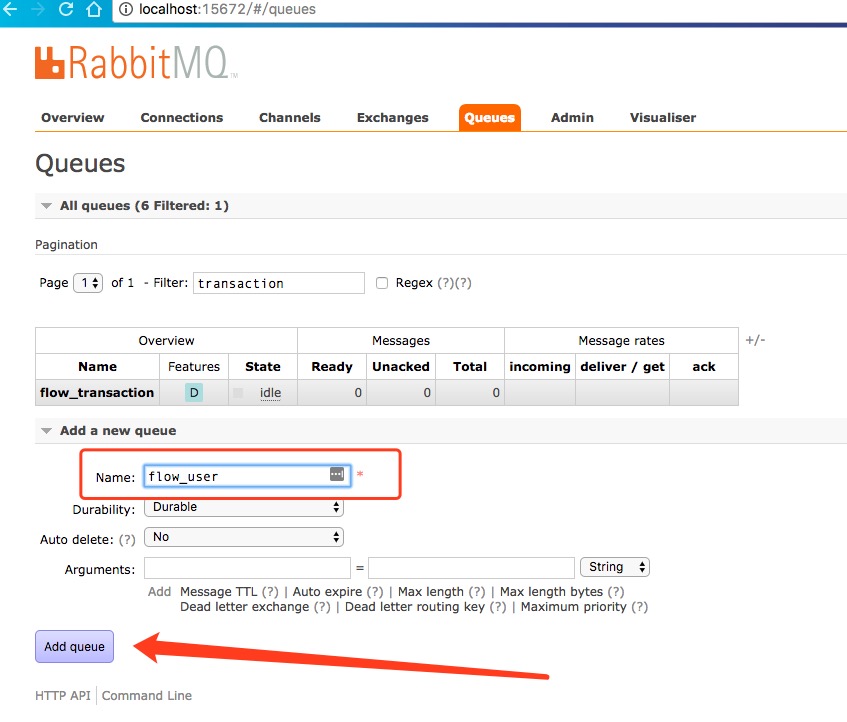
bind-queue:flow_user
白话文就是,把user绑定到flow_user序列
发送方使用ro...
Rabbitmq中绑定
exchange:flow
routing-key:user
bind-queue:flow_user
白话文就是,把user绑定到flow_user序列
发送方使用routing-key推送:
//把routing-key发送给名为flow的exchenge,然后exchenge负责向绑定的这个Queue推送
 amqpTemplate.convertAndSend("flow","user", context);
- 1
- 2
Rabbit配置
- 添加exchange(这里类型type应该是topic,截图时候没有注意)

- 添加Queue

- 添加这个User 到exchange(注意routing-key)

SpringBoot集成Rabbitmq
- 注册配置bean
@Configurable
public class TopicRabbitConfig {
    public final static String FLOW = "flow";

    public final static String USER = "user";
    public final static String USER_QUEUE = "flow_user";


    @Bean
    public Queue queueMessages3() {
        return new Queue(USER_QUEUE);
    }

    @Bean
    TopicExchange exchange() {
        return new TopicExchange(FLOW);
    }
    @Bean
    Binding bindingExchangeMessages3(Queue queueMessages3, TopicExchange exchange) {
        return BindingBuilder.bind(queueMessages3).to(exchange).with(FLOW);
    }
}
- 1
- 2
- 3
- 4
- 5
- 6
- 7
- 8
- 9
- 10
- 11
- 12
- 13
- 14
- 15
- 16
- 17
- 18
- 19
- 20
- 21
- 22
- 发送方代码
/**
 * @Package: pterosaur.account.service.impl
 * @Description: 模拟发送消息,测试使用
 * @author: liuxin
 * @date: 17/4/19 下午3:17
 */
@Component
public class AccountSentImpl {
    @Autowired
    private AmqpTemplate amqpTemplate;

    private ExecutorService threadPool = Executors.newFixedThreadPool(8);

    public void send() {
       for (int i=0;i<10;i++){
           String context = "hello :" + DateUtil.formatDatetime(System.currentTimeMillis())+",当前线程:"+Thread.currentThread().getName();
           System.out.println("Sender : " + context);
           threadPool.execute(new Runnable() {
               @Override
               public void run() {
                   amqpTemplate.convertAndSend(TopicRabbitConfig.FLOW,TopicRabbitConfig.USER, context);
               }
           });
       }
    }

}
- 1
- 2
- 3
- 4
- 5
- 6
- 7
- 8
- 9
- 10
- 11
- 12
- 13
- 14
- 15
- 16
- 17
- 18
- 19
- 20
- 21
- 22
- 23
- 24
- 25
- 26
- 27
- 接受方代码
/**
 * @Package: pterosaur.account.service.impl
 * @Description: mq信息处理实现类
 * @author: liuxin
 * @date: 17/4/19 下午2:55
 */
@Component
public class AccountReceiverImpl implements AccountReceiver {
    private static final Logger logger = LoggerFactory.getLogger(AccountReceiverImpl.class);

    @Autowired
    ExecutorService threadPool;


    /**
     * 用户流水
     *
     * @param message
     */
    @RabbitListener(queues = TopicRabbitConfig.USER_QUEUE)
    @RabbitHandler
    public void processUser(String message) {
        threadPool.execute(new Runnable() {
            @Override
            public void run() {
                logger.info("用户侧流水:{}",message);
            }
        });
    }


}
- 1
- 2
- 3
- 4
- 5
- 6
- 7
- 8
- 9
- 10
- 11
- 12
- 13
- 14
- 15
- 16
- 17
- 18
- 19
- 20
- 21
- 22
- 23
- 24
- 25
- 26
- 27
- 28
- 29
- 30
- 31
- 32
- 33
- 测试代码
Sender : hello :2017-04-25 17:44:15,当前线程:main
Sender : hello :2017-04-25 17:44:20,当前线程:main
2017-04-25 17:44:25.754  INFO 67685 --- [pool-1-thread-1] p.a.service.impl.AccountReceiverImpl     : 用户侧流水:hello :2017-04-25 17:44:20,当前线程:main
Sender : hello :2017-04-25 17:44:25,当前线程:main
Sender : hello :2017-04-25 17:44:30,当前线程:main
2017-04-25 17:44:32.048  INFO 67685 --- [pool-1-thread-2] p.a.service.impl.AccountReceiverImpl     : 用户侧流水:hello :2017-04-25 17:44:30,当前线程:main
Sender : hello :2017-04-25 17:44:32,当前线程:main
Sender : hello :2017-04-25 17:44:33,当前线程:main
2017-04-25 17:44:35.556  INFO 67685 --- [pool-1-thread-3] p.a.service.impl.AccountReceiverImpl     : 用户侧流水:hello :2017-04-25 17:44:33,当前线程:main
Sender : hello :2017-04-25 17:44:35,当前线程:main
Sender : hello :2017-04-25 17:44:37,当前线程:main
2017-04-25 17:44:38.797  INFO 67685 --- [pool-1-thread-1] p.a.service.impl.AccountReceiverImpl     : 用户侧流水:hello :2017-04-25 17:44:37,当前线程:main
- 1
- 2
- 3
- 4
- 5
- 6
- 7
- 8
- 9
- 10
- 11
- 12
- 13
文章来源: springlearn.blog.csdn.net,作者:西魏陶渊明,版权归原作者所有,如需转载,请联系作者。
原文链接:springlearn.blog.csdn.net/article/details/77652294
【版权声明】本文为华为云社区用户转载文章,如果您发现本社区中有涉嫌抄袭的内容,欢迎发送邮件进行举报,并提供相关证据,一经查实,本社区将立刻删除涉嫌侵权内容,举报邮箱:
cloudbbs@huaweicloud.com
- 点赞
- 收藏
- 关注作者


评论(0)