.Net Framework WebApi使用OAuth2.0

【摘要】
参考资料:https://olepetterdahlmann.com/2016/08/08/implement-an-oauth-2-0-authorization-server-using-owin-oauth-middleware-on-asp-net-web-api/
1.新建webapi项目,并添加以下三个库引用...
1.新建webapi项目,并添加以下三个库引用:
Microsoft.AspNet.WebApi.Owin
Microsoft.Owin.Host.SystemWeb
Microsoft ASP.NET Identity Owin
2.App_Start目录下新建类:Startup.Auth.cs
-
using Microsoft.Owin;
-
using Microsoft.Owin.Security.OAuth;
-
using Owin;
-
using System;
-
using System.Collections.Generic;
-
using System.Linq;
-
using System.Web;
-
-
-
namespace YFAPICommon
-
{
-
//Startup.Auth.cs
-
public partial class Startup
-
{
-
public static OAuthAuthorizationServerOptions OAuthOptions { get; private set; }
-
-
static Startup()
-
{
-
OAuthOptions = new OAuthAuthorizationServerOptions
-
{
-
TokenEndpointPath = new PathString("/token"),
-
//Provider = new OAuthAppProvider(),
-
AccessTokenExpireTimeSpan = TimeSpan.FromDays(2),
-
AllowInsecureHttp = true
-
};
-
}
-
-
public void ConfigureAuth(IAppBuilder app)
-
{
-
app.UseOAuthBearerTokens(OAuthOptions);
-
}
-
-
public void Configuration(IAppBuilder app)
-
{
-
ConfigureAuth(app);
-
}
-
}
-
}

3.新建用来创建Token的控制器:AuthenticateController.cs
-
using Microsoft.Owin.Security;
-
using Microsoft.Owin.Security.OAuth;
-
using Newtonsoft.Json.Linq;
-
using System;
-
using System.Collections.Generic;
-
using System.Linq;
-
using System.Net;
-
using System.Net.Http;
-
using System.Security.Claims;
-
using System.Web.Http;
-
-
-
namespace YFAPICommon.Controllers
-
{
-
public class LoginInput
-
{
-
public string account { set; get; }
-
public string pass { set; get; }
-
}
-
public class AuthenticateController : ApiController
-
{
-
[HttpPost]
-
public JObject GetAccessTokenByPass(LoginInput input)
-
{
-
-
var tokenExpiration = TimeSpan.FromDays(14);
-
ClaimsIdentity identity = new ClaimsIdentity(OAuthDefaults.AuthenticationType);
-
identity.AddClaim(new Claim(ClaimTypes.Name, "zzzili"));
-
identity.AddClaim(new Claim(ClaimTypes.Sid, "1"));
-
-
var props = new AuthenticationProperties()
-
{
-
IssuedUtc = DateTime.UtcNow,
-
ExpiresUtc = DateTime.UtcNow.Add(tokenExpiration),
-
};
-
var ticket = new AuthenticationTicket(identity, props);
-
var accessToken = Startup.OAuthOptions.AccessTokenFormat.Protect(ticket);
-
JObject tokenResponse = new JObject(
-
new JProperty("userName", "zzzili"),
-
new JProperty("access_token", accessToken),
-
new JProperty("token_type", "bearer"),
-
new JProperty("expires_in", tokenExpiration.TotalSeconds.ToString()),
-
new JProperty(".issued", ticket.Properties.IssuedUtc.ToString()),
-
new JProperty(".expires", ticket.Properties.ExpiresUtc.ToString()));
-
-
return tokenResponse;
-
}
-
}
-
}
4.添加Swagger支持:
参看:https://www.cnblogs.com/daxnet/p/6181366.html
5.添加swagger对OAuth的支持,可以在swagger页面上输入token:
在SwaggerConfig.cs文件中修改如下代码:
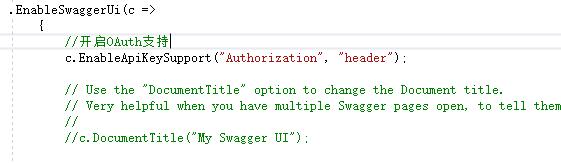
c.EnableApiKeySupport("Authorization", "header");
6.项目启动后可以在Swagger页面的右上角api_key处输入access_Token,例如:
Bearer NfHlhFRSf78Ig9cIQ7H2l0P9nxMpaU4H53j_h2PFf2PlqPnIJ**************

7.添加完成后,即可在控制器内对方法添加Auth身份认证:
-
[Authorize]
-
[HttpPost]
-
public string Test1()
-
{
-
var ident = this.User.Identity;
-
return "test";
-
}
-
protected int GetAuthUserId()
-
{
-
var ident = (ClaimsIdentity)User.Identity;
-
return int.Parse(ident.FindFirst(ClaimTypes.Sid).Value);
-
}
工程git地址:https://github.com/zzzili/YFAPICommon
文章来源: zzzili.blog.csdn.net,作者:清雨小竹,版权归原作者所有,如需转载,请联系作者。
原文链接:zzzili.blog.csdn.net/article/details/79297800

【版权声明】本文为华为云社区用户转载文章,如果您发现本社区中有涉嫌抄袭的内容,欢迎发送邮件进行举报,并提供相关证据,一经查实,本社区将立刻删除涉嫌侵权内容,举报邮箱:
cloudbbs@huaweicloud.com
- 点赞
- 收藏
- 关注作者
评论(0)