2022年08月 微信小程序-view生成分享图片(第三方组件使用)
【摘要】 前言微信小程序并不支持view直接转绘到画布上,想要实现海报功能必须通过以下4个步骤:通过wx.createCanvasContext创建一个画布在画布上绘制文本、内容、图片在通过wx.canvasToTempFilePath保存到本地路径在通过wx.saveImageToPhotosAlbum保存到相册 一、view生成分享图片 1.第三方工具的使用安装包:npm install --s...
前言
微信小程序并不支持view直接转绘到画布上,想要实现海报功能必须通过以下4个步骤:
- 通过wx.createCanvasContext创建一个画布
- 在画布上绘制文本、内容、图片
- 在通过wx.canvasToTempFilePath保存到本地路径
- 在通过wx.saveImageToPhotosAlbum保存到相册
一、view生成分享图片
1.第三方工具的使用
安装包:npm install --save wxml-to-canvas
引入组件
"usingComponents": {
  "wxml-to-canvas": "wxml-to-canvas"
}
demo.js
const wxml = `
<view class="container" >
  <view class="item-box red">
  </view>
  <view class="item-box green" >
    <text class="text">yeah!</text>
  </view>
  <view class="item-box blue">
      <image class="img" src="https://cdn.nlark.com/yuque/0/2020/png/1252071/1590050624644-dd5948db-22fe-48d9-af37-8a2a9f099715.png"></image>
  </view>
</view>
`

const style = {
  container: {
    width: 300,
    height: 200,
    flexDirection: 'row',
    justifyContent: 'space-around',
    backgroundColor: '#ccc',
    alignItems: 'center',
  },
  itemBox: {
    width: 80,
    height: 60,
  },
  red: {
    backgroundColor: '#ff0000'
  },
  green: {
    backgroundColor: '#00ff00'
  },
  blue: {
    backgroundColor: '#0000ff',
    alignItems: 'center',
    justifyContent: 'center',
  },
  text: {
    width: 80,
    height: 60,
    textAlign: 'center',
    verticalAlign: 'middle',
  },
  img: {
    width: 40,
    height: 40,
    borderRadius: 20,
  }
}

module.exports = {
  wxml,
  style
}
wxml
<!-- wxml -->
<view class="page-section">
	<view class="page-section-title">wxml</view>
 	<view class="container" >
    <view class="item-box red">
    </view>
    <view class="item-box green" >
      <text class="text">yeah!</text>
    </view>
    <view class="item-box blue">
        <image class="img" src="https://cdn.nlark.com/yuque/0/2020/png/1252071/1590050624644-dd5948db-22fe-48d9-af37-8a2a9f099715.png"></image>
    </view>
  </view>
</view>

<!--  -->
<!-- 渲染wxml -->
<view class="page-section">
	<view class="page-section-title">渲染wxml</view>
	<!-- 组件 -->
	<wxml-to-canvas class="widget"></wxml-to-canvas>
	<view class="page-section-title">导出图片</view>
	<!-- 图片 -->
	<image src="{{src}}" style="width: {{width}}px; height: {{height}}px"></image>
</view>

<!-- btns -->
<view class="btn-area">
	<button type="primary" bindtap="renderToCanvas">渲染到canvas</button>
	<button bindtap="extraImage">导出图片</button>
	<button bindtap="onTapSaveBtn">保存图片</button>
</view>
js
const { wxml, style } = require('./demo')
Page({
  data: {
    src: ''
  },
  onLoad() {
    this.widget = this.selectComponent('.widget')
  },
  onTapSaveBtn(e){
    wx.saveImageToPhotosAlbum({
      filePath:this.data.src,
      complete(res) {
        console.log(res)
      }
    })
  },
  renderToCanvas() {
    const p1 = this.widget.renderToCanvas({ wxml, style })
    p1.then((res) => {
      console.log('container', res.layoutBox)
      this.container = res
    })
  },
  extraImage() {
    const p2 = this.widget.canvasToTempFilePath()
    p2.then(res => {
      this.setData({
        src: res.tempFilePath,
        width: this.container.layoutBox.width,
        height: this.container.layoutBox.height
      })
    })
  }
})
wxss
.widget {

}

.container {
  width: 300px;
  height: 200px;
  min-height: 200px;
  flex-direction: row;
  justify-content: space-around;
  background-color: #ccc;
  align-items: center;
  padding: 60px 0 60px;
  display: flex;
}
.item-box {
  width: 80px;
  height: 60px;
  display: flex;
}
.red{
  background-color: #ff0000
}
.green {
  background-color: #00ff00
}
.blue{
  background-color: #0000ff;
  align-items: center;
  justify-content: center;
}
.text{
  width: 80px;
  height: 60px;
  text-align: center;
  vertical-align: middle;
  line-height: 60px;
}
.img{
  width: 40px;
  height: 40px;
  border-radius: 50%;
}
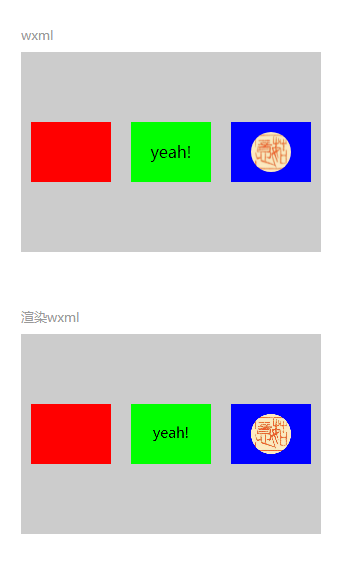
效果

【声明】本内容来自华为云开发者社区博主,不代表华为云及华为云开发者社区的观点和立场。转载时必须标注文章的来源(华为云社区)、文章链接、文章作者等基本信息,否则作者和本社区有权追究责任。如果您发现本社区中有涉嫌抄袭的内容,欢迎发送邮件进行举报,并提供相关证据,一经查实,本社区将立刻删除涉嫌侵权内容,举报邮箱:
cloudbbs@huaweicloud.com
- 点赞
- 收藏
- 关注作者


评论(0)