【Nest教程】Nest项目集成JWT接口认证

【摘要】
Json web token (JWT), 是为了在网络应用环境间传递声明而执行的一种基于JSON的开放标准((RFC 7519).该token被设计为紧凑且安全的,特别适用于分布式站点的单点登录(SSO)场景。JWT的声明一般被用来在身份提供者和服务提供者间传递被认证的用户身份信息,以便于从资源服务器获取资源,也可以增加一...
Json web token (JWT), 是为了在网络应用环境间传递声明而执行的一种基于JSON的开放标准((RFC 7519).该token被设计为紧凑且安全的,特别适用于分布式站点的单点登录(SSO)场景。JWT的声明一般被用来在身份提供者和服务提供者间传递被认证的用户身份信息,以便于从资源服务器获取资源,也可以增加一些额外的其它业务逻辑所必须的声明信息,该token也可直接被用于认证,也可被加密。
我们都知道,http协议本身是无状态的协议,如果在一个系统中,我们只有登录后在可以操作,由于http是无状态的,所以那就必须每个接口都需要一个认证,来查看当前用户是否有权限。今天我们就基于之前的项目,集成JWT。
1 user.service方法
增加一个查询单个用户的方法,这个方法不需要对应控制器。
-
async findOne(name: string): Promise<any | undefined> {
-
const user = await this.UserRepository.findOne({
-
where: {
-
name: name,
-
},
-
});
-
if (user == undefined) {
-
return void 0;
-
} else {
-
return user;
-
}
-
}
2 增加登录路由
在user.controller文件中新增路由,里面的逻辑暂时什么都不写
-
@Post('/login')
-
async login(@Body() loginParmas: any) {}
3 安装依赖
yarn add passport passport-jwt passport-local @nestjs/passport @nestjs/jwt -S
4 创建Auth模块
src下新建文件夹logical/auth,auth目录下为我们逻辑功能。
constants.ts - 常量
-
export const jwtConstants = {
-
secret: 'NestAPI',
-
};
jwt.strategy.ts - 验证策略
-
import { ExtractJwt, Strategy } from 'passport-jwt';
-
import { PassportStrategy } from '@nestjs/passport';
-
import { Injectable } from '@nestjs/common';
-
import { jwtConstants } from './constants';
-
-
@Injectable()
-
export class JwtStrategy extends PassportStrategy(Strategy) {
-
constructor() {
-
super({
-
jwtFromRequest: ExtractJwt.fromAuthHeaderAsBearerToken(),
-
ignoreExpiration: false,
-
secretOrKey: jwtConstants.secret,
-
});
-
}
-
-
// JWT验证 - Step 4: 被守卫调用
-
async validate(payload: any) {
-
return {
-
id: payload.id,
-
name: payload.name,
-
nickname: payload.nickname,
-
};
-
}
-
}

auth.service.ts - 验证逻辑
-
import { Injectable, Inject } from '@nestjs/common';
-
import { JwtService } from '@nestjs/jwt';
-
import { UserService } from '../../user/user.service';
-
import { encryptPassword } from '../../utils/cryptogram';
-
-
@Injectable()
-
export class AuthService {
-
constructor(
-
@Inject('UserService') private readonly usersService: UserService,
-
private readonly jwtService: JwtService,
-
) {}
-
-
// JWT验证 - Step 2: 校验用户信息
-
async validateUser(name: string, password: string): Promise<any> {
-
const user = await this.usersService.findOne(name);
-
if (user) {
-
const hashedPassword = user.password;
-
const salt = user.passwdSalt;
-
// 通过密码盐,加密传参,再与数据库里的比较,判断是否相等
-
const hashPassword = encryptPassword(password, salt);
-
if (hashedPassword === hashPassword) {
-
// 密码正确
-
return {
-
code: 1,
-
user,
-
};
-
} else {
-
// 密码错误
-
return {
-
code: 2,
-
user: null,
-
};
-
}
-
}
-
// 查无此人
-
return {
-
code: 3,
-
user: null,
-
};
-
}
-
-
// JWT验证 - Step 3: 处理 jwt 签证
-
async certificate(user: any) {
-
const payload = {
-
id: user.id,
-
name: user.name,
-
nickname: user.nickname,
-
};
-
try {
-
const token = this.jwtService.sign(payload);
-
return {
-
code: 200,
-
data: {
-
token,
-
},
-
msg: `登录成功`,
-
};
-
} catch (error) {
-
return {
-
code: 600,
-
msg: `账号或密码错误`,
-
};
-
}
-
}
-
}
auth.module.ts
-
import { Module } from '@nestjs/common';
-
import { AuthService } from './auth.service';
-
import { JwtStrategy } from './jwt.strategy';
-
import { UserModule } from '../../user/user.module';
-
import { PassportModule } from '@nestjs/passport';
-
import { JwtModule } from '@nestjs/jwt';
-
import { jwtConstants } from './constants';
-
-
@Module({
-
imports: [
-
PassportModule.register({ defaultStrategy: 'jwt' }),
-
JwtModule.register({
-
secret: jwtConstants.secret,
-
signOptions: { expiresIn: '8h' }, // token 过期时效
-
}),
-
UserModule,
-
],
-
providers: [AuthService, JwtStrategy],
-
exports: [AuthService],
-
})
-
export class AuthModule {}
上面这些属于配置,调用我们需要在路由/login里面写逻辑,第2步中我们只定义了一个空的方法,我们接下来写逻辑
-
import { ApiTags, ApiParam, ApiQuery, ApiHeader } from '@nestjs/swagger';
-
import {
-
Controller,
-
Post,
-
Body,
-
Logger,
-
HttpCode,
-
UseGuards,
-
} from '@nestjs/common';
-
import { AuthGuard } from '@nestjs/passport';
-
import { AuthService } from '../logical/auth/auth.service';
-
import { UserService } from './user.service';
-
-
@ApiTags('用户管理')
-
@Controller('user')
-
export class UserController {
-
constructor(
-
private readonly authService: AuthService,
-
private readonly userService: UserService,
-
) {}
-
-
/**
-
* 用户登录
-
*/
-
@Post('/login')
-
async login(@Body() loginParmas: any) {
-
const authResult = await this.authService.validateUser(
-
loginParmas.name,
-
loginParmas.password,
-
);
-
switch (authResult.code) {
-
case 1:
-
return this.authService.certificate(authResult.user);
-
case 2:
-
return {
-
code: 600,
-
msg: `账号或密码不正确`,
-
};
-
default:
-
return {
-
code: 600,
-
msg: `当前用户未查到`,
-
};
-
}
-
}
-
}
5 测试
运行项目,我们用postman测试
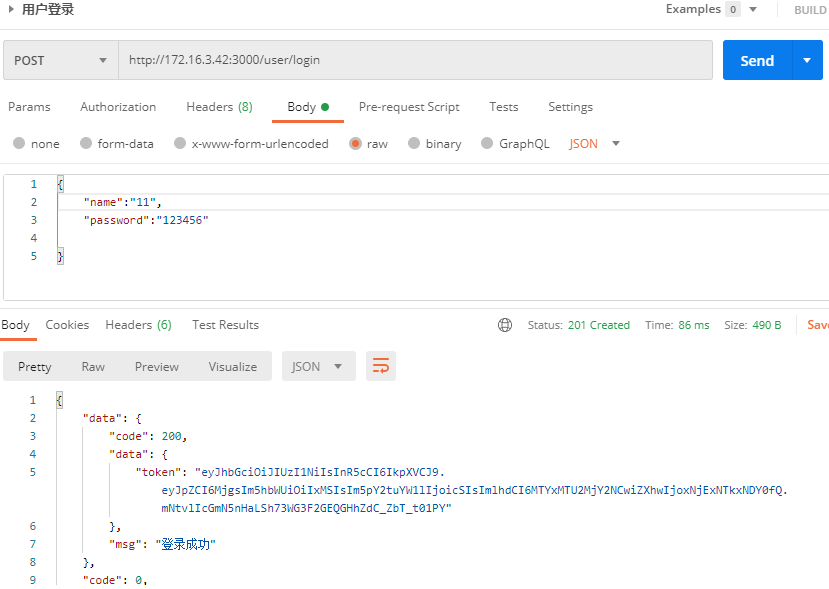
登录成功,返回token。
文章来源: blog.csdn.net,作者:NMGWAP,版权归原作者所有,如需转载,请联系作者。
原文链接:blog.csdn.net/NMGWAP/article/details/125066956

【版权声明】本文为华为云社区用户转载文章,如果您发现本社区中有涉嫌抄袭的内容,欢迎发送邮件进行举报,并提供相关证据,一经查实,本社区将立刻删除涉嫌侵权内容,举报邮箱:
cloudbbs@huaweicloud.com
- 点赞
- 收藏
- 关注作者
评论(0)