Vue3动态添加路由及生成菜单

【摘要】
前面讲了Vue2项目中动态添加路由及生成菜单,今天尝试在Vue3中动态添加路由及生成菜单。
最近在尝试用Vue3开发个管理平台项目,一切都是从头开始,基本框架搭建,熟悉Vue3写法,编写登录页,编写路由守卫,上面功能已基本完成,开始编写首页布局,用Vue3就必须用Router4.x版本,所以之前的代码迁移过来之后发现,...
前面讲了Vue2项目中动态添加路由及生成菜单,今天尝试在Vue3中动态添加路由及生成菜单。
最近在尝试用Vue3开发个管理平台项目,一切都是从头开始,基本框架搭建,熟悉Vue3写法,编写登录页,编写路由守卫,上面功能已基本完成,开始编写首页布局,用Vue3就必须用Router4.x版本,所以之前的代码迁移过来之后发现,动态路由不生效,查了很多资料,最后发现,Router4中,去掉了 router.addRoutes ,只能使用 addRoute
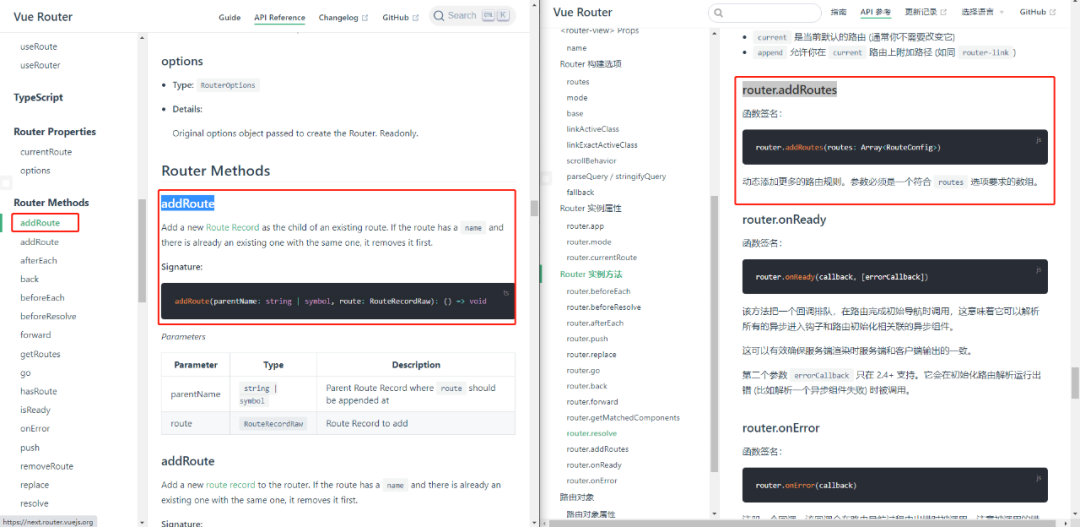
所以之前的写法就要相应的调整,之前是可以动态添加更多的路由规则,参数必须是一个符合 routes 选项要求的数组。
router.addRoutes(routes: Array<RouteConfig>);
现在是只能添加一个
-
router.addRoute("名称", {
-
path: `/index`,
-
name: '首页',
-
component: () => import(`@/index.vue`)
-
});
接下来就详细说明
1 路由数据封装
前台把路由写在代码里,这种方式只适用部分情况,所以大部分情况是路由后台提供,比如返回格式如下:
-
{
-
"code": 0,
-
"msg": "success",
-
"data": [{
-
"id": 1000,
-
"parentId": -1,
-
"icon": "iconquanxian",
-
"name": "组织架构",
-
"path": "/system",
-
"component": "Layout",
-
"redirect": null,
-
"type": "0",
-
"children": [{
-
"id": 1100,
-
"parentId": 1000,
-
"children": [],
-
"icon": "iconyonghuguanli",
-
"name": "用户管理",
-
"path": "/user",
-
"component": "views/system/user/index",
-
"redirect": null,
-
"type": "0",
-
}],
-
-
}, {
-
"id": 2000,
-
"parentId": -1,
-
"icon": "iconquanxian",
-
"name": "权限管理",
-
"path": "/organization",
-
"component": "Layout",
-
"redirect": null,
-
"type": "0",
-
"children": [{
-
"id": 2100,
-
"parentId": 2000,
-
"children": [],
-
"icon": "iconyonghuguanli",
-
"name": "菜单管理",
-
"path": "/menu",
-
"component": "views/system/user/index",
-
"redirect": null,
-
"type": "0",
-
}],
-
-
}]
-
}

这种是后台树型结构返回,前台不需要进行二次处理可以直接显示成菜单,
-
<a-menu
-
theme="dark"
-
mode="inline"
-
>
-
<a-sub-menu v-for="subitem in menuData.menu" :key="subitem.path">
-
<template #title>
-
<Icon-font :type="subitem.icon" />
-
<span>{{ subitem.name }}</span>
-
</template>
-
<a-menu-item v-for="item in subitem.children" :key="item.path">{{
-
item.name
-
}}</a-menu-item>
-
</a-sub-menu>
-
</a-menu>
但是路由需要重新封装,先说说用到的字段,path-路由地址、component这个现在有两种,一种是Layout代表父菜单,另一种views开头的是组件地址。那么我们就可以开始动态生成路由了,写法和Vue2项目有所不同,首先定义一个方法,
-
const routerPackag = routers => {
-
routers.filter(itemRouter => {
-
if (itemRouter.component != "Layout") {
-
router.addRoute("BasicLayout", {
-
path: `${itemRouter.path}`,
-
name: itemRouter.name,
-
component: () => import(`@/${itemRouter.component}`)
-
});
-
}
-
// 是否存在子集
-
if (itemRouter.children && itemRouter.children.length) {
-
routerPackag(itemRouter.children);
-
}
-
return true;
-
});
-
};
2 调用
上面这个方式是动态生成路由,接下来就是调用这个方法。
-
getBasisMenu().then(res => {
-
if (res.code == 0) {
-
routerPackag(res.data);
-
}
-
});
3 效果
动态路由实现了,但是现在还有部分问题未解决
代码在gitee上,可以直接运行。
文章来源: blog.csdn.net,作者:NMGWAP,版权归原作者所有,如需转载,请联系作者。
原文链接:blog.csdn.net/NMGWAP/article/details/125066990

【版权声明】本文为华为云社区用户转载文章,如果您发现本社区中有涉嫌抄袭的内容,欢迎发送邮件进行举报,并提供相关证据,一经查实,本社区将立刻删除涉嫌侵权内容,举报邮箱:
cloudbbs@huaweicloud.com
- 点赞
- 收藏
- 关注作者
评论(0)