axios的基本概念及使用①(如何发送请求、响应结构)

【摘要】
文章目录
几种请求的示例axios用其他方式发送请求axios发送请求后的响应结构
几种请求的示例
我们从一个模拟场景中体会:网页有四个按钮,点击即发送对应的请求。 在这之中我们会使用到:...
几种请求的示例
我们从一个模拟场景中体会:网页有四个按钮,点击即发送对应的请求。
在这之中我们会使用到:
代码实现:
<body>
    <div class="container">
        <h2 class="page-header">基本使用</h2>
        <button class="btn btn-primary"> 发送GET请求 </button>
        <button class="btn btn-warning" > 发送POST请求 </button>
        <button class="btn btn-success"> 发送 PUT 请求 </button>
        <button class="btn btn-danger"> 发送 DELETE 请求 </button>
    </div>
    <script>
        //获取按钮
        const btns = document.querySelectorAll('button');

        //第一个
        btns[0].onclick = function(){
            //发送 AJAX 请求
            axios({
                //请求类型
                method: 'GET',
                //URL
                url: 'http://localhost:3000/posts/2',
            }).then(response => {
                console.log(response);
            });
        }

        //添加一篇新的文章
        btns[1].onclick = function(){
            //发送 AJAX 请求
            axios({
                //请求类型
                method: 'POST',
                //URL
                url: 'http://localhost:3000/posts',
                //设置请求体
                data: {
                    title: "今天天气不错, 还挺风和日丽的",
                    author: "张三"
                }
            }).then(response => {
                console.log(response);
            });
        }

        //更新数据
        btns[2].onclick = function(){
            //发送 AJAX 请求
            axios({
                //请求类型
                method: 'PUT',
                //URL
                url: 'http://localhost:3000/posts/3',
                //设置请求体
                data: {
                    title: "今天天气不错, 还挺风和日丽的",
                    author: "李四"
                }
            }).then(response => {
                console.log(response);
            });
        }

        //删除数据
        btns[3].onclick = function(){
            //发送 AJAX 请求
            axios({
                //请求类型
                method: 'delete',
                //URL
                url: 'http://localhost:3000/posts/3',
            }).then(response => {
                console.log(response);
            });
        }

    </script>
</body>
- 1
- 2
- 3
- 4
- 5
- 6
- 7
- 8
- 9
- 10
- 11
- 12
- 13
- 14
- 15
- 16
- 17
- 18
- 19
- 20
- 21
- 22
- 23
- 24
- 25
- 26
- 27
- 28
- 29
- 30
- 31
- 32
- 33
- 34
- 35
- 36
- 37
- 38
- 39
- 40
- 41
- 42
- 43
- 44
- 45
- 46
- 47
- 48
- 49
- 50
- 51
- 52
- 53
- 54
- 55
- 56
- 57
- 58
- 59
- 60
- 61
- 62
- 63
- 64
- 65
- 66
- 67
- 68
- 69
- 70
- 71
- 72
- 73
- 74
- 75
- 76
添加的时候是不用指明id的。
axios用其他方式发送请求
我们上面是使用axios函数来发送请求,接下来我们尝试使用axios对象的方法发送请求。
相关API:
axios(config): 通用/最本质的发任意类型请求的方式
axios(url[, config]): 可以只指定 url 发 get 请求
axios.request(config): 等同于 axios(config)
axios.get(url[, config]): 发 get 请求
axios.delete(url[, config]): 发 delete 请求
axios.post(url[, data, config]): 发 post 请求
axios.put(url[, data, config]): 发 put 请求
- 1
- 2
- 3
- 4
- 5
- 6
- 7
例如:
<body>
    <div class="container">
        <h2 class="page-header">其他使用</h2>
        <button class="btn btn-primary"> 发送GET请求 </button>
        <button class="btn btn-warning" > 发送POST请求 </button>
        <button class="btn btn-success"> 发送 PUT 请求 </button>
        <button class="btn btn-danger"> 发送 DELETE 请求 </button>
    </div>
    <script>
        //获取按钮
        const btns = document.querySelectorAll('button');

        //发送 GET 请求
        btns[0].onclick = function(){
            // axios()
            axios.request({
                method:'GET',
                url: 'http://localhost:3000/comments'
            }).then(response => {
                console.log(response);
            })
        }

        //发送 POST 请求
        btns[1].onclick = function(){
            // axios()
            axios.post(
                'http://localhost:3000/comments',
                {
                    "body": "喜大普奔",
                    "postId": 2
                }).then(response => {
                    console.log(response);
                })
        }

    </script>
</body>
- 1
- 2
- 3
- 4
- 5
- 6
- 7
- 8
- 9
- 10
- 11
- 12
- 13
- 14
- 15
- 16
- 17
- 18
- 19
- 20
- 21
- 22
- 23
- 24
- 25
- 26
- 27
- 28
- 29
- 30
- 31
- 32
- 33
- 34
- 35
- 36
- 37
- 38
axios发送请求后的响应结构
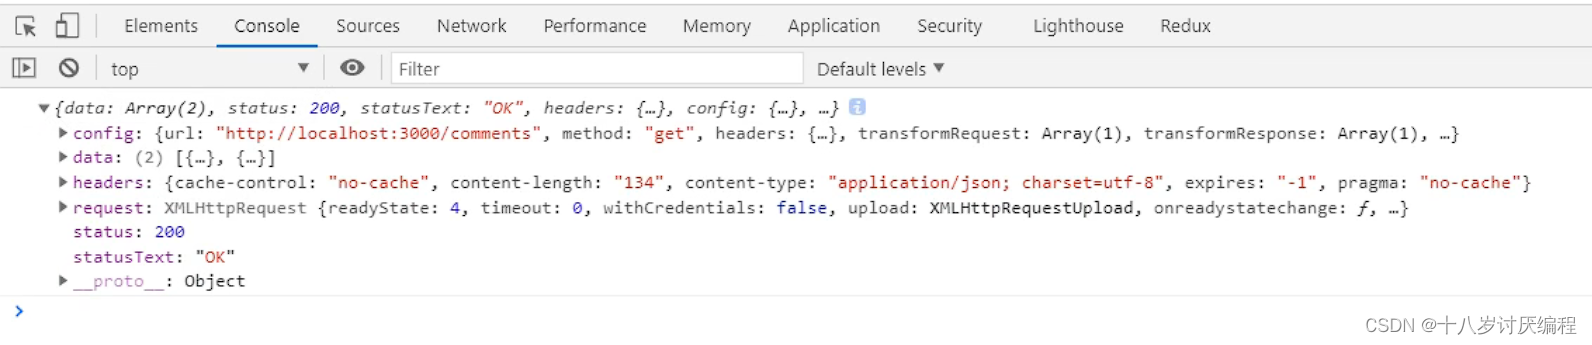
以上图为例:
- config是一个配置对象,里面包含了请求类型,请求url,请求体等数据
- data是响应体的结果,axios会将服务器返回的结果进行json解析转化成对象之后,方便我们后续对其进行处理。
- headers是响应的头信息
- request是原生的AJAX请求对象。其中保存的正是当前axios发送请求时所创建的AJAX请求对象。
- status是响应状态码
- statusText是响应的状态字符串
文章来源: blog.csdn.net,作者:十八岁讨厌编程,版权归原作者所有,如需转载,请联系作者。
原文链接:blog.csdn.net/zyb18507175502/article/details/124064743

【版权声明】本文为华为云社区用户转载文章,如果您发现本社区中有涉嫌抄袭的内容,欢迎发送邮件进行举报,并提供相关证据,一经查实,本社区将立刻删除涉嫌侵权内容,举报邮箱:
cloudbbs@huaweicloud.com
- 点赞
- 收藏
- 关注作者
评论(0)