axios的基本概念及使用②

【摘要】
文章目录
axios的默认配置axios创建示例对象发送请求axios拦截器axios取消请求
axios的默认配置
这是一种对重复配置的默认编写,可以减少冗余的代码 例如:
<b...
axios的默认配置
这是一种对重复配置的默认编写,可以减少冗余的代码
例如:
<body>
    <div class="container">
        <h2 class="page-header">基本使用</h2>
        <button class="btn btn-primary"> 发送GET请求 </button>
        <button class="btn btn-warning" > 发送POST请求 </button>
        <button class="btn btn-success"> 发送 PUT 请求 </button>
        <button class="btn btn-danger"> 发送 DELETE 请求 </button>
    </div>
    <script>
        //获取按钮
        const btns = document.querySelectorAll('button');
        //默认配置
        axios.defaults.method = 'GET';//设置默认的请求类型为 GET
        axios.defaults.baseURL = 'http://localhost:3000';//设置基础 URL
        axios.defaults.params = {id:100};
        axios.defaults.timeout = 3000;//

        btns[0].onclick = function(){
            axios({
                url: '/posts'
            }).then(response => {
                console.log(response);
            })
        }

    </script>
</body>
- 1
- 2
- 3
- 4
- 5
- 6
- 7
- 8
- 9
- 10
- 11
- 12
- 13
- 14
- 15
- 16
- 17
- 18
- 19
- 20
- 21
- 22
- 23
- 24
- 25
- 26
- 27
axios创建示例对象发送请求
axios.create(config)
- 根据指定配置创建一个新的 axios, 也就就每个新 axios 都有自己的配置
- 新 axios 只是没有取消请求和批量发请求的方法, 其它所有语法都是一致的
- 为什么要设计这个语法?
(1) 需求: 项目中有部分接口需要的配置与另一部分接口需要的配置不太一样
(2) 解决: 创建 2 个新 axios, 每个都有自己特有的配置, 分别应用到不同要求的接口请求中
例如:
<script>
        //获取按钮
        const btns = document.querySelectorAll('button');

        //创建实例对象  /getJoke
        const duanzi = axios.create({
            baseURL: 'https://api.apiopen.top',
            timeout: 2000
        });

        const another = axios.create({
            baseURL: 'https://b.com',
            timeout: 2000
        });
        //这里  duanzi 与 axios 对象的功能几近是一样的
        // duanzi({
        //     url: '/getJoke',
        // }).then(response => {
        //     console.log(response);
        // });

        duanzi.get('/getJoke').then(response => {
            console.log(response.data)
        })
    </script>
- 1
- 2
- 3
- 4
- 5
- 6
- 7
- 8
- 9
- 10
- 11
- 12
- 13
- 14
- 15
- 16
- 17
- 18
- 19
- 20
- 21
- 22
- 23
- 24
- 25
axios拦截器
拦截器本质是一些函数,其分为两类:
- 请求拦截器
- 响应拦截器
请求拦截器的作用:在发送请求之前,我们可以借助一些回调,来对请求参数和内容进行一些处理和检测。如果说没有问题则去发送请求,如果有问题则这个请求可以直接停止取消。(类似于一个关卡)
响应拦截器的作用:在我们处理返回结果之前做一些预处理。如果没有问题则交由我们自己自定义的回调进行处理,如果有问题在相应拦截器中处理掉即可,我们不用处理失败的结果。(类似于一个关卡)
拦截器使用演示:
<script>
        // Promise
        // 设置请求拦截器  config 配置对象
        axios.interceptors.request.use(function (config) {
            console.log('请求拦截器 成功 - 1号');
            //修改 config 中的参数
            config.params = {a:100};

            return config;
        }, function (error) {
            console.log('请求拦截器 失败 - 1号');
            return Promise.reject(error);
        });

        axios.interceptors.request.use(function (config) {
            console.log('请求拦截器 成功 - 2号');
            //修改 config 中的参数
            config.timeout = 2000;
            return config;
        }, function (error) {
            console.log('请求拦截器 失败 - 2号');
            return Promise.reject(error);
        });

        // 设置响应拦截器
        axios.interceptors.response.use(function (response) {
            console.log('响应拦截器 成功 1号');
            return response.data;
            // return response;
        }, function (error) {
            console.log('响应拦截器 失败 1号')
            return Promise.reject(error);
        });

        axios.interceptors.response.use(function (response) {
            console.log('响应拦截器 成功 2号')
            return response;
        }, function (error) {
            console.log('响应拦截器 失败 2号')
            return Promise.reject(error);
        });

        //发送请求
        axios({
            method: 'GET',
            url: 'http://localhost:3000/posts'
        }).then(response => {
            console.log('自定义回调处理成功的结果');
            console.log(response);
        });
    </script>
- 1
- 2
- 3
- 4
- 5
- 6
- 7
- 8
- 9
- 10
- 11
- 12
- 13
- 14
- 15
- 16
- 17
- 18
- 19
- 20
- 21
- 22
- 23
- 24
- 25
- 26
- 27
- 28
- 29
- 30
- 31
- 32
- 33
- 34
- 35
- 36
- 37
- 38
- 39
- 40
- 41
- 42
- 43
- 44
- 45
- 46
- 47
- 48
- 49
- 50
- 51
几个注意点:
- 此流程是通过 promise 串连起来的, 请求拦截器传递的是 config, 响应拦截器传递的是 response
- config即为配置对象,我们可以利用他对配置对象中的参数进行修改
- response即为axios默认创建的响应结果,我们可以只返回其中的一个部分(相当于放行其中的一部分),如同上述代码中的return response.data。
- 可以设置多个拦截器
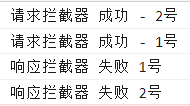
- 如果我们设置多个响应拦截器,是先进先执行
- 如果我们设置多个请求拦截器,是后进先执行
- 假设我们在一号请求拦截器抛出一个错误,则整体返回结果为:

axios取消请求
基本流程:
- 配置 cancelToken 对象
- 缓存用于取消请求的 cancel 函数
- 在后面特定时机调用 cancel 函数取消请求
- 在错误回调中判断如果 error 是 cancel, 做相应处理
场景一:点击按钮, 取消某个正在请求中的请求
代码实现:
<body>
    <div class="container">
        <h2 class="page-header">axios取消请求</h2>
        <button class="btn btn-primary"> 发送请求 </button>
        <button class="btn btn-warning" > 取消请求 </button>
    </div>
    <script>
        //获取按钮
        const btns = document.querySelectorAll('button');
        //2.声明全局变量
        let cancel = null;
        //发送请求
        btns[0].onclick = function(){
            axios({
                method: 'GET',
                url: 'http://localhost:3000/posts',
                //1. 添加配置对象的属性
                cancelToken: new axios.CancelToken(function(c){
                    //3. 将 c 的值赋值给 cancel
                    cancel = c;
                })
            }).then(response => {
                console.log(response);
            })
        }

        //绑定第二个事件取消请求
        btns[1].onclick = function(){
            cancel();
        }
    </script>
- 1
- 2
- 3
- 4
- 5
- 6
- 7
- 8
- 9
- 10
- 11
- 12
- 13
- 14
- 15
- 16
- 17
- 18
- 19
- 20
- 21
- 22
- 23
- 24
- 25
- 26
- 27
- 28
- 29
- 30
- 31
考虑到有时候多次重复发送请求,会造成服务器端的巨大压力,模拟场景二:在请求一个接口前, 取消前面一个未完成的请求
<body>
    <div class="container">
        <h2 class="page-header">axios取消请求</h2>
        <button class="btn btn-primary"> 发送请求 </button>
        <button class="btn btn-warning" > 取消请求 </button>
    </div>
    <script>
        //获取按钮
        const btns = document.querySelectorAll('button');
        //2.声明全局变量
        let cancel = null;
        //发送请求
        btns[0].onclick = function(){
            //检测上一次的请求是否已经完成
            if(cancel !== null){
                //取消上一次的请求
                cancel();
            }
            axios({
                method: 'GET',
                url: 'http://localhost:3000/posts',
                //1. 添加配置对象的属性
                cancelToken: new axios.CancelToken(function(c){
                    //3. 将 c 的值赋值给 cancel
                    cancel = c;
                })
            }).then(response => {
                console.log(response);
                //将 cancel 的值初始化
                cancel = null;
            })
        }

        //绑定第二个事件取消请求
        btns[1].onclick = function(){
            cancel();
        }
    </script>
</body>
- 1
- 2
- 3
- 4
- 5
- 6
- 7
- 8
- 9
- 10
- 11
- 12
- 13
- 14
- 15
- 16
- 17
- 18
- 19
- 20
- 21
- 22
- 23
- 24
- 25
- 26
- 27
- 28
- 29
- 30
- 31
- 32
- 33
- 34
- 35
- 36
- 37
- 38
- 39
文章来源: blog.csdn.net,作者:十八岁讨厌编程,版权归原作者所有,如需转载,请联系作者。
原文链接:blog.csdn.net/zyb18507175502/article/details/124065985

【版权声明】本文为华为云社区用户转载文章,如果您发现本社区中有涉嫌抄袭的内容,欢迎发送邮件进行举报,并提供相关证据,一经查实,本社区将立刻删除涉嫌侵权内容,举报邮箱:
cloudbbs@huaweicloud.com
- 点赞
- 收藏
- 关注作者
评论(0)