OpenCV中的深度学习姿态估计

在本教程中,使用OpenCV进行基于深度学习的人体姿态估计。我们将详细解释如何在您自己的应用程序中使用预先训练的Caffe模型,该模型赢得了2016年COCO关键点挑战。我们将简要回顾架构以了解其内部情况。
1.姿态估计(关键点检测)
姿态估计是计算机视觉中的一个普遍问题,用于检测物体的位置和方向。这通常意味着检测描述物体的关键点位置。
一个相关的问题是头部姿态估计,我们使用面部关键点特征来获得一个人的头部相对于相机的3D方向。
在这篇文章中,我们将重点讨论人体姿态估计,它需要检测和定位身体的主要部分/关节(例如肩膀、脚踝、膝盖、手腕等)。
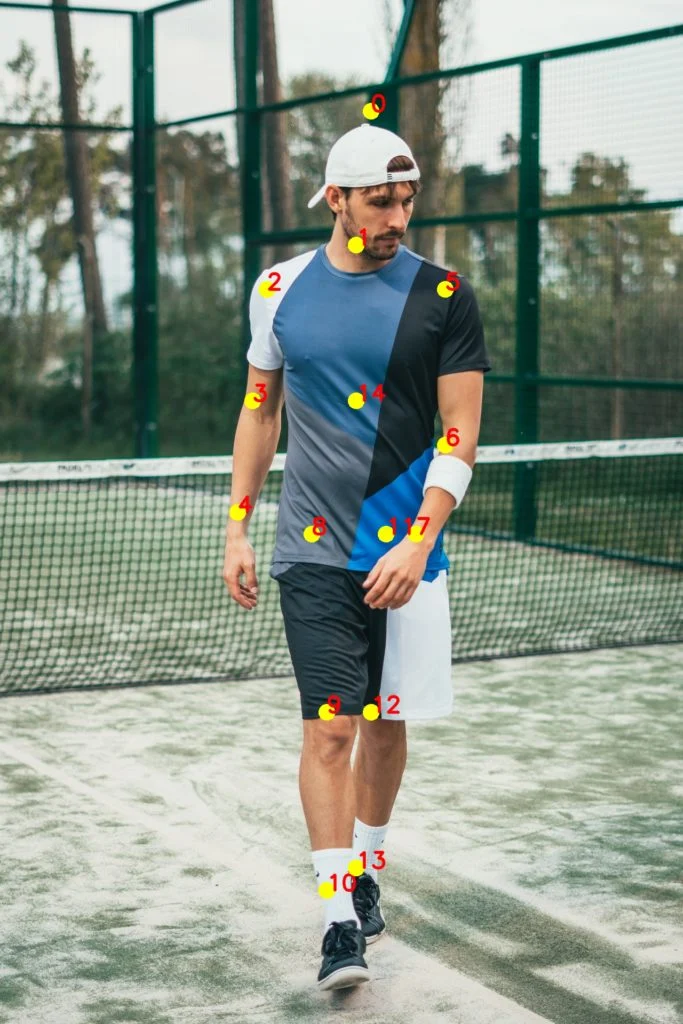
不过,出于本文的目的,我们将稍微降低我们的野心,并解决一个更简单的问题,即检测身体上的关键点。一个典型的姿态检测器输出如下所示:
1.1关键点检测数据集
由于缺乏高质量的数据集,在姿态估计方面几乎没有进展。如今,人们对人工智能的热情如此高涨,以至于相信每一个问题都只是需要一个好的数据集。在过去几年中,已经发布一些具有挑战性的数据集,这使得研究人员能够更容易地利用他们的全部智力力量来解决这个问题。
一些数据集是:
2.多人姿态估计模型
本教程中使用的模型基于卡内基梅隆大学感知计算实验室的一篇题为《多人姿态估计》的论文。这篇论文的作者为此训练了一个非常深入的神经网络。在解释如何使用预先训练过的模型之前,让我们简要地回顾一下架构。
2.1结构概述

模型以尺寸为w × h的彩色图像作为输入,输出图像中每个人关键点的2D位置。检测分三个阶段进行:
- 第0阶段:使用VGGNet的前10层为输入图像创建特征图。
- 第1阶段:使用2分支多阶段CNN,其中第一个分支预测一组身体部位位置(如肘、膝等)的2D置信图(S)。下面给出了左肩的关键点置信度图。

第二分支预测了一组部件亲和度的2D向量场(L),用于编码部件之间的关联程度。在下面的图中,颈部和左肩之间的部分亲和力被显示出来。 - 第二阶段:通过贪婪推理对置信度和亲和度映射进行解析,生成图像中所有人的二维关键点。

2.2预训练的人体姿态估计模型
本文的作者分享了两个模型——一个是在多人数据集(MPII)上训练的,另一个是在COCO数据集上训练的。COCO模型产生18点,而MPII模型输出15点。在一个人身上绘制的输出如下图所示。
COCO输出格式:鼻子- 0,脖子- 1,右肩- 2,右手肘- 3,右手腕- 4,左肩- 5,左肘- 6,左腕- 7,右髋部- 8,右膝- 9,右脚踝- 10,左臀部- 11,左膝- 12,左脚踝 - 13,右眼- 14,左眼- 15,右耳- 16,左耳- 17,背景-18MPII输出格式:头-0,颈-1,右肩-2,右手肘-3,右手腕-4,左肩-5,左肘-6,左腕-7,右髋部-8,右膝-9,右脚踝-10,左臀部-11,左膝-12,左脚踝-13,胸部-14,背景-15
3.OpenCV中人体姿态估计的代码
在本节中,我们将看到如何在OpenCV中加载训练过的模型并检查输出。为了简单起见,我们将讨论仅用于单人姿态估计的代码。正如我们在前一节中看到的,输出由置信映射和关联映射组成。如果有多人在场,这些输出可以用来找到一个帧中每个人的姿势。我们将在以后的文章中介绍多人情况。
3.1 目录结构

3.2 代码展示
链接:https://pan.baidu.com/s/1OoDWEc7bdwKbKBEqQ5oOdA
提取码:123a
(1)Python
# OpenPoseImage.py
import cv2
import time
import numpy as np
import argparse

parser = argparse.ArgumentParser(description='Run keypoint detection')
parser.add_argument("--device", default="cpu", help="Device to inference on")
parser.add_argument("--image_file", default="single.jpeg", help="Input image")

args = parser.parse_args()


MODE = "COCO"

if MODE is "COCO":
    protoFile = "pose/coco/pose_deploy_linevec.prototxt"
    weightsFile = "pose/coco/pose_iter_440000.caffemodel"
    nPoints = 18
    POSE_PAIRS = [ [1,0],[1,2],[1,5],[2,3],[3,4],[5,6],[6,7],[1,8],[8,9],[9,10],[1,11],[11,12],[12,13],[0,14],[0,15],[14,16],[15,17]]

elif MODE is "MPI" :
    protoFile = "pose/mpi/pose_deploy_linevec_faster_4_stages.prototxt"
    weightsFile = "pose/mpi/pose_iter_160000.caffemodel"
    nPoints = 15
    POSE_PAIRS = [[0,1], [1,2], [2,3], [3,4], [1,5], [5,6], [6,7], [1,14], [14,8], [8,9], [9,10], [14,11], [11,12], [12,13] ]


frame = cv2.imread(args.image_file)
frameCopy = np.copy(frame)
frameWidth = frame.shape[1]
frameHeight = frame.shape[0]
threshold = 0.1

net = cv2.dnn.readNetFromCaffe(protoFile, weightsFile)

if args.device == "cpu":
    net.setPreferableBackend(cv2.dnn.DNN_TARGET_CPU)
    print("Using CPU device")
elif args.device == "gpu":
    net.setPreferableBackend(cv2.dnn.DNN_BACKEND_CUDA)
    net.setPreferableTarget(cv2.dnn.DNN_TARGET_CUDA)
    print("Using GPU device")

t = time.time()
# 为网络输入图像的维数
inWidth = 368
inHeight = 368
inpBlob = cv2.dnn.blobFromImage(frame, 1.0 / 255, (inWidth, inHeight),
                          (0, 0, 0), swapRB=False, crop=False)

net.setInput(inpBlob)

output = net.forward()
print("time taken by network : {:.3f}".format(time.time() - t))

H = output.shape[2]
W = output.shape[3]

# 空列表来存储检测到的关键点
points = []

for i in range(nPoints):
    # 对应身体部位的置信图。
    probMap = output[0, i, :, :]

    # 求probMap的全局极大值。
    minVal, prob, minLoc, point = cv2.minMaxLoc(probMap)

    # 缩放点以适应原始图像
    x = (frameWidth * point[0]) / W
    y = (frameHeight * point[1]) / H

    if prob > threshold :
        cv2.circle(frameCopy, (int(x), int(y)), 8, (0, 255, 255), thickness=-1, lineType=cv2.FILLED)
        cv2.putText(frameCopy, "{}".format(i), (int(x), int(y)), cv2.FONT_HERSHEY_SIMPLEX, 1, (0, 0, 255), 2, lineType=cv2.LINE_AA)

        # 如果概率大于阈值,则将该点添加到列表中
        points.append((int(x), int(y)))
    else :
        points.append(None)

# 绘制骨架
for pair in POSE_PAIRS:
    partA = pair[0]
    partB = pair[1]

    if points[partA] and points[partB]:
        cv2.line(frame, points[partA], points[partB], (0, 255, 255), 2)
        cv2.circle(frame, points[partA], 8, (0, 0, 255), thickness=-1, lineType=cv2.FILLED)


cv2.imshow('Output-Keypoints', frameCopy)
cv2.imshow('Output-Skeleton', frame)


cv2.imwrite('Output-Keypoints.jpg', frameCopy)
cv2.imwrite('Output-Skeleton.jpg', frame)

print("Total time taken : {:.3f}".format(time.time() - t))

cv2.waitKey(0)
# OpenPoseVideo.py
import cv2
import time
import numpy as np
import argparse

parser = argparse.ArgumentParser(description='Run keypoint detection')
parser.add_argument("--device", default="cpu", help="Device to inference on")
parser.add_argument("--video_file", default="sample_video.mp4", help="Input Video")

args = parser.parse_args()

MODE = "MPI"

if MODE is "COCO":
    protoFile = "pose/coco/pose_deploy_linevec.prototxt"
    weightsFile = "pose/coco/pose_iter_440000.caffemodel"
    nPoints = 18
    POSE_PAIRS = [ [1,0],[1,2],[1,5],[2,3],[3,4],[5,6],[6,7],[1,8],[8,9],[9,10],[1,11],[11,12],[12,13],[0,14],[0,15],[14,16],[15,17]]

elif MODE is "MPI" :
    protoFile = "pose/mpi/pose_deploy_linevec_faster_4_stages.prototxt"
    weightsFile = "pose/mpi/pose_iter_160000.caffemodel"
    nPoints = 15
    POSE_PAIRS = [[0,1], [1,2], [2,3], [3,4], [1,5], [5,6], [6,7], [1,14], [14,8], [8,9], [9,10], [14,11], [11,12], [12,13] ]


inWidth = 368
inHeight = 368
threshold = 0.1


input_source = args.video_file
cap = cv2.VideoCapture(input_source)
hasFrame, frame = cap.read()

vid_writer = cv2.VideoWriter('output.avi',cv2.VideoWriter_fourcc('M','J','P','G'), 10, (frame.shape[1],frame.shape[0]))

net = cv2.dnn.readNetFromCaffe(protoFile, weightsFile)
if args.device == "cpu":
    net.setPreferableBackend(cv2.dnn.DNN_TARGET_CPU)
    print("Using CPU device")
elif args.device == "gpu":
    net.setPreferableBackend(cv2.dnn.DNN_BACKEND_CUDA)
    net.setPreferableTarget(cv2.dnn.DNN_TARGET_CUDA)
    print("Using GPU device")

while cv2.waitKey(1) < 0:
    t = time.time()
    hasFrame, frame = cap.read()
    frameCopy = np.copy(frame)
    if not hasFrame:
        cv2.waitKey()
        break

    frameWidth = frame.shape[1]
    frameHeight = frame.shape[0]

    inpBlob = cv2.dnn.blobFromImage(frame, 1.0 / 255, (inWidth, inHeight),
                              (0, 0, 0), swapRB=False, crop=False)
    net.setInput(inpBlob)
    output = net.forward()

    H = output.shape[2]
    W = output.shape[3]
    # 空列表来存储检测到的关键点
    points = []

    for i in range(nPoints):
        # 对应身体部位的置信图。
        probMap = output[0, i, :, :]

        # 求probMap的全局极大值。
        minVal, prob, minLoc, point = cv2.minMaxLoc(probMap)

        # 缩放点以适应原始图像
        x = (frameWidth * point[0]) / W
        y = (frameHeight * point[1]) / H

        if prob > threshold :
            cv2.circle(frameCopy, (int(x), int(y)), 8, (0, 255, 255), thickness=-1, lineType=cv2.FILLED)
            cv2.putText(frameCopy, "{}".format(i), (int(x), int(y)), cv2.FONT_HERSHEY_SIMPLEX, 1, (0, 0, 255), 2, lineType=cv2.LINE_AA)

            # 如果概率大于阈值,则将该点添加到列表中
            points.append((int(x), int(y)))
        else :
            points.append(None)

    # 绘制骨架
    for pair in POSE_PAIRS:
        partA = pair[0]
        partB = pair[1]

        if points[partA] and points[partB]:
            cv2.line(frame, points[partA], points[partB], (0, 255, 255), 3, lineType=cv2.LINE_AA)
            cv2.circle(frame, points[partA], 8, (0, 0, 255), thickness=-1, lineType=cv2.FILLED)
            cv2.circle(frame, points[partB], 8, (0, 0, 255), thickness=-1, lineType=cv2.FILLED)

    cv2.putText(frame, "time taken = {:.2f} sec".format(time.time() - t), (50, 50), cv2.FONT_HERSHEY_COMPLEX, .8, (255, 50, 0), 2, lineType=cv2.LINE_AA)
    # cv2.putText(frame, "OpenPose using OpenCV", (50, 50), cv2.FONT_HERSHEY_COMPLEX, 1, (255, 50, 0), 2, lineType=cv2.LINE_AA)
    # cv2.imshow('Output-Keypoints', frameCopy)
    cv2.imshow('Output-Skeleton', frame)

    vid_writer.write(frame)

vid_writer.release()
(2)C++
// OpenPoseImage.cpp
#include <opencv2/dnn.hpp>
#include <opencv2/imgproc.hpp>
#include <opencv2/highgui.hpp>
#include <iostream>

using namespace std;
using namespace cv;
using namespace cv::dnn;

#define MPI

#ifdef MPI
const int POSE_PAIRS[14][2] =
{
    {0,1}, {1,2}, {2,3},
    {3,4}, {1,5}, {5,6},
    {6,7}, {1,14}, {14,8}, {8,9},
    {9,10}, {14,11}, {11,12}, {12,13}
};

string protoFile = "pose/mpi/pose_deploy_linevec_faster_4_stages.prototxt";
string weightsFile = "pose/mpi/pose_iter_160000.caffemodel";

int nPoints = 15;
#endif

#ifdef COCO
const int POSE_PAIRS[17][2] =
{
    {1,2}, {1,5}, {2,3},
    {3,4}, {5,6}, {6,7},
    {1,8}, {8,9}, {9,10},
    {1,11}, {11,12}, {12,13},
    {1,0}, {0,14},
    {14,16}, {0,15}, {15,17}
};

string protoFile = "pose/coco/pose_deploy_linevec.prototxt";
string weightsFile = "pose/coco/pose_iter_440000.caffemodel";

int nPoints = 18;
#endif

int main(int argc, char **argv)
{

    cout << "USAGE : ./OpenPose <imageFile> " << endl;
    cout << "USAGE : ./OpenPose <imageFile> <device>" << endl;

    string device = "cpu";

    string imageFile = "single.jpeg";
    // 从命令行获取参数
    if (argc == 2)
    {
      if((string)argv[1] == "gpu")
        device = "gpu";
      else
      imageFile = argv[1];
    }
    else if (argc == 3)
    {
        imageFile = argv[1];
        if((string)argv[2] == "gpu")
            device = "gpu";
    }


    int inWidth = 368;
    int inHeight = 368;
    float thresh = 0.1;

    Mat frame = imread(imageFile);
    Mat frameCopy = frame.clone();
    int frameWidth = frame.cols;
    int frameHeight = frame.rows;

    double t = (double) cv::getTickCount();
    Net net = readNetFromCaffe(protoFile, weightsFile);

    if (device == "cpu")
    {
        cout << "Using CPU device" << endl;
        net.setPreferableBackend(DNN_TARGET_CPU);
    }
    else if (device == "gpu")
    {
        cout << "Using GPU device" << endl;
        net.setPreferableBackend(DNN_BACKEND_CUDA);
        net.setPreferableTarget(DNN_TARGET_CUDA);
    }

    Mat inpBlob = blobFromImage(frame, 1.0 / 255, Size(inWidth, inHeight), Scalar(0, 0, 0), false, false);

    net.setInput(inpBlob);

    Mat output = net.forward();

    int H = output.size[2];
    int W = output.size[3];

    // 找到身体部位的位置
    vector<Point> points(nPoints);
    for (int n=0; n < nPoints; n++)
    {
        // 对应身体部位的概率图。
        Mat probMap(H, W, CV_32F, output.ptr(0,n));

        Point2f p(-1,-1);
        Point maxLoc;
        double prob;
        minMaxLoc(probMap, 0, &prob, 0, &maxLoc);
        if (prob > thresh)
        {
            p = maxLoc;
            p.x *= (float)frameWidth / W ;
            p.y *= (float)frameHeight / H ;

            circle(frameCopy, cv::Point((int)p.x, (int)p.y), 8, Scalar(0,255,255), -1);
            cv::putText(frameCopy, cv::format("%d", n), cv::Point((int)p.x, (int)p.y), cv::FONT_HERSHEY_COMPLEX, 1, cv::Scalar(0, 0, 255), 2);

        }
        points[n] = p;
    }

    int nPairs = sizeof(POSE_PAIRS)/sizeof(POSE_PAIRS[0]);

    for (int n = 0; n < nPairs; n++)
    {
        // 查找2连接体/手部件
        Point2f partA = points[POSE_PAIRS[n][0]];
        Point2f partB = points[POSE_PAIRS[n][1]];

        if (partA.x<=0 || partA.y<=0 || partB.x<=0 || partB.y<=0)
            continue;

        line(frame, partA, partB, Scalar(0,255,255), 8);
        circle(frame, partA, 8, Scalar(0,0,255), -1);
        circle(frame, partB, 8, Scalar(0,0,255), -1);
    }

    t = ((double)cv::getTickCount() - t)/cv::getTickFrequency();
    cout << "Time Taken = " << t << endl;
    imshow("Output-Keypoints", frameCopy);
    imshow("Output-Skeleton", frame);
    imwrite("Output-Skeleton.jpg", frame);

    waitKey();

    return 0;
}
// OpenPoseVideo.cpp
#include <opencv2/dnn.hpp>
#include <opencv2/imgproc.hpp>
#include <opencv2/highgui.hpp>
#include <iostream>

using namespace std;
using namespace cv;
using namespace cv::dnn;

#define MPI

#ifdef MPI
const int POSE_PAIRS[14][2] =
{
    {0,1}, {1,2}, {2,3},
    {3,4}, {1,5}, {5,6},
    {6,7}, {1,14}, {14,8}, {8,9},
    {9,10}, {14,11}, {11,12}, {12,13}
};

string protoFile = "pose/mpi/pose_deploy_linevec_faster_4_stages.prototxt";
string weightsFile = "pose/mpi/pose_iter_160000.caffemodel";

int nPoints = 15;
#endif

#ifdef COCO
const int POSE_PAIRS[17][2] =
{
    {1,2}, {1,5}, {2,3},
    {3,4}, {5,6}, {6,7},
    {1,8}, {8,9}, {9,10},
    {1,11}, {11,12}, {12,13},
    {1,0}, {0,14},
    {14,16}, {0,15}, {15,17}
};

string protoFile = "pose/coco/pose_deploy_linevec.prototxt";
string weightsFile = "pose/coco/pose_iter_440000.caffemodel";

int nPoints = 18;
#endif

int main(int argc, char **argv)
{

    cout << "USAGE : ./OpenPose <videoFile> " << endl;
    cout << "USAGE : ./OpenPose <videoFile> <device>" << endl;

    string device = "cpu";
    string videoFile = "sample_video.mp4";

    // 从命令行获取参数
    if (argc == 2)
    {
      if((string)argv[1] == "gpu")
        device = "gpu";
      else
      videoFile = argv[1];
    }
    else if (argc == 3)
    {
        videoFile = argv[1];
        if((string)argv[2] == "gpu")
            device = "gpu";
    }

    int inWidth = 368;
    int inHeight = 368;
    float thresh = 0.01;

    cv::VideoCapture cap(videoFile);

    if (!cap.isOpened())
    {
        cerr << "Unable to connect to camera" << endl;
        return 1;
    }

    Mat frame, frameCopy;
    int frameWidth = cap.get(CAP_PROP_FRAME_WIDTH);
    int frameHeight = cap.get(CAP_PROP_FRAME_HEIGHT);

    VideoWriter video("Output-Skeleton.avi",VideoWriter::fourcc('M','J','P','G'), 10, Size(frameWidth,frameHeight));

    Net net = readNetFromCaffe(protoFile, weightsFile);

    if (device == "cpu")
    {
        cout << "Using CPU device" << endl;
        net.setPreferableBackend(DNN_TARGET_CPU);
    }
    else if (device == "gpu")
    {
        cout << "Using GPU device" << endl;
        net.setPreferableBackend(DNN_BACKEND_CUDA);
        net.setPreferableTarget(DNN_TARGET_CUDA);
    }

    double t=0;
    while( waitKey(1) < 0)
    {
        double t = (double) cv::getTickCount();

        cap >> frame;
        frameCopy = frame.clone();
        Mat inpBlob = blobFromImage(frame, 1.0 / 255, Size(inWidth, inHeight), Scalar(0, 0, 0), false, false);

        net.setInput(inpBlob);

        Mat output = net.forward();

        int H = output.size[2];
        int W = output.size[3];

        // 找到身体部位的位置
        vector<Point> points(nPoints);
        for (int n=0; n < nPoints; n++)
        {
            // 对应身体部位的概率图。
            Mat probMap(H, W, CV_32F, output.ptr(0,n));

            Point2f p(-1,-1);
            Point maxLoc;
            double prob;
            minMaxLoc(probMap, 0, &prob, 0, &maxLoc);
            if (prob > thresh)
            {
                p = maxLoc;
                p.x *= (float)frameWidth / W ;
                p.y *= (float)frameHeight / H ;

                circle(frameCopy, cv::Point((int)p.x, (int)p.y), 8, Scalar(0,255,255), -1);
                cv::putText(frameCopy, cv::format("%d", n), cv::Point((int)p.x, (int)p.y), cv::FONT_HERSHEY_COMPLEX, 1.1, cv::Scalar(0, 0, 255), 2);
            }
            points[n] = p;
        }

        int nPairs = sizeof(POSE_PAIRS)/sizeof(POSE_PAIRS[0]);

        for (int n = 0; n < nPairs; n++)
        {
            // 找 2 个连接的身体/手部
            Point2f partA = points[POSE_PAIRS[n][0]];
            Point2f partB = points[POSE_PAIRS[n][1]];

            if (partA.x<=0 || partA.y<=0 || partB.x<=0 || partB.y<=0)
                continue;

            line(frame, partA, partB, Scalar(0,255,255), 8);
            circle(frame, partA, 8, Scalar(0,0,255), -1);
            circle(frame, partB, 8, Scalar(0,0,255), -1);
        }

        t = ((double)cv::getTickCount() - t)/cv::getTickFrequency();
        cv::putText(frame, cv::format("time taken = %.2f sec", t), cv::Point(50, 50), cv::FONT_HERSHEY_COMPLEX, .8, cv::Scalar(255, 50, 0), 2);
        // imshow("Output-Keypoints", frameCopy);
        imshow("Output-Skeleton", frame);
        video.write(frame);
    }
    // 当一切完成后,释放视频捕获和写入对象
    cap.release();
    video.release();

    return 0;
}
4.代码解析
首先,从下载代码和模型文件。图像和视频输入有单独的文件。如果您遇到任何问题,请仔细阅读README文件。
4.1步骤1:下载模型权重
使用代码提供的getModels.sh文件将所有模型权重下载到相应的文件夹中。注意,配置文件已经在文件夹中。
在命令行中,从下载的文件夹中执行以下操作。
sudo chmod a+x getModels.sh
./getModels.sh
检查文件夹以确保模型二进制文件(.Caffemodel文件)已下载。如果您不能运行上面的脚本,那么您可以通过点击这里下载MPII模型,点击这里下载COCO模型。
4.2步骤2:加载网络
我们使用Caffe深度学习框架训练的模型。Caffe型号有2个文件:
.prototxt:这个文件指定了神经网络的结构——不同的层是如何排列的等等。.caffemodel:存储训练模型权重的文件
我们将使用这两个文件将网络加载到内存中。
(1)Python
// Specify the paths for the 2 files
string protoFile = "pose/mpi/pose_deploy_linevec_faster_4_stages.prototxt";
string weightsFile = "pose/mpi/pose_iter_160000.caffemodel";

// Read the network into Memory
Net net = readNetFromCaffe(protoFile, weightsFile);
(2)C++
# Specify the paths for the 2 files
protoFile = "pose/mpi/pose_deploy_linevec_faster_4_stages.prototxt"
weightsFile = "pose/mpi/pose_iter_160000.caffemodel"

# Read the network into Memory
net = cv2.dnn.readNetFromCaffe(protoFile, weightsFile)
4.3步骤3:读取图像并准备输入到网络
我们使用OpenCV读取的输入帧应该被转换成一个输入blob(像Caffe),这样它就可以被提供给网络。这是使用blobFromImage()函数完成的,该函数将图像从OpenCV格式转换为Caffe blob格式。参数将在blobFromImage()函数中提供。首先,我们将像素值归一化为(0,1)。然后我们指定图像的尺寸。接下来,减去均值,即(0,0,0)。不需要交换R和B通道,因为OpenCV和Caffe都使用BGR格式。
(1)Python
# Read image
frame = cv2.imread("single.jpg")
# Specify the input image dimensions
inWidth = 368
inHeight = 368
# Prepare the frame to be fed to the network
inpBlob = cv2.dnn.blobFromImage(frame, 1.0 / 255, (inWidth, inHeight), (0, 0, 0), swapRB=False, crop=False)
# Set the prepared object as the input blob of the network
net.setInput(inpBlob)
(2)C++
Mat frame = imread("single.jpg");
// Specify the input image dimensions
int inWidth = 368;
int inHeight = 368;

// Prepare the frame to be fed to the network
Mat inpBlob = blobFromImage(frame, 1.0 / 255, Size(inWidth, inHeight), Scalar(0, 0, 0), false, false);

// Set the prepared object as the input blob of the network
net.setInput(inpBlob);
4.4步骤4:做出预测并解析关键点
一旦将图像传递给模型,只需一行代码就可以进行预测。OpenCV中DNN类的前向方法是通过网络进行前向传递,这只是另一种说法,它正在进行预测。
(1)Python
output = net.forward()
(2)C++
Mat output = net.forward()
输出是一个4D矩阵:
- 第一个维度是图像ID(如果您向网络传递多个图像)。
- 第二个维度表示关键点的索引。该模型生成的置信度映射和部分亲和度映射都是串联的。对于COCO模型,它由57个部分组成- 18个关键点置信映射+ 1个背景+ 19*2个部分亲和映射。同样,MPI的产生44个点。我们将只使用与关键点对应的前几个点。
- 第三个维度是输出映射的高度。
- 第四个维度是输出映射的宽度。
我们检查每个关键点是否存在于图像中。我们通过求关键点置信度图的极大值来确定关键点的位置。我们还使用一个阈值来减少误检。
一旦检测到关键点,我们就把它们画在图像上。
(1)Python
H = out.shape[2]
W = out.shape[3]
# Empty list to store the detected keypoints
points = []
for i in range(len()):
    # confidence map of corresponding body's part.
    probMap = output[0, i, :, :]

    # Find global maxima of the probMap.
    minVal, prob, minLoc, point = cv2.minMaxLoc(probMap)

    # Scale the point to fit on the original image
    x = (frameWidth * point[0]) / W
    y = (frameHeight * point[1]) / H

    if prob > threshold :
        cv2.circle(frame, (int(x), int(y)), 15, (0, 255, 255), thickness=-1, lineType=cv.FILLED)
        cv2.putText(frame, "{}".format(i), (int(x), int(y)), cv2.FONT_HERSHEY_SIMPLEX, 1.4, (0, 0, 255), 3, lineType=cv2.LINE_AA)

        # Add the point to the list if the probability is greater than the threshold
        points.append((int(x), int(y)))
    else :
        points.append(None)

cv2.imshow("Output-Keypoints",frame)
cv2.waitKey(0)
cv2.destroyAllWindows()
(2)C++
int H = output.size[2];
int W = output.size[3];

// find the position of the body parts
vector<Point> points(nPoints);
for (int n=0; n < nPoints; n++)
{
    // Probability map of corresponding body's part.
    Mat probMap(H, W, CV_32F, output.ptr(0,n));

    Point2f p(-1,-1);
    Point maxLoc;
    double prob;
    minMaxLoc(probMap, 0, &prob, 0, &maxLoc);
    if (prob > thresh)
    {
        p = maxLoc;
        p.x *= (float)frameWidth / W ;
        p.y *= (float)frameHeight / H ;

        circle(frameCopy, cv::Point((int)p.x, (int)p.y), 8, Scalar(0,255,255), -1);
        cv::putText(frameCopy, cv::format("%d", n), cv::Point((int)p.x, (int)p.y), cv::FONT_HERSHEY_COMPLEX, 1, cv::Scalar(0, 0, 255), 2);

    }
    points[n] = p;
}
4.4步骤5:绘制骨架
因为我们事先知道了这些点的索引,所以当我们有了这些关键点时,只要把这些点对连起来,就可以画出骨架了。这是使用下面给出的代码完成的。
(1)Python
for pair in POSE_PAIRS:
    partA = pair[0]
    partB = pair[1]

    if points[partA] and points[partB]:
        cv2.line(frameCopy, points[partA], points[partB], (0, 255, 0), 3)
(2)C++
for (int n = 0; n < nPairs; n++)
{
    // lookup 2 connected body/hand parts
    Point2f partA = points[POSE_PAIRS[n][0]];
    Point2f partB = points[POSE_PAIRS[n][1]];

    if (partA.x<=0 || partA.y<=0 || partB.x<=0 || partB.y<=0)
        continue;

    line(frame, partA, partB, Scalar(0,255,255), 8);
    circle(frame, partA, 8, Scalar(0,0,255), -1);
    circle(frame, partB, 8, Scalar(0,0,255), -1);
}
使用视频版本的代码进行视频演示,我们发现COCO模型比MPI模型慢1.5倍。这是预期的,因为我们使用的是一个有4个阶段的精简版本。
5.代码优化
由于视频是逐帧处理的,所以数据中存在抖动。OpenPose模型很好,但并不一直很好。这个模型往往会以随机的方式出错。这使得身体部位的位置围绕着真实的值跳动。
幸运的是,该数据正态分布在真值周围。这意味着可以使用Savgol滤波器平滑数据,并从噪声数据中生成准确的值。
平滑的第一步是为整个视频收集姿态数据,并将其存储在.csv文件中。
# save_pose_data.py
#!/usr/bin/python3
# -*- encoding: utf-8 -*-
import cv2, numpy as np, csv

# https://github.com/opencv/opencv/blob/master/samples/dnn/openpose.py
outfile_path = 'workout.csv'

protoFile = "D:/code/learnopencv/OpenCV-dnn-gpu-support-Linux/pose/mpi/pose_deploy_linevec_faster_4_stages.prototxt"
weightsFile = "D:/code/learnopencv/OpenCV-dnn-gpu-support-Linux/pose/mpi/pose_iter_160000.caffemodel"
net = cv2.dnn.readNetFromCaffe(protoFile, weightsFile)

data, input_width, input_height, threshold, frame_number = [], 368, 386, 0.1, 0

input_source = "sample_video.mp4"
cap = cv2.VideoCapture(input_source)

# use the previous location of the body part if the model is wrong
previous_x, previous_y = [0, 0, 0, 0, 0, 0, 0, 0, 0, 0, 0, 0, 0, 0, 0, 0], [0, 0, 0, 0, 0, 0, 0, 0, 0, 0, 0, 0, 0, 0, 0,
                                                                            0]

while True:

    ret, img = cap.read()
    if not ret: break

    # get the image shape
    img_width, img_height = img.shape[1], img.shape[0]

    # get a blob from the image
    inputBlob = cv2.dnn.blobFromImage(img, 1.0 / 255, (input_width, input_height), (0, 0, 0), swapRB=False, crop=False)

    # set the input and perform a forward pass
    net.setInput(inputBlob)
    output = net.forward()

    # get the output shape
    output_width, output_height = output.shape[2], output.shape[3]

    # Empty list to store the detected keypoints
    x_data, y_data = [], []

    # Iterate through the body parts
    for i in range(15):

        # find probability that point is correct
        _, prob, _, point = cv2.minMaxLoc(output[0, i, :, :])

        # Scale the point to fit on the original image
        x, y = (img_width * point[0]) / output_width, (img_height * point[1]) / output_height

        # Is the point likely to be correct?
        if prob > threshold:
            x_data.append(x)
            y_data.append(y)
            xy = tuple(np.array([x, y], int))
            cv2.circle(img, xy, 5, (25, 0, 255), 5)
        # No? us the location in the previous frame
        else:
            x_data.append(previous_x[i])
            y_data.append(previous_y[i])

    # add these points to the list of data
    data.append(x_data + y_data)
    previous_x, previous_y = x_data, y_data
    frame_number += 1
    # use this break statement to check your data before processing the whole video
    # if frame_number == 300: break
    print(frame_number)

    cv2.imshow('img', img)
    k = cv2.waitKey(1)
    if k == 27: break

# write the data to a .csv file
import pandas as pd

df = pd.DataFrame(data)
df.to_csv(outfile_path, index=False)
print('save complete')
有时,模型会发生改变。在接下来的步骤中,身体部分被交换,这样左边的部分就总是在左边。
# swap_body_parts.py
import pandas as pd
import numpy as np
import cv2, os
import csv

input_source = "sample_video.mp4"
cap = cv2.VideoCapture(input_source)
frame_number = 0
font, scale, colorText, thick = cv2.FONT_HERSHEY_SIMPLEX, .5, (234,234,234), 1
size, color, thickness = 5, (255,255,255), 5
#get pose data - data is generated by open pose video
df = pd.read_csv('workout.csv')

# there are 15 points in the skeleton
# 0 head
# 1 neck
# 2, 5 shoulders
# 3, 6 elbows
# 4, 7 hands
# 8, 11 hips
# 9, 12 knees
# 10, 13 ankles
# 14 torso

data = []
while cv2.waitKey(10) < 0 and frame_number<len(df.values)-2:
    ret, img = cap.read()
    if not ret: break
    try: values = df.values[frame_number]
    except: break
    values = np.array(values, int)
    points = []
    points.append((values[0], values[1]))
    points.append((values[2], values[3]))
    points.append((values[4], values[5]))
    points.append((values[6], values[7]))
    points.append((values[8], values[9]))
    points.append((values[10], values[11]))
    points.append((values[12], values[13]))
    points.append((values[14], values[15]))
    points.append((values[16], values[17]))
    points.append((values[18], values[19]))
    points.append((values[20], values[21]))
    points.append((values[22], values[23]))
    points.append((values[24], values[25]))
    points.append((values[26], values[27]))
    points.append((values[28], values[29]))


    #create a blank list to store the non-swapped poitns
    non_swap_points = []
    for i in range(15): non_swap_points.append((0,0))
    #add the head, that point never changes
    non_swap_points[0] = points[0]
    #add the neck, that point never changes
    non_swap_points[1] = points[1]
    #add the torso, that never changes
    non_swap_points[14] = points[14]

    #swap the left and right shoulders (2 and 5)
    if points[2][0]<points[5][0]:
        non_swap_points[2] = points[2]
        non_swap_points[5] = points[5]
    else:
        non_swap_points[2] = points[5]
        non_swap_points[5] = points[2]
    # swap the elbows
    if points[3][0]<points[6][0]:
        non_swap_points[3] = points[3]
        non_swap_points[6] = points[6]
    else:
        non_swap_points[6] = points[3]
        non_swap_points[3] = points[6]

    #swap the hands
    if points[4][0]<points[7][0]:
        non_swap_points[4] = points[4]
        non_swap_points[7] = points[7]
    else:
        non_swap_points[7] = points[4]
        non_swap_points[4] = points[7]
    #swap the hips
    if points[8][0]<points[11][0]:
        non_swap_points[11] = points[11]
        non_swap_points[8] = points[8]
    else:
        non_swap_points[8] = points[11]
        non_swap_points[11] = points[8]

    #swap the knees
    if points[9][0]<points[12][0]:
        non_swap_points[9] = points[9]
        non_swap_points[12] = points[12]
    else:
        non_swap_points[12] = points[9]
        non_swap_points[9] = points[12]

    #swap the feet
    if points[10][0]<points[13][0]:
        non_swap_points[10] = points[10]
        non_swap_points[13] = points[13]
    else:
        non_swap_points[13] = points[10]
        non_swap_points[10] = points[13]


    for point in non_swap_points:
        cv2.circle(img, point, 3, (0, 0, 255), 3)
        cv2.putText(img, str(non_swap_points.index(point)), point, font, scale, colorText, thick, cv2.LINE_AA)

    cv2.imshow('Output-Skeleton', img)
    frame_number+=1
    data.append(non_swap_points)
cv2.destroyAllWindows()


with open('swapped_body_parts.csv', 'w') as csvfile:
    fieldnames = []
    for i in range(30): fieldnames.append(str(i))
    writer = csv.DictWriter(csvfile, fieldnames=fieldnames)
    writer.writeheader()

    for trick in data:
        writer.writerow({'0': trick[0][0],
                         '1':trick[0][1],
                         '2':trick[1][0],
                         '3':trick[1][1],
                         '4':trick[2][0],
                         '5':trick[2][1],
                         '6':trick[3][0],
                         '7':trick[3][1],
                         '8':trick[4][0],
                         '9':trick[4][1],
                         '10':trick[5][0],
                         '11':trick[5][1],
                         '12':trick[6][0],
                         '13':trick[6][1],
                         '14':trick[7][0],
                         '15':trick[7][1],
                         '16':trick[8][0],
                         '17':trick[8][1],
                         '18':trick[9][0],
                         '19':trick[9][1],
                         '20':trick[10][0],
                         '21':trick[10][1],
                         '22':trick[11][0],
                         '23':trick[11][1],
                         '24':trick[12][0],
                         '25':trick[12][1],
                         '26':trick[13][0],
                         '27':trick[13][1],
                         '28':trick[14][0],
                         '29':trick[14][1]})
最后,是时候应用平滑了。对于60帧每秒,我发现值在9到31之间的window_length参数工作得很好(低是更不平滑,高是更平滑)。
# smooth_pose_data.py
#!/usr/bin/python3
# -*- encoding: utf-8 -*-
import pandas as pd
import numpy as np
import cv2
from scipy import signal

circle_color, line_color = (255, 255, 0), (0, 0, 255)
window_length, polyorder = 13, 2
input_source = "sample_video.mp4"

# Get pose data - data is generated by OpenPose
df = pd.read_csv('swapped_body_parts.csv')

cap = cv2.VideoCapture(input_source)
# 获取视频宽度
frame_width = int(cap.get(cv2.CAP_PROP_FRAME_WIDTH))
# 获取视频高度
frame_height = int(cap.get(cv2.CAP_PROP_FRAME_HEIGHT))
out = cv2.VideoWriter('smooth_pose.avi',
                      cv2.VideoWriter_fourcc('M', 'J', 'P', 'G'), 30, (frame_width, frame_height))
# There are 15 points in the skeleton
pairs = [[0, 1],  # head
         [1, 2], [1, 5],  # sholders
         [2, 3], [3, 4], [5, 6], [6, 7],  # arms
         [1, 14], [14, 11], [14, 8],  # hips
         [8, 9], [9, 10], [11, 12], [12, 13]]  # legs

# Smooth it out
for i in range(30): df[str(i)] = signal.savgol_filter(df[str(i)], window_length, polyorder)

frame_number = 0
while True:
    print(frame_number)
    ret, img = cap.read()
    if not ret: break
    # img = np.zeros_like(img)
    values = np.array(df.values[frame_number], int)

    points, lateral_offset = [], 18
    points = list(zip(values[:15] + lateral_offset, values[15:]))

    cc = 0
    for point in points:
        cc += 90
        xy = tuple(np.array([point[0], point[1]], int))
        cv2.circle(img, xy, 5, (cc, cc, cc), 5)

    # Draw Skeleton
    for pair in pairs:
        partA = pair[0]
        partB = pair[1]
        cv2.line(img, points[partA], points[partB], line_color, 3, lineType=cv2.LINE_AA)

    cv2.imshow('Output-Skeleton', img)
    k = cv2.waitKey(100)
    if k == 27: break
    out.write(img)
    frame_number += 1
cv2.destroyAllWindows()
一般来说,平滑的结果来自跟踪而不是检测。在视频的第一帧检测姿态,然后用光流跟踪关键点。跟踪比检测快100倍(Optical Flow vs. OpenPose)。
这种方法只适用于后期制作。在应用平滑算法之前,所有帧的姿态数据必须是已知的。我的电脑花了好几分钟才把这个.gif的姿势数据提取出来。
Bonus

- 点赞
- 收藏
- 关注作者
评论(0)