【强化学习】迷宫寻宝:Sarsa和Q-Learning
前言
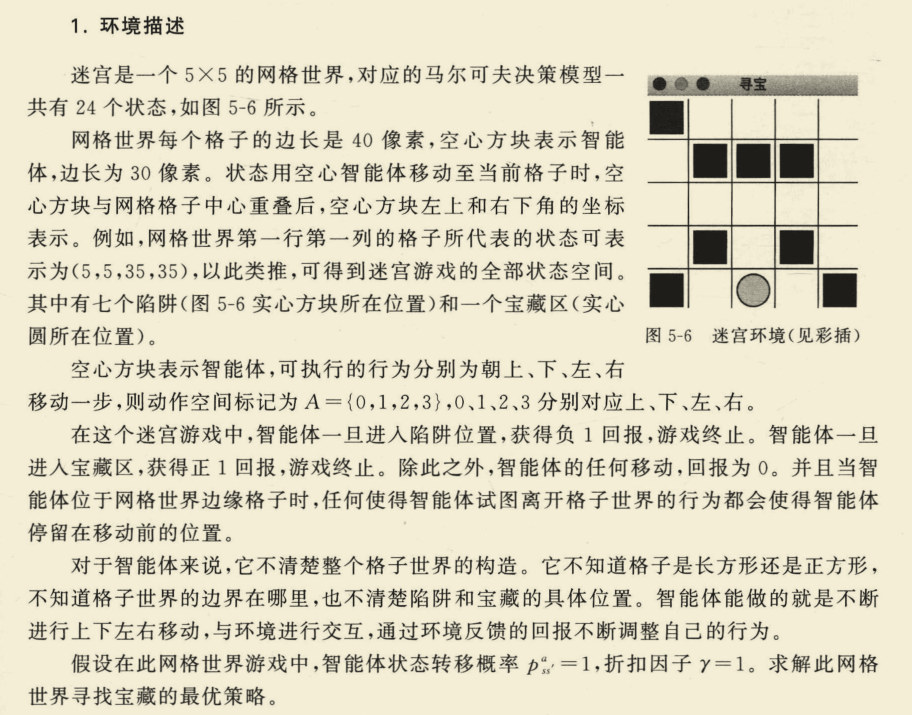
本篇博文通过迷宫寻宝这一实例来探究Sarsa和Q-Learning的不同。
相关代码主要参考自邹伟等人所著的《强化学习》(清华大学出版社)。.
理论基础
这里简单放一下Sarsa和Q-Learning的更新公式,更详细的内容可参看本专栏后续的知识点整理。
Sarsa:
Q ( s , a ) ← Q ( s , a ) + α ( r + γ Q ( s ′ , a ′ ) − Q ( s , a ) ) Q(s, a) \leftarrow Q(s, a)+\alpha\left(r+\gamma Q\left(s^{\prime}, a^{\prime}\right)-Q(s, a)\right) Q(s,a)←Q(s,a)+α(r+γQ(s′,a′)−Q(s,a))
Q-Learning:
Q ( s , a ) ← Q ( s , a ) + α ( r + γ max a ′ Q ( s ′ , a ′ ) − Q ( s , a ) ) Q(s, a) \leftarrow Q(s, a)+\alpha\left(r+\gamma \max _{a^{\prime}} Q\left(s^{\prime}, a^{\prime}\right)-Q(s, a)\right) Q(s,a)←Q(s,a)+α(r+γa′maxQ(s′,a′)−Q(s,a))
环境介绍

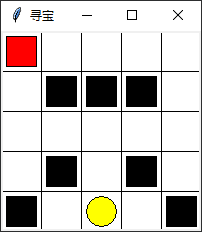
环境采用可视化工具Tkinter进行绘制,效果如图:

前置知识扩充
代码中Q表格主要通过pandas的DataFrame数据结构来进行实现,由于笔者对该结构了解不深,特用下面的代码来做个实验,以便对DataFrame有个初步了解。
import pandas as pd
import numpy as np

table = pd.DataFrame(columns=['u', 'd', 'l', 'r'], dtype=np.float64)
table = table.append(
    pd.Series(
        [1] * 4,
        index=table.columns,
        name=1))

table = table.append(
    pd.Series(
        [0] * 4,
        index=table.columns,
        name=2))

table = table.append(
    pd.Series(
        [0] * 4,
        index=table.columns,
        name=3))
print(table)
predict = table.loc[1, "d"]
print(predict)
- 1
- 2
- 3
- 4
- 5
- 6
- 7
- 8
- 9
- 10
- 11
- 12
- 13
- 14
- 15
- 16
- 17
- 18
- 19
- 20
- 21
- 22
- 23
- 24
输出:
     u    d    l    r
1  1.0  1.0  1.0  1.0
2  0.0  0.0  0.0  0.0
3  0.0  0.0  0.0  0.0
1.0
- 1
- 2
- 3
- 4
- 5
首先创建了一个table,u,d,l,r代表四个动作(上下左右),columns将这四个值设置为表格的列标签。
然后以Series的形式向表格内插入数据,第一个值是数据值,第二个index是列索引,第三个name是行标签,即Q表格的状态。
通过loc函数可以获得表格中的任意值,第一个是行标签,第二个是列标签。
程序流程
Sarsa和Q-Learning两种方法的流程几乎是一样的,主要区别在于Q值的更新公式不一样。下面就用语言描述一下算法流程。
Step1:初始化环境
env = Maze()
- 1
Step2:初始化Q表格
RL = SarsaTable(actions=list(range(env.n_actions)))
- 1
Step3:设定100幕迭代,每次迭代首先初始化状态,即将初始位置放在左上角。
observation = env.reset()
- 1
Step4:基于当前状态选择动作,这里采用的是epsilon-贪心选择,epsilon取值为0.9,即每次有90%的概率选择当前状态的最优动作,10%的概率进行随机选择,即探索。选择前,先检查该状态是否在Q表格中存在,不存在就添加。
action = RL.choose_action(str(observation))

   def choose_action(self, observation):
        self.check_state_exist(observation)
        # 从均匀分布的[0,1)中随机采样,当小于阈值时采用选择最优行为的方式,当大于阈值选择随机行为的方式,这样人为增加随机性是为了解决陷入局部最优
        if np.random.rand() < self.epsilon:
            # 选择最优行为
            state_action = self.q_table.loc[observation, :]
            # 因为一个状态下最优行为可能会有多个,所以在碰到这种情况时,需要随机选择一个行为进行
            state_action = state_action.reindex(np.random.permutation(state_action.index))
            action = state_action.idxmax()
        else:
            # 选择随机行为
            action = np.random.choice(self.actions)
        return action
- 1
- 2
- 3
- 4
- 5
- 6
- 7
- 8
- 9
- 10
- 11
- 12
- 13
- 14
- 15
Step5:保存临时策略,策略即当前状态下的选择的动作,在程序中可以理解为一个字典,键就是当前状态,键值就是动作。
tmp_policy[state_item] = action
- 1
Step6:采取动作并获得下一个状态和回报以及是否终止信息
observation_, reward, done, oval_flag = env.step(action)
- 1
Step6.5(这一步只有Sarsa有,Q-Learning没有):再次获取下一个动作,由于Sarsa需要五个值,因此还需要根据下一个状态来再次选择一次动作而Q-Learning不需要再次进行动作选择(体现了离轨策略的思想)。
action_ = RL.choose_action(str(observation_))
- 1
Step7:更新Q表格,这一步是两者区别的关键,前面提到两者的更新公式不一样,这里用程序来表达一下。
Sarsa:
# 同轨策略Sarsa
class SarsaTable(RL):
    def __init__(self, actions, learning_rate=0.01, reward_decay=0.9, e_greedy=0.9):
        super(SarsaTable, self).__init__(actions, learning_rate, reward_decay, e_greedy)

    def learn(self, s, a, r, s_, a_):
        self.check_state_exist(s_)
        q_predict = self.q_table.loc[s, a]
        if s_ != 'terminal':
            # 使用公式: Q_taget = r+γQ(s',a')
            q_target = r + self.gamma * self.q_table.loc[s_, a_]
        else:
            q_target = r
        # 更新公式: Q(s,a)←Q(s,a)+α(r+γQ(s',a')-Q(s,a))
        self.q_table.loc[s, a] += self.lr * (q_target - q_predict)
- 1
- 2
- 3
- 4
- 5
- 6
- 7
- 8
- 9
- 10
- 11
- 12
- 13
- 14
- 15
Q-learning:
# 离轨策略Q-learning
class QLearningTable(RL):
    def __init__(self, actions, learning_rate=0.01, reward_decay=0.9, e_greedy=0.9):
        super(QLearningTable, self).__init__(actions, learning_rate, reward_decay, e_greedy)

    def learn(self, s, a, r, s_):
        self.check_state_exist(s_)
        q_predict = self.q_table.loc[s, a]
        if s_ != 'terminal':
            # 使用公式:Q_target = r+γ  maxQ(s',a')
            q_target = r + self.gamma * self.q_table.loc[s_, :].max()  # next state is not terminal
        else:
            q_target = r

        # 更新公式: Q(s,a)←Q(s,a)+α(r+γ  maxQ(s',a')-Q(s,a))
        self.q_table.loc[s, a] += self.lr * (q_target - q_predict)
- 1
- 2
- 3
- 4
- 5
- 6
- 7
- 8
- 9
- 10
- 11
- 12
- 13
- 14
- 15
- 16
可以发现,两者的区别就在于下一时刻的动作a‘如何选择。Sarsa和第一次选择动作一样,再次进行动作选择;而Q-Learning直接基于下一个状态S’,在Q表格中选择最大价值的动作。
这里做简单的一个分析。以迷宫为例,里面存在多个陷阱。如果进行动作的epsilon-贪心选择,则有更大几率调入陷阱,从而影响第一步Q值的更新,这样就会导致智能体”畏首畏尾“。而Q-Learning第二步进行贪心选择,则不容易落入陷阱中,从而会使智能体更为路径规划更为大胆。所以从这样的直观角度理解,Q-Learning的效果应该会比Sarsa要好。
Step8:先判断是否到达终止状态,若到达,结束这一幕,并再次判断是否收敛;这里收敛的条件设为三次策略policy不变化,如果不收敛,将临时的策略进行保存;如果收敛,跳出循环,结束操作。
 # 如果为终止状态,结束当前的局数
if done:
    episode_num = episode
    step_num += c
    print(policy)
    print("-" * 50)
    # 如果N次行走的策略相同,表示已经收敛
    if policy == tmp_policy and oval_flag:
        count = count + 1
        if count == N:
            flag = True
    else:
        count = 0
        policy = tmp_policy
    break
- 1
- 2
- 3
- 4
- 5
- 6
- 7
- 8
- 9
- 10
- 11
- 12
- 13
- 14
- 15
效果展示
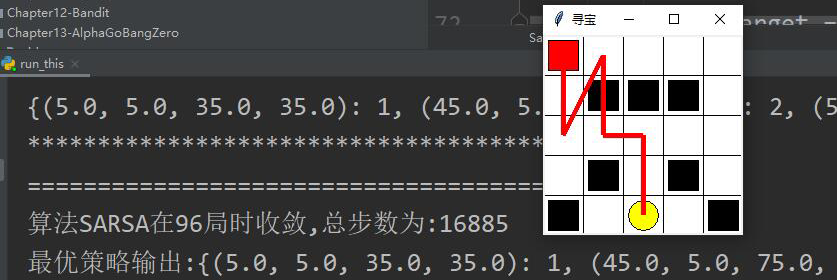
Sarsa结果:

这里可以发现,即使策略收敛,依旧花费了比较长的时间。而且最终的结果存在问题,运行多次,结果不稳定,有时候在100局内无法收敛。
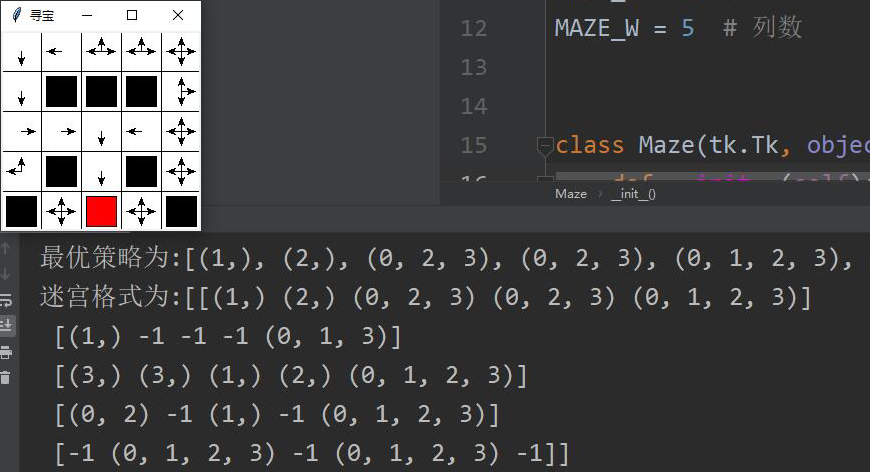
Q-Learning结果:

可以看到Q-Learning找到了最佳的路径,并且用时不长。这和前面的直观分析是吻合的。
完整代码
maze.py(迷宫环境)
import numpy as np
import time
import sys

if sys.version_info.major == 2:
    import Tkinter as tk
else:
    import tkinter as tk

UNIT = 40  # 每个格子的大小
MAZE_H = 5  # 行数
MAZE_W = 5  # 列数


class Maze(tk.Tk, object):
    def __init__(self):
        super(Maze, self).__init__()
        self.action_space = ['u', 'd', 'l', 'r']
        self.nS = np.prod([MAZE_H, MAZE_W])
        self.n_actions = len(self.action_space)
        self.title('寻宝')
        self.geometry('{0}x{1}'.format(MAZE_H * UNIT, MAZE_H * UNIT))
        self._build_maze()

    def _build_maze(self):
        # 创建一个画布
        self.canvas = tk.Canvas(self, bg='white',
                                height=MAZE_H * UNIT,
                                width=MAZE_W * UNIT)

        # 在画布上画出列
        for c in range(0, MAZE_W * UNIT, UNIT):
            x0, y0, x1, y1 = c, 0, c, MAZE_H * UNIT
            self.canvas.create_line(x0, y0, x1, y1)
        # 在画布上画出行
        for r in range(0, MAZE_H * UNIT, UNIT):
            x0, y0, x1, y1 = 0, r, MAZE_H * UNIT, r
            self.canvas.create_line(x0, y0, x1, y1)

        # 创建探险者起始位置(默认为左上角)
        origin = np.array([20, 20])

        # 陷阱1
        hell1_center = origin + np.array([UNIT, UNIT])
        self.hell1 = self.canvas.create_rectangle(
            hell1_center[0] - 15, hell1_center[1] - 15,
            hell1_center[0] + 15, hell1_center[1] + 15,
            fill='black')
        # 陷阱2
        hell2_center = origin + np.array([UNIT * 2, UNIT])
        self.hell2 = self.canvas.create_rectangle(
            hell2_center[0] - 15, hell2_center[1] - 15,
            hell2_center[0] + 15, hell2_center[1] + 15,
            fill='black')

        # 陷阱3
        hell3_center = origin + np.array([UNIT * 3, UNIT])
        self.hell3 = self.canvas.create_rectangle(
            hell3_center[0] - 15, hell3_center[1] - 15,
            hell3_center[0] + 15, hell3_center[1] + 15,
            fill='black')

        # 陷阱4
        hell4_center = origin + np.array([UNIT, UNIT * 3])
        self.hell4 = self.canvas.create_rectangle(
            hell4_center[0] - 15, hell4_center[1] - 15,
            hell4_center[0] + 15, hell4_center[1] + 15,
            fill='black')

        # 陷阱5
        hell5_center = origin + np.array([UNIT * 3, UNIT * 3])
        self.hell5 = self.canvas.create_rectangle(
            hell5_center[0] - 15, hell5_center[1] - 15,
            hell5_center[0] + 15, hell5_center[1] + 15,
            fill='black')

        # 陷阱6
        hell6_center = origin + np.array([0, UNIT * 4])
        self.hell6 = self.canvas.create_rectangle(
            hell6_center[0] - 15, hell6_center[1] - 15,
            hell6_center[0] + 15, hell6_center[1] + 15,
            fill='black')

        # 陷阱7
        hell7_center = origin + np.array([UNIT * 4, UNIT * 4])
        self.hell7 = self.canvas.create_rectangle(
            hell7_center[0] - 15, hell7_center[1] - 15,
            hell7_center[0] + 15, hell7_center[1] + 15,
            fill='black')

        # 宝藏位置
        oval_center = origin + np.array([UNIT * 2, UNIT * 4])
        self.oval = self.canvas.create_oval(
            oval_center[0] - 15, oval_center[1] - 15,
            oval_center[0] + 15, oval_center[1] + 15,
            fill='yellow')

        # 将探险者用矩形表示
        self.rect = self.canvas.create_rectangle(
            origin[0] - 15, origin[1] - 15,
            origin[0] + 15, origin[1] + 15,
            fill='red')

        # 画布展示
        self.canvas.pack()

    # 根据当前的状态重置画布(为了展示动态效果)
    def reset(self):
        self.update()
        time.sleep(0.5)
        self.canvas.delete(self.rect)
        origin = np.array([20, 20])
        self.rect = self.canvas.create_rectangle(
            origin[0] - 15, origin[1] - 15,
            origin[0] + 15, origin[1] + 15,
            fill='red')
        return self.canvas.coords(self.rect)

    # 根据当前行为,确认下一步的位置
    def step(self, action):
        s = self.canvas.coords(self.rect)
        base_action = np.array([0, 0])
        if action == 0:  # 上
            if s[1] > UNIT:
                base_action[1] -= UNIT
        elif action == 1:  # 下
            if s[1] < (MAZE_H - 1) * UNIT:
                base_action[1] += UNIT
        elif action == 2:  # 左
            if s[0] > UNIT:
                base_action[0] -= UNIT
        elif action == 3:  # 右
            if s[0] < (MAZE_W - 1) * UNIT:
                base_action[0] += UNIT

        # 在画布上将探险者移动到下一位置
        self.canvas.move(self.rect, base_action[0], base_action[1])
        # 重新渲染整个界面
        s_ = self.canvas.coords(self.rect)
        oval_flag = False

        # 根据当前位置来获得回报值,及是否终止
        if s_ == self.canvas.coords(self.oval):
            reward = 1
            done = True
            s_ = 'terminal'
            oval_flag = True
        elif s_ in [self.canvas.coords(self.hell1), self.canvas.coords(self.hell2), self.canvas.coords(self.hell3),
                    self.canvas.coords(self.hell4), self.canvas.coords(self.hell5), self.canvas.coords(self.hell6),
                    self.canvas.coords(self.hell7)]:
            reward = -1
            done = True
            s_ = 'terminal'
        else:
            reward = 0
            done = False

        return s_, reward, done, oval_flag

    def render(self):
        time.sleep(0.1)
        self.update()

    # 根据传入策略进行界面的渲染
    def render_by_policy(self, policy):
        cal_policy = sorted(policy)

        pre_x, pre_y = 20, 20

        for state in cal_policy:
            x = (state[0] + state[2]) / 2
            y = (state[1] + state[3]) / 2

            self.canvas.create_line(pre_x, pre_y, x, y, fill="red", tags="line", width=5)

            pre_x = x
            pre_y = y

        # 连接到宝藏位置
        oval_center = [20, 20] + np.array([UNIT * 2, UNIT * 4])

        self.canvas.create_line(pre_x, pre_y, oval_center[0], oval_center[1], fill="red", tags="line", width=5)

        self.render()

    def render_by_policy_new(self, policy):
        for i in range(MAZE_W):
            rows_obj = policy[i]
            for j in range(MAZE_H):
                item_center_x, item_center_y = (j * UNIT + UNIT / 2), (i * UNIT + UNIT / 2)

                cols_obj = rows_obj[j]

                if cols_obj == -1:
                    continue

                for item in cols_obj:
                    if item == 0:
                        item_x = item_center_x
                        item_y = item_center_y - 15.0
                        self.canvas.create_line(item_center_x, item_center_y, item_x, item_y, fill="black", width=1,
                                                arrow='last')
                    elif item == 1:
                        item_x = item_center_x
                        item_y = item_center_y + 15.0
                        self.canvas.create_line(item_center_x, item_center_y, item_x, item_y, fill="black", width=1,
                                                arrow='last')
                    elif item == 2:
                        item_x = item_center_x - 15.0
                        item_y = item_center_y
                        self.canvas.create_line(item_center_x, item_center_y, item_x, item_y, fill="black", width=1,
                                                arrow='last')
                    elif item == 3:
                        item_x = item_center_x + 15.0
                        item_y = item_center_y
                        self.canvas.create_line(item_center_x, item_center_y, item_x, item_y, fill="black", width=1,
                                                arrow='last')
        self.render()
- 1
- 2
- 3
- 4
- 5
- 6
- 7
- 8
- 9
- 10
- 11
- 12
- 13
- 14
- 15
- 16
- 17
- 18
- 19
- 20
- 21
- 22
- 23
- 24
- 25
- 26
- 27
- 28
- 29
- 30
- 31
- 32
- 33
- 34
- 35
- 36
- 37
- 38
- 39
- 40
- 41
- 42
- 43
- 44
- 45
- 46
- 47
- 48
- 49
- 50
- 51
- 52
- 53
- 54
- 55
- 56
- 57
- 58
- 59
- 60
- 61
- 62
- 63
- 64
- 65
- 66
- 67
- 68
- 69
- 70
- 71
- 72
- 73
- 74
- 75
- 76
- 77
- 78
- 79
- 80
- 81
- 82
- 83
- 84
- 85
- 86
- 87
- 88
- 89
- 90
- 91
- 92
- 93
- 94
- 95
- 96
- 97
- 98
- 99
- 100
- 101
- 102
- 103
- 104
- 105
- 106
- 107
- 108
- 109
- 110
- 111
- 112
- 113
- 114
- 115
- 116
- 117
- 118
- 119
- 120
- 121
- 122
- 123
- 124
- 125
- 126
- 127
- 128
- 129
- 130
- 131
- 132
- 133
- 134
- 135
- 136
- 137
- 138
- 139
- 140
- 141
- 142
- 143
- 144
- 145
- 146
- 147
- 148
- 149
- 150
- 151
- 152
- 153
- 154
- 155
- 156
- 157
- 158
- 159
- 160
- 161
- 162
- 163
- 164
- 165
- 166
- 167
- 168
- 169
- 170
- 171
- 172
- 173
- 174
- 175
- 176
- 177
- 178
- 179
- 180
- 181
- 182
- 183
- 184
- 185
- 186
- 187
- 188
- 189
- 190
- 191
- 192
- 193
- 194
- 195
- 196
- 197
- 198
- 199
- 200
- 201
- 202
- 203
- 204
- 205
- 206
- 207
- 208
- 209
- 210
- 211
- 212
- 213
- 214
- 215
- 216
- 217
- 218
RL_brain.py (智能体/Q表)
import numpy as np
import pandas as pd


class RL(object):
    def __init__(self, action_space, learning_rate=0.01, reward_decay=0.9, e_greedy=0.9):
        self.actions = action_space
        self.lr = learning_rate
        self.gamma = reward_decay
        self.epsilon = e_greedy

        self.q_table = pd.DataFrame(columns=self.actions, dtype=np.float64)

    def check_state_exist(self, state):
        if state not in self.q_table.index:
            # 如果状态在当前的Q表中不存在,将当前状态加入Q表中
            self.q_table = self.q_table.append(
                pd.Series(
                    [0] * len(self.actions),
                    index=self.q_table.columns,
                    name=state,
                )
            )

    def choose_action(self, observation):
        self.check_state_exist(observation)
        # 从均匀分布的[0,1)中随机采样,当小于阈值时采用选择最优行为的方式,当大于阈值选择随机行为的方式,这样人为增加随机性是为了解决陷入局部最优
        if np.random.rand() < self.epsilon:
            # 选择最优行为
            state_action = self.q_table.loc[observation, :]
            # 因为一个状态下最优行为可能会有多个,所以在碰到这种情况时,需要随机选择一个行为进行
            state_action = state_action.reindex(np.random.permutation(state_action.index))
            action = state_action.idxmax()
        else:
            # # 选择随机行为
            action = np.random.choice(self.actions)
        return action

    def learn(self, *args):
        pass


# 离轨策略Q-learning
class QLearningTable(RL):
    def __init__(self, actions, learning_rate=0.01, reward_decay=0.9, e_greedy=0.9):
        super(QLearningTable, self).__init__(actions, learning_rate, reward_decay, e_greedy)

    def learn(self, s, a, r, s_):
        self.check_state_exist(s_)
        q_predict = self.q_table.loc[s, a]
        if s_ != 'terminal':
            # 使用公式:Q_target = r+γ  maxQ(s',a')
            q_target = r + self.gamma * self.q_table.loc[s_, :].max()  # next state is not terminal
        else:
            q_target = r

        # 更新公式: Q(s,a)←Q(s,a)+α(r+γ  maxQ(s',a')-Q(s,a))
        self.q_table.loc[s, a] += self.lr * (q_target - q_predict)


# 同轨策略Sarsa
class SarsaTable(RL):

    def __init__(self, actions, learning_rate=0.01, reward_decay=0.9, e_greedy=0.9):
        super(SarsaTable, self).__init__(actions, learning_rate, reward_decay, e_greedy)

    def learn(self, s, a, r, s_, a_):
        self.check_state_exist(s_)
        q_predict = self.q_table.loc[s, a]
        if s_ != 'terminal':
            # 使用公式: Q_taget = r+γQ(s',a')
            q_target = r + self.gamma * self.q_table.loc[s_, a_]
        else:
            q_target = r
        # 更新公式: Q(s,a)←Q(s,a)+α(r+γQ(s',a')-Q(s,a))
        self.q_table.loc[s, a] += self.lr * (q_target - q_predict)
- 1
- 2
- 3
- 4
- 5
- 6
- 7
- 8
- 9
- 10
- 11
- 12
- 13
- 14
- 15
- 16
- 17
- 18
- 19
- 20
- 21
- 22
- 23
- 24
- 25
- 26
- 27
- 28
- 29
- 30
- 31
- 32
- 33
- 34
- 35
- 36
- 37
- 38
- 39
- 40
- 41
- 42
- 43
- 44
- 45
- 46
- 47
- 48
- 49
- 50
- 51
- 52
- 53
- 54
- 55
- 56
- 57
- 58
- 59
- 60
- 61
- 62
- 63
- 64
- 65
- 66
- 67
- 68
- 69
- 70
- 71
- 72
- 73
- 74
- 75
- 76
main.py
import sys

if "../" not in sys.path:
    sys.path.append("../")
from lib.envs.maze import Maze
from RL_brain import QLearningTable, SarsaTable
import numpy as np

# METHOD = "SARSA"
METHOD = "Q-Learning"


def get_action(q_table, state):
    # 选择最优行为
    state_action = q_table.loc[state, :]

    # 因为一个状态下最优行为可能会有多个,所以在碰到这种情况时,需要随机选择一个行为进行
    state_action_max = state_action.max()

    idxs = []

    for max_item in range(len(state_action)):
        if state_action[max_item] == state_action_max:
            idxs.append(max_item)

    sorted(idxs)
    return tuple(idxs)


def get_policy(q_table, rows=5, cols=5, pixels=40, orign=20):
    policy = []

    for i in range(rows):
        for j in range(cols):
            # 求出每个各自的状态
            item_center_x, item_center_y = (j * pixels + orign), (i * pixels + orign)
            item_state = [item_center_x - 15.0, item_center_y - 15.0, item_center_x + 15.0, item_center_y + 15.0]

            # 如果当前状态为各终止状态,则值为-1
            if item_state in [env.canvas.coords(env.hell1), env.canvas.coords(env.hell2),
                              env.canvas.coords(env.hell3), env.canvas.coords(env.hell4),
                              env.canvas.coords(env.hell5), env.canvas.coords(env.hell6),
                              env.canvas.coords(env.hell7), env.canvas.coords(env.oval)]:
                policy.append(-1)
                continue

            if str(item_state) not in q_table.index:
                policy.append((0, 1, 2, 3))
                continue

            # 选择最优行为
            item_action_max = get_action(q_table, str(item_state))

            policy.append(item_action_max)

    return policy


def update():
    for episode in range(100):
        # 初始化状态
        observation = env.reset()

        c = 0

        tmp_policy = {}

        while True:
            # 渲染当前环境
            env.render()

            # 基于当前状态选择行为
            action = RL.choose_action(str(observation))

            state_item = tuple(observation)

            tmp_policy[state_item] = action

            # 采取行为获得下一个状态和回报,及是否终止
            observation_, reward, done, oval_flag = env.step(action)

            if METHOD == "SARSA":
                # 基于下一个状态选择行为
                action_ = RL.choose_action(str(observation_))

                # 基于变化 (s, a, r, s, a)使用Sarsa进行Q的更新
                RL.learn(str(observation), action, reward, str(observation_), action_)
            elif METHOD == "Q-Learning":
                # 根据当前的变化开始更新Q
                RL.learn(str(observation), action, reward, str(observation_))

            # 改变状态和行为
            observation = observation_
            c += 1
            # 如果为终止状态,结束当前的局数
            if done:
                break
    print('游戏结束')
    # 开始输出最终的Q表
    q_table_result = RL.q_table
    # 使用Q表输出各状态的最优策略
    policy = get_policy(q_table_result)
    print("最优策略为", end=":")
    print(policy)
    print("迷宫格式为", end=":")
    policy_result = np.array(policy).reshape(5, 5)
    print(policy_result)
    print("根据求出的最优策略画出方向")
    env.render_by_policy_new(policy_result)

    # env.destroy()


if __name__ == "__main__":
    env = Maze()
    RL = SarsaTable(actions=list(range(env.n_actions)))
    if METHOD == "Q-Learning":
        RL = QLearningTable(actions=list(range(env.n_actions)))
    env.after(100, update)
    env.mainloop()
- 1
- 2
- 3
- 4
- 5
- 6
- 7
- 8
- 9
- 10
- 11
- 12
- 13
- 14
- 15
- 16
- 17
- 18
- 19
- 20
- 21
- 22
- 23
- 24
- 25
- 26
- 27
- 28
- 29
- 30
- 31
- 32
- 33
- 34
- 35
- 36
- 37
- 38
- 39
- 40
- 41
- 42
- 43
- 44
- 45
- 46
- 47
- 48
- 49
- 50
- 51
- 52
- 53
- 54
- 55
- 56
- 57
- 58
- 59
- 60
- 61
- 62
- 63
- 64
- 65
- 66
- 67
- 68
- 69
- 70
- 71
- 72
- 73
- 74
- 75
- 76
- 77
- 78
- 79
- 80
- 81
- 82
- 83
- 84
- 85
- 86
- 87
- 88
- 89
- 90
- 91
- 92
- 93
- 94
- 95
- 96
- 97
- 98
- 99
- 100
- 101
- 102
- 103
- 104
- 105
- 106
- 107
- 108
- 109
- 110
- 111
- 112
- 113
- 114
- 115
- 116
- 117
- 118
- 119
- 120
文章来源: zstar.blog.csdn.net,作者:zstar-_,版权归原作者所有,如需转载,请联系作者。
原文链接:zstar.blog.csdn.net/article/details/124062331
- 点赞
- 收藏
- 关注作者


评论(0)