【Web开发】登录注册功能实现
登录注册是网站的常用功能,本篇根据黑马程序员的教程来实现此功能的小demo。
参考:https://www.bilibili.com/video/BV1Qf4y1T7Hx?p=109
maven文件下载:https://download.csdn.net/download/qq1198768105/79568473
登录功能
思路分析
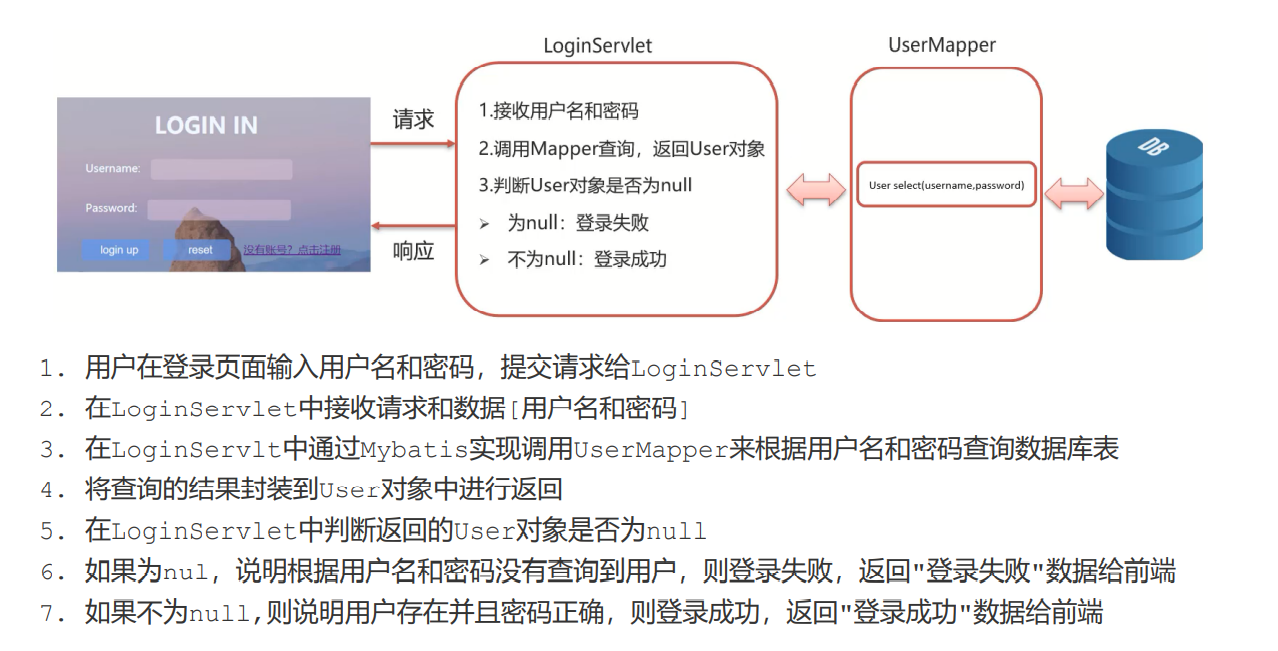
登录页面设计

相关前端资源文件见maven文件。
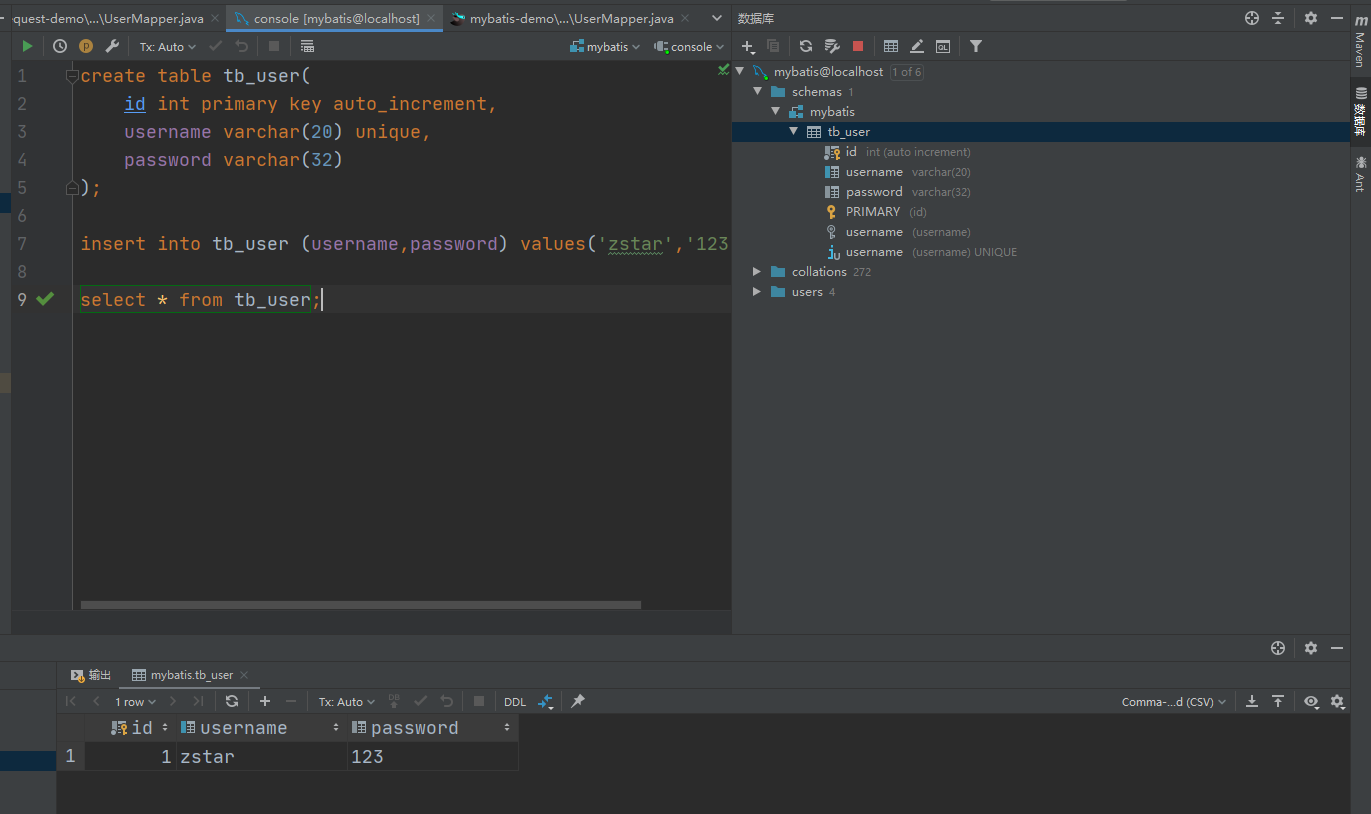
数据表数据建立
直接用IDEA集成的mysql数据库建立数据。
设置每个用户有三个值:
主键:id
用户名:username(最多20位,不能重复)
密码:password(最多32位)
设立一个账号:zstar,123
相关sql语句:
create table tb_user(
    id int primary key auto_increment,
    username varchar(20) unique,
    password varchar(32)
);

insert into tb_user (username,password) values('zstar','123');

select * from tb_user;
- 1
- 2
- 3
- 4
- 5
- 6
- 7
- 8
- 9
创建实体类
在com.itheima.pojo文件夹下创建User实体类,该实体类的三个属性和数据表里三个值相对应:
package com.itheima.pojo;

public class User {

    private Integer id;
    private String username;
    private String password;

    public Integer getId() {
        return id;
    }

    public void setId(Integer id) {
        this.id = id;
    }

    public String getUsername() {
        return username;
    }

    public void setUsername(String username) {
        this.username = username;
    }

    public String getPassword() {
        return password;
    }

    public void setPassword(String password) {
        this.password = password;
    }

    @Override
    public String toString() {
        return "User{" +
                "id=" + id +
                ", username='" + username + '\'' +
                ", password='" + password + '\'' +
                '}';
    }
}
- 1
- 2
- 3
- 4
- 5
- 6
- 7
- 8
- 9
- 10
- 11
- 12
- 13
- 14
- 15
- 16
- 17
- 18
- 19
- 20
- 21
- 22
- 23
- 24
- 25
- 26
- 27
- 28
- 29
- 30
- 31
- 32
- 33
- 34
- 35
- 36
- 37
- 38
- 39
- 40
- 41
- 42
导入驱动
在项目的pom.xml导入所需驱动坐标
<dependencies>
        <dependency>
            <groupId>javax.servlet</groupId>
            <artifactId>javax.servlet-api</artifactId>
            <version>3.1.0</version>
            <scope>provided</scope>
        </dependency>

        <dependency>
            <groupId>commons-io</groupId>
            <artifactId>commons-io</artifactId>
            <version>2.6</version>
        </dependency>

        <dependency>
            <groupId>org.mybatis</groupId>
            <artifactId>mybatis</artifactId>
            <version>3.5.5</version>
        </dependency>

        <dependency>
            <groupId>mysql</groupId>
            <artifactId>mysql-connector-java</artifactId>
            <version>5.1.34</version>
        </dependency>
</dependencies>
- 1
- 2
- 3
- 4
- 5
- 6
- 7
- 8
- 9
- 10
- 11
- 12
- 13
- 14
- 15
- 16
- 17
- 18
- 19
- 20
- 21
- 22
- 23
- 24
- 25
- 26
设置mybatis配置
创建mybatis-config.xml核心配置文件
<?xml version="1.0" encoding="UTF-8" ?>
<!DOCTYPE configuration
PUBLIC "-//mybatis.org//DTD Config 3.0//EN"
"http://mybatis.org/dtd/mybatis-3-config.dtd">
<configuration>
<!--起别名-->
<typeAliases>
<package name="com.itheima.pojo"/>
</typeAliases>
<environments default="development">
<environment id="development">
<transactionManager type="JDBC"/>
<dataSource type="POOLED">
<property name="driver" value="com.mysql.jdbc.Driver"/>
<property name="url" value="jdbc:mysql:///mybatis?useSSL=false&useServerPrepStmts=true"/>
<property name="username" value="root"/>
<property name="password" value="zzz"/>
</dataSource>
</environment>
</environments>
<mappers>
<!--扫描mapper-->
<package name="com.itheima.mapper"/>
</mappers>
</configuration>
- 1
- 2
- 3
- 4
- 5
- 6
- 7
- 8
- 9
- 10
- 11
- 12
- 13
- 14
- 15
- 16
- 17
- 18
- 19
- 20
- 21
- 22
- 23
- 24
- 25
- 26
注:这里需要根据自己的数据库信息进行设置
我的数据库名为mybatis,在url上进行修改
数据库用户名为root
密码为zzz
useSSL:关闭SSL安全连接 性能更高
useServerPrepStmts:开启预编译功能
& 等同于 &(直接写&会报错)
创建UserMapper接口
在mabatis的配置文件中,设置扫描mapper为com.itheima.mapper
在com.itheima.mapper包下创建UserMapper接口
package com.itheima.mapper;

import com.itheima.pojo.User;
import org.apache.ibatis.annotations.Insert;
import org.apache.ibatis.annotations.Param;
import org.apache.ibatis.annotations.Select;

public interface UserMapper {
    /**
     * 根据用户名和密码查询用户对象
     * @param username
     * @param password
     * @return
     */
    @Select("select * from tb_user where username = #{username} and password = #{password}")
    User select(@Param("username") String username,@Param("password")  String password);
}
- 1
- 2
- 3
- 4
- 5
- 6
- 7
- 8
- 9
- 10
- 11
- 12
- 13
- 14
- 15
- 16
- 17
实现该接口的主要有两种方式,第一种在同文件夹下创建UserMapper.xml文件,在文件中用namespace来进行关联,第二种直接适用注解进行sql语句的实现。
这里采用了第二种方式。
这里sql语句的占位符有两种方式,一种是#{},一种是${},两者区别:
#{} :执行SQL时,会将 #{} 占位符替换为?,将来自动设置参数值。 底层使用的是PreparedStatement
${} :拼接SQL。底层使用的是Statement,会存在SQL注入问题。
因此为了防止SQL注入问题,使用#不用$。
@Param注解的作用:用于传递参数,是方法的参数可以与SQL中的字段名相对应。
修改登录页面
修改loign.html:
<!DOCTYPE html>
<html lang="en">
<head>
<meta charset="UTF-8">
<title>login</title>
<link href="css/login.css" rel="stylesheet">
</head>
<body>
<div id="loginDiv">
<form action="/request-demo/loginServlet" method="post" id="form">
<h1 id="loginMsg">LOGIN IN</h1>
<p>Username:<input id="username" name="username" type="text"></p>
<p>Password:<input id="password" name="password" type="password"></p>
<div id="subDiv">
<input type="submit" class="button" value="login up">
<input type="reset" class="button" value="reset">
<a href="register.html">没有账号?点击注册</a>
</div>
</form>
</div>
</body>
</html>
- 1
- 2
- 3
- 4
- 5
- 6
- 7
- 8
- 9
- 10
- 11
- 12
- 13
- 14
- 15
- 16
- 17
- 18
- 19
- 20
- 21
- 22
- 23
- 24
- 25
- 26
- 27
这里主要修改的一点是username和password要设定id,这样才能被后面的LoginServlet获取到。
编写登录Servlet
package com.itheima.web;

import com.itheima.mapper.UserMapper;
import com.itheima.pojo.User;
import com.itheima.util.SqlSessionFactoryUtils;
import org.apache.ibatis.io.Resources;
import org.apache.ibatis.session.SqlSession;
import org.apache.ibatis.session.SqlSessionFactory;
import org.apache.ibatis.session.SqlSessionFactoryBuilder;

import javax.servlet.*;
import javax.servlet.http.*;
import javax.servlet.annotation.*;
import java.io.IOException;
import java.io.InputStream;
import java.io.PrintWriter;

@WebServlet("/loginServlet")
public class LoginServlet extends HttpServlet {
    @Override
    protected void doGet(HttpServletRequest request, HttpServletResponse response) throws ServletException, IOException {
        //1. 接收用户名和密码
        String username = request.getParameter("username");
        String password = request.getParameter("password");

        //2. 调用MyBatis完成查询
        //2.1 获取SqlSessionFactory对象
       /* String resource = "mybatis-config.xml";
        InputStream inputStream = Resources.getResourceAsStream(resource);
        SqlSessionFactory sqlSessionFactory = new SqlSessionFactoryBuilder().build(inputStream);*/

        SqlSessionFactory sqlSessionFactory = SqlSessionFactoryUtils.getSqlSessionFactory();
        //2.2 获取SqlSession对象
        SqlSession sqlSession = sqlSessionFactory.openSession();
        //2.3 获取Mapper
        UserMapper userMapper = sqlSession.getMapper(UserMapper.class);
        //2.4 调用方法
        User user = userMapper.select(username, password);
        //2.5 释放资源
        sqlSession.close();


        //获取字符输出流,并设置content type
        response.setContentType("text/html;charset=utf-8");
        PrintWriter writer = response.getWriter();
        //3. 判断user释放为null
        if(user != null){
            // 登陆成功
            writer.write("登陆成功");
        }else {
            // 登陆失败
            writer.write("登陆失败");
        }
    }

    @Override
    protected void doPost(HttpServletRequest request, HttpServletResponse response) throws ServletException, IOException {
        this.doGet(request, response);
    }
}
- 1
- 2
- 3
- 4
- 5
- 6
- 7
- 8
- 9
- 10
- 11
- 12
- 13
- 14
- 15
- 16
- 17
- 18
- 19
- 20
- 21
- 22
- 23
- 24
- 25
- 26
- 27
- 28
- 29
- 30
- 31
- 32
- 33
- 34
- 35
- 36
- 37
- 38
- 39
- 40
- 41
- 42
- 43
- 44
- 45
- 46
- 47
- 48
- 49
- 50
- 51
- 52
- 53
- 54
- 55
- 56
- 57
- 58
- 59
- 60
注:在2.1获取SqlSessionFactory对象中,登录和后面的注册均要使用这相同的三行代码,如果在两个Servlet都进行获取,则会重复创建,比较消耗资源;因此,这里作出了优化,创建SqlSessionFactory工具类,使用静态代码块保证只执行一次。
SqlSessionFactory工具类:SqlSessionFactoryUtils
package com.itheima.util;

import org.apache.ibatis.io.Resources;
import org.apache.ibatis.session.SqlSessionFactory;
import org.apache.ibatis.session.SqlSessionFactoryBuilder;

import java.io.IOException;
import java.io.InputStream;

public class SqlSessionFactoryUtils {

    private static SqlSessionFactory sqlSessionFactory;

    static {
        //静态代码块会随着类的加载而自动执行,且只执行一次

        try {
            String resource = "mybatis-config.xml";
            InputStream inputStream = Resources.getResourceAsStream(resource);
            sqlSessionFactory = new SqlSessionFactoryBuilder().build(inputStream);
        } catch (IOException e) {
            e.printStackTrace();
        }
    }


    public static SqlSessionFactory getSqlSessionFactory(){
        return sqlSessionFactory;
    }
}
- 1
- 2
- 3
- 4
- 5
- 6
- 7
- 8
- 9
- 10
- 11
- 12
- 13
- 14
- 15
- 16
- 17
- 18
- 19
- 20
- 21
- 22
- 23
- 24
- 25
- 26
- 27
- 28
- 29
- 30
功能测试
使用Maven Helper插件开启tomcat服务:
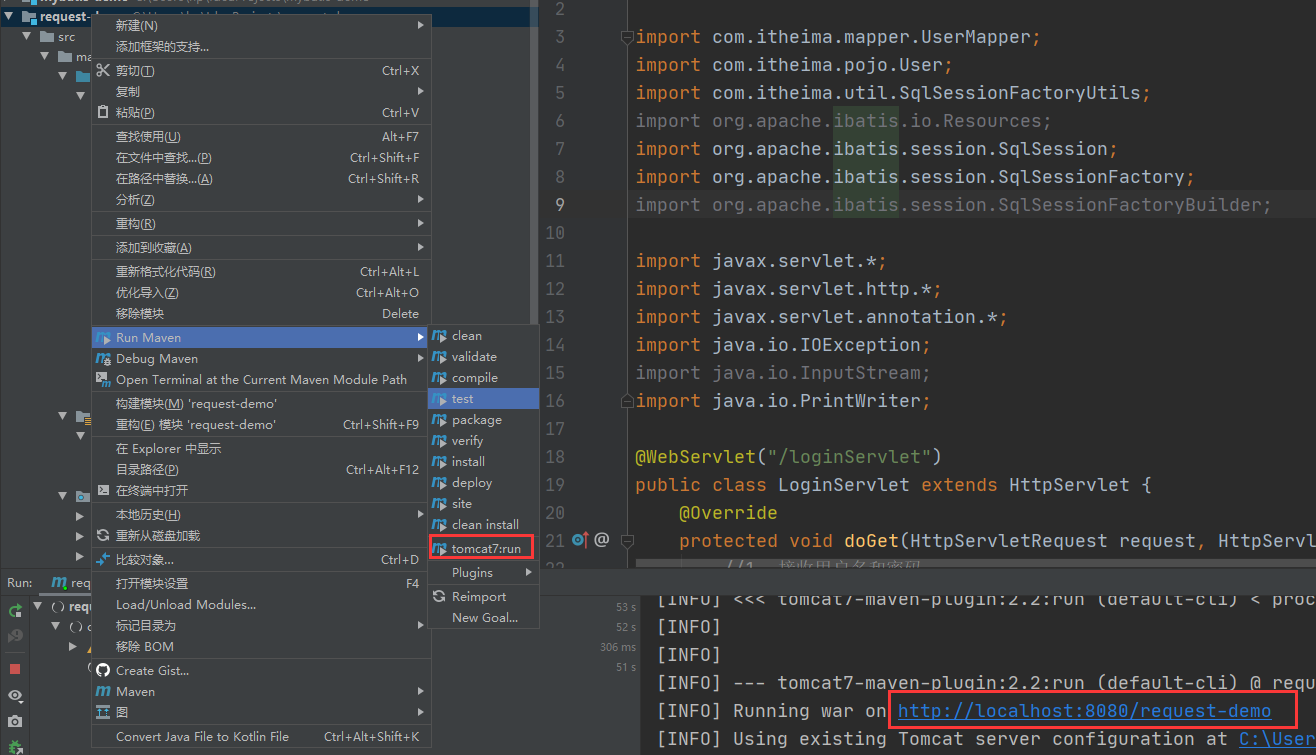
进入页面,访问
http://localhost:8080/request-demo/login.html
- 1
能正常访问,提交数据,提交数据,发现报错:
Could not create connection to database server
查阅原因:数据库版本和驱动不匹配
在控制台查看我的mysql版本:8.0.28
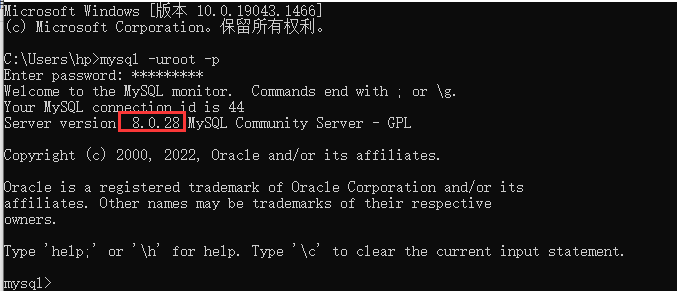
在pom.xml中修改mysql驱动:
        <dependency>
            <groupId>mysql</groupId>
            <artifactId>mysql-connector-java</artifactId>
            <version>8.0.28</version>
        </dependency>
- 1
- 2
- 3
- 4
- 5
- 6
重新运行,结果正常。
注册功能
思路分析
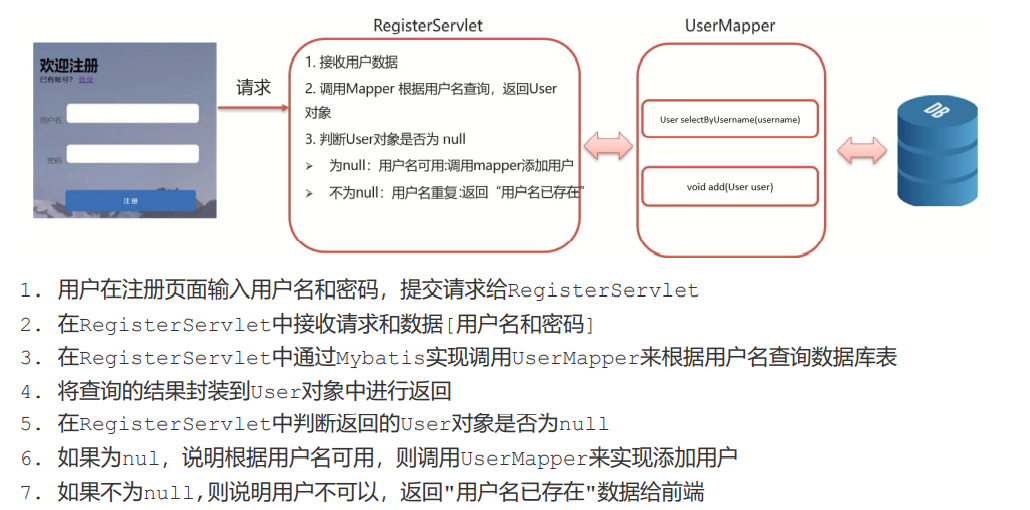
注册页面设计

register.html
<!DOCTYPE html>
<html lang="en">
<head>
    <meta charset="UTF-8">
    <title>欢迎注册</title>
    <link href="css/register.css" rel="stylesheet">
</head>
<body>

<div class="form-div">
    <div class="reg-content">
        <h1>欢迎注册</h1>
        <span>已有帐号?</span> <a href="login.html">登录</a>
    </div>
    <form id="reg-form" action="/request-demo/registerServlet" method="post">

        <table>

            <tr>
                <td>用户名</td>
                <td class="inputs">
                    <input name="username" type="text" id="username">
                    <br>
                    <span id="username_err" class="err_msg" style="display: none">用户名不太受欢迎</span>
                </td>

            </tr>

            <tr>
                <td>密码</td>
                <td class="inputs">
                    <input name="password" type="password" id="password">
                    <br>
                    <span id="password_err" class="err_msg" style="display: none">密码格式有误</span>
                </td>
            </tr>

        </table>

        <div class="buttons">
            <input value="注 册" type="submit" id="reg_btn">
        </div>
        <br class="clear">
    </form>

</div>
</body>
</html>
- 1
- 2
- 3
- 4
- 5
- 6
- 7
- 8
- 9
- 10
- 11
- 12
- 13
- 14
- 15
- 16
- 17
- 18
- 19
- 20
- 21
- 22
- 23
- 24
- 25
- 26
- 27
- 28
- 29
- 30
- 31
- 32
- 33
- 34
- 35
- 36
- 37
- 38
- 39
- 40
- 41
- 42
- 43
- 44
- 45
- 46
- 47
- 48
修改UserMapper
在之前的基础上增加查询用户名和添加用户的功能:
package com.itheima.mapper;

import com.itheima.pojo.User;
import org.apache.ibatis.annotations.Insert;
import org.apache.ibatis.annotations.Param;
import org.apache.ibatis.annotations.Select;

public interface UserMapper {


    /**
     * 根据用户名和密码查询用户对象
     * @param username
     * @param password
     * @return
     */
    @Select("select * from tb_user where username = #{username} and password = #{password}")
    User select(@Param("username") String username,@Param("password")  String password);

    /**
     * 根据用户名查询用户对象
     * @param username
     * @return
     */
    @Select("select * from tb_user where username = #{username}")
    User selectByUsername(String username);

    /**
     * 添加用户
     * @param user
     */
    @Insert("insert into tb_user values(null,#{username},#{password})")
    void add(User user);
}
- 1
- 2
- 3
- 4
- 5
- 6
- 7
- 8
- 9
- 10
- 11
- 12
- 13
- 14
- 15
- 16
- 17
- 18
- 19
- 20
- 21
- 22
- 23
- 24
- 25
- 26
- 27
- 28
- 29
- 30
- 31
- 32
- 33
- 34
编写注册Servlet
和登录类似 RegisterServlet:
package com.itheima.web;

import com.itheima.mapper.UserMapper;
import com.itheima.pojo.User;
import com.itheima.util.SqlSessionFactoryUtils;
import org.apache.ibatis.io.Resources;
import org.apache.ibatis.session.SqlSession;
import org.apache.ibatis.session.SqlSessionFactory;
import org.apache.ibatis.session.SqlSessionFactoryBuilder;

import javax.servlet.*;
import javax.servlet.http.*;
import javax.servlet.annotation.*;
import java.io.IOException;
import java.io.InputStream;

@WebServlet("/registerServlet")
public class RegisterServlet extends HttpServlet {
    @Override
    protected void doGet(HttpServletRequest request, HttpServletResponse response) throws ServletException, IOException {
        //1. 接收用户数据
        String username = request.getParameter("username");
        String password = request.getParameter("password");

        //封装用户对象
        User user = new User();
        user.setUsername(username);
        user.setPassword(password);

        //2. 调用mapper 根据用户名查询用户对象
        //2.1 获取SqlSessionFactory对象
       /* String resource = "mybatis-config.xml";
        InputStream inputStream = Resources.getResourceAsStream(resource);
        SqlSessionFactory sqlSessionFactory = new SqlSessionFactoryBuilder().build(inputStream);*/
        SqlSessionFactory sqlSessionFactory = SqlSessionFactoryUtils.getSqlSessionFactory();

        //2.2 获取SqlSession对象
        SqlSession sqlSession = sqlSessionFactory.openSession();
        //2.3 获取Mapper
        UserMapper userMapper = sqlSession.getMapper(UserMapper.class);

        //2.4 调用方法
        User u = userMapper.selectByUsername(username);

        //3. 判断用户对象释放为null
        if( u == null){
            // 用户名不存在,添加用户
            userMapper.add(user);

            // 提交事务
            sqlSession.commit();
            // 释放资源
            sqlSession.close();
        }else {
            // 用户名存在,给出提示信息
            response.setContentType("text/html;charset=utf-8");
            response.getWriter().write("用户名已存在");
        }

    }

    @Override
    protected void doPost(HttpServletRequest request, HttpServletResponse response) throws ServletException, IOException {
        this.doGet(request, response);
    }
}
- 1
- 2
- 3
- 4
- 5
- 6
- 7
- 8
- 9
- 10
- 11
- 12
- 13
- 14
- 15
- 16
- 17
- 18
- 19
- 20
- 21
- 22
- 23
- 24
- 25
- 26
- 27
- 28
- 29
- 30
- 31
- 32
- 33
- 34
- 35
- 36
- 37
- 38
- 39
- 40
- 41
- 42
- 43
- 44
- 45
- 46
- 47
- 48
- 49
- 50
- 51
- 52
- 53
- 54
- 55
- 56
- 57
- 58
- 59
- 60
- 61
- 62
- 63
- 64
- 65
- 66
功能测试
访问
http://localhost:8080/request-demo/register.html
- 1
提交表单后,查阅数据库成功输进新用户数据,测试通过。

文章来源: zstar.blog.csdn.net,作者:zstar-_,版权归原作者所有,如需转载,请联系作者。
原文链接:zstar.blog.csdn.net/article/details/122805581
- 点赞
- 收藏
- 关注作者


评论(0)