python常用函数技巧汇总

python有许多实用函数,合理实用可以大幅精简代码。本篇博文旨在记录一些常用的操作技巧,以便重复使用时快速查阅,会持续进行更新。
读取txt文件
data = np.genfromtxt('./sonar.txt', delimiter=',', usecols=np.arange(0, 60)
- 1
通过numpy的genfromtxt来读取txt文件
delimiter 分隔符
usecols 指定读取的列
随机生成正态分布数
生成[0,1)大小为(2,2)的符合正态分布的矩阵
u = np.random.uniform(0, 1, (2, 2))
- 1
随机生成不重复的数
产生k个[0,60)的不同随机数
Index = random.sample(range(0, 60), k)
- 1
返回列表中最多次出现过的数
cx = max(label_list, key=label_list.count)
- 1
返回数组中非零元素的位置
nozero_index = np.nonzero()
- 1
这个函数更多的实用案例可参考:
https://www.cnblogs.com/pengzhonglian/p/11613336.html
绘制散点图
导入库:
import matplotlib.pyplot as plt
- 1
plt.figure(1)
plt.scatter(x0[:, 0], x0[:, 1], c='r', marker='o', label='类别一') # scatter绘制散点图
plt.scatter(x1[:, 0], x1[:, 1], c='g', marker='o', label='类别二')
plt.xlabel('x轴标签')
plt.ylabel('y轴标签')
plt.title('图片标题')
plt.legend(loc=2)  # 把图例放到左上角
plt.rcParams['font.sans-serif'] = ['SimHei'] # 中文字体显示
plt.savefig('./保存名')# 导出图片保存
plt.show() # 显示图片
- 1
- 2
- 3
- 4
- 5
- 6
- 7
- 8
- 9
- 10
关于浅拷贝和深拷贝的冷知识
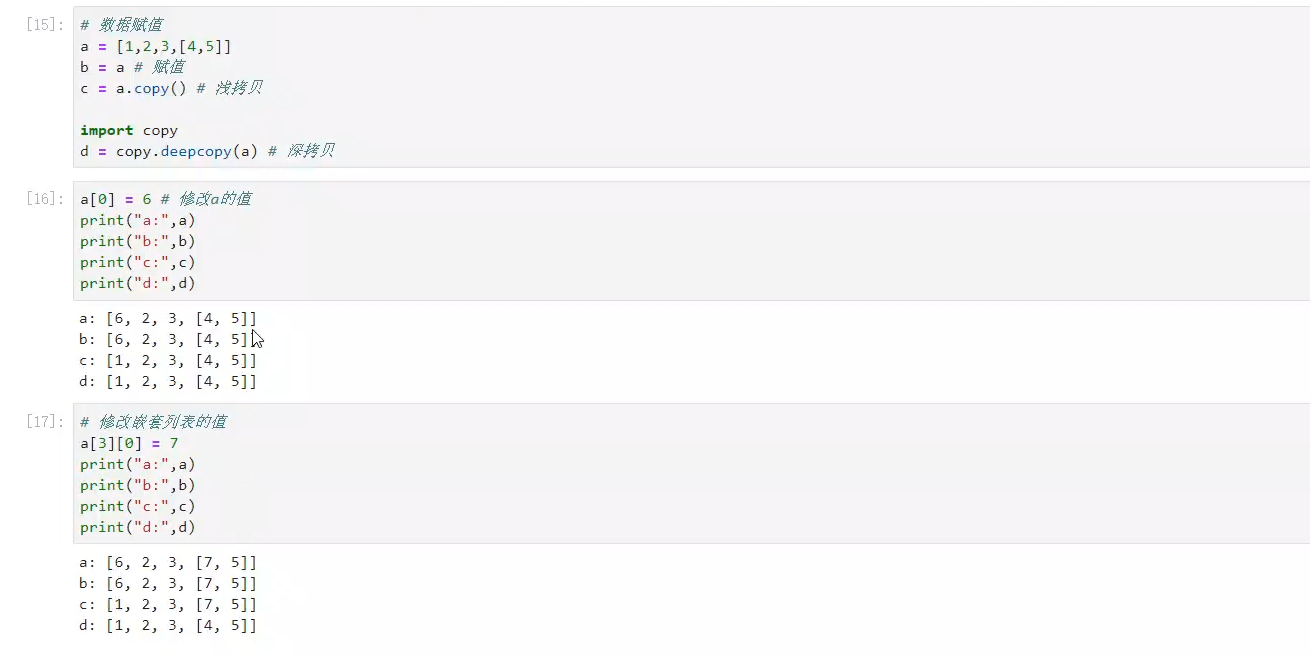
没有嵌套,copy()即可;
有嵌套,必须copy.deepcopy(变量)
求欧式距离
经常用到,有两种方式实现,一种手写,另一种调用numpy的某接口。
我倾向手写的方式,对结果更容易掌控。
# 计算x,y欧式距离
def dist_cal(x, y):
    return ((x[0] - y[0]) ** 2 + (x[1] - y[1]) ** 2) ** 0.5
- 1
- 2
- 3
洗牌操作shuffle
用于打乱某序列的固定顺序
np.random.shuffle(rand_ch)
- 1
求累积和
在轮盘赌算法中常用,累求和序列
q = p.cumsum()
- 1
比如 ,这里的p是1,2,3,q就是1,3,6
生成随机数/整数
生成随机数:
np.random.rand()
- 1
生成随机整数:
np.random.randint()
- 1
括号里可添加范围,默认(0,1]
求列表ind_a中元素等于1的下标
index = np.argwhere(ind_a == 1)
- 1
反解包*zip
已知location = [(x1,y1),(x2,y2)]
通过下面的方式将x,y单独分离
x, y = zip(*location)
- 1
将一个序列作为索引,另一个序列输出索引值
很实用,很巧妙
ls=[1,2,3,4,5,6,7,8,9,0]#list
index=[2,3,6]#index list
[ls[i]for i in index]
- 1
- 2
- 3
array的部分翻转


翻转[::-1]
a = np.array([[24, 20, 10, 22, 21, 4, 27, 6, 25, 1, 0, 28, 2, 17, 14, 7, 12, 16, 8, 23, 9, 3, 13, 11,
              19, 18, 26, 5, 15],[24, 20, 10, 22, 21, 4, 27, 6, 25, 1, 0, 28, 2, 17, 14, 7, 12, 16, 8, 23, 9, 3, 13, 11,19, 18, 26, 5, 15]])
a[0,1:4] = a[0,1:4][::-1]
- 1
- 2
- 3
结果:a[0]的20,10,22变为22,10,20
List中每个数都除以某数
直接除会报错,巧妙办法:
每个数都除以10
my_list = [x/10 for x in my_list]
- 1
多个列表同时排序
遇到这么一个问题:两个list元素一一对应,一个list进行排序,另一个list上的元素也跟着排序,保持一一对应关系。
下面是我遇到的实际问题场景:
一个list存储文章标题,另一个list存储文章发表时间,根据时间来进行两者同时排序:
title_list = ['文章1标题', '文章2']
time_List = ['2021-2-12', '2020-3-18']

title_time = zip(title_list, time_List)
sorted_title_time = sorted(title_time, key=lambda x: x[1])
result = zip(*sorted_title_time)
title_list, title_time = [list(x) for x in result]
print(title_list)
print(title_time)
- 1
- 2
- 3
- 4
- 5
- 6
- 7
- 8
- 9
主要思路:用zip将两者进行打包,排序完之后再用zip*解包。
跳过异常继续运行
这个需求是我在进行爬虫练习时遇到的,有的网站为了防爬虫,会连续性的网站数据中加入某些异常值,导致正常爬虫遇到时会进行报错,从而前功尽弃。
为了防止这种事情发生,就需要通过异常检测的方式来跳过去:
    for item in List:
        try:
            # 继续执行的内容
        except Exception:
            pass
        continue
- 1
- 2
- 3
- 4
- 5
- 6
字符串截取(以截取Link为例)
字符串截取比较常规,遇到这么一个场景:需要从字符串中提取出所有的网页链接,即Link。
可直接调用下面封装好的函数。
# 从a标签中切分出具体文章链接
def split_link(string):
    start_string = 'http'
    end_string = '.html'
    sub_str = ""
    start = string.find(start_string)
    # 只要start不等于-1,说明找到了http
    while start != -1:
        # 找结束的位置
        end = string.find(end_string, start)
        # 截取字符串 结束位置=结束字符串的开始位置+结束字符串的长度
        sub_str = string[start:end + len(end_string)]
        # 找下一个开始的位置
        # 如果没有下一个开始的位置,结束循环
        start = string.find(start_string, end)
    return sub_str
- 1
- 2
- 3
- 4
- 5
- 6
- 7
- 8
- 9
- 10
- 11
- 12
- 13
- 14
- 15
- 16
获取今天年月日
import time
print(time.strftime("%Y-%m-%d"))
- 1
- 2
转换array中类型
将numpy中的array序列中的类型进行转换可使用astype
例如:转换成浮点型
X.astype(int)
- 1
Matplotlib设置中文
让图例显示中文,全局添加:
import matplotlib.pyplot as plt

plt.rcParams['font.sans-serif'] = ["SimHei"]
plt.rcParams["axes.unicode_minus"] = False
- 1
- 2
- 3
- 4
Matplotlib两个子图并列显示
使用subplot控制子图位置,用figsize调整子图大小
plt.figure(figsize=(20, 15))
plt.subplot(2, 2, 1)
for i in range(len(label_pred)):
    plt.scatter(smile['smile'][i][0], smile['smile']
                [i][1], color=colors[label_pred[i]])
    plt.title("原始数据")
plt.subplot(2, 2, 2)
for i in range(len(y)):
    plt.scatter(smile['smile'][i][0], smile['smile'][i][1], color=colors[y[i]])
    plt.title("聚类后数据")
- 1
- 2
- 3
- 4
- 5
- 6
- 7
- 8
- 9
- 10
Matplotlib子图并列显示/保存组合图
和上面的写法略有区别
# 绘图显示
fig, ax = plt.subplots(1, 3, figsize=(20, 20))
ax[0].imshow(img)
ax[0].set_title("子图标题1")
ax[1].imshow(out_img)
ax[1].set_title("子图标题2")
ax[2].imshow(out_img2)
ax[2].set_title("子图标题3")
plt.show()
fig.savefig(r"组合图名称.png")
- 1
- 2
- 3
- 4
- 5
- 6
- 7
- 8
- 9
- 10
统计程序花费时间
import time

begin_time = time.time()
# 所运行程序
end_time = time.time()
print("程序花费时间{}秒".format(end_time-begin_time))
- 1
- 2
- 3
- 4
- 5
- 6
绘制简单折线图并保存
# 绘制折线图
def plot_pic(x, y):
    plt.plot(x, y, linewidth=1, color="orange", marker="o")
    plt.xlabel("num_bits")
    plt.ylabel("ACC (%)")
    plt.savefig("./result.png")
    plt.show()
- 1
- 2
- 3
- 4
- 5
- 6
- 7
将数据结果写入txt文件
with open(r'./result.txt', mode='a', encoding='utf-8') as f:
	f.write(str(reward) + "\n")
- 1
- 2
获取矩阵每行下标
# 获取每行最大值
y_pred = []
for row in y_test:
    y = np.argmax(row)
    y_pred.append(y)
- 1
- 2
- 3
- 4
- 5
批量修改txt文件
新建一个txt文件,读取原文件每行数据,批量进行添加信息
ff = open(r'D:\Desktop\ailab\task6\pa\submission.txt', 'w')  # 打开一个文件,可写模式
with open(r'D:\Desktop\ailab\task6\pa\pa_result.txt', 'r') as f:  # 打开一个文件只读模式
    line = f.readlines()
    for line_list in line:
        line_new = line_list.replace('\n', '')  # 将换行符替换为空('')
        line_new = 'cat_12_test/' + line_new + '\n'
        print(line_new)
        ff.write(line_new)  # 写入一个新文件中
- 1
- 2
- 3
- 4
- 5
- 6
- 7
- 8
通道交换
(3, 320, 640) -> (320, 640, 3)
print(img.shape)  # (3, 320, 640)
print(img.transpose((1, 2, 0)).shape)  # (320, 640, 3)
- 1
- 2
注意0,1,2表示原序列的索引
文章来源: zstar.blog.csdn.net,作者:zstar-_,版权归原作者所有,如需转载,请联系作者。
原文链接:zstar.blog.csdn.net/article/details/121105014

- 点赞
- 收藏
- 关注作者
评论(0)