元素偏移量 offset 系列
offset 概述
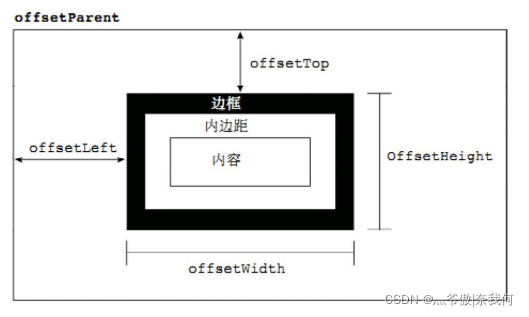
offset 翻译过来就是偏移量, 我们使用 offset 系列相关属性可以动态的得到该元素的位置(偏移)、大小等。
- 获得元素距离带有定位父元素的位置
- 获得元素自身的大小(宽度高度)
- 返回的数值都不带单位

offset 系列常用属性:

<body>
    <div class="father">
        <div class="son"></div>
    </div>
    <div class="w"></div>
    <script>
        // offset 系列
        var father = document.querySelector('.father');
        var son = document.querySelector('.son');
        // 1.可以得到元素的偏移 位置 返回的不带单位的数值
        console.log(father.offsetTop);
        console.log(father.offsetLeft);
        // 它以带有定位的父亲为准  如果么有父亲或者父亲没有定位 则以 body 为准
        console.log(son.offsetLeft);
        var w = document.querySelector('.w');
        // 2.可以得到元素的大小 宽度和高度 是包含padding + border + width
        console.log(w.offsetWidth);
        console.log(w.offsetHeight);
        // 3. 返回带有定位的父亲 否则返回的是body
        console.log(son.offsetParent); // 返回带有定位的父亲 否则返回的是body
        console.log(son.parentNode); // 返回父亲 是最近一级的父亲 亲爸爸 不管父亲有没有定位
    </script>
</body>
- 1
- 2
- 3
- 4
- 5
- 6
- 7
- 8
- 9
- 10
- 11
- 12
- 13
- 14
- 15
- 16
- 17
- 18
- 19
- 20
- 21
- 22
- 23
offset 与 style 区别
offset
- offset 可以得到任意样式表中的样式值
- offset 系列获得的数值是没有单位的
- offsetWidth 包含padding+border+width
- offsetWidth 等属性是只读属性,只能获取不能赋值
- 所以,我们想要获取元素大小位置,用offset更合适
sytle
- style 只能得到行内样式表中的样式值
- style.width 获得的是带有单位的字符串
- style.width 获得不包含padding和border 的值
- style.width 是可读写属性,可以获取也可以赋值
- 所以,我们想要给元素更改值,则需要用style改变
案例一:模态框拖拽
其本质就是实现一个拖动效果
思路:
① 鼠标按下,我们要得到鼠标在盒子的坐标。
② 鼠标移动,就让模态框的坐标 设置为 : 鼠标坐标 减去盒子坐标即可,注意移动事件写到按下事件里面。
③ 鼠标松开,就停止拖拽,就是可以让鼠标移动事件解除
代码实现:
   <style>
        div {
            height: 200px;
            width: 200px;
            position: fixed;
            top: 50%;
            left: 50%;
            transform: translate(-50%,-50%);
            background-color: orange;
            cursor: move;
        }
    </style>
</head>
<body>
    <div> </div>
    <script>
        let box = document.getElementsByTagName('div')[0];
        box.onmousedown = function(e){
            console.log(e);
            let abx = e.pageX - box.offsetLeft;
            let aby = e.pageY - box.offsetTop;
            box.onmousemove = function(e){
                console.log(1);
                box.style.top = (e.pageY - aby) + 'px';
                box.style.left = (e.pageX - abx) + 'px';
                box.onmouseup = function(){
                    box.onmousemove = null;

                };
            };
        };
    </script>
</body>
- 1
- 2
- 3
- 4
- 5
- 6
- 7
- 8
- 9
- 10
- 11
- 12
- 13
- 14
- 15
- 16
- 17
- 18
- 19
- 20
- 21
- 22
- 23
- 24
- 25
- 26
- 27
- 28
- 29
- 30
- 31
- 32
- 33
注意onmousedown在一直按下鼠标的时候,不会反复触发
案例二:京东放大镜
思路:(分为三大部分)
第一部分:
鼠标经过小图片盒子, 黄色的遮挡层 和 大图片盒子显示,离开隐藏2个盒子功能
做法:
① 鼠标经过小图片盒子, 黄色的遮挡层 和 大图片盒子显示,离开隐藏2个盒子功能
② 就是显示与隐藏
第二部分:
黄色的遮挡层跟随鼠标功能。
做法:
① 黄色的遮挡层跟随鼠标功能。
② 把鼠标坐标给遮挡层不合适。因为遮挡层坐标以父盒子为准。
③ 首先是获得鼠标在盒子的坐标。
④ 之后把数值给遮挡层做为left 和top值。
⑤ 此时用到鼠标移动事件,但是还是在小图片盒子内移动。
⑥ 发现,遮挡层位置不对,需要再减去盒子自身高度和宽度的一半。
⑦ 遮挡层不能超出小图片盒子范围。
⑧ 如果小于零,就把坐标设置为0
⑨ 如果大于遮挡层最大的移动距离,就把坐标设置为最大的移动距离
⑩ 遮挡层的最大移动距离: 小图片盒子宽度 减去 遮挡层盒子宽度
第三部分:
移动黄色遮挡层,大图片跟随移动功能
做法:

代码实现
     <style>
        * {
            margin: 0;
            padding: 0;
        }
        div {
            float: left;
            margin-right: 50px;
            /* background-color: orange; */
        }
        .product {
            height: 400px;
            width: 400px;
            position: relative;
            margin-left: 200px;
            border: 1px solid gray;
        }
        .big {
            height: 650px;
            width: 500px;
            overflow: hidden;
            display: none;
            border: 1px solid gray;
            position: relative;
        }
        .watch {
            position: absolute;
            background-color: orange;
            z-index: 5px;
            height: 200px;
            width: 200px;
            opacity: 0.5;
            display: none;
            cursor: move;
        }
        .bigpic {
            display: block;
            position: absolute;
        }
    </style>
</head>
<body>
    <div class="product">
        <div class="watch"></div>
        <img src="pics\s3.png" alt="">
    </div>
    <div class="big">
        <img src="pics\big.jpg" alt="" class="bigpic">
    </div>
    <script>
        let product = document.getElementsByClassName('product')[0];
        let watch = document.getElementsByClassName('watch')[0];
        let big = document.getElementsByClassName('big')[0];
        let pic = document.getElementsByTagName('img')[1];
        product.onmouseover = function(e){
            watch.style.display = 'block';
            big.style.display = 'block';
            product.onmouseout = function(){
                watch.style.display = 'none';
                big.style.display = 'none';
            };
        };
        product.onmousemove = function(e){
            markY = e.pageY - product.offsetTop - watch.offsetHeight / 2 ;
            markX = e.pageX - product.offsetLeft - watch.offsetWidth / 2 ;
            if(markX <= 200 && markX >= 0) {watch.style.left = e.pageX - product.offsetLeft - watch.offsetWidth / 2 + 'px';
            pic.style.left = -2 * markX + 'px';}
            else if(markX < 0) watch.style.left = 0 + 'px';
            else watch.style.left = 200 + 'px';

            if(markY <= 200 && markY >= 0)  {watch.style.top = e.pageY - product.offsetTop - watch.offsetHeight / 2 + 'px';
             pic.style.top = -2 * markY + 'px';}
            else if(markY < 0) watch.style.top = 0 + 'px';
            else watch.style.top = 200 + 'px';
        };


    </script>

</body>
- 1
- 2
- 3
- 4
- 5
- 6
- 7
- 8
- 9
- 10
- 11
- 12
- 13
- 14
- 15
- 16
- 17
- 18
- 19
- 20
- 21
- 22
- 23
- 24
- 25
- 26
- 27
- 28
- 29
- 30
- 31
- 32
- 33
- 34
- 35
- 36
- 37
- 38
- 39
- 40
- 41
- 42
- 43
- 44
- 45
- 46
- 47
- 48
- 49
- 50
- 51
- 52
- 53
- 54
- 55
- 56
- 57
- 58
- 59
- 60
- 61
- 62
- 63
- 64
- 65
- 66
- 67
- 68
- 69
- 70
- 71
- 72
- 73
- 74
- 75
- 76
- 77
- 78
- 79
- 80
注意:
①img是行内元素,不能直接使用定位
②rgba和opacity的区别:
rgba()和opacity都能实现透明效果,但最大的不同是opacity作用于元素,以及元素内的所有内容的透明度,而rgba()只作用于元素的颜色或其背景色。(设置rgba透明的元素的子元素不会继承透明效果!)比如,我们写透明的黑色部分都是用opcity(0.5),但这带出来一个问题就是如果你在这一div上写字的话,然后那个字体也会变成透明色。所以我们采取rgba的样式写,前面三个数字分别对应r,g,b,的三种颜色,第四位的数字对应的是透明的系数。同时opacity会继承父元素的 opacity 属性,而RGBA设置的元素的后代元素不会继承不透明属性。
文章来源: blog.csdn.net,作者:十八岁讨厌编程,版权归原作者所有,如需转载,请联系作者。
原文链接:blog.csdn.net/zyb18507175502/article/details/123827485
- 点赞
- 收藏
- 关注作者


评论(0)