Vue中的Ajax①(配置代理)

回顾
常用的发送Ajax请求的方法有哪些?
xhrnew XMLHttpRequest() xhr.open()、xhr.send()(真正开发中很少用到,太麻烦了,我们一般使用的都是他的二次封装)jQuery其对xhr有二次封装 $.get()、$.postaxiosPromise风格,体积比jQuery小,并且支持请求拦截器、响应拦截器等等(最常用,也是Vue推荐的发送Ajax请求的方法)fetch跟xhr是平级的,它在window内置对象上直接存在!并且其也是Promise风格的,IE不支持(也有人使用)
尝试使用axios发送Ajax请求
假设现在已经开好了两台服务器
在本机的5000端口,使用get请求我们可以获取学生信息
http://localhost:5000/students
在本机的5001端口,我们可以获取汽车信息
http://localhost:5001/cars


我们在页面上创建一个按钮,点击即可发送get请求获的学生数据:
<template>
	<div>
		<button @click="getStudents">获取学生信息</button>
	</div>
</template>

<script>
	import axios from 'axios'
	export default {
		name:'App',
		methods: {
			getStudents(){
				axios.get('http://localhost:5000/students').then(
					response => {
						console.log('请求成功了',response.data)
					},
					error => {
						console.log('请求失败了',error.message)
					}
				)
			},

		},
	}
</script>
- 1
- 2
- 3
- 4
- 5
- 6
- 7
- 8
- 9
- 10
- 11
- 12
- 13
- 14
- 15
- 16
- 17
- 18
- 19
- 20
- 21
- 22
- 23
- 24
- 25
然后我们发现:

很明显这是一个跨域问题,也就是说我们违背了同源策略
复习:同源策略规定了三个东西必须一致
①协议名
②主机名
③端口号

我们现在所处的位置是localhost:8080
也就是说此时我们所处的状态:
- 使用的http协议
- 主机名是localhost
- 端口号是8080
但服务器所处的状态:
- 使用的http协议
- 主机名是localhost
- 端口号是5000
所以说并不同源,故发生了跨域问题
跨域问题的过程:浏览器发出请求之后,服务器接收到了请求。
同时服务器也会把数据交给本地浏览器。浏览器也收到了这个数据,但是浏览器发现这里存在跨域问题,所以浏览器不会把这个数据交给用户!
那么我们如何解决跨域问题呢?
这里有几种思路:
cors最标准的解决办法 使用这个方法不用前端人员去做任何事情。其原理是:写服务器的人,让服务器给我们返回数据的时候加几个响应头,而浏览器看到了这几个响应头,就会放行,把数据给我们。jsonp借助script标签的src属性。(真正开发基本不用!,因为其需要前后端一起配合,并且只能解决get请求的跨域问题)- 配置一个代理服务器(开发中常用)
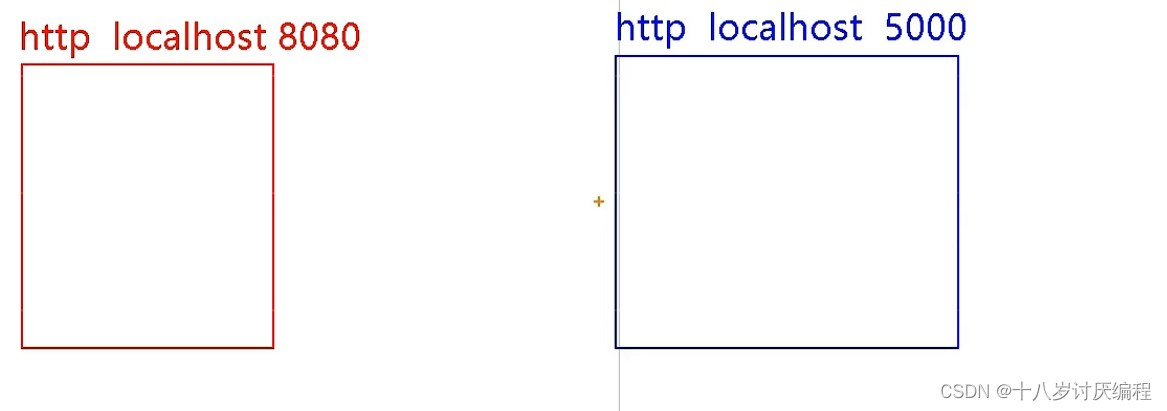
使用代理服务器解决跨域问题的原理

左边红色方框代表本地浏览器,中间的粉色方框代表代理服务器,右边的蓝色方框代表服务器。
左边这个8080服务器,是Vue脚手架帮我们开启的,用来支撑脚手架的运行
这个代理服务器与我们所处的端口号一定是一样的!
当我们向服务器请求学生信息的时候,我们不直接请求服务器,而是找代理服务器,代理服务器收到了我们本次请求之后,他会帮我们把请求转发给服务器。然后服务器会把数据交给代理服务器,最后代理服务器再把数据交给我们。
从这个过程中我们不难看出,代理服务器有点“中介”的味道。
有人可能会问这两条线难道不会存在跨域问题吗?
当然不会!左边的是代理服务器,右边的是服务器。服务器与服务器之间传数据压根就不用Ajax,Ajax它是一种前端技术!

配置代理服务器
既然我们知道了要用代理服务器来解决跨域问题,那么我们怎么开启这个服务器呢?
这里有两种常用的方法:
nginxvue-cli(也就是借助Vue脚手架)
这里我们使用第二种方式,他更加的简单。
方法一
打开Vue-CLI的配置参考,找到devServer.proxy
https://cli.vuejs.org/zh/config/#devserver-proxy
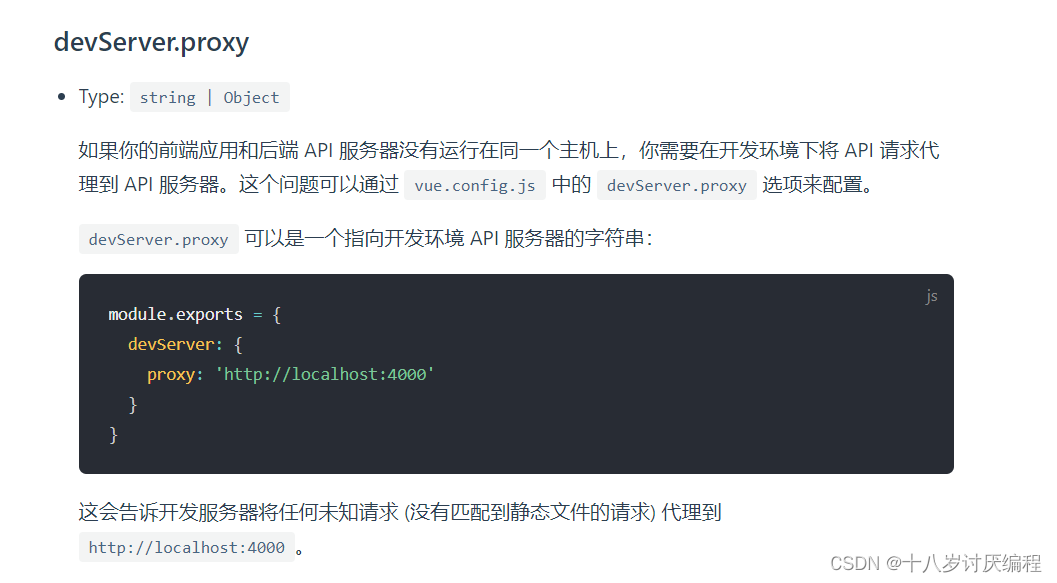
注意:这个proxy配置项里面填的是代理服务器向哪一个服务器拿东西
根据上面的案例(向5000端口的服务器要学生数据),代码如下:
const { defineConfig } = require('@vue/cli-service')
module.exports = defineConfig({
  transpileDependencies: true,
  //开启代理服务器
  devServer: {
    proxy: 'http://localhost:5000'
  }
})
- 1
- 2
- 3
- 4
- 5
- 6
- 7
- 8
因为我们修改了Vue的配置文件,所以必须重启脚手架才能生效、
在这个基础上我们修改请求的服务器:
<template>
	<div>
		<button @click="getStudents">获取学生信息</button>
	</div>
</template>

<script>
	import axios from 'axios'
	export default {
		name:'App',
		methods: {
			getStudents(){
				axios.get('http://localhost:8080/students').then(
					response => {
						console.log('请求成功了',response.data)
					},
					error => {
						console.log('请求失败了',error.message)
					}
				)
			},
		},
	}
</script>
- 1
- 2
- 3
- 4
- 5
- 6
- 7
- 8
- 9
- 10
- 11
- 12
- 13
- 14
- 15
- 16
- 17
- 18
- 19
- 20
- 21
- 22
- 23
- 24
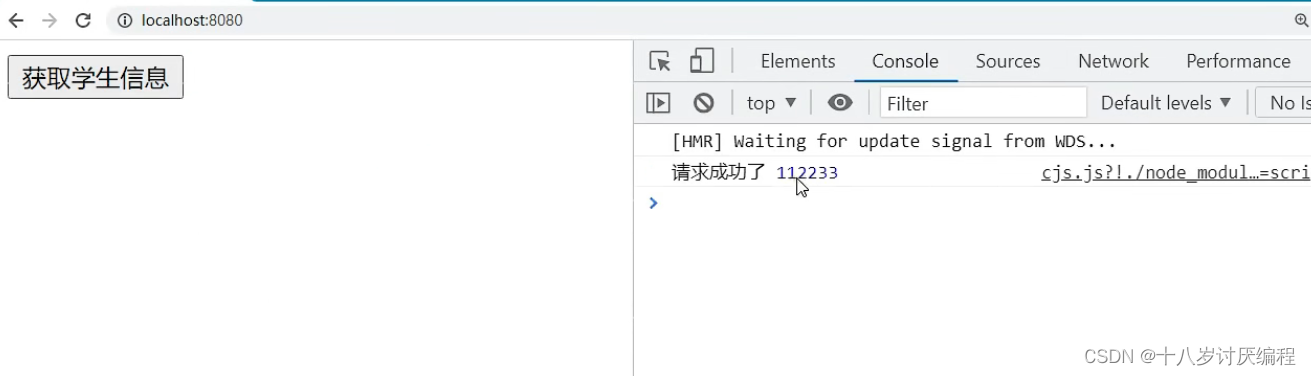
结果:
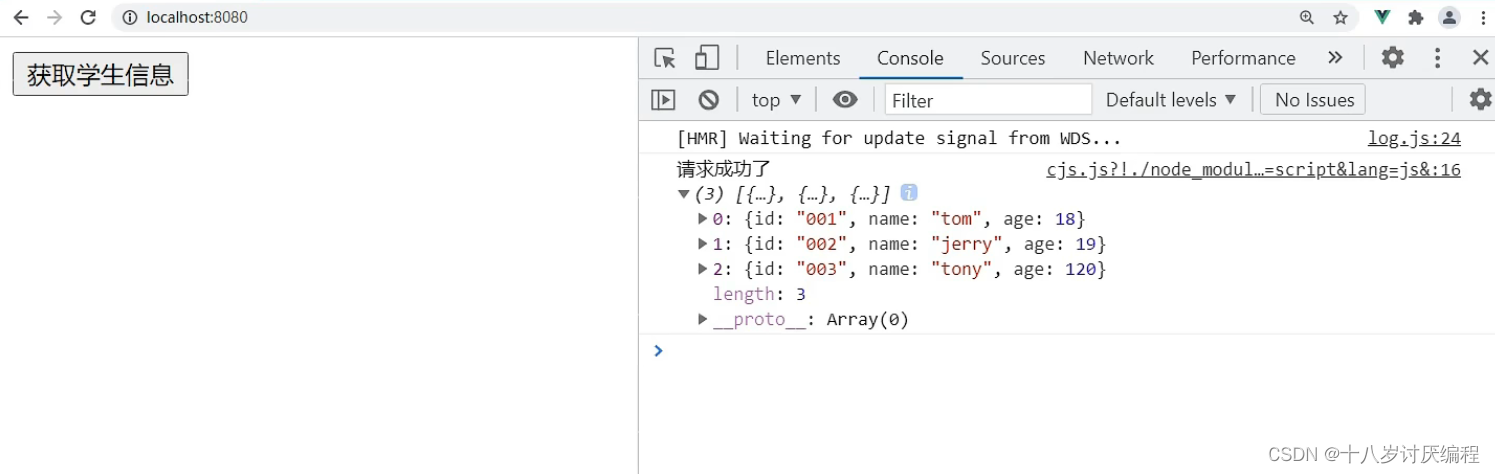
这里有两个细节需要我们注意:
①这样配置代理服务器并非会把所有请求发给服务器。
当我们请求的资源8080服务器(本地服务器)本来就有的时候,代理服务器不会再把请求转发给服务器.
我们脚手架中的public文件夹就相当于8080服务器(本地服务器)的根路径。说直白点8080服务器中有什么public文件夹中就有什么。
我们可以举一个例子:
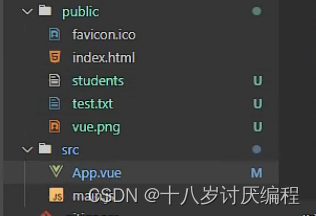
我们在students文件中写上112233。如果在这种情况下我们去请求,代理服务器不会把请求转发,而是直接返回112233.
②使用这种方式配置,只能配置一个代理服务器!

综上这样配置有两个弊端:
- 不能够配置多个代理
- 不能灵活的控制是否使用代理
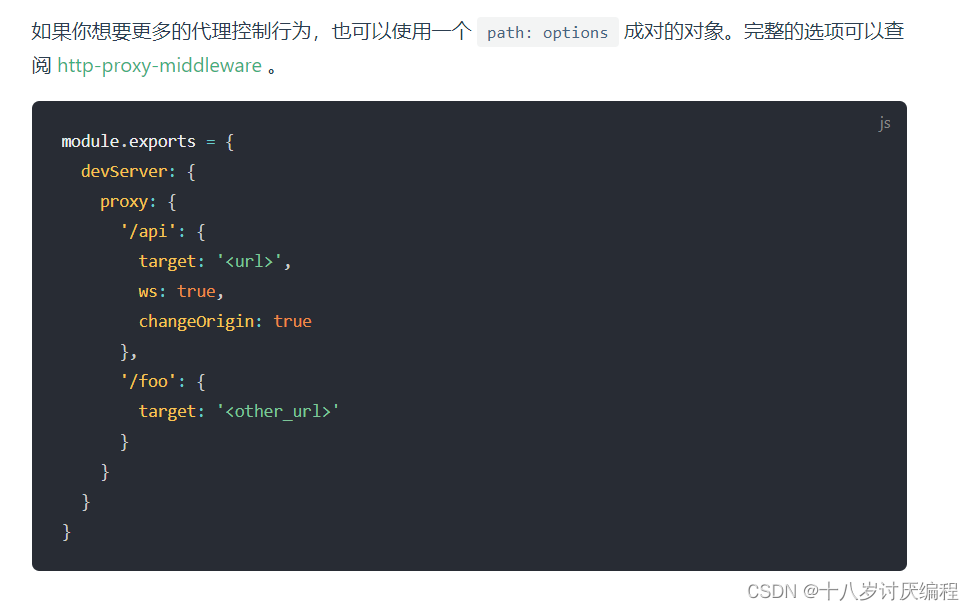
方法二
我们还是参考刚才的文档:
const { defineConfig } = require('@vue/cli-service')
module.exports = defineConfig({
  transpileDependencies: true,
  // devServer: {
  //   proxy: 'http://localhost:5000'
  // }
  devServer: {
    proxy: {
      '/api': {
        target: '<url>',
        ws: true,
        changeOrigin: true
      },
      '/foo': {
        target: '<other_url>'
      }
    }
  }
})
- 1
- 2
- 3
- 4
- 5
- 6
- 7
- 8
- 9
- 10
- 11
- 12
- 13
- 14
- 15
- 16
- 17
- 18
- 19
首先我们来看这一部分:
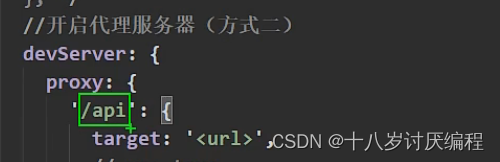
这个api就代表请求前缀,也就是说如果你此次请求的前缀是/api,则会走代理服务器。如此来灵活的控制是否使用代理。
请求前缀紧跟端口号
target代表如果你使用代理服务器,那么代理服务器向谁转发请求。
现在我们使用这种配置方式,发送一次请求:
配置代理服务器:
const { defineConfig } = require('@vue/cli-service')
module.exports = defineConfig({
  transpileDependencies: true,
  // devServer: {
  //   proxy: 'http://localhost:5000'
  // }
  devServer: {
    proxy: {
      '/csdn': {
        target: 'http://localhost:5000',
        // ws: true,
        // changeOrigin: true
      },
    }
  }
})
- 1
- 2
- 3
- 4
- 5
- 6
- 7
- 8
- 9
- 10
- 11
- 12
- 13
- 14
- 15
- 16
<template>
	<div>
		<button @click="getStudents">获取学生信息</button>
	</div>
</template>

<script>
	import axios from 'axios'
	export default {
		name:'App',
		methods: {
			getStudents(){
				axios.get('http://localhost:8080/csdn/students').then(
					response => {
						console.log('请求成功了',response.data)
					},
					error => {
						console.log('请求失败了',error.message)
					}
				)
			},
		},
	}
</script>
- 1
- 2
- 3
- 4
- 5
- 6
- 7
- 8
- 9
- 10
- 11
- 12
- 13
- 14
- 15
- 16
- 17
- 18
- 19
- 20
- 21
- 22
- 23
- 24
其实这样是不成功的,最后返回的错误是404NOT FOUND。
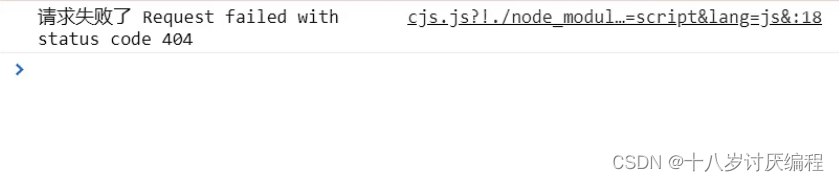
之所以会发生这种错误是因为,代理服务器在转发请求的时候,也会带上前缀。也就是说代理服务器是想要服务器上的/csdn/students数据,但我们的本意是要/students的数据。
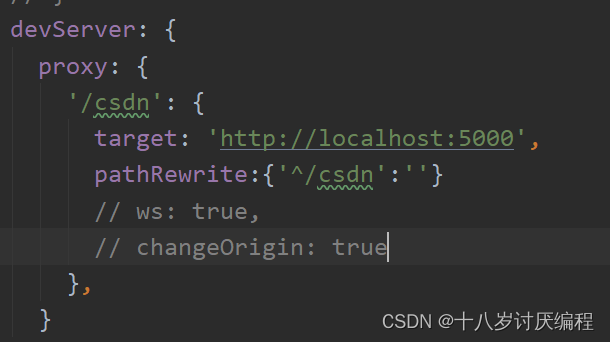
解决这个问题我们需要另外一个配置项:pathRewrite
它的值是一个对象,里面包含着key和value。其中key写正则的匹配条件,value是替换的值
const { defineConfig } = require('@vue/cli-service')
module.exports = defineConfig({
  transpileDependencies: true,
  // devServer: {
  //   proxy: 'http://localhost:5000'
  // }
  devServer: {
    proxy: {
      '/csdn': {
        target: 'http://localhost:5000',
        pathRewrite:{'^/csdn':''}
        // ws: true,
        // changeOrigin: true
      },
    }
  }
})
- 1
- 2
- 3
- 4
- 5
- 6
- 7
- 8
- 9
- 10
- 11
- 12
- 13
- 14
- 15
- 16
- 17
- 18
如此再请求,请求成功:

接下类我们继续来看:
ws用于支持websocket
changeOrigin用于控制请求头中的host值,形象点来理解:

当代理服务器向5000服务器发送请求时,5000服务器会问这个代理服务器来自哪里?如果我们将changeOrigin设为true,那么代理服务器会撒谎告诉它自己也来自于5000端口。如果我们将changeOrigin设为false,那么代理服务器会如实告诉它自己来自于8080端口。
接下来我们来配置多个代理:
const { defineConfig } = require('@vue/cli-service')
module.exports = defineConfig({
  transpileDependencies: true,
  // devServer: {
  //   proxy: 'http://localhost:5000'
  // }
  devServer: {
    proxy: {
      '/csdn': {
        target: 'http://localhost:5000',
        pathRewrite:{'^/csdn':''}
        // ws: true,
        // changeOrigin: true
      },
      '/csdn2': {
        target: 'http://localhost:5001',
        pathRewrite:{'^/csdn2':''}
        // ws: true,
        // changeOrigin: true
      },
    }
  }
})
- 1
- 2
- 3
- 4
- 5
- 6
- 7
- 8
- 9
- 10
- 11
- 12
- 13
- 14
- 15
- 16
- 17
- 18
- 19
- 20
- 21
- 22
- 23
<template>
	<div>
		<button @click="getStudents">获取学生信息</button>
		<button @click="getCars">获取汽车信息</button>
	</div>
</template>

<script>
	import axios from 'axios'
	export default {
		name:'App',
		methods: {
			getStudents(){
				axios.get('http://localhost:8080/csdn/students').then(
					response => {
						console.log('请求成功了',response.data)
					},
					error => {
						console.log('请求失败了',error.message)
					}
				)
			},
			getCars(){
				axios.get('http://localhost:8080/csdn2/cars').then(
					response => {
						console.log('请求成功了',response.data)
					},
					error => {
						console.log('请求失败了',error.message)
					}
				)
			}
		},
	}
</script>
- 1
- 2
- 3
- 4
- 5
- 6
- 7
- 8
- 9
- 10
- 11
- 12
- 13
- 14
- 15
- 16
- 17
- 18
- 19
- 20
- 21
- 22
- 23
- 24
- 25
- 26
- 27
- 28
- 29
- 30
- 31
- 32
- 33
- 34
- 35
总结
vue脚手架配置代理
方法一
在vue.config.js中添加如下配置:
devServer:{
  proxy:"http://localhost:5000"
}
- 1
- 2
- 3
说明:
- 优点:配置简单,请求资源时直接发给前端(8080)即可。
- 缺点:不能配置多个代理,不能灵活的控制请求是否走代理。
- 工作方式:若按照上述配置代理,当请求了前端不存在的资源时,那么该请求会转发给服务器 (优先匹配前端资源)
方法二
编写vue.config.js配置具体代理规则:
module.exports = {
	devServer: {
      proxy: {
      '/api1': {// 匹配所有以 '/api1'开头的请求路径
        target: 'http://localhost:5000',// 代理目标的基础路径
        changeOrigin: true,
        pathRewrite: {'^/api1': ''}
      },
      '/api2': {// 匹配所有以 '/api2'开头的请求路径
        target: 'http://localhost:5001',// 代理目标的基础路径
        changeOrigin: true,
        pathRewrite: {'^/api2': ''}
      }
    }
  }
}
/*
   changeOrigin设置为true时,服务器收到的请求头中的host为:localhost:5000
   changeOrigin设置为false时,服务器收到的请求头中的host为:localhost:8080
   changeOrigin默认值为true
*/
- 1
- 2
- 3
- 4
- 5
- 6
- 7
- 8
- 9
- 10
- 11
- 12
- 13
- 14
- 15
- 16
- 17
- 18
- 19
- 20
- 21
说明:
- 优点:可以配置多个代理,且可以灵活的控制请求是否走代理。
- 缺点:配置略微繁琐,请求资源时必须加前缀。
文章来源: blog.csdn.net,作者:十八岁讨厌编程,版权归原作者所有,如需转载,请联系作者。
原文链接:blog.csdn.net/zyb18507175502/article/details/125589798

- 点赞
- 收藏
- 关注作者
评论(0)