[SpringMVC]基于RESTful页面数据交互案例
需求分析
需求一:图片列表查询,从后台返回数据,将数据展示在页面上

需求二:新增图片,将新增图书的数据传递到后台,并在控制台打印

说明:此次案例的重点是在SpringMVC中如何使用RESTful实现前后台交互,所以本案例并没有和数据库进行交互,所有数据使用假数据来完成开发。
我们的基本步骤:
-
搭建项目导入jar包
-
编写Controller类,提供两个方法,一个用来做列表查询,一个用来做新增
-
在方法上使用RESTful进行路径设置
-
完成请求、参数的接收和结果的响应
-
使用PostMan进行测试
-
将前端页面拷贝到项目中
-
页面发送ajax请求
-
完成页面数据的展示
环境准备
-
创建一个Web的Maven项目
-
pom.xml添加Spring依赖
<?xml version="1.0" encoding="UTF-8"?> <project xmlns="http://maven.apache.org/POM/4.0.0" xmlns:xsi="http://www.w3.org/2001/XMLSchema-instance" xsi:schemaLocation="http://maven.apache.org/POM/4.0.0 http://maven.apache.org/xsd/maven-4.0.0.xsd"> <modelVersion>4.0.0</modelVersion> <groupId>com.nefu</groupId> <artifactId>springmvc_try</artifactId> <version>1.0-SNAPSHOT</version> <packaging>war</packaging> <dependencies> <dependency> <groupId>javax.servlet</groupId> <artifactId>javax.servlet-api</artifactId> <version>3.1.0</version> <scope>provided</scope> </dependency> <dependency> <groupId>org.springframework</groupId> <artifactId>spring-webmvc</artifactId> <version>5.2.10.RELEASE</version> </dependency> <dependency> <groupId>com.fasterxml.jackson.core</groupId> <artifactId>jackson-databind</artifactId> <version>2.9.0</version> </dependency> </dependencies> <build> <plugins> <plugin> <groupId>org.apache.tomcat.maven</groupId> <artifactId>tomcat7-maven-plugin</artifactId> <version>2.1</version> <configuration> <port>80</port> <path>/</path> </configuration> </plugin> </plugins> </build> </project>- 1
- 2
- 3
- 4
- 5
- 6
- 7
- 8
- 9
- 10
- 11
- 12
- 13
- 14
- 15
- 16
- 17
- 18
- 19
- 20
- 21
- 22
- 23
- 24
- 25
- 26
- 27
- 28
- 29
- 30
- 31
- 32
- 33
- 34
- 35
- 36
- 37
- 38
- 39
- 40
- 41
- 42
- 43
- 44
- 45
-
创建对应的配置类
public class ServletContainersInitConfig extends AbstractAnnotationConfigDispatcherServletInitializer { protected Class<?>[] getRootConfigClasses() { return new Class[0]; } protected Class<?>[] getServletConfigClasses() { return new Class[]{SpringMvcConfig.class}; } protected String[] getServletMappings() { return new String[]{"/"}; } //乱码处理 @Override protected Filter[] getServletFilters() { CharacterEncodingFilter filter = new CharacterEncodingFilter(); filter.setEncoding("UTF-8"); return new Filter[]{filter}; } } @Configuration @ComponentScan("com.nefu.controller") //开启json数据类型自动转换 @EnableWebMvc public class SpringMvcConfig { }- 1
- 2
- 3
- 4
- 5
- 6
- 7
- 8
- 9
- 10
- 11
- 12
- 13
- 14
- 15
- 16
- 17
- 18
- 19
- 20
- 21
- 22
- 23
- 24
- 25
- 26
- 27
- 28
- 29
- 30
-
编写模型类Book
public class Book { private Integer id; private String type; private String name; private String description; //setter...getter...toString略 }- 1
- 2
- 3
- 4
- 5
- 6
- 7
-
编写BookController
@Controller public class BookController { }- 1
- 2
- 3
- 4
- 5
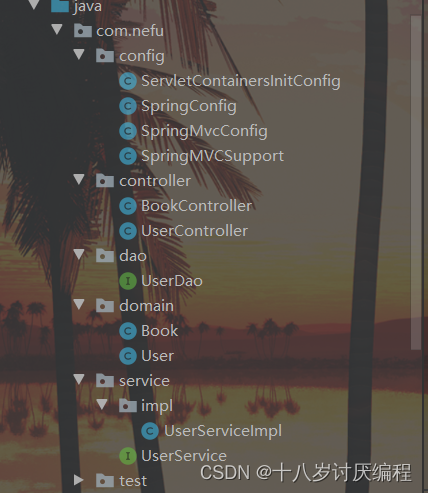
项目结构:
后台接口开发
步骤1:编写Controller类并使用RESTful进行配置
@RestController
@RequestMapping("/books")
public class BookController {

    @PostMapping
    public String save(@RequestBody Book book){
        System.out.println("book save ==> "+ book);
        return "{'module':'book save success'}";
    }

 	@GetMapping
    public List<Book> getAll(){
        System.out.println("book getAll is running ...");
        List<Book> bookList = new ArrayList<Book>();

        Book book1 = new Book();
        book1.setType("计算机");
        book1.setName("SpringMVC入门教程");
        book1.setDescription("小试牛刀");
        bookList.add(book1);

        Book book2 = new Book();
        book2.setType("计算机");
        book2.setName("SpringMVC实战教程");
        book2.setDescription("一代宗师");
        bookList.add(book2);

        Book book3 = new Book();
        book3.setType("计算机丛书");
        book3.setName("SpringMVC实战教程进阶");
        book3.setDescription("一代宗师呕心创作");
        bookList.add(book3);

        return bookList;
    }

}
- 1
- 2
- 3
- 4
- 5
- 6
- 7
- 8
- 9
- 10
- 11
- 12
- 13
- 14
- 15
- 16
- 17
- 18
- 19
- 20
- 21
- 22
- 23
- 24
- 25
- 26
- 27
- 28
- 29
- 30
- 31
- 32
- 33
- 34
- 35
- 36
- 37
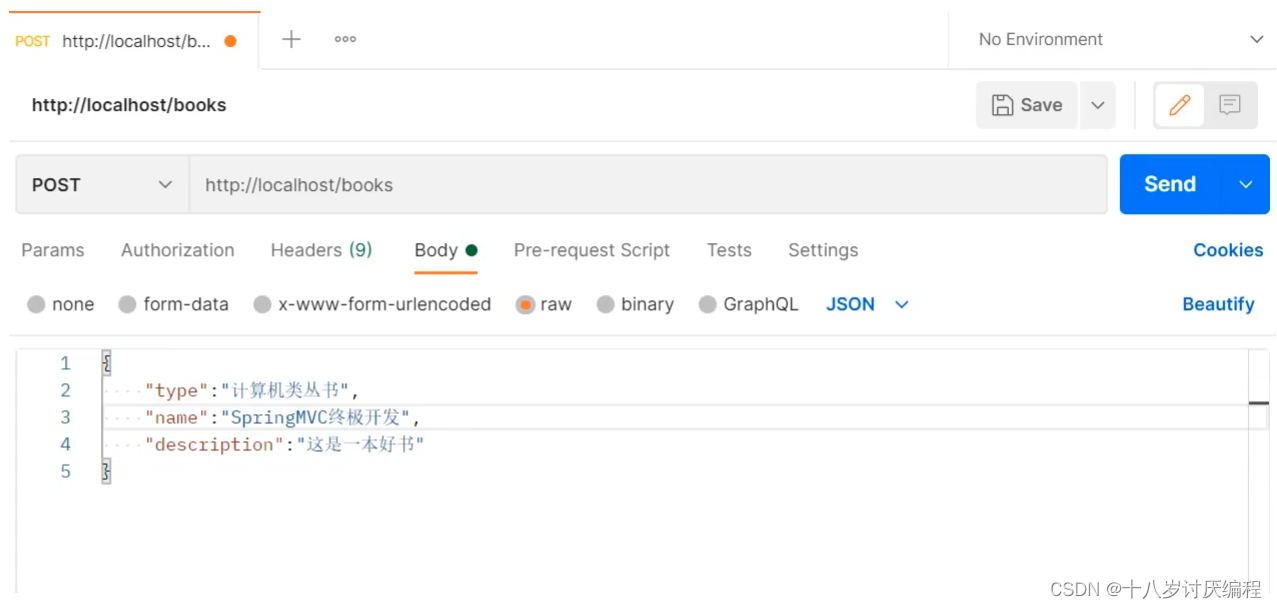
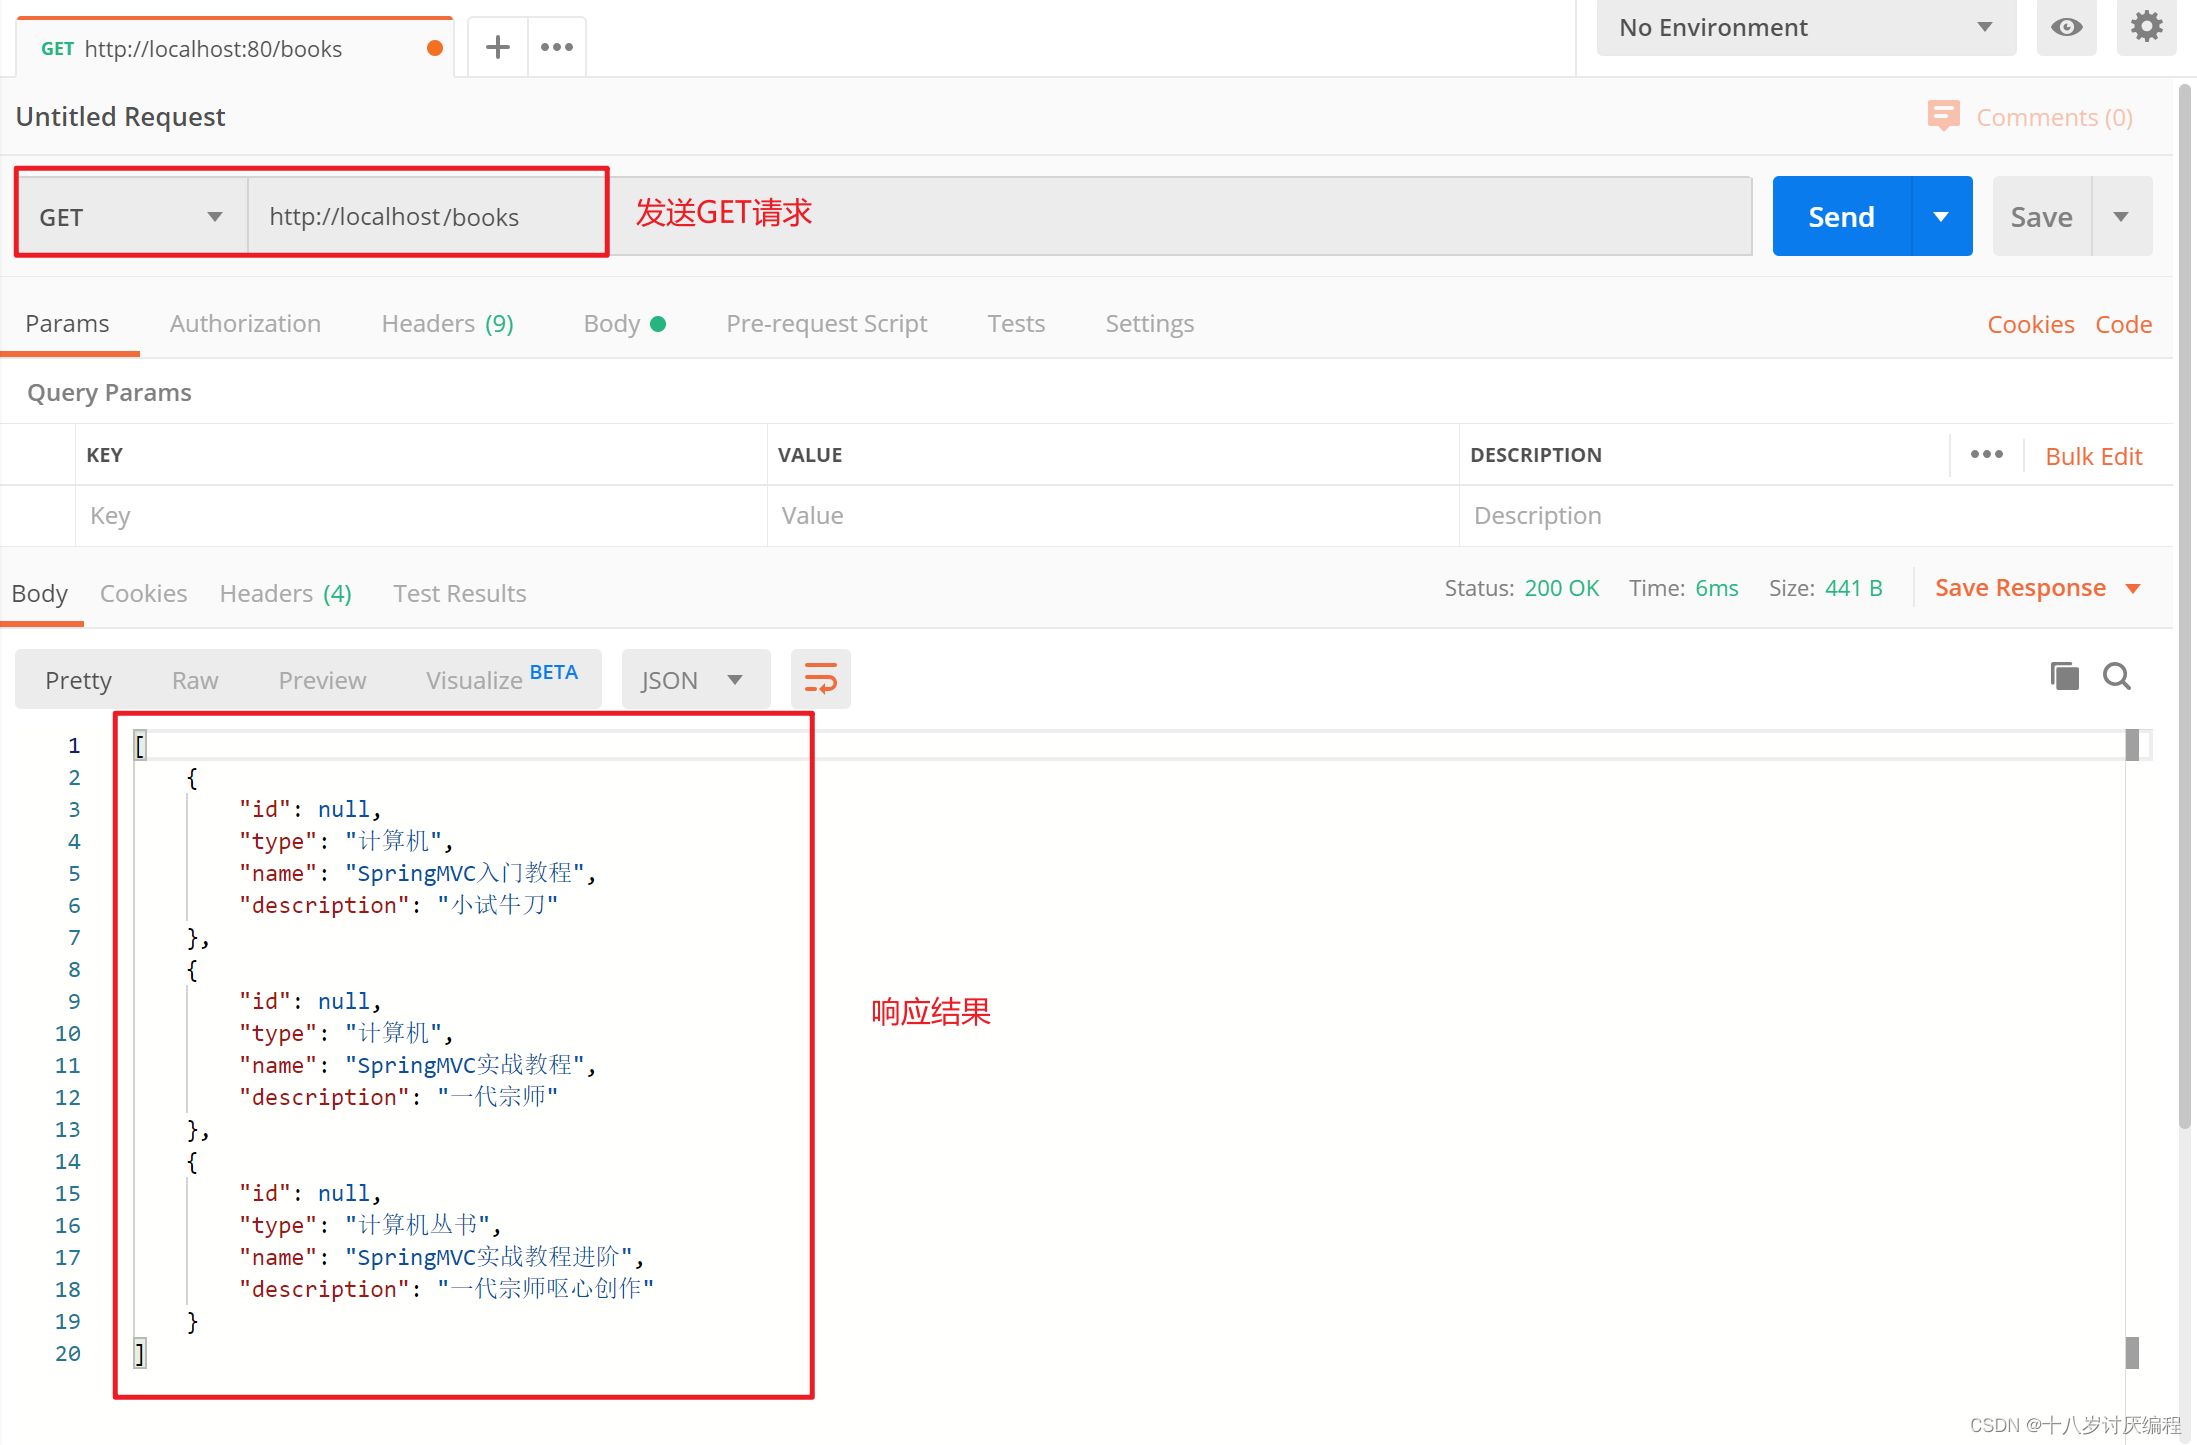
步骤2:使用PostMan进行测试
测试新增
{
    "type":"计算机丛书",
    "name":"SpringMVC终极开发",
    "description":"这是一本好书"
}
- 1
- 2
- 3
- 4
- 5
测试查询
页面访问处理
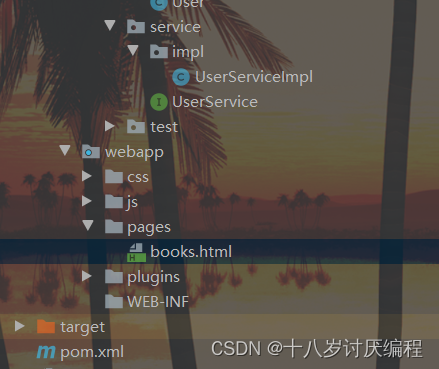
步骤1:拷贝静态页面
将资料\功能页面下的所有内容拷贝到项目的webapp目录下
步骤2:访问pages目录下的books.html
打开浏览器输入http://localhost/pages/books.html

(1)出现错误的原因?

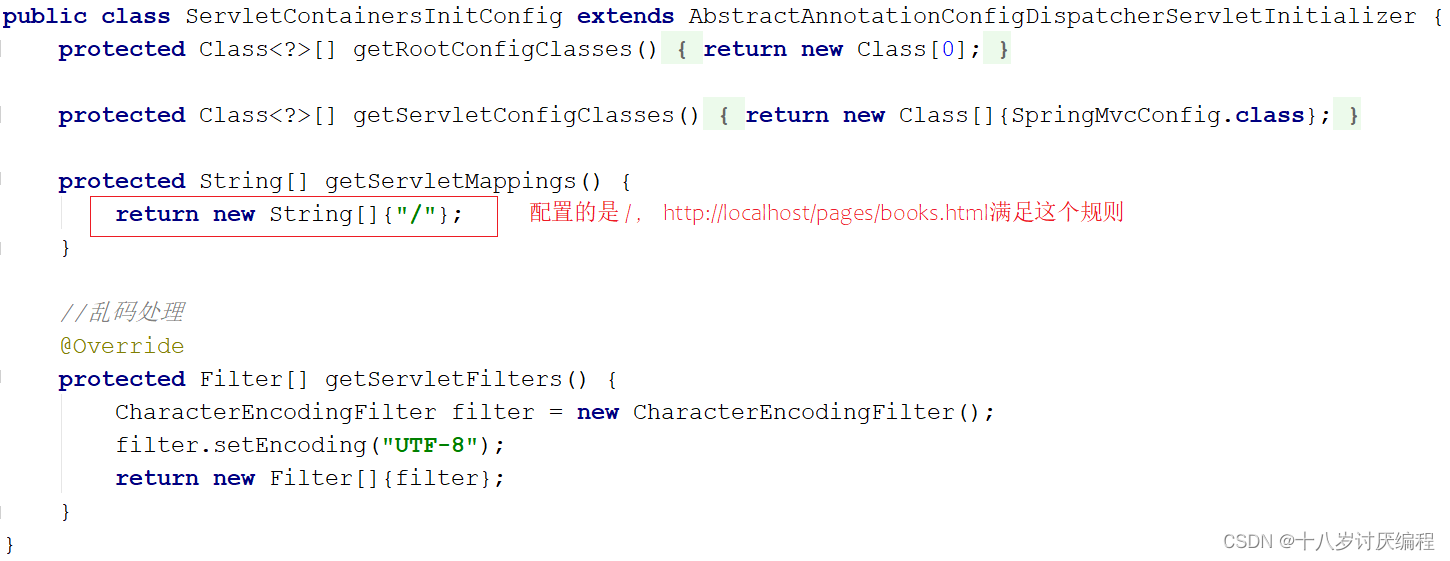
SpringMVC拦截了静态资源,根据/pages/books.html去controller找对应的方法,找不到所以会报404的错误。
(2)SpringMVC为什么会拦截静态资源呢?
(3)解决方案?
- SpringMVC需要将静态资源进行放行。
@Configuration
public class SpringMvcSupport extends WebMvcConfigurationSupport {
    //设置静态资源访问过滤,当前类需要设置为配置类,并被扫描加载
    @Override
    protected void addResourceHandlers(ResourceHandlerRegistry registry) {
        //当访问/pages/????时候,从/pages目录下查找内容
        registry.addResourceHandler("/pages/**").addResourceLocations("/pages/");
        registry.addResourceHandler("/js/**").addResourceLocations("/js/");
        registry.addResourceHandler("/css/**").addResourceLocations("/css/");
        registry.addResourceHandler("/plugins/**").addResourceLocations("/plugins/");
    }
}
- 1
- 2
- 3
- 4
- 5
- 6
- 7
- 8
- 9
- 10
- 11
- 12
- 13
- 该配置类是在config目录下,SpringMVC扫描的是controller包,所以该配置类还未生效,要想生效需要将SpringMvcConfig配置类进行修改
@Configuration
@ComponentScan({"com.nefu.controller","com.nefu.config"})
@EnableWebMvc
public class SpringMvcConfig {
}

或者

@Configuration
@ComponentScan("com.nefu")
@EnableWebMvc
public class SpringMvcConfig {
}
- 1
- 2
- 3
- 4
- 5
- 6
- 7
- 8
- 9
- 10
- 11
- 12
- 13
注意:
此处有人可能会想着把SpringMvcSupport配置类上的@Configuration注解给去掉,然后在SpringMvcConfig文件中使用@Import进行引入这样是不行的!因为这样的话实际上是让SpringMvcConfig引入SpringMvcSupport配置类中所有的bean,但是你SpringMvcSupport配置类中就重写了一个方法,压根就没有bean。所以不能使用。
例如像下面这种才可以使用:@Configuration public class ImportedConfig { @Bean public ImportedBean getImportedBean(){ return new ImportedBean(); } }
- 1
- 2
- 3
- 4
- 5
- 6
- 7
具体的@Import注解使用规则,可以参考下面的链接:
@Import注解详解
步骤3:修改books.html页面
<!DOCTYPE html>

<html>
    <head>
        <!-- 页面meta -->
        <meta charset="utf-8">
        <title>SpringMVC案例</title>
        <!-- 引入样式 -->
        <link rel="stylesheet" href="../plugins/elementui/index.css">
        <link rel="stylesheet" href="../plugins/font-awesome/css/font-awesome.min.css">
        <link rel="stylesheet" href="../css/style.css">
    </head>

    <body class="hold-transition">

        <div id="app">

            <div class="content-header">
                <h1>图书管理</h1>
            </div>

            <div class="app-container">
                <div class="box">
                    <div class="filter-container">
                        <el-input placeholder="图书名称" style="width: 200px;" class="filter-item"></el-input>
                        <el-button class="dalfBut">查询</el-button>
                        <el-button type="primary" class="butT" @click="openSave()">新建</el-button>
                    </div>

                    <el-table size="small" current-row-key="id" :data="dataList" stripe highlight-current-row>
                        <el-table-column type="index" align="center" label="序号"></el-table-column>
                        <el-table-column prop="type" label="图书类别" align="center"></el-table-column>
                        <el-table-column prop="name" label="图书名称" align="center"></el-table-column>
                        <el-table-column prop="description" label="描述" align="center"></el-table-column>
                        <el-table-column label="操作" align="center">
                            <template slot-scope="scope">
                                <el-button type="primary" size="mini">编辑</el-button>
                                <el-button size="mini" type="danger">删除</el-button>
                            </template>
                        </el-table-column>
                    </el-table>

                    <div class="pagination-container">
                        <el-pagination
                            class="pagiantion"
                            @current-change="handleCurrentChange"
                            :current-page="pagination.currentPage"
                            :page-size="pagination.pageSize"
                            layout="total, prev, pager, next, jumper"
                            :total="pagination.total">
                        </el-pagination>
                    </div>

                    <!-- 新增标签弹层 -->
                    <div class="add-form">
                        <el-dialog title="新增图书" :visible.sync="dialogFormVisible">
                            <el-form ref="dataAddForm" :model="formData" :rules="rules" label-position="right" label-width="100px">
                                <el-row>
                                    <el-col :span="12">
                                        <el-form-item label="图书类别" prop="type">
                                            <el-input v-model="formData.type"/>
                                        </el-form-item>
                                    </el-col>
                                    <el-col :span="12">
                                        <el-form-item label="图书名称" prop="name">
                                            <el-input v-model="formData.name"/>
                                        </el-form-item>
                                    </el-col>
                                </el-row>
                                <el-row>
                                    <el-col :span="24">
                                        <el-form-item label="描述">
                                            <el-input v-model="formData.description" type="textarea"></el-input>
                                        </el-form-item>
                                    </el-col>
                                </el-row>
                            </el-form>
                            <div slot="footer" class="dialog-footer">
                                <el-button @click="dialogFormVisible = false">取消</el-button>
                                <el-button type="primary" @click="saveBook()">确定</el-button>
                            </div>
                        </el-dialog>
                    </div>

                </div>
            </div>
        </div>
    </body>

    <!-- 引入组件库 -->
    <script src="../js/vue.js"></script>
    <script src="../plugins/elementui/index.js"></script>
    <script type="text/javascript" src="../js/jquery.min.js"></script>
    <script src="../js/axios-0.18.0.js"></script>

    <script>
        var vue = new Vue({

            el: '#app',

            data:{
				dataList: [],//当前页要展示的分页列表数据
                formData: {},//表单数据
                dialogFormVisible: false,//增加表单是否可见
                dialogFormVisible4Edit:false,//编辑表单是否可见
                pagination: {},//分页模型数据,暂时弃用
            },

            //钩子函数,VUE对象初始化完成后自动执行
            created() {
                this.getAll();
            },

            methods: {
                // 重置表单
                resetForm() {
                    //清空输入框
                    this.formData = {};
                },

                // 弹出添加窗口
                openSave() {
                    this.dialogFormVisible = true;
                    this.resetForm();
                },

                //添加
                saveBook () {
                    axios.post("/books",this.formData).then((res)=>{

                    });
                },

                //主页列表查询
                getAll() {
                    axios.get("/books").then((res)=>{
                        this.dataList = res.data;
                    });
                },

            }
        })
    </script>
</html>
- 1
- 2
- 3
- 4
- 5
- 6
- 7
- 8
- 9
- 10
- 11
- 12
- 13
- 14
- 15
- 16
- 17
- 18
- 19
- 20
- 21
- 22
- 23
- 24
- 25
- 26
- 27
- 28
- 29
- 30
- 31
- 32
- 33
- 34
- 35
- 36
- 37
- 38
- 39
- 40
- 41
- 42
- 43
- 44
- 45
- 46
- 47
- 48
- 49
- 50
- 51
- 52
- 53
- 54
- 55
- 56
- 57
- 58
- 59
- 60
- 61
- 62
- 63
- 64
- 65
- 66
- 67
- 68
- 69
- 70
- 71
- 72
- 73
- 74
- 75
- 76
- 77
- 78
- 79
- 80
- 81
- 82
- 83
- 84
- 85
- 86
- 87
- 88
- 89
- 90
- 91
- 92
- 93
- 94
- 95
- 96
- 97
- 98
- 99
- 100
- 101
- 102
- 103
- 104
- 105
- 106
- 107
- 108
- 109
- 110
- 111
- 112
- 113
- 114
- 115
- 116
- 117
- 118
- 119
- 120
- 121
- 122
- 123
- 124
- 125
- 126
- 127
- 128
- 129
- 130
- 131
- 132
- 133
- 134
- 135
- 136
- 137
- 138
- 139
- 140
- 141
- 142
- 143
- 144
文章来源: blog.csdn.net,作者:十八岁讨厌编程,版权归原作者所有,如需转载,请联系作者。
原文链接:blog.csdn.net/zyb18507175502/article/details/125902464
- 点赞
- 收藏
- 关注作者


评论(0)