unity使用Dijkstra算法实现自动寻路

前言
最近开始做新的功能模块——章节关卡。在做的过程中看到一个要求:根据当前关卡位置,点击任意已开放的关卡,主角自动寻路至该处。
数据准备
关卡配置表如下:
map = {
	[1] = { coordinate = { 1, 1, }, link = { 2, 3, }, },
	[2] = { coordinate = { 2, 1, }, link = { 1, 3, }, },
	[3] = { coordinate = { 3, 2, }, link = { 4, 3, }, },
	[4] = { coordinate = { 8, 2, }, link = { 2, 3, }, },
	[5] = { coordinate = { 3, 3, }, link = { 2, 3, }, },
	[6] = { coordinate = { 5, 3, }, link = { 2, 3, }, },
	[7] = { coordinate = { 9, 3, }, link = { 2, 3, }, },
	[8] = { coordinate = { 2, 4, }, link = { 2, 3, }, },
}
- 1
- 2
- 3
- 4
- 5
- 6
- 7
- 8
- 9
- 10
map的key值代表第X关。
coordinate代表对应关卡的坐标位置,例如:{2,1}代表坐标位置为x=2,y=1。
link代表与之相连的关卡,{2,3}代表与关卡2和关卡3相连。(即表示有通路)
尝试1
看到自动寻路,第一反应就是AStar算法。毕竟自动寻路嘛,那肯定得是A了。上次使用A还是在上次…enen,还是几年前上学时候,当时也只是学习了该算法的思路伪代码。要说用到实践里,那就是一个鸡蛋了。加上这么长时间过去了,只问其名,却已忘记其身,不得不借助www:度娘,我来了~。
首先找一篇通俗易懂的文章,看看算法的思路吧,代码的事后面再说~
先说下这个算法:A*算法主要用于求最短路径。算法的主要思想是:
参考自:https://blog.csdn.net/Zhouzi_heng/article/details/115035298
(1) 把起点加入 open list 。
(2) 重复如下过程:
      a.  遍历 open list ,查找 F 值最小的节点,把它作为当前要处理的节点。

      b.  把这个节点移到 close list 。

      c.  对当前方格的 8 个相邻方格的每一个方格?

       ◆ 如果它是不可抵达的或者它在 close list 中,忽略它。否则,做如下操作。

       ◆ 如果它不在 open list 中,把它加入 open list ,并且把当前方格设置为它的父亲,记录该方格的 F , G 和 H 值。

       ◆ 如果它已经在 open list 中,检查这条路径 ( 即经由当前方格到达它那里 ) 是否更好,用 G 值作参考。更小的 G 值表示这是更好的路径。如果是这样,把它的父亲设置为当前方格,并重新计算它                                                                的 G 和 F 值。如果你的 open list 是按 F 值排序的话,改变后你可能需要重新排序。

     d.停止,当你

       ◆把终点加入到了 open list 中,此时路径已经找到了,或者

       ◆查找终点失败,并且 open list 是空的,此时没有路径。

- 1
- 2
- 3
- 4
- 5
- 6
- 7
- 8
- 9
- 10
- 11
- 12
- 13
- 14
- 15
- 16
- 17
(3)保存路径。从终点开始,每个方格沿着父节点移动直至起点,这就是你的路径。
详情可见:推荐一篇大佬的A*算法文章:https://blog.csdn.net/xinzhilinger/article/details/119643810
搞懂了算法的思想后,我们其实是不需要自己写代码的,因为网上已经有很多成功的案例了,我们只需要站在巨人的肩膀上操作,去使用它。找到一个A算法的脚本如下:
https://mp.csdn.net/mp_download/manage/download/UpDetailed
那么怎么去使用它呢?
由于A算法是在网格上寻路的,因此我们需要先创建地图网格,使用Star.New(),观察发现Astar.cs脚本发现,需要的参数是String该网格是由网格的长宽,以及每个位置的信息(是否能通过,1代表可通过0代表不可通过)构成的,类似于这样:

第一行的两个值分表达标地图网格的长宽,除去第一行后可以发现,剩下的是一个10*10的网格,每个格子上有一个数字(值为0或者1),代表是否可以通过。
那么,第一步,我们需要先将上面给我们的配置信息转换为对应的网格字段,方法如下:
--判断某个位置是路还是障碍物
local function CheckRoadOrBarrier(x,y)
	for k,v in pairs(map) do
		local coordinate = v.coordinate
		if coordinate[1] == x and coordinate[2] == y then
			return 1--是路
		end
	end
	return 0--障碍物
end
local fu
nction CreateMapData()
    --长宽
    local width = 10
    local heigth = 10
    local map = string.format("%s,%s",width,heigth)
    for i=1,heigth do
        map = map.."\n"
        for j=1,width do
            if j == 1 then
                map = string.format("%s%s",map,CheckRoadOrBarrier(i,j))
            else
                map = string.format("%s,%s",map,CheckRoadOrBarrier(i,j))
            end
        end
    end
    printlog(map,"生成的地图信息????")
    return map
end
- 1
- 2
- 3
- 4
- 5
- 6
- 7
- 8
- 9
- 10
- 11
- 12
- 13
- 14
- 15
- 16
- 17
- 18
- 19
- 20
- 21
- 22
- 23
- 24
- 25
- 26
- 27
- 28
- 29
- 30
网格数据转换好后,我们需要开始初始化Astar算法:
local function InitAStar()
    current = AStarPoint.New(0,0)--默认初始位置在(0,0)坐标点
    local map = CreateMapData()
    astar = AStar.New(map)
    astar:SetMapWidthAndHeigth(10, 10)
end
- 1
- 2
- 3
- 4
- 5
- 6
接下来,是时候展现我们真正的技术了:我们开始真正使用Astar算法了。
local function GetShortPath(_x,_y,_finishfunc)
    local _next = AStarPoint.New(_x,_y)
    local path = astar:FindPath(current, _next)
    if path == nil or path.Count == 0 then
        _finishfunc(false)
        return
    else
        _finishfunc(true)
    end
end

local targetPos = Vector2.New(4,6)--目标位置,假设是(4,6)点,实际应用中以鼠标点击位置为准
GetShortPath(targetPos.x,targetPos.y,function (_bool)
    if _bool then
        --找到最短路径,可以前往目的地
    else
        --没有通路,不能前往目的地
    end
end)
- 1
- 2
- 3
- 4
- 5
- 6
- 7
- 8
- 9
- 10
- 11
- 12
- 13
- 14
- 15
- 16
- 17
- 18
- 19
运行程序后我发现,额,貌似有点尴尬,这个算法和我的需求不符合,我的需求只知道哪些点之间有路,
用Astar来寻路的话,反而将问题复杂化了,最主要是不可行,典型的没读懂题意。
网格可视化实现
一再陷入沉思中,既然算法还没想好,那就先按照配置,把关卡生成出来再试着找解决办法吧:
首先需要按照制定坐标生成关卡图标:
local function ShowLevelIcon()
    --关卡图标的父节点和关卡预制根据实际需要赋值
    -- local parent = base.arena
    -- local prefab = base.levelPrefab
    local num = table.tablelen(map)--关卡数量
    for i=1,num do
        local data = map[i]
        local obj = utils.addchild(parent , prefab)--实例化物体并制定父节点
        local x = data.coordinate[1]
        local y = data.coordinate[2]
        obj.transform.localPosition = Vector3.New(x , y , 0)
        SetActive(obj , true)
    end
end
- 1
- 2
- 3
- 4
- 5
- 6
- 7
- 8
- 9
- 10
- 11
- 12
- 13
- 14
接着需要根据关卡图标的位置和相连关系,生成通路。但是在此之前,我们需要将配置信息转化为通路信息:例如:{{x1,y1},{x2,y2}}这种格式,代表(x1,y1)与(x2,y2)之间有通路。
local function GetRoadPos()
    local allRoadPos = {}
    for i,v in ipairs(map) do
        local pos1 = v.coordinate
        for i,v in ipairs(v.link) do
            local pos2 = map[v].coordinate
            local pos = {pos1,pos2}
            table.insert(base.allRoadPos,pos)
        end
    end
    printlog(allRoadPos,"allRoadPos ===lxlxlxl")
    return allRoadPos
end
- 1
- 2
- 3
- 4
- 5
- 6
- 7
- 8
- 9
- 10
- 11
- 12
- 13
运行发现,同一通路可能会存在多条相同的路径,这肯定是不符合我们需求的,因此我们需要将相同的路径唯一化处理:即需要再插入新路径前判断该路径是否已存在即可。
local function CheckExitRoad(pos,allRoadPos)
    for i,v in ipairs(allRoadPos) do
        if (pos[1] == v[1] and pos[2] == v[2]) or (pos[2] == v[1] and pos[1] == v[2]) then
            return true
        end
    end
    return false
end

local function GetRoadPos()
    local allRoadPos = {}
    for i,v in ipairs(map) do
        local pos1 = v.coordinate
        for i,v in ipairs(v.link) do
            local pos2 = map[v].coordinate
            local pos = {pos1,pos2}
            local bol = base.CheckExitRoad(pos,allRoadPos)
            if not bol then
                table.insert(base.allRoadPos,pos)
            end
        end
    end
    printlog(allRoadPos,"allRoadPos ===lxlxlxl")
    return allRoadPos
end
- 1
- 2
- 3
- 4
- 5
- 6
- 7
- 8
- 9
- 10
- 11
- 12
- 13
- 14
- 15
- 16
- 17
- 18
- 19
- 20
- 21
- 22
- 23
- 24
- 25
有了路径数据,要生成路径就很简单了,直接根据坐标信息在指定位置实例化预制。需要注意的是:只关心生成位置是远远不够的,我们还需要根据两点的坐标计算出两点的距离,从而控制路径的长短。
求两点间距离,lua已经为我们封装好了:
local distance = Vector2.Distance(endPos , startPos)
- 1
有了位置长短,还需要控制路径的旋转角度,只有合适的旋转角度才能在视觉上构成真正的通路。
旋转角度的求解如下:
local rorationZ = math.atan2((x2-x1),(y2-y1))*180/math.pi-90--求旋转角度
local rotation = obj.transform.localRotation
obj.transform.localRotation = Quaternion.Euler(rotation.x,rotation.y,-rorationZ)
- 1
- 2
- 3
既然思路我们知道了,只需要闭上眼睛,把代码写出来了:
local function ShowRoad()
    --关卡路径的父节点和关卡路径预制,根据实际需要赋值
    -- local parent = base.arena
    -- local prefab = base.roadPrefab
    local allRoadPos = GetRoadPos(map)
    local num = table.tablelen(allRoadPos)
    for i=1,num do
        local pos = allRoadPos[i]
        local pos1 = pos[1]
        local pos2 = pos[2]
        local x1 = pos1[1]
        local x2 = pos2[1]
        local y1 = pos1[2]
        local y2 = pos2[2]
        obj.transform.localPosition = Vector2.New(x1, y1);
        local obj = utils.addchild(base.arena , base.roadPrefab)
        local rect = obj:GetComponent("RectTransform")
        local startPos = Vector3.New(x1, y1,0);
        local endPos = Vector3.New(x2, y2,0);
        rect.pivot = Vector2.New(0, 0.5);
        local distance = Vector2.Distance(endPos , startPos)
        rect.sizeDelta = Vector2.New(distance, rect.sizeDelta.y);

        local rorationZ = math.atan2((x2-x1),(y2-y1))*180/math.pi-90--求旋转角度
        local rotation = obj.transform.localRotation
        obj.transform.localRotation = Quaternion.Euler(rotation.x,rotation.y,-rorationZ)
        SetActive(obj , true)
    end
end
- 1
- 2
- 3
- 4
- 5
- 6
- 7
- 8
- 9
- 10
- 11
- 12
- 13
- 14
- 15
- 16
- 17
- 18
- 19
- 20
- 21
- 22
- 23
- 24
- 25
- 26
- 27
- 28
- 29
运行效果如下:

尝试2
仔细看看这个网格图,貌似在哪见过哪儿见过,努力一回忆,这不就是大学求最短路径的那种图嘛。
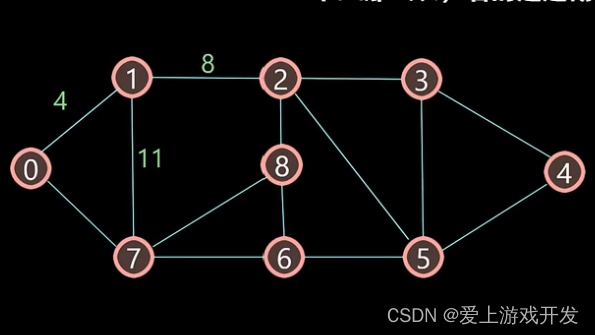

毕竟我也是上过学的,貌似是使用Dijkstra算法算法求最短路径。确认过眼神,你是对的算法。
--创建Dijkstra算法权中路径表
local function CreateEdges()
    local edges = {}
    for i,v in ipairs(map) do
        local pos1 = v.coordinate[1]*10+v.coordinate[2]
        edges[pos1] = {}
        for a,b in ipairs(v.link) do
            local coordinate1 = v.coordinate
            local coordinate2 = base.node_coordinate_proto[b].coordinate
            local x = coordinate2[1] - coordinate1[1]
            local y = coordinate2[2] - coordinate1[2]
            local pos2 = coordinate2[1]*10+coordinate2[2]
            edges[pos1][pos2] = math.sqrt(x * x + y * y)
        end
    end
    printlog(edges,"edges =??????????")
    return edges
end
- 1
- 2
- 3
- 4
- 5
- 6
- 7
- 8
- 9
- 10
- 11
- 12
- 13
- 14
- 15
- 16
- 17
- 18
运行发现,对于下图33——>32的路径,不存在32——>33的路径,这样写出来的程序肯定是有bug的。因为这个路径表的路径是带有方向的,即a与b之间有一条通路,a可以通往b,但b不可以通往a,这肯定是我们不愿意看到的,因此,我们还需要加入逆向路径:即当有a——>b路径时,我们需要判断是否存在b——>a的路径,不存在时需要手动添加。
local function CreateEdges()
    local edges = {}
    for i,v in ipairs(map) do
        local pos1 = v.coordinate[1]*10+v.coordinate[2]
        edges[pos1] = {}
        for a,b in ipairs(v.link) do
            local coordinate1 = v.coordinate
            local coordinate2 = base.node_coordinate_proto[b].coordinate
            local x = coordinate2[1] - coordinate1[1]
            local y = coordinate2[2] - coordinate1[2]
            local pos2 = coordinate2[1]*10+coordinate2[2]
            edges[pos1][pos2] = math.sqrt(x * x + y * y)
        end
    end
    printlog(edges,"edges =??????????")
    --添加逆向路径
    for k,v in pairs(edges) do
        for a,b in pairs(v) do
            local pos = a
            edges[pos] = edges[pos] or {}
            local isExit = false
            for n,m in pairs(edges[pos]) do
                if n == k then
                    --已经有逆向路径
                    isExit = true
                    break
                end
            end
            if not isExit then
                edges[pos][k] = b
            end
        end
    end
    printlog(edges,"edges =添加逆向路径后的输出??????????")
    return edges
end
- 1
- 2
- 3
- 4
- 5
- 6
- 7
- 8
- 9
- 10
- 11
- 12
- 13
- 14
- 15
- 16
- 17
- 18
- 19
- 20
- 21
- 22
- 23
- 24
- 25
- 26
- 27
- 28
- 29
- 30
- 31
- 32
- 33
- 34
- 35
- 36
使用Dijkstra算法:
local coordinate = map[1].coordinate
currPos = coordinate[1]*10+coordinate[2]

local function GetShortPath(_x,_y,_finishfunc)
    local edges = CreateEdges()
    local targetPos = _x*10+_y
    local path = dijkstra.StartDijkstra(currPos,targetPos,edges)
    printlog(path,"最短路径???")
    if path == nil then
        _finishfunc(false)
        return
    else
        _finishfunc(true)
        currPos = targetPos
    end
end

local targetPos = Vector2.New(4,6)--目标位置,假设是(4,6)点,实际应用中以鼠标点击位置为准
GetShortPath(targetPos.x,targetPos.y,function (_bool)
    if _bool then
        --找到最短路径,可以前往目的地
    else
        --没有通路,不能前往目的地
    end
end)
- 1
- 2
- 3
- 4
- 5
- 6
- 7
- 8
- 9
- 10
- 11
- 12
- 13
- 14
- 15
- 16
- 17
- 18
- 19
- 20
- 21
- 22
- 23
- 24
- 25
算法测试通过之后,为了让肉眼清楚的看到路径,我们需要放上一个小人,在路上走动。
首先实例化小人:
--prefab是将要实例化的对象parent是挂载的父节点
local player = GameObject.Instantiate(prefab, parent.transform)
- 1
- 2
根据需要到达的坐标,移动小人
function chapterLevel.MoveToPos(path,idx,len)
    local pos = path[idx]
    local y = pos%10
    local x = (pos-y)/10
    local target = Vector3.New(x*100,y*100,0)
    local mypos = player.transform.localPosition
    if target.x == mypos.x and target.y == mypos.y then
        return
    end
    ChangeDir(target)
    local distance = Vector3.Distance(target , player.transform.localPosition)
    local time = distance/400
    playerAnim:SetBool("run", true)
    player.transform:DOLocalMove(target, time):SetEase(Ease.Linear):OnComplete(
        function ()
            if idx<=1 then
                playerAnim:SetBool("idle", false)
            else
                base.MoveToPos(path,idx-1,len)--递归执行两点之间的移动
            end
        end
    )
end

GetShortPath(coordinate[1],coordinate[2],function (_bool,path)
    if _bool then
        local len = table.tablelen(path)
        base.MoveToPos(path,len-1,len)
    end
end)
- 1
- 2
- 3
- 4
- 5
- 6
- 7
- 8
- 9
- 10
- 11
- 12
- 13
- 14
- 15
- 16
- 17
- 18
- 19
- 20
- 21
- 22
- 23
- 24
- 25
- 26
- 27
- 28
- 29
- 30
为了让小人看上去逼真一点,我们需要给他加上动画,根据需要,加上跑步和待机动画
local playerAnim = utils.getcom(player, "Animator")--获取动画组件
- 1
当需要移动的时候执行:
playerAnim:SetBool("run", true)
- 1
移动结束执行:
base.playerAnim:SetBool("idle", true)
- 1
因为人物移动时,按照常理来说都是面朝移动方向的,所以我们还需要加上人物转向的代码:
local function GetAngle(from , to, anglen)
    local angle = Vector2.Angle(from,to)
    local sign = nil
    if Vector3.Dot(Vector3.New(0,0,1),Vector3.Cross(Vector3.New(from.x,from.y,0),Vector3.New(to.x,to.y,0))) > 0 then
        sign = 1
    else
        sign = -1
    end
    return angle * sign
end

local mydirNor = Vector2.New(1,0)--开始默认朝向
local funciton ChangeDir(target)
    local oppsitionVec = target - player.transform.localPosition
    local dirNor = Vector2.Normalize(Vector2.New(oppsitionVec.x,oppsitionVec.y))
    local anglen = Vector3.New(0,1,0)
    local angle = GetAngle(mydirNor , dirNor, anglen)
    mydirNor = dirNor
    player.transform.rotation = Quaternion.AngleAxis(angle, anglen)*player.transform.rotation
end
- 1
- 2
- 3
- 4
- 5
- 6
- 7
- 8
- 9
- 10
- 11
- 12
- 13
- 14
- 15
- 16
- 17
- 18
- 19
- 20
这时候运行发现,几近完美。效果如下:

使用Dijkstra算法人物移动完整代码入下:
--创建Dijkstra算法需要的路径表
local function CreateEdges()
    local edges = {}
    for i,v in ipairs(map) do
        local pos1 = v.coordinate[1]*10+v.coordinate[2]
        edges[pos1] = {}
        for a,b in ipairs(v.link) do
            local coordinate1 = v.coordinate
            local coordinate2 = base.node_coordinate_proto[b].coordinate
            local x = coordinate2[1] - coordinate1[1]
            local y = coordinate2[2] - coordinate1[2]
            local pos2 = coordinate2[1]*10+coordinate2[2]
            edges[pos1][pos2] = math.sqrt(x * x + y * y)
        end
    end
    printlog(edges,"edges =??????????")
    --添加逆向路径
    for k,v in pairs(edges) do
        for a,b in pairs(v) do
            local pos = a
            edges[pos] = edges[pos] or {}
            local isExit = false
            for n,m in pairs(edges[pos]) do
                if n == k then
                    --已经有逆向路径
                    isExit = true
                    break
                end
            end
            if not isExit then
                edges[pos][k] = b
            end
        end
    end
    printlog(edges,"edges =添加逆向路径后的输出??????????")
    return edges
end
--利用Dijkstra算法获取最短路径
function chapterLevel.GetShortPath(_x,_y,_finishfunc)
    local edges = CreateEdges()
    local targetPos = _x*10+_y
    local path = dijkstra.StartDijkstra(currPos,targetPos,edges)--使用Dijkstra算法获取最短路径
    printlog(path,"最短路径???")
    if table.tablelen(path) <=1 then--只有一个点代表是起点,没有通路
        _finishfunc(false)
        return
    else
        _finishfunc(true,path)
        currPos = targetPos
    end
end
--获取当前朝向与目标朝向之间的角度
local function GetAngle(from , to, anglen)
    local angle = Vector2.Angle(from,to)
    local sign = nil
    if Vector3.Dot(Vector3.New(0,0,1),Vector3.Cross(Vector3.New(from.x,from.y,0),Vector3.New(to.x,to.y,0))) > 0 then
        sign = 1
    else
        sign = -1
    end
    local signed_angle = angle * sign
    return signed_angle
end
--改变人物朝向
local function ChangeDir(target)
    local oppsitionVec = target - player.transform.localPosition
    local dirNor = Vector2.Normalize(Vector2.New(oppsitionVec.x,oppsitionVec.y))
    local anglen = Vector3.New(0,1,0)
    local angle = GetAngle(base.mydirNor , dirNor, anglen)
    base.mydirNor = dirNor
    base.herogo.transform.rotation = Quaternion.AngleAxis(angle, anglen)*base.herogo.transform.rotation
end
--根据最短路径执行移动操作
function chapterLevel.MoveToPos(path,idx,len)
    local pos = path[idx]
    local y = pos%10
    local x = (pos-y)/10
    local target = Vector3.New(x*100,y*100,0)
    local mypos = player.transform.localPosition
    if target.x == mypos.x and target.y == mypos.y then
        return
    end
    ChangeDir(target)
    local distance = Vector3.Distance(target , player.transform.localPosition)
    local time = distance/400
    playerAnim:SetBool("run", true)
    player.transform:DOLocalMove(target, time):SetEase(Ease.Linear):OnComplete(
        function ()
            if idx<=1 then
                playerAnim:SetBool("idle", false)
            else
                base.MoveToPos(path,idx-1,len)--递归执行两点之间的移动
            end
        end
    )
end
-- 点击某个关卡图标
local function ClickLevelItem(_go,idx)
    printlog(idx,"点击了的关卡下标")
    local coordinate = map[idx].coordinate
    GetShortPath(coordinate[1],coordinate[2],function (_bool,path)
        if _bool then
            local len = table.tablelen(path)
            base.MoveToPos(path,len-1,len)
        end
    end)
end
- 1
- 2
- 3
- 4
- 5
- 6
- 7
- 8
- 9
- 10
- 11
- 12
- 13
- 14
- 15
- 16
- 17
- 18
- 19
- 20
- 21
- 22
- 23
- 24
- 25
- 26
- 27
- 28
- 29
- 30
- 31
- 32
- 33
- 34
- 35
- 36
- 37
- 38
- 39
- 40
- 41
- 42
- 43
- 44
- 45
- 46
- 47
- 48
- 49
- 50
- 51
- 52
- 53
- 54
- 55
- 56
- 57
- 58
- 59
- 60
- 61
- 62
- 63
- 64
- 65
- 66
- 67
- 68
- 69
- 70
- 71
- 72
- 73
- 74
- 75
- 76
- 77
- 78
- 79
- 80
- 81
- 82
- 83
- 84
- 85
- 86
- 87
- 88
- 89
- 90
- 91
- 92
- 93
- 94
- 95
- 96
- 97
- 98
- 99
- 100
- 101
- 102
- 103
- 104
- 105
- 106
- 107
文章来源: unity3d.blog.csdn.net,作者:爱上游戏开发,版权归原作者所有,如需转载,请联系作者。
原文链接:unity3d.blog.csdn.net/article/details/125498483

- 点赞
- 收藏
- 关注作者
评论(0)