【轻松入门vue】vue组件化开发
- 组件化思想:标准、分治、重用、组合
- 组件 (Component) 是 Vue.js 最强大的功能之一
- 组件可以扩展 HTML 元素,封装可重用的代码
五、组件化开发
1. 组件注册
官方强烈推荐遵循 W3C 规范中的自定义组件名 (字母全小写且必须包含一个连字符)。这会帮助你避免和当前以及未来的 HTML 元素相冲突。
组件命名规范
- 当使用 短横线分隔命名定义一个组件时,你也必须在引用这个自定义元素时使用短横线分隔命名例如:
Vue.component('my-component-name', { /* ... */ })
<my-component-name>
- 当使用 首字母大写命名定义一个组件时,你在引用这个自定义元素时两种命名法都可以使用(在组件模板内容中)直接在dom中依旧只能使用短横线分割的形式。
Vue.component('MyComponentName', { /* ... */ })
<my-component-name>或者<MyComponentName>
组件注册注意事项
- data必须是一个函数
data使用函数会形成一个闭包的环境,保证每个组件的数据是独立的。
Vue.component('button-counter',{
        //组件中需要的数据
       data: function () {
           return{
               count:0
           }
       },
        //组件模板内容
        template:`
            <div>
                <button @click='handel'>点击了{{count}}次</button>
                <button>确定</button>
            </div>
        `,
        methods:{
           handel:function () {
               this.count+=2;
           }
        }
    });
    ```
2. 组件模板内容必须是单个根节点的元素

```vue
<!--错误-->
<button @click='handel'>点击了{{count}}次</button>
<button>确定</button>
<!--正确-->
<div>
	<button @click='handel'>点击了{{count}}次</button>
	<button>确定</button>
</div>
- 组件模板内容可以是模板字符串(ES6语法需要浏览器支持)
当模板很长的时候使用字符串形式代码将会十分繁杂
//组件模板内容
template:"<div>\n" +
    "\t<button @click='handel'>点击了{{count}}次</button>\n" +
    "\t<button>确定</button>\n" +
    "</div>",
vue提供模板字符串形式,在模板外部加上反引号
//组件模板内容
template:`
    <div>
        <button @click='handel'>点击了{{count}}次</button>
        <button>确定</button>
    </div>
`,
全局组件注册
注册之后可以用在任何新创建的 Vue 根实例 (new Vue) 的模板中
Vue.component('组件名称', {
	data:组件数据(必须是一个函数),
	template:组件模板内容
});
demo
<body>
    <div id="app">
        <button-counter></button-counter>
        <button-counter></button-counter>
    </div>
    <script>
        //组件注册
        Vue.component('button-counter',{
            //组件中需要的数据
           data: function () {
               return{
                   count:0
               }
           },
            //组件模板内容
            template:"<button @click='handel'>点击了{{count}}次</button>",
            methods:{
               handel:function () {
                   this.count+=2;
               }
            }
        });
        var vue = new Vue({
            el:"#app",
            data:{

            },
        })
    </script>
</body>
局部组件注册
只能在注册他的父组件中使用
//可以通过一个普通的 JavaScript 对象来定义组件:
var ComponentA = { /* ... */ }
var ComponentB = { /* ... */ }
var ComponentC = { /* ... */ }
//在 components 选项中定义你想要使用的组件:
new Vue({
  el: '#app',
  components: {
    'component-a': ComponentA,
    'component-b': ComponentB
  }
})
demo
<div id="app1">
    <component-a></component-a>
</div>
<script>
    var ComponentA = {
        //组件中需要的数据
        data: function () {
            return{
                count:0
            }
        },
        //组件模板内容
        template:`
            <div>
                <button @click='handel'>点击了{{count}}次</button>
                <button>确定</button>
            </div>
        `,
        methods:{
            handel:function () {
                this.count+=2;
            }
        }
    };
    new Vue({
        el: '#app1',
        components: {
            'component-a': ComponentA,
        }
    })
</script>
2. Vue调试工具下载
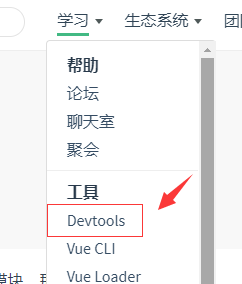
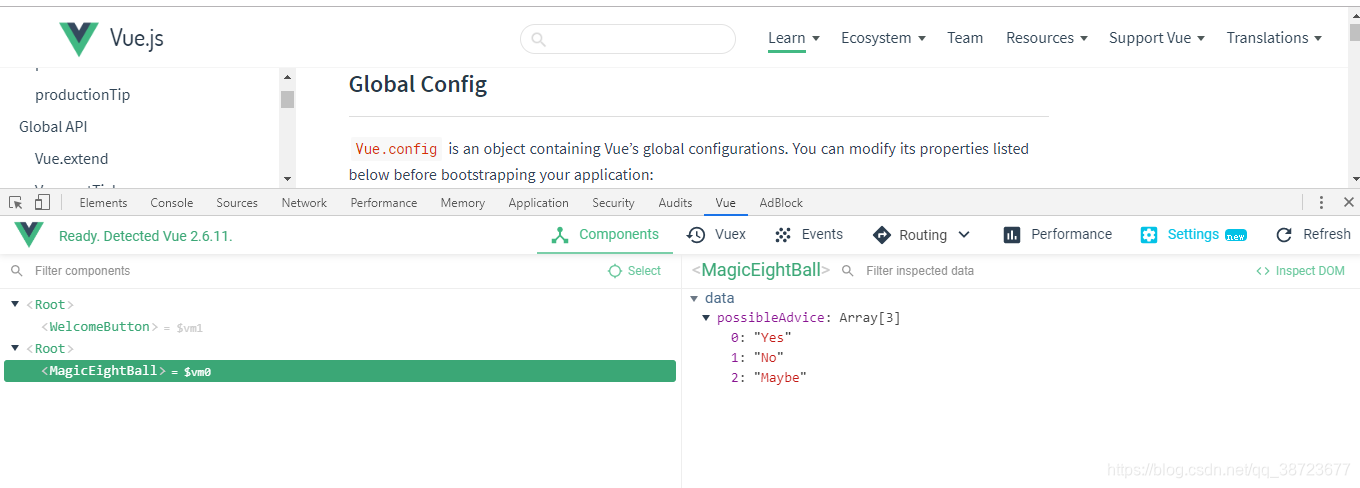
vue-devtools是一款基于chrome游览器的插件,用于调试vue应用,这可以极大地提高我们的调试效率。
- 根据官网提示信息去github下载安装

2. chrome商店直接下载

方便的查看各组件之间的关系,能够直接清楚的看到组件中的数据

3. 组件间数据交互
父组件向子组件传值
- 组件内部通过props接收传递过来的值
props用于接收父组件传递过来的数据,是一个数组
Vue.component('blog-post', {
  // 在 JavaScript 中是 camelCase 的
  props: ['postTitle'],
  template: '<h3>{{ postTitle }}</h3>'
})
- 父组件通过属性将值传递给子组件
<blog-post post-title="来自父组件的数据!"></blog-post>
<!--也可以是绑定的数据-->
<blog-post :post-title="post"></blog-post>
demo
<div id="app">
    <!--直接传值、注意不能用postTitle(Html大小写不敏感)-->
    <blog-post post-title="来自父组件的数据"></blog-post>
    <!--通过 v-bind 动态赋值-->
    <blog-post :post-title="postTitle"></blog-post>
</div>
<script>
    Vue.component('blog-post', {
        // 在 JavaScript 中是 camelCase 的
        props: ['postTitle'],
        data:function(){
          return{
              msg:"子组件本身的数据"
          }
        },
        template: '<h3>{{ postTitle +"----" + msg}}</h3>'
    });
    var vue =new Vue({
        el:"#app",
        data:{
            postTitle:"postTitle",
        },
    })
</script>
- props属性名规则
在props中使用驼峰形式,模板中需要使用短横线的形式
字符串式的模板中没有这个限制(在template模板中给子组件传值可以使用驼峰形式)
- props属性值类型
字符串String(略)
数值Number
<!-- 即便 `42` 是静态的,我们仍然需要 `v-bind` 来告诉 Vue -->
<!-- 这是一个 JavaScript 表达式而不是一个字符串。-->
<blog-post v-bind:likes="42"></blog-post>

<!-- 用一个变量进行动态赋值。-->
<blog-post v-bind:likes="post.likes"></blog-post>
布尔值Boolean
<!-- 包含该 prop 没有值的情况在内,都意味着 `true`。-->
<blog-post is-published></blog-post>

<!-- 即便 `false` 是静态的,我们仍然需要 `v-bind` 来告诉 Vue -->
<!-- 这是一个 JavaScript 表达式而不是一个字符串。-->
<blog-post v-bind:is-published="false"></blog-post>

<!-- 用一个变量进行动态赋值。-->
<blog-post v-bind:is-published="post.isPublished"></blog-post>
数组Array
<!-- 即便数组是静态的,我们仍然需要 `v-bind` 来告诉 Vue -->
<!-- 这是一个 JavaScript 表达式而不是一个字符串。-->
<blog-post v-bind:comment-ids="[234, 266, 273]"></blog-post>

<!-- 用一个变量进行动态赋值。-->
<blog-post v-bind:comment-ids="post.commentIds"></blog-post>
对象Object
<!-- 即便对象是静态的,我们仍然需要 `v-bind` 来告诉 Vue -->
<!-- 这是一个 JavaScript 表达式而不是一个字符串。-->
<blog-post
  v-bind:author="{
    name: 'Veronica',
    company: 'Veridian Dynamics'
  }"
></blog-post>

<!-- 用一个变量进行动态赋值。-->
<blog-post v-bind:author="post.author"></blog-post>
props传递数据原则:单向数据流。
只允许父组件向子组件传递数据,不允许子组件直接操作props中的数据
子组件向父组件传值
- 子组件通过自定义事件向父组件传递信息
Vue.component('menu-text',{
        template:`
            <button @click="$emit('enlarge-text')">字体变大</button>
        `
    });
- 父组件监听子组件的事件
<menu-text @enlarge-text="handel"></menu-text>
demo
<div id="app">
    <div :style="{fontSize:fontSize+'px'}">字体</div>
    <menu-text @enlarge-text="handel"></menu-text>
</div>
<script>
    Vue.component('menu-text',{
        template:`
            <button @click="$emit('enlarge-text')">字体变大</button>
        `
    });

    var vue = new Vue({
        el:"#app",
        data:{
            fontSize:5,
        },
        methods:{
            handel:function () {
                this.fontSize+=10;
            }
        }
    })
</script>
- 子组件通过自定义事件向父组件传递信息
<button @click="$emit('enlarge-text',10)">字体变大</button>
- 父组件监听子组件的事件
<menu-text @enlarge-text="handel($event)"></menu-text>
demo
<div id="app">
    <div :style="{fontSize:fontSize+'px'}">字体</div>
    <menu-text @enlarge-text="handel($event)"></menu-text>
</div>
<script>
    Vue.component('menu-text',{
        template:`
            <button @click="$emit('enlarge-text',10)">字体变大</button>
        `
    });

    var vue = new Vue({
        el:"#app",
        data:{
            fontSize:5,
        },
        methods:{
            handel:function (val) {
                this.fontSize+=val;
            }
        }
    })
</script>
非父子组件之间传值
- 单独的时间中心管理组件间的通信
var hub = new Vue();// 提供事件中心
- 监听事件与销毁事件
// 监听事件(创建一个监听事件)
hub.$on('tom-event', (val) => {
	this.num += val;
});
//销毁事件
hub.$off('tom-event');
- 触发事件
// 触发兄弟组件的事件
hub.$emit('tom-event', 1);
demo
<div id="app">
    <div>父组件</div>
    <div>
        <button @click='handle'>销毁事件</button>
    </div>
    <test-tom></test-tom>
    <test-jerry></test-jerry>
</div>
<script type="text/javascript">
    /*
      兄弟组件之间数据传递
    */
    // 提供事件中心
    var hub = new Vue();

    Vue.component('test-tom', {
        data: function(){
            return {
                num: 0
            }
        },
        template: `
        <div>
          <div>TOM:{{num}}</div>
          <div>
            <button @click='handle'>点击</button>
          </div>
        </div>
      `,
        methods: {
            handle: function(){
                hub.$emit('jerry-event', 2);
            }
        },
        mounted: function() {
            // 监听事件
            hub.$on('tom-event', (val) => {
                this.num += val;
            });
        }
    });
    Vue.component('test-jerry', {
        data: function(){
            return {
                num: 0
            }
        },
        template: `
        <div>
          <div>JERRY:{{num}}</div>
          <div>
            <button @click='handle'>点击</button>
          </div>
        </div>
      `,
        methods: {
            handle: function(){
                // 触发兄弟组件的事件
                hub.$emit('tom-event', 1);
            }
        },
        mounted: function() {
            // 监听事件
            hub.$on('jerry-event', (val) => {
                this.num += val;
            });
        }
    });
    var vm = new Vue({
        el: '#app',
        data: {

        },
        methods: {
            handle: function(){
                hub.$off('tom-event');
                hub.$off('jerry-event');
            }
        }
    });
</script>
4. 组件插槽
父组件向子组件传递内容(模板的内容,区别去上面的数据交互)
父组件标签之间的内容会放置到子组件插槽中
基本用法
当组件渲染的时候,<slot></slot>将会被替换为“hello Vue”。插槽内可以包含任何模板代码,包括 HTML:
- 插槽位置
Vue.component('text-show',{
        template:`
            <div>
                <strong>莫逸风</strong>
                <slot></slot>
            </div>
        `
    });
- 插槽内容
<text-show>hello Vue</text-show>
demo
<div id="app">
    <text-show>
        <strong>HelloVue</strong>
    </text-show>
</div>
<script>

    Vue.component('text-show',{
        template:`
            <div>
                <strong>莫逸风</strong>
                <slot></slot>
            </div>
        `
    });

    var vue = new Vue({
        el:"#app",
        data:{

        },
    })
</script>
- 编译作用域
hello访问的是app实例中的数据,而不是text-show中的数据
父级模板里的所有内容都是在父级作用域中编译的;子模板里的所有内容都是在子作用域中编译的。
<div id="app">
    <text-show>
        <strong>{{hello}}</strong>
    </text-show>
</div>
- 后备内容
在子组件中solt标签中添加默认内容
<slot>默认</slot>
插槽无内筒显示默认内容
<text-show></text-show> <!--显示“默认”-->
插槽有内容覆盖默认内容
<text-show>莫逸风</text-show> <!--显示“莫逸风”-->
具名插槽用法
自 2.6.0 起有所更新。已废弃的使用
slotattribute 的语法在这里。
- 插槽定义
一个不带 name 的 slot 出口会带有隐含的名字“default”。
<div class="container">
  <header>
    <slot name="header"></slot>
  </header>
  <main>
    <slot></slot>
  </main>
  <footer>
    <slot name="footer"></slot>
  </footer>
</div>
- 插槽内容
我们可以在一个 <template> 元素上使用 v-slot 指令,其参数对应插槽name
<base-layout>
  <template v-slot:header>
    <h1>Here might be a page title</h1>
  </template>

  <p>A paragraph for the main content.</p>
  <p>And another one.</p>

  <template v-slot:footer>
    <p>Here's some contact info</p>
  </template>
</base-layout>
demo
<div id="app">
    <base-layout>
        <template v-slot:header>
            <h1>Here might be a page title</h1>
        </template>

        <p>A paragraph for the main content.</p>
        <p>And another one.</p>

        <template v-slot:footer>
            <p>Here's some contact info</p>
        </template>
    </base-layout>
</div>
<script>

    Vue.component('base-layout',{
        template:`
            <div class="container">
              <header>
                <slot name="header"></slot>
              </header>
              <main>
                <slot></slot>
              </main>
              <footer>
                <slot name="footer"></slot>
              </footer>
            </div>
        `
    })

    var vue =new Vue({
        el:"#app",
        data:{

        },
    })
</script>
作用域插槽
自 2.6.0 起有所更新。已废弃的使用
slot-scopeattribute 的语法在这里。
有时让插槽内容能够访问子组件中才有的数据是很有用的。
- 插槽定义
为了让 user 在父级的插槽内容中可用,我们可以将 user 作为 slot 元素的一个 attribute 绑定上去
<span>
  <slot v-bind:user="user">
    {{ user.lastName }}
  </slot>
</span>
- 插槽内容
绑定在 <solt> 元素上的 attribute 被称为插槽 prop。现在在父级作用域中,我们可以使用带值的 v-slot 来定义我们提供的插槽 prop 的名字:
<current-user>
  <template v-slot:default="slotProps">
    {{ slotProps.user.firstName }}
  </template>
</current-user>
demo
<div id="app">
    <current-user :user="user">
        <template v-slot:default="slotProps">
            {{ slotProps.bindUser.firstName }}
        </template>
    </current-user>
    <current-user :user="user"></current-user>
</div>
<script>
    Vue.component('current-user',{
        props: ['user'],
        template:`
            <span>
              <slot v-bind:bindUser="user">
                {{ user.lastName }}
              </slot>
            </span>
        `
    })

    var vue = new Vue({
        el:"#app",
        data:{
            user:{
                firstName:"莫",
                lastName:"逸风",
            }
        }
    })
</script>
- 点赞
- 收藏
- 关注作者


评论(0)