三层架构完成增删改查篇章五

【摘要】 实现添加我们首先在Dao层也就是mapper层写出这个接口方法。package com.jgdabc.mapper;import com.jgdabc.pojo.Brand;import org.apache.ibatis.annotations.Delete;import org.apache.ibatis.annotations.Insert;import org.apache.iba...
实现添加
我们首先在Dao层也就是mapper层写出这个接口方法。
package com.jgdabc.mapper;

import com.jgdabc.pojo.Brand;
import org.apache.ibatis.annotations.Delete;
import org.apache.ibatis.annotations.Insert;
import org.apache.ibatis.annotations.Select;
import org.apache.ibatis.annotations.Update;

import java.util.List;

public interface BrandMapper {
    @Select("select * from tb_brand")
    List<Brand>selectAll();
    @Insert("insert into tb_brand values(null,#{brandName},#{companyName},#{ordered},#{description},#{status})")
    void add(Brand brand);
    @Select("select * from tb_brand where id = #{id}")
}
然后在service里面调用
 public void add(Brand brand)
    {
        SqlSession sqlSession = factory.openSession();
        BrandMapper mapper = sqlSession.getMapper(BrandMapper.class);
        mapper.add(brand);
        sqlSession.commit();
        sqlSession.close();
    }
记住我们的工具类封装。
package com.jgdabc.util;

import org.apache.ibatis.io.Resources;
import org.apache.ibatis.session.SqlSessionFactory;
import org.apache.ibatis.session.SqlSessionFactoryBuilder;

import java.io.IOException;
import java.io.InputStream;

public class SqlSessionFactoryUtils {

    private static SqlSessionFactory sqlSessionFactory;

    static {
        //静态代码块会随着类的加载而自动执行,且只执行一次

        try {
            String resource = "mybatis-config.xml";
            InputStream inputStream = Resources.getResourceAsStream(resource);
            sqlSessionFactory = new SqlSessionFactoryBuilder().build(inputStream);
        } catch (IOException e) {
            e.printStackTrace();
        }
    }


    public static SqlSessionFactory getSqlSessionFactory(){
        return sqlSessionFactory;
    }
}
然后我们需要写出这个添加的jsp
<%--
  Created by IntelliJ IDEA.
  User: jgdabc
  Date: 2022/5/11
  Time: 17:33
  To change this template use File | Settings | File Templates.
--%>
<%@ page contentType="text/html;charset=UTF-8" language="java" %>

<!DOCTYPE html>
<html lang="en">

<head>
    <meta charset="UTF-8">
    <title>添加品牌</title>
</head>
<body>
<h3>添加品牌</h3>
<form action="/brand-demo/addServlet" method="post"enctype="application/x-www-form-urlencoded">
    品牌名称:<input name="brandName"><br>
    企业名称:<input name="companyName"><br>
    排序:<input name="ordered"><br>
    描述信息:<textarea rows="5" cols="20" name="description"></textarea><br>
    状态:
    <input type="radio" name="status" value="0">禁用
    <input type="radio" name="status" value="1">启用<br>

    <input type="submit" value="提交">
</form>
</body>
</html>
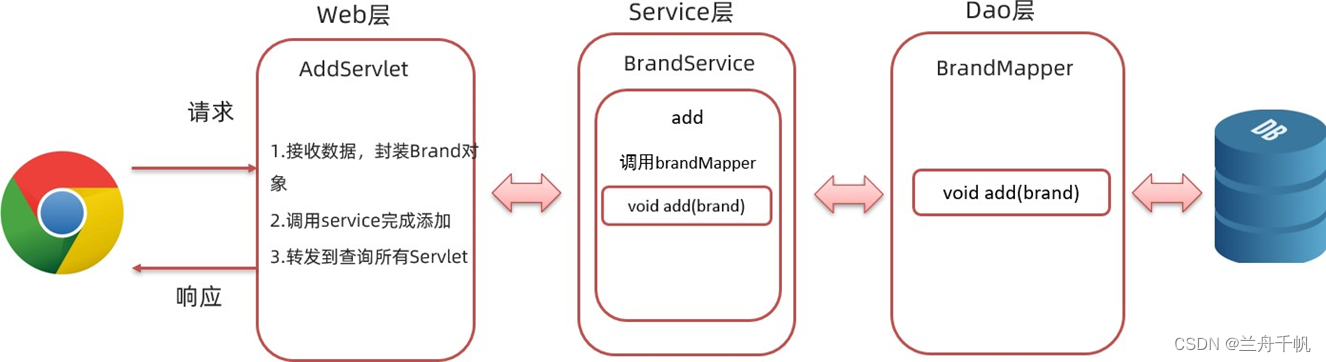
然后我们写这个Servlet。我们的Servlet从jsp前端获取到数据后我们再次回到查看全部数据的页面,这样可以查看到更新的数据。
package com.jgdabc.web;

import com.jgdabc.pojo.Brand;
import com.jgdabc.service.BrandService;

import javax.servlet.ServletException;
import javax.servlet.annotation.WebServlet;
import javax.servlet.http.HttpServlet;
import javax.servlet.http.HttpServletRequest;
import javax.servlet.http.HttpServletResponse;
import java.io.IOException;


@WebServlet("/addServlet")
public class AddServlet extends HttpServlet {
    private BrandService service = new BrandService();

    @Override
    protected void doGet(HttpServletRequest request, HttpServletResponse response) throws ServletException, IOException, IOException {
        //接收表单提交的数据,封装为brand对象
//        处理乱码问题
        request.setCharacterEncoding("utf-8");


        String brandName = request.getParameter("brandName");
        String companyName = request.getParameter("companyName");
        String ordered = request.getParameter("ordered");
        String description = request.getParameter("description");
        String status = request.getParameter("status");
        System.out.println("brandName"+brandName);
        //封装为一个Brand对象
        Brand brand = new Brand();
        brand.setBrandName(brandName);
        brand.setCompanyName(companyName);

        brand.setOrdered(Integer.parseInt(ordered));
        brand.setDescription(description);
        brand.setStatus(Integer.parseInt(status));
        service.add(brand);
//        转发到查询所有Servlet
        //request.getRequestDispatcher("/selectAllServlet").forward(request, response);
        response.sendRedirect("selectAllServlet");
        System.out.println("request");


    }

    @Override
    protected void doPost(HttpServletRequest request, HttpServletResponse response) throws ServletException, IOException {
        System.out.println("post");
       doGet(request, response);

    }
}
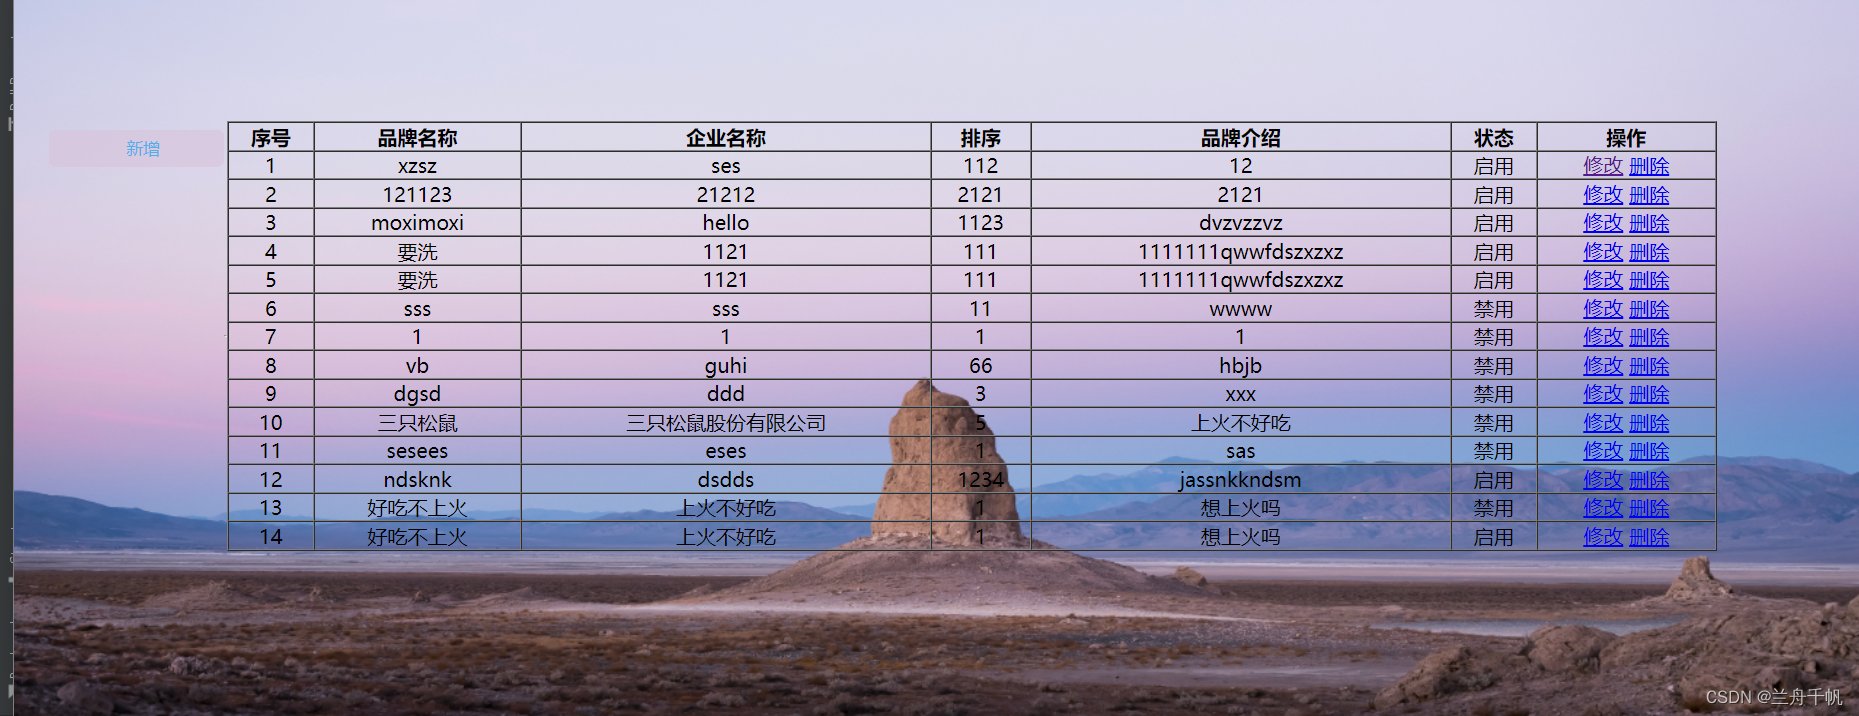
后面索性给brand.jsp加了个背景css。
属实比较丑陋
<%@ page contentType="text/html;charset=UTF-8" language="java" %>
<%@ taglib prefix="c" uri="http://java.sun.com/jsp/jstl/core" %>

<!DOCTYPE html>
<html lang="en">
<head>
    <meta charset="UTF-8">
    <title>Title</title>
    <link href="css/login.css" rel="stylesheet">
</head>
<body>
<input type="button" value="新增" id="add" style="margin-left: -100px;margin-top: -300px;color: #50afeb"><br>
<hr>
<table border="1" cellspacing="0" width="80%">

    <tr>

        <th>序号</th>
        <th>品牌名称</th>
        <th>企业名称</th>
        <th>排序</th>
        <th>品牌介绍</th>
        <th>状态</th>
        <th>操作</th>

    </tr>


    <c:forEach items="${brands}" var="brand" varStatus="status">
        <tr align="center">
            <%--<td>${brand.id}</td>--%>
            <td>${status.count}</td>
            <td>${brand.brandName}</td>
            <td>${brand.companyName}</td>
            <td>${brand.ordered}</td>
            <td>${brand.description}</td>
            <c:if test="${brand.status == 1}">
                <td>启用</td>
            </c:if>
            <c:if test="${brand.status != 1}">
                <td>禁用</td>
            </c:if>

            <td><a href="/brand-demo01/selectByIdServlet?id=${brand.id}">修改</a>
                <a href="/brand-demo01/selectDeleteServlet?id=${brand.id}">删除</a></td>

        </tr>

    </c:forEach>

</table>

<script>
    document.getElementById("add").onclick = function (){
        location.href = "/brand-demo01/addBrand.jsp";
    }

</script>
</body>
</html>
具体的css还是我们之前用过的css布局
* {
    margin: 0;
    padding: 0;
}

html {
    height: 100%;
    width: 100%;
    overflow: hidden;
    margin: 0;
    padding: 0;
    background: url(../imgs/Desert.jpg) no-repeat 0px 0px;
    background-repeat: no-repeat;
    background-size: 100% 100%;
    -moz-background-size: 100% 100%;
}

body {
    display: flex;
    align-items: center;
    justify-content: center;
    height: 100%;
}

#loginDiv {
    width: 37%;
    display: flex;
    justify-content: center;
    align-items: center;
    height: 300px;
    background-color: rgba(75, 81, 95, 0.3);
    box-shadow: 7px 7px 17px rgba(52, 56, 66, 0.5);
    border-radius: 5px;
}

#name_trip {
    margin-left: 50px;
    color: red;
}

p {
    margin-top: 30px;
    margin-left: 20px;
    color: azure;
}

input {
    margin-left: 15px;
    border-radius: 5px;
    border-style: hidden;
    height: 30px;
    width: 140px;
    background-color: rgba(216, 191, 216, 0.5);
    outline: none;
    color: #f0edf3;
    padding-left: 10px;
}
#username{
    width: 200px;
}
#password{
    width: 202px;
}
.button {
    border-color: cornsilk;
    background-color: rgba(100, 149, 237, .7);
    color: aliceblue;
    border-style: hidden;
    border-radius: 5px;
    width: 100px;
    height: 31px;
    font-size: 16px;
}

#subDiv {
    text-align: center;
    margin-top: 30px;
}
#loginMsg{
    text-align: center;color: aliceblue;
}
然后我们启动一下。

我们进行添加的话,可以在这里添加成功。

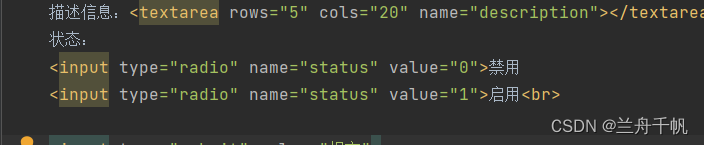
我们对启用禁用这样进行数据回显。我在添加这个jsp页面这样做。当我点击禁用的话,就给值为0,当我点击启用给值为1。然后这样提交给Servlet进行处理,然后在brand.jsp里面根据这些数值做一些回显。

【版权声明】本文为华为云社区用户原创内容,未经允许不得转载,如需转载请自行联系原作者进行授权。如果您发现本社区中有涉嫌抄袭的内容,欢迎发送邮件进行举报,并提供相关证据,一经查实,本社区将立刻删除涉嫌侵权内容,举报邮箱:
cloudbbs@huaweicloud.com
- 点赞
- 收藏
- 关注作者
评论(0)