Spring 从入门到精通 (六) 注入篇
关键词:Spring | 容器 | 注入详解
本专栏通过理论和实践相结合,系统学习框架核心思想及简单原理,原创不易,如果觉得文章对你有帮助,点赞收藏支持博主 ✨

一、环境搭建
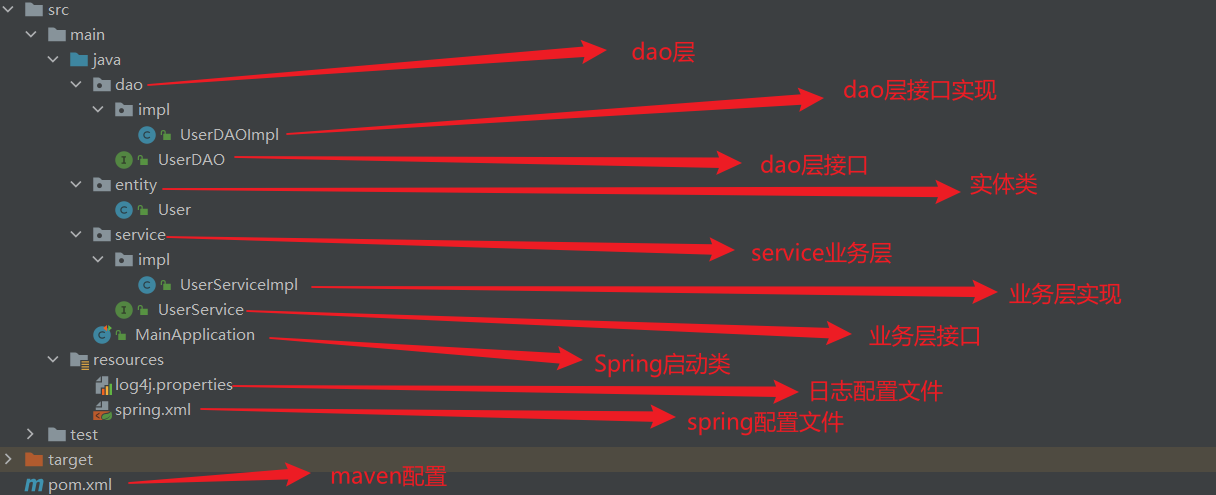
创建空maven项目,基础包结构如下:

pom.xml
<dependencies>
    <!--Spring IoC容器,负责实例化、配置和组装bean-->
    <dependency>
        <groupId>org.springframework</groupId>
        <artifactId>spring-context</artifactId>
        <version>5.1.10.RELEASE</version>
    </dependency>
    <!--lombok 自动生成标准Java类-->
    <dependency>
        <groupId>org.projectlombok</groupId>
        <artifactId>lombok</artifactId>
        <version>1.18.12</version>
        <scope>provided</scope>
    </dependency>
    <!--单元测试框架-->
    <dependency>
        <groupId>org.junit.jupiter</groupId>
        <artifactId>junit-jupiter</artifactId>
        <version>RELEASE</version>
        <scope>compile</scope>
    </dependency>
    <!--整合日志-->
    <dependency>
        <groupId>org.slf4j</groupId>
        <artifactId>slf4j-log4j12</artifactId>
        <version>1.7.15</version>
    </dependency>
    <dependency>
        <groupId>log4j</groupId>
        <artifactId>log4j</artifactId>
        <version>1.2.12</version>
    </dependency>
</dependencies>
- 1
- 2
- 3
- 4
- 5
- 6
- 7
- 8
- 9
- 10
- 11
- 12
- 13
- 14
- 15
- 16
- 17
- 18
- 19
- 20
- 21
- 22
- 23
- 24
- 25
- 26
- 27
- 28
- 29
- 30
- 31
- 32
- 33
log4j.properties
配置文件名是log4j.properties,不要写其他的
log4j.rootLogger=debug,console

log4j.appender.console=org.apache.log4j.ConsoleAppender
log4j.appender.console.Target=System.out
log4j.appender.console.layout=org.apache.log4j.PatternLayout
log4j.appender.console.layout.ConversionPattern=%d{MM-dd HH:mm:ss} %-5p %c{1}:%L - %m%n
- 1
- 2
- 3
- 4
- 5
- 6
二、什么是注入?
注入,Injection,通过Spring工厂和配置文件,为所创建对象的成员变量赋值
三、使用注入前,成员变量赋值
在com.liu包下创建实体类包dao,在com.liu.dao下创建类User并使用lombok
User
@Data
@NoArgsConstructor
@AllArgsConstructor
public class User {
    private String name;
    private Integer age;
    private char sex;
}
- 1
- 2
- 3
- 4
- 5
- 6
- 7
- 8
spring.xml
在spring配置文件中配置bean,交由工厂管理
<?xml version="1.0" encoding="UTF-8"?>
<beans xmlns="http://www.springframework.org/schema/beans"
       xmlns:xsi="http://www.w3.org/2001/XMLSchema-instance"
       xsi:schemaLocation="http://www.springframework.org/schema/beans http://www.springframework.org/schema/beans/spring-beans.xsd">

    <bean id="user" class="com.liu.dao.User"/>

</beans>
- 1
- 2
- 3
- 4
- 5
- 6
- 7
- 8
测试
在启动类中创建测试方法,启动测试
/**
 * 没有使用注入前,通过set为成员变量赋值
 */
@Test
public void test1() {
    ClassPathXmlApplicationContext context = new ClassPathXmlApplicationContext("/spring.xml");
    User xiaozang = (User) context.getBean("user");
    xiaozang.setName("小张");
    xiaozang.setAge(10);
    xiaozang.setSex('女');
    System.out.println(xiaozang);
}
- 1
- 2
- 3
- 4
- 5
- 6
- 7
- 8
- 9
- 10
- 11
- 12
User(name=小张, age=10, sex=女)
- 1
成功赋值,实现效果上没有任何问题,但是这样真的好吗?想想前面学到的耦合,这里的值写死在了程序中,如果想把年龄改为8岁,只能停止程序,找到源代码中赋值的这一块,修改了,再重启程序,显然耦合了,不符合预期。
所以Spring提出了注入这个概念,通过再配置文件配置成员变量的值实现赋值,实现解耦,程序的可维护性和代码可读性大大提升,下面就学习注入的具体写法。
四、体验Spring注入
使用Spring的注入,首先修改配置文件为如下:
<?xml version="1.0" encoding="UTF-8"?>
<beans xmlns="http://www.springframework.org/schema/beans"
       xmlns:xsi="http://www.w3.org/2001/XMLSchema-instance"
       xsi:schemaLocation="http://www.springframework.org/schema/beans http://www.springframework.org/schema/beans/spring-beans.xsd">

    <bean id="user" class="com.liu.dao.User">
        <property name="name" value="小张"/>
        <property name="age" value="10"/>
        <property name="sex" value="女"/>
    </bean>

</beans>
- 1
- 2
- 3
- 4
- 5
- 6
- 7
- 8
- 9
- 10
- 11
- 12
有点类似与html,使用双标签,因为里面有配置,注入使用<property>,其中有属性name是值准备赋值的成员变量名,value就是成员变量值,就这样就配置完成了,编写测试类
/**
 * 使用注入
 */
@Test
public void test2() {
    ClassPathXmlApplicationContext context = new ClassPathXmlApplicationContext("/spring.xml");
    User xiaozang = (User) context.getBean("user");
    System.out.println(xiaozang);
}
- 1
- 2
- 3
- 4
- 5
- 6
- 7
- 8
- 9
执行测试,使用注入成功赋值了
User(name=小张, age=10, sex=女)
- 1
现在如果想把小张的年龄改为8岁,我需要修改配置文件的这一行.
<property name="age" value="8"/>
- 1
再次启动程序,芜湖,起飞🛫
User(name=小张, age=8, sex=女)
- 1
五、注入的好处
解耦,代码可维护性提升,代码可读性变好
六、注入原理
通过配置文件,创建bean,并调用对象的set()方法完成属性的赋值在,也称这种注入方式为
set注入
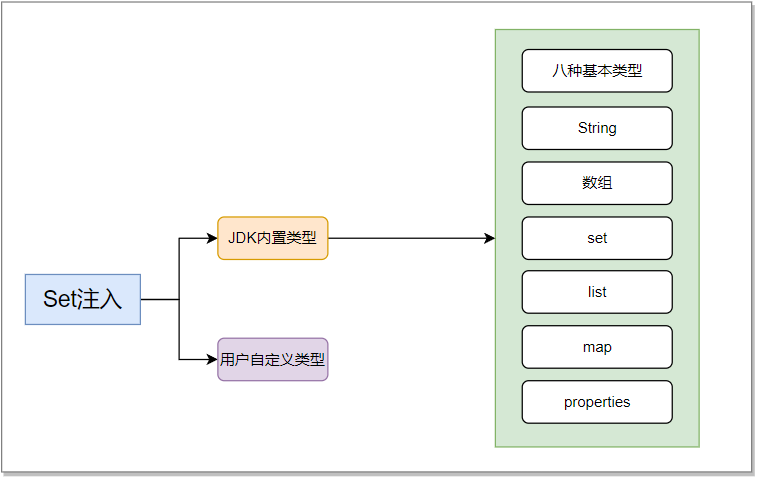
七、Set注入详解

7.1 定义
Spring通过调用set方法,通过配置文件为成员变量赋值
7.2 开发步骤
- 为成员变量提供set方法
- 在配置文件中完成注入
7.3 String
<property name="xx" value="xx"/>
- 1
7.4 八种基本类型
<property name="xx" value="xx"/>
- 1
7.5 数组
private String[] hobby;
- 1
<property name="hobby">
    <list>
        <value>写代码</value>
        <value>打游戏</value>
        <value>听歌</value>
    </list>
</property>
- 1
- 2
- 3
- 4
- 5
- 6
- 7
hobby=[写代码, 打游戏, 听歌]
- 1
7.6 Set
private Set<String> set;
- 1
<property name="set">
    <set>
        <value>set1</value>
        <value>set2</value>
        <value>set3</value>
    </set>
</property>
- 1
- 2
- 3
- 4
- 5
- 6
- 7
set=[set1, set2, set3]
- 1
7.7 List
private List<String> list;
- 1
<property name="list">
    <list>
        <value>l1</value>
        <value>l2</value>
        <value>l2</value>
    </list>
</property>
- 1
- 2
- 3
- 4
- 5
- 6
- 7
list=[l1, l2, l2]
- 1
7.8 Map
private Map<String,String> qqs;
- 1
<property name="qqs">
     <map>
         <entry>
             <key>
                 <value>23423</value>
             </key>
             <value>45</value>
         </entry>
         <entry>
             <key>
                 <value>79878</value>
             </key>
             <value>90890</value>
         </entry>
     </map>
 </property>
- 1
- 2
- 3
- 4
- 5
- 6
- 7
- 8
- 9
- 10
- 11
- 12
- 13
- 14
- 15
- 16
qqs={23423=45, 79878=90890}
- 1
7.9 properties
因为键和值都是String,所以省去了值的标签,直接写
private Properties properties;
- 1
<property name="properties">
    <props>
        <prop key="username">root</prop>
        <prop key="pwd">root</prop>
    </props>
</property>
- 1
- 2
- 3
- 4
- 5
- 6
properties={pwd=root, username=root}
- 1
八、自定义类型注入
实际开发中,service层需要dao层,因此要把dao层注入给service,使用Spring提供的set注入应怎么写呢?
先来完成基础架子,代码包结构如下图所示:

8.1 举例
UserDAO
public interface UserDAO {
    void save(String name,String pwd);
}
- 1
- 2
- 3
UserDOAImpl
public class UserDAOImpl implements UserDAO {
    @Override
    public void save(String name, String pwd) {
        System.out.println(name + "注册了,数据库新增");
    }
}
- 1
- 2
- 3
- 4
- 5
- 6
User
@Data
@NoArgsConstructor
@AllArgsConstructor
public class User {
    private String name;
    private String password;
}
- 1
- 2
- 3
- 4
- 5
- 6
- 7
UserService
public interface UserService {
    void save(String name,String pwd);
}
- 1
- 2
- 3
UserServiceImpl
public class UserServiceImpl implements UserService {
    @Override
    public void save(String name, String pwd) {
    }
}
- 1
- 2
- 3
- 4
- 5
现在,Service实现里什么都没写,本应该调用dao完成数据库操作,那么如果我们不使用new的方式,而是使用配置文件,该如何写呢?
第一步改写UserServiceImpl,把dao声明为成员变量,同时提供set方法并在save方法中调用dao完成持久层操作,改写后代码如下:
public class UserServiceImpl implements UserService {

    private UserDAO userDAO;

    public void setUserDAO(UserDAO userDAO) {
        this.userDAO = userDAO;
    }

    @Override
    public void save(String name, String pwd) {
        userDAO.save(name,pwd);
    }
}
- 1
- 2
- 3
- 4
- 5
- 6
- 7
- 8
- 9
- 10
- 11
- 12
- 13
第二步,在Spring配置文件中,配置bean并通过ref属性注入bean
<?xml version="1.0" encoding="UTF-8"?>
<beans xmlns="http://www.springframework.org/schema/beans"
       xmlns:xsi="http://www.w3.org/2001/XMLSchema-instance"
       xsi:schemaLocation="http://www.springframework.org/schema/beans http://www.springframework.org/schema/beans/spring-beans.xsd">
    <!--把dao交给工厂管理-->
    <bean id="userDAO" class="dao.impl.UserDAOImpl"/>
    <!--把Service交给工厂管理-->
    <bean id="userService" class="service.impl.UserServiceImpl">
        <!--把dao注入给Service,会调用set方法-->
        <property name="userDAO" ref="userDAO"/>
    </bean>
</beans>
- 1
- 2
- 3
- 4
- 5
- 6
- 7
- 8
- 9
- 10
- 11
- 12
第三步,编写测试用例,通过工厂获取Service层,调用save方法,看看能不能调用dao完成数据库的操作,如果可以,就说明我们成功通过配置完成了注入
public class MainApplication {
    @Test
    public void t1(){
        ClassPathXmlApplicationContext context = new ClassPathXmlApplicationContext("/spring.xml");
        UserService userService = context.getBean("userService", UserService.class);
        userService.save("小刘","123123");
    }
}
- 1
- 2
- 3
- 4
- 5
- 6
- 7
- 8
第四步,执行测试用例,可以看到成功调用了dao
小刘注册了,数据库新增

进程已结束,退出代码为 0
- 1
- 2
- 3
九、构造注入
9.1 定义
Spring调用构造方法,通过配置文件为成员变量赋值
9.2 开发步骤
- 提供有参构造
- 编写配置文件
User 实体类提供有参构造
给需要注入的成员变量使用构造参数构造
public class User {
    private String name;
    private String password;

    public User(String name, String password) {
        this.name = name;
        this.password = password;
    }

    @Override
    public String toString() {
        return "User{" +
                "name='" + name + '\'' +
                ", password='" + password + '\'' +
                '}';
    }
}
- 1
- 2
- 3
- 4
- 5
- 6
- 7
- 8
- 9
- 10
- 11
- 12
- 13
- 14
- 15
- 16
- 17
spring.xml 配置文件构造注入
不再使用property标签,使用constructor-arg标签,注入根据具体情况使用具体标签。
<bean id="user" class="entity.User">
    <constructor-arg value="小本"/>
    <constructor-arg value="12312312"/>
</bean>
- 1
- 2
- 3
- 4
编写执行测试用例
@Test
public void t2() {
    ClassPathXmlApplicationContext context = new ClassPathXmlApplicationContext("/spring.xml");
    User user = context.getBean("user", User.class);
    System.out.println(user);
}
- 1
- 2
- 3
- 4
- 5
- 6
看到成功注入
User{name='小本', password='12312312'}
- 1
9.3 构造重载
方法名相同,参数列表不同,参数个数不同,参数类型不同,参数顺序不同
9.3.1 参数个数不同
参数个数不同时,通过控制
constructor-arg标签数量进行区分
User
public class User {
    private String name;
    private String password;

    public User(String name) {
        this.name = name;
    }

    public User(String name, String password) {
        this.name = name;
        this.password = password;
    }

    @Override
    public String toString() {
        return "User{" +
                "name='" + name + '\'' +
                ", password='" + password + '\'' +
                '}';
    }
}
- 1
- 2
- 3
- 4
- 5
- 6
- 7
- 8
- 9
- 10
- 11
- 12
- 13
- 14
- 15
- 16
- 17
- 18
- 19
- 20
- 21
spring.xml
<bean id="user" class="entity.User">
    <constructor-arg value="AD"/>
</bean>
- 1
- 2
- 3
test
User{name='AD', password='null'}
- 1
9.3.2 参数个数相同时
通过在标签中引入 type 指定类型
<constructor-arg type="" value=""/>
User
public class User {
    private String name;
    private int password;

    public User(String name) {
        this.name = name;
    }

    public User(int password) {
        this.password = password;
    }

    @Override
    public String toString() {
        return "User{" +
                "name='" + name + '\'' +
                ", password='" + password + '\'' +
                '}';
    }
}
- 1
- 2
- 3
- 4
- 5
- 6
- 7
- 8
- 9
- 10
- 11
- 12
- 13
- 14
- 15
- 16
- 17
- 18
- 19
- 20
spring.xml
<bean id="user" class="entity.User">
    <!--指定给构造函数中类型为int的成员变量赋值-->
    <constructor-arg type="int" value="123123"/>
</bean>
- 1
- 2
- 3
- 4
test
@Test
public void t2() {
    ClassPathXmlApplicationContext context = new ClassPathXmlApplicationContext("/spring.xml");
    User user = context.getBean("user", User.class);
    System.out.println(user);
}
- 1
- 2
- 3
- 4
- 5
- 6
User{name='null', password='123123'}
- 1
十、总结
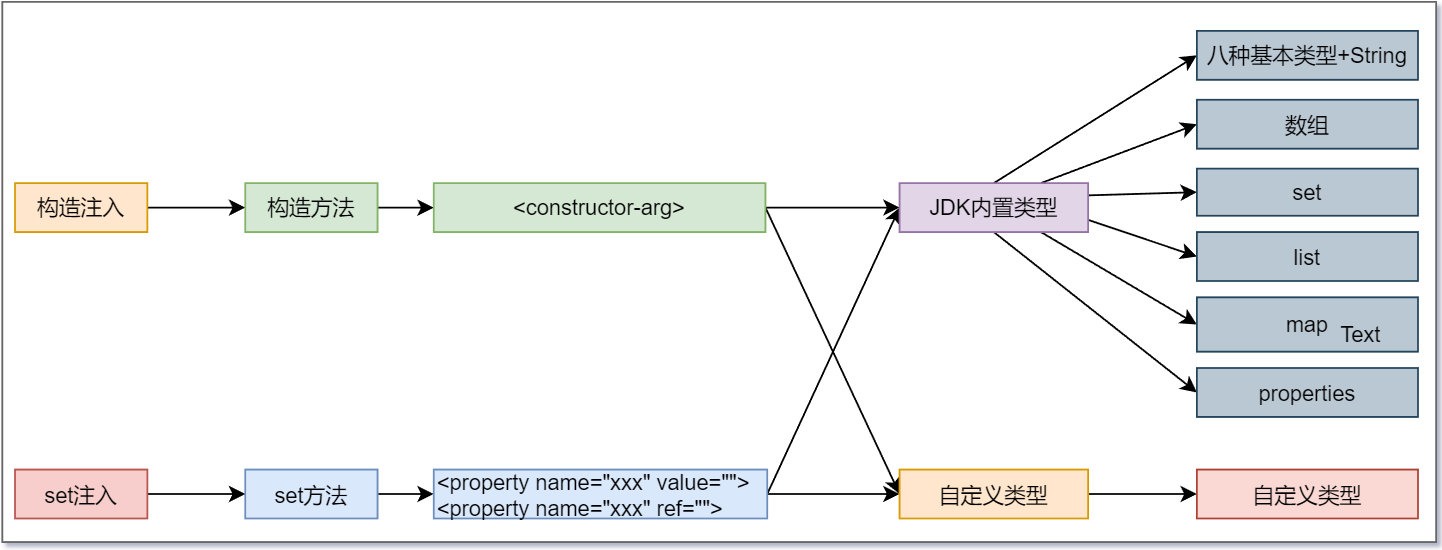
10.1 set注入和构造注入怎么选择呢?
set注入使用较多,因为构造注入重载麻烦
10.2 总结图

十一、写在最后
座右铭:不要在乎别人如何看你,要在乎你自己如何看未来,看梦想,看世界…!
一起学习的可以私信博主或添加博主微信哦。
文章来源: blog.csdn.net,作者:王子周棋洛,版权归原作者所有,如需转载,请联系作者。
原文链接:blog.csdn.net/m0_53321320/article/details/125861780
- 点赞
- 收藏
- 关注作者


评论(0)