金鱼哥RHCA回忆录:DO447使用Ansible与API通信--使用Ansible剧本与Api交互
🎹 个人简介:大家好,我是 金鱼哥,CSDN运维领域新星创作者,华为云·云享专家
📚个人资质:CCNA、HCNP、CSNA(网络分析师),软考初级、中级网络工程师、RHCSA、RHCE、RHCA、RHCI、ITIL😜
💬格言:努力不一定成功,但要想成功就必须努力🔥🎈支持我:可点赞👍、可收藏⭐️、可留言📝
📜11.2.1 与API交互
Red Hat Ansible Engine可以与服务提供的任何HTTP API交互,包括RESTful API。由于各种原因,可能需要这种交互。例如,该服务可能位于运行Ansible托管系统的网络的外部,可能没有特定的Ansible模块来与该服务交互,或者Ansible模块可能没有公开所需的功能。
为了访问这些api, Ansible提供了uri模块。该模块连接到一个给定的URL,控制连接的参数并对响应进行操作。唯一需要的参数是url,表示要连接的HTTP或HTTPS完整url。
这是一个使用uri模块的非常简单的示例任务:
- name: Check that the page is reachable and returns a status 200 using GET
  uri:
    url: http://www.example.com
但是,通常必须为Ansible模块指定method参数,该参数用于指定用于连接到服务器的HTTP方法。method参数最method的选项是:
📑GET
方法从由请求的URL标识的服务获取实体。这是默认值。
📑POST
请求服务将请求体中包含的实体存储在URL所标识的资源下。
📑PUT
请求服务将在请求体中发送的实体存储为URL标识的资源,如果存在则修改它。
📑DELETE
删除由请求的URL标识的服务中的实体。
📑PATCH
用正文中的值修改由请求URL标识的实体。只有修改后的值必须在主体中。
控制如何连接到服务的下一个选项使用headers参数。此参数是一个字典,可以将自定义HTTP头添加到请求中。例如:
headers:
  Cookie: type=Test
下面是一个更高级的示例,使用到目前为止介绍的参数:
- name: Get an entity and set a Cookie
  uri:
    url: https://example.com/entity/1
    method: GET
    headers:
      Cookie: type=TEST
📜11.2.2 将信息发送到API
既然知道了如何调用API,就可以开始向任何API发送信息了。发送此信息有两个互斥的参数:src和body。
src选项指向一个包含您想要发出的HTTP请求主体的文件。或者,您可以使用body选项,它用YAML语法在剧本中定义HTTP请求的正文。
根据接收服务期望的格式,您可能需要使用参数body_format。该参数的选项有:raw、json和form-urlencoded。对于REST api,使用json, 对于传统的基于表单的页面,使用form-urlencoded。
例如,登录到一个服务可以通过以下方法实现:
- name: Login to a form-based webpage
  uri:
    url: https://example.com/login.php
    method: POST
    body_format: form-urlencoded
    body:
      name: your_username
      password: your_password
      enter: Sign in
📜11.2.3 处理API的响应
任何HTTP服务返回的第一种信息是响应的状态代码。使用status _code选项告诉uri模块您期望成功时的状态代码。如果响应中的状态码不同,任务将失败。
其次,您必须处理响应本身。
如果您想将响应保存为一个文件,请使用dest参数指定该文件。
要在剧本中使用响应,请使用return_content选项来指示应该将响应体添加到结果字典中。使用register将其保存在一个变量中。
这里你可以看到一个如何使用请求响应的例子:
- name: Check the contents of the response
  uri:
    url: http://www.example.com
  return_content: yes
  register: response
  failed_when: "'SUCCESS' not in response.content"
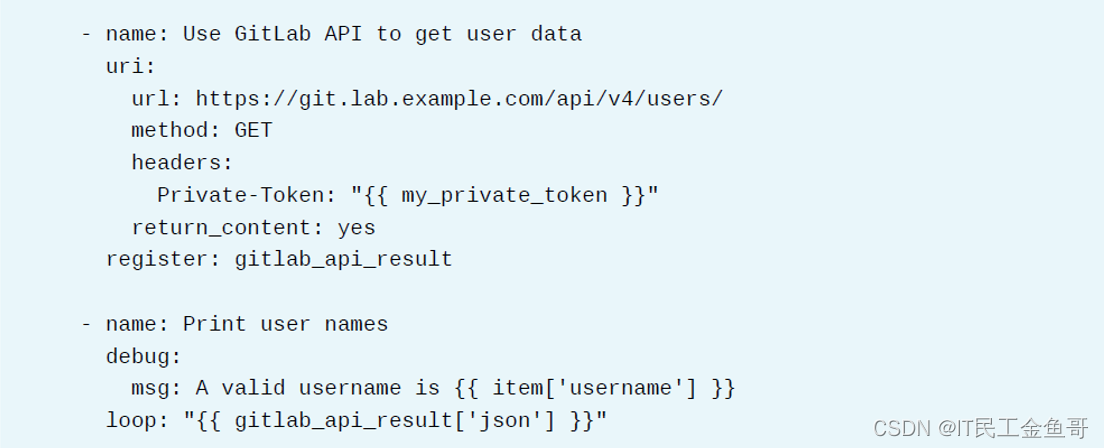
下面是另一个实际示例,它将GitLab APlv4调用返回的数据解析为Ansible中的变量。变量my_private_ token是在GitLab接口中设置的个人访问令牌,可能是从Ansible Vault保护的文件加载到剧本中。API调用返回的JSON是一个字典列表,其中每个字典包含一个用户的信息:关键用户名包含用户的用户名。

📜11.2.4 HTTP安全性设置
uri模块还支持Digest,、Basic或WSSE身份验证,可以通过使用url_username和url_password参数来控制。如果远程服务支持基本身份验证,但此模块身份验证失败,则使用force_basic_auth参数尝试强制基本身份验证。
一个更安全的选项是使用私钥建立到服务器的安全连接。使用client_cert参数参考PEM证书链文件。如果证书链文件不包含密钥,则使用client_key参数将模块指向存储密钥的文件。
最后,如果必须避免TLS证书验证,则将validate_certs参数设置为false。此设置会降低连接的安全性。
📜11.2.5 使用过滤器准备和解析数据
在前面的章节中,您已经看到了如何使用过滤器来转换数据。在处理HTTP和REST api时,有几个过滤器非常有用。
url支持US-ASCIl字符集的一个有限子集。要确保URL被正确编码,请使用urlencode过滤器。

to_json和from_json过滤器在封送数据到API和从API封送数据时也很有用。
xml模块还可以与过滤器一起用于处理来自某些API的数据。
📜11.2.6 课本练习
[student@workstation ~]$ lab api-interaction start
📑1. 按要求拉取实验代码。
[student@workstation ~]$ cd git-repos/
[student@workstation git-repos]$ git clone http://git.lab.example.com:8081/git/api-interaction.git
[student@workstation git-repos]$ cd api-interaction
📑2. 查看对应的清单文件
[student@workstation api-interaction]$ cat inventory.yml
tower:                      # 主机组
  hosts:
    tower.lab.example.com:
  vars:
    template_name: DEV ftpservers setup              # 已存在模板的名称
    copy_template_name: Exact copy of DEV ftpservers setup     # 要创建的模板的名称
    tower_fqdn: tower.lab.example.com                    # API URL
    tower_user: admin
    tower_password: redhat
📑3. 修改tower_copy_template.yml 剧本。
添加任务以复制和启动作业模板。为了方便,可以在~/DO447/solutions/api-interaction/目录下找到已经编辑过的文件。
[student@workstation api-interaction]$ cp -iv ~/DO447/solutions/api-interaction/tower_copy_template.yml  .
[student@workstation api-interaction]$ ansible-playbook tower_copy_template.yml --syntax-check

playbook: tower_copy_template.yml

[student@workstation api-interaction]$ ansible-playbook tower_copy_template.yml
注意:
tower_copy_template.yml 的剧本不是幂等的。如果出现错误,模板被错误地创建了,请在再次运行修正后的剧本之前删除模板。
📑4. 修改tower_add_survey.yml剧本将一个调查添加到作业模板并激活它。
为了方便,可以在~/DO447/solutions/api-interaction/ 目录下找到已经编辑过的文件。
[student@workstation api-interaction]$ cp -iv ~/DO447/solutions/api-interaction/tower_add_survey.yml  .
cp: overwrite './tower_add_survey.yml'? y
'/home/student/DO447/solutions/api-interaction/tower_add_survey.yml' -> './tower_add_survey.yml'

[student@workstation api-interaction]$ ansible-playbook tower_add_survey.yml --syntax-check

playbook: tower_add_survey.yml
[student@workstation api-interaction]$ ansible-playbook tower_add_survey.yml
PLAY [Using the uri module to add a survey] **************************************************

TASK [Add a survey to the existing Job Template using the uri module] *************************
ok: [tower.lab.example.com]

TASK [Enable the survey] ***************************************************************
ok: [tower.lab.example.com]

PLAY RECAP *****************************************************************************
tower.lab.example.com      : ok=2    changed=0    unreachable=0    failed=0    skipped=0    rescued=0    ignored=0

[student@workstation api-interaction]$ ansible-playbook tower_add_survey.yml --tags with_variable

📑5. 修改tower_template_cleanup.yml剧本删除复制的模板。
为了方便,可以在~/DO447/solutions/api-interaction/目录下找到已经编辑过的文件。
[student@workstation api-interaction]$ cp -iv ~/DO447/solutions/api-interaction/tower_template_cleanup.yml .
cp: overwrite './tower_template_cleanup.yml'? y
'/home/student/DO447/solutions/api-interaction/tower_template_cleanup.yml' -> './tower_template_cleanup.yml'
[student@workstation api-interaction]$ ansible-playbook tower_template_cleanup.yml --syntax-check

playbook: tower_template_cleanup.yml
[student@workstation api-interaction]$ ansible-playbook tower_template_cleanup.yml
📑6. 更新代码。
[student@workstation api-interaction]$ git add .
[student@workstation api-interaction]$ git commit -m "Tower API interaction"
[student@workstation api-interaction]$ git push
📑7. 清空实验
[student@workstation ~]$ lab api-interaction finish
📜11.3 章节实验
[student@workstation ~]$ lab api-review start
📑1. 拉取实验代码。
[student@workstation ~]$ cd /home/student/git-repos
[student@workstation git-repos]$ git clone \
http://git.lab.example.com:8081/git/api-review.git
[student@workstation git-repos]$ cd api-review
📑2. 按要求,创建模板副本。
使用Ansible uri模块,使用Ansible Tower REST API创建一个现有的New模板Job模板的副本。要创建剧本,请使用本课程中的变量、过滤器和任何其他适用的Ansible最佳实践。
使用以下名称和位置来修改现有的剧本和清单。注意,名称是区分大小写的。
[student@workstation api-review]$ vim inventory.yml
tower:
  hosts:
    tower.lab.example.com:
  vars:
    template_name: New template
    copy_template_name: Review template
    tower_fqdn: tower.lab.example.com
    tower_user: simon
    tower_password: redhat123
[student@workstation api-review]$ vim copy_template.yml
---
- name: Using the uri module to connect to tower
  hosts: tower
  gather_facts: false

  tasks:
    - name: Copy the existing New template using the uri module
      uri:
        url: "https://{{ tower_fqdn }}/api/v2/job_templates/{{ template_name | urlencode }}/copy/"
        validate_certs: no
        method: POST
        return_content: yes
        force_basic_auth: yes
        user: "{{ tower_user }}"
        password: "{{ tower_password }}"
        status_code: [201, 202]
        body:
          name: "{{ copy_template_name }}"
        body_format: json
📑3. 执行剧本。
[student@workstation api-review]$ ansible-playbook copy_template.yml

📑4. 修改提供的template_cleanup.yml的剧本删除原来的新模板模板。
使用DELETE方法。
[student@workstation api-review]$ vim template_cleanup.yml
---
- name: Using the uri module to delete a Job Template
  hosts: tower
  gather_facts: false

  tasks:
    - name: Delete an existing Ansible Tower Job Template using the uri module
      uri:
        url: "https://{{ tower_fqdn }}/api/v2/job_templates/{{ template_name | urlencode }}/"
        validate_certs: no
        method: DELETE
        return_content: yes
        force_basic_auth: yes
        user: "{{ tower_user }}"
        password: "{{ tower_password }}"
        status_code: 204
📑5. 执行剧本。
[student@workstation api-review]$ ansible-playbook template_cleanup.yml
📑6. 上传代码。
[student@workstation data-review]$ git status
[student@workstation data-review]$ git add --all
[student@workstation data-review]$ git commit -m "Updated review playbooks"
[student@workstation data-review]$ git push
📑7. 评分与清楚实验。
[student@workstation ~]$ lab api-review grade
[student@workstation ~]$ lab api-review finish
💡总结
RHCA认证需要经历5门的学习与考试,还是需要花不少时间去学习与备考的,好好加油,可以噶🤪。

以上就是【金鱼哥】对 第十一章 使用Ansible与API通信–使用Ansible剧本与Api交互 的简述和讲解。希望能对看到此文章的小伙伴有所帮助。
💾红帽认证专栏系列:
RHCSA专栏:戏说 RHCSA 认证
RHCE专栏:戏说 RHCE 认证
此文章收录在RHCA专栏:RHCA 回忆录
如果这篇【文章】有帮助到你,希望可以给【金鱼哥】点个赞👍,创作不易,相比官方的陈述,我更喜欢用【通俗易懂】的文笔去讲解每一个知识点。
如果有对【运维技术】感兴趣,也欢迎关注❤️❤️❤️ 【金鱼哥】❤️❤️❤️,我将会给你带来巨大的【收获与惊喜】💕💕!

- 点赞
- 收藏
- 关注作者


评论(0)