利用python,20行代码即可实现照片墙,还可以生成爱心形状哟

【摘要】
照片,可以勾起无限零零碎碎的回忆,或美好,或悲伤。
将零零散散的回忆连接在一起,便是一段难以忘怀的往事。
今天就带给大家一种把多张照片集合成一张“照片墙”的方法,包学包会,注释非常全面哦~😄
开...

照片,可以勾起无限零零碎碎的回忆,或美好,或悲伤。
将零零散散的回忆连接在一起,便是一段难以忘怀的往事。
今天就带给大家一种把多张照片集合成一张“照片墙”的方法,包学包会,注释非常全面哦~😄
- 开始前,需要安装pillow库
pip install pillow
- 1
🍓照片素材
如果你有很多图片的话,可以自己设置一下。
没有的话,也不用担心呀,博主写好了一个爬虫,可以爬取根据你想要的分辨率爬取漂亮姐姐的照片,赶紧去看看吧😆
🍉普通照片墙
# -*- coding: UTF-8 -*-
"""
# @Time: 2021/8/21 20:11
# @Author: 远方的星
# @CSDN: https://blog.csdn.net/qq_44921056
"""
import os
from PIL import Image
from PIL import ImageFile
# 跳过“损坏”图片
ImageFile.LOAD_TRUNCATED_IMAGES = True
# 读取文件内部文件名,并生成一个列表
image_list = os.listdir("D:/极简壁纸")
# 定义一个参数,有助于行、列的确定
lines = 10
# 定义照片墙中每一张图片的宽和高
image_width = 192
image_height = 108
# 定义一个照片墙的大小
image_wall = Image.new("RGB", (image_width*lines, image_height*lines))
# 定义两个参数用于记录坐标
x = 0
y = 0
# 这里的范围注意,要与image_wall相匹配,应该是10*10
for i in range(0, lines**2):
    # 读取每一张素材图片
    image = Image.open("D:/极简壁纸/" + image_list[i])
    # 对素材图片进行重新设定大小
    image = image.resize((image_width, image_height))
    # 把素材图片放到照片墙的相应位置
    image_wall.paste(image, (x*image_width, y*image_height))
    # 按行摆放图片
    x += 1
    if x == lines:
        x = 0
        y += 1
    # 按列摆放图片
    # y += 1
    # if y == lines
    #     y = 0
    #     x += 1
# 展示图片
image_wall.show()
# 保存图片
image_wall.save("D:/image_wall.png")
print("照片墙保存完成啦^_^")
- 1
- 2
- 3
- 4
- 5
- 6
- 7
- 8
- 9
- 10
- 11
- 12
- 13
- 14
- 15
- 16
- 17
- 18
- 19
- 20
- 21
- 22
- 23
- 24
- 25
- 26
- 27
- 28
- 29
- 30
- 31
- 32
- 33
- 34
- 35
- 36
- 37
- 38
- 39
- 40
- 41
- 42
- 43
- 44
- 45
- 46
🍑心形照片墙
为了能够更好体现出心形效果,可以先模拟涂色,我这里是利用wps的表格,模拟照片墙效果
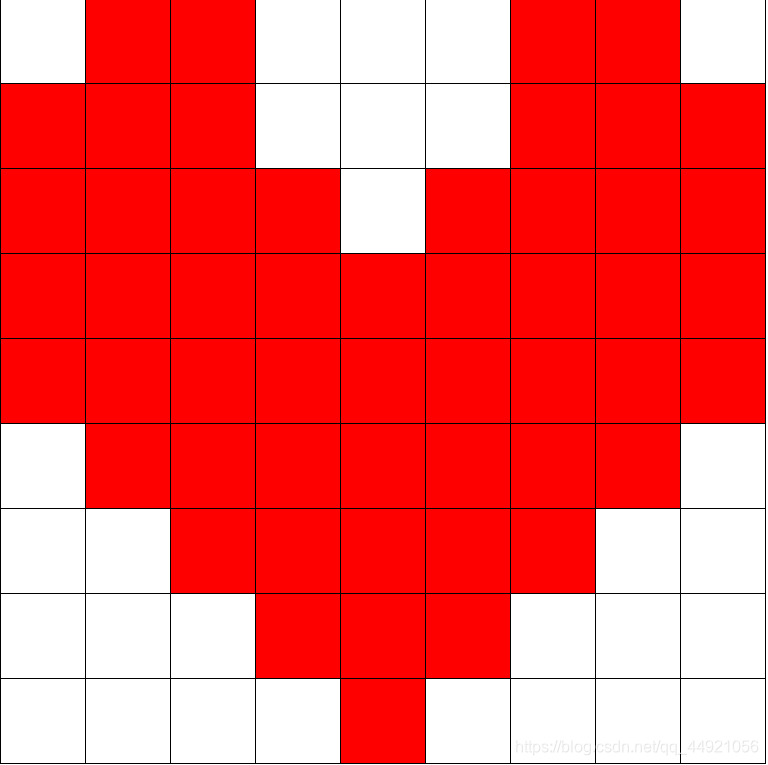
心形不像上面标准的照片墙容易计算,但也是有迹可循。后四行的涂色部分数量是一个等差数列,中间有两行涂满了,最上面三行单独判断就可以了。
于是,可以写一个判断函数:
def images_position(x, y):
    if x == 0 and y in [1, 2, 6, 7]:
        return True
    elif x == 1 and y not in [3, 4, 5]:
        return True
    elif x == 2 and y != 4:
        return True
    elif x in [3, 4]:
        return True
    elif x >= 5 and (x - 5) < y < (13 - x):
        return True
- 1
- 2
- 3
- 4
- 5
- 6
- 7
- 8
- 9
- 10
- 11
然后,我们先创建一个空的画布,然后规定每张图片的固定尺寸为192x192,然后我们按照红框的计算,动态填充图片或者白色的幕布。
- 🍈代码如下:
# -*- coding: UTF-8 -*-
"""
# @Time: 2021/8/21 21:46
# @Author: 远方的星
# @CSDN: https://blog.csdn.net/qq_44921056
"""
from PIL import Image
from PIL import ImageFile

# 跳过“损坏”图片
ImageFile.LOAD_TRUNCATED_IMAGES = True


# 用于判断哪里放图片,哪里放空白图像
def images_position(x, y):
    if x == 0 and y in [1, 2, 6, 7]:
        return True
    elif x == 1 and y not in [3, 4, 5]:
        return True
    elif x == 2 and y != 4:
        return True
    elif x in [3, 4]:
        return True
    elif x >= 5 and (x - 5) < y < (13 - x):
        return True


# 定义正方形照片墙的边长
lines = 9
# 定义一个新的照片墙
heart_image = Image.new('RGB', (192 * lines, 192 * lines))
# 定义宽和高两个参数
row = col = 0
for side in range(lines * lines):
    # 判断该放图片还是空白图
    if images_position(col, row):
        # 读取图像,这里素材是用爬虫爬取的,命名已经有规律了,直接读取
        img = Image.open("D:/极简壁纸/{}.png".format(side+1))
        # 调整图片大小
        img = img.resize((192, 192), Image.ANTIALIAS)
    else:
        # 空白图像
        img = Image.new("RGB", (192, 192), (255, 255, 255))
    # 往照片墙上粘贴照片
    heart_image.paste(img, (row * 192, col * 192))
    col += 1
    if col == lines:
        col = 0
        row += 1
    # 行数等于列数,跳出循环
    if row == col == lines:
        break
heart_image.show()
heart_image.save("D:/heart_image.png")
- 1
- 2
- 3
- 4
- 5
- 6
- 7
- 8
- 9
- 10
- 11
- 12
- 13
- 14
- 15
- 16
- 17
- 18
- 19
- 20
- 21
- 22
- 23
- 24
- 25
- 26
- 27
- 28
- 29
- 30
- 31
- 32
- 33
- 34
- 35
- 36
- 37
- 38
- 39
- 40
- 41
- 42
- 43
- 44
- 45
- 46
- 47
- 48
- 49
- 50
- 51
- 52
- 53
- 54
- 🍋效果如下:
如果对你有帮助,记得点个赞👍哟,也是对作者最大的鼓励🙇♂️。
如有不足之处可以在评论区👇多多指正,我会在看到的第一时间进行修正
作者:远方的星
CSDN:https://blog.csdn.net/qq_44921056
本文仅用于交流学习,未经作者允许,禁止转载,更勿做其他用途,违者必究。
文章来源: luckystar.blog.csdn.net,作者:爱打瞌睡的CV君,版权归原作者所有,如需转载,请联系作者。
原文链接:luckystar.blog.csdn.net/article/details/119850851

【版权声明】本文为华为云社区用户转载文章,如果您发现本社区中有涉嫌抄袭的内容,欢迎发送邮件进行举报,并提供相关证据,一经查实,本社区将立刻删除涉嫌侵权内容,举报邮箱:
cloudbbs@huaweicloud.com
- 点赞
- 收藏
- 关注作者
评论(0)