Android 自定义UI 实战 03 RecyclerView 吸顶 仿微信好友列表

【摘要】 Android 自定义UI 实战 03 RecyclerView 吸顶@TOC 前言使用纯代码 加 注释的方式,可以更快的理解源码如果你喜欢,请点个赞,后期会不断的深入讲解 一、吸顶效果准备工作在绘制吸顶效果之前,需要先实现一个RecyclerView功能列表 1、创建item,和item 实现新建一个item 的Layout 文件<?xml version="1.0" encoding=...
Android 自定义UI 实战 03 RecyclerView 吸顶
@TOC
前言
使用纯代码 加 注释的方式,可以更快的理解源码
如果你喜欢,请点个赞,后期会不断的深入讲解
一、吸顶效果准备工作
在绘制吸顶效果之前,需要先实现一个RecyclerView功能列表
1、创建item,和item 实现
新建一个item 的Layout 文件
<?xml version="1.0" encoding="utf-8"?>
<RelativeLayout xmlns:android="http://schemas.android.com/apk/res/android"
    xmlns:tools="http://schemas.android.com/tools"
    android:layout_width="match_parent"
    android:layout_height="match_parent">

    <TextView
        android:id="@+id/user_name"
        android:text="姓名"
        android:gravity="center"
        android:layout_width="match_parent"
        android:layout_height="44dp"
        android:textSize="20sp"
        tools:ignore="MissingConstraints" />

</RelativeLayout>
在 RecyclerView 中引用item
<?xml version="1.0" encoding="utf-8"?>
<LinearLayout xmlns:android="http://schemas.android.com/apk/res/android"
    xmlns:app="http://schemas.android.com/apk/res-auto"
    xmlns:tools="http://schemas.android.com/tools"
    android:layout_width="match_parent"
    android:layout_height="match_parent"
    tools:context=".MainActivity">

    <androidx.recyclerview.widget.RecyclerView
        android:id="@+id/main_rv"
        android:layout_width="match_parent"
        android:layout_height="match_parent"
        tools:listitem="@layout/item"
        />

</LinearLayout>
2、创建一个 Star
public class Star {

    String userName;
    String groupName;

    public String getUserName() {
        return userName;
    }

    public void setUserName(String userName) {
        this.userName = userName;
    }

    public String getGroupName() {
        return groupName;
    }

    public void setGroupName(String groupName) {
        this.groupName = groupName;
    }


    public Star(String userName, String groupName) {
        this.userName = userName;
        this.groupName = groupName;
    }

}
3、创建一个 StarAdapter
在StarAdapter 中实现 RecyclerView 功能
public class StarAdapter extends RecyclerView.Adapter<StarAdapter.StarViewHolder> {

    private Context mContext;
    private List<Star> starList;
    private LayoutInflater inflater;


   public StarAdapter(Context context, List<Star> stars){
        this.mContext = context;
        this.starList = stars;
        this.inflater = LayoutInflater.from(mContext);
    }

    @NonNull
    @Override
    public StarViewHolder onCreateViewHolder(@NonNull ViewGroup parent, int viewType) {
        View view =  inflater.inflate(R.layout.item, null);

        return new StarViewHolder(view);
    }

    @Override
    public void onBindViewHolder(@NonNull StarViewHolder holder, int position) {

        holder.textView.setText(starList.get(position).getUserName());

       if (position %2 == 0){
           holder.textView.setBackgroundColor(Color.YELLOW);
       }else {
           holder.textView.setBackgroundColor(Color.RED);
       }

    }


    @Override
    public int getItemCount() {
        return starList.size();
    }

    public class StarViewHolder extends RecyclerView.ViewHolder {

       private TextView textView;

        public StarViewHolder(@NonNull View itemView) {
            super(itemView);

            textView = itemView.findViewById(R.id.user_name);
        }
    }
}
4、Activity 完整代码
public class MainActivity extends AppCompatActivity {

    private RecyclerView recyclerView;
    private StarAdapter starAdapter;
    private List<Star> starList;

    @Override
    protected void onCreate(Bundle savedInstanceState) {
        super.onCreate(savedInstanceState);
        setContentView(R.layout.activity_main);

        init();

        recyclerView = findViewById(R.id.main_rv);
        starAdapter = new StarAdapter(this, starList);
        recyclerView.setLayoutManager(new LinearLayoutManager(this));
        recyclerView.setAdapter(starAdapter);

    }

    private void init(){
        starList = new ArrayList<>();
        for (int i = 0; i < 4; i++) {
            for (int j = 0; j < 20; j++) {
                if (i % 2 ==0){
                    starList.add(new Star("小明" + j, "快乐家族" + i));
                }else {
                    starList.add(new Star("王美丽" + j, "嗨嗨家族" + i));
                }

            }
        }
    }
}
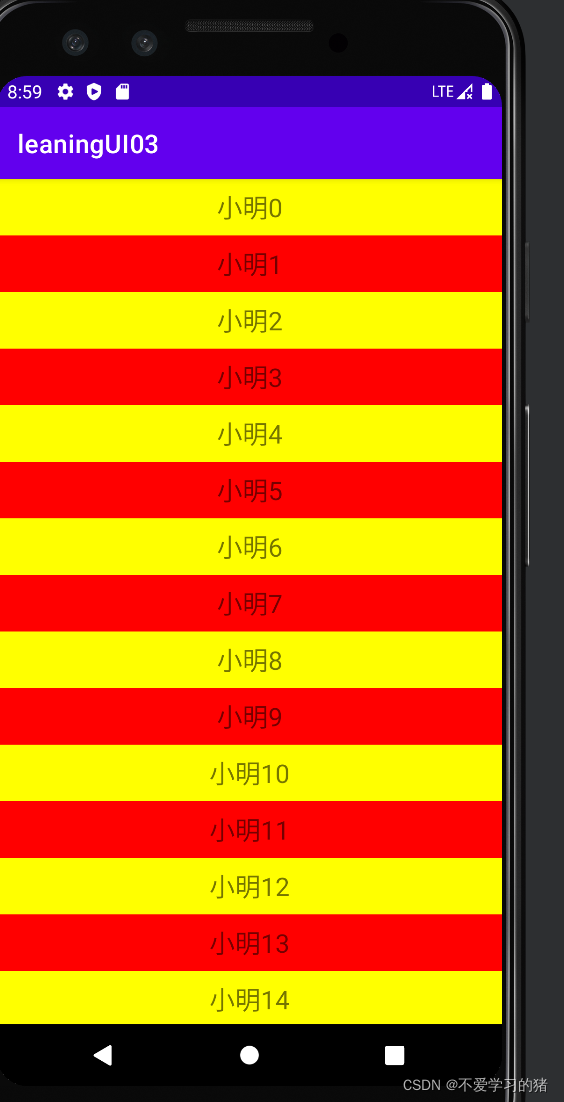
上面源码中,我写了一个嵌套的for 循环,用来实现数据的赋值,显示为4组,每组组20条数据。代码运行效果如下:
二、吸顶功能实现
1、自定义 ItemDecoration
在 StarDecoration 中,我写了一个分辩率的转换方法
public class StarDecoration extends RecyclerView.ItemDecoration {

    /**
     * 分辩率
     * @param context
     * @param dpValue
     * @return
     */
    private int dp2px(Context context, float dpValue){
        return (int) TypedValue.applyDimension(TypedValue.COMPLEX_UNIT_DIP, dpValue,
                context.getResources().getDisplayMetrics());
    }

}
2、StarDecoration 初始化
  //    分组栏的高度
    private int headerHeight;
    private int valueHeight = 50;

    private Paint headPaint;
    private Paint drawTextPaint;

    private Rect textRect;

    public StarDecoration(Context context){
        //    顶部吸顶栏的高度
        headerHeight = dp2px(context, valueHeight);

//        每一组的头部的Paint
        headPaint = new Paint();
        headPaint.setColor(Color.RED);

        drawTextPaint = new Paint();
        drawTextPaint.setColor(Color.YELLOW);
        drawTextPaint.setTextSize(50);

        textRect = new Rect();
    }
3、重写 getItemOffsets() 方法
ItemDecoration 想要绘制的话,就必须得重写 getItemOffsets() 方法。代码如下
    @Override
    public void getItemOffsets(@NonNull Rect outRect, @NonNull View view,
                               @NonNull RecyclerView parent, @NonNull RecyclerView.State state) {
        super.getItemOffsets(outRect, view, parent, state);

//        绑定自己的 Adapter
        if (parent.getAdapter() instanceof StarAdapter){
            StarAdapter starAdapter = (StarAdapter) parent.getAdapter();
//            当前item 的位置
            int position = parent.getChildLayoutPosition(view);

//            分割线预留的空间
            outRect.set(10, 10, 0, 0);
        }
    }
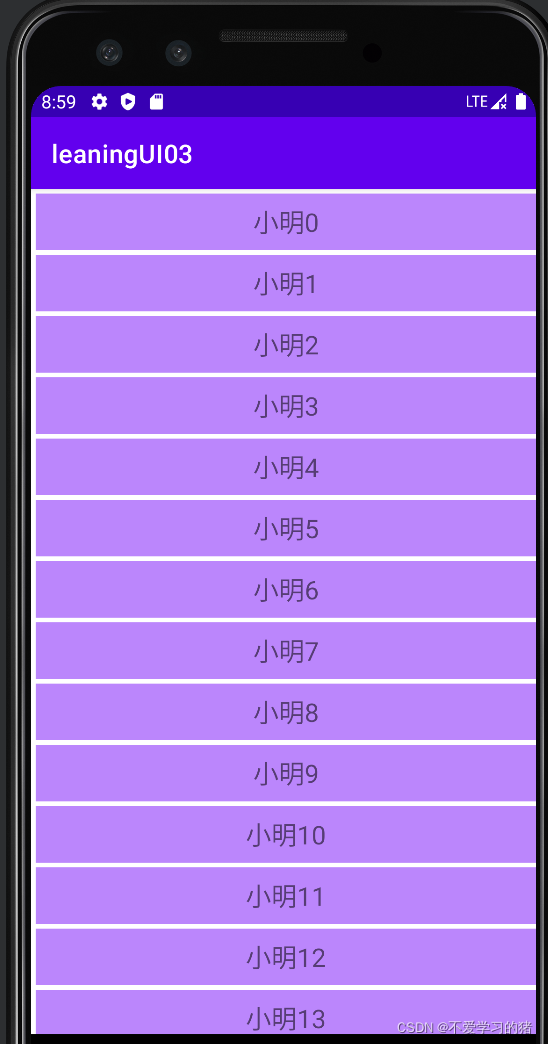
上面的代码中,我们给ItemDecoration 预留了一个划线的空间
运行如下:
4、绘制头部预留空间
- 在Adapter 中判断当前组的第一个item 是不是头部
//    是否是组的第一个Item
    public boolean isFirstItemOfGroup(int position) {
        if (position == 0) {
            return true;
        } else {
//           拿到当前位置的和前一个位置的 组名
            String currentItemGroupName = getGroupName(position);
            String preItemGroupName = getGroupName(position - 1);

//           如果相等,则表示position 的 item 不是第一个,否则是
            if (currentItemGroupName.equals(preItemGroupName)) {
                return false;
            } else {
                return true;
            }
        }
    }
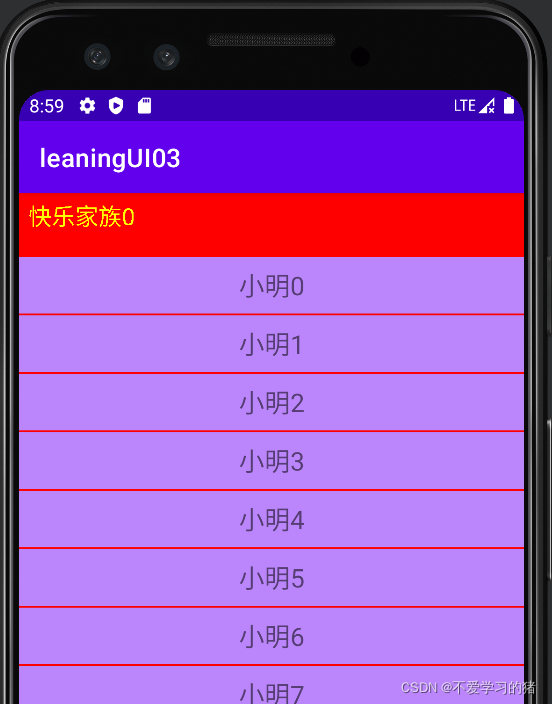
- 在 获取到头部 item 之后,预留一个绘制空间
//           判断 Item 是头部
            boolean isGroupHeader = starAdapter.isFirstItemOfGroup(position);
            if (isGroupHeader){
//                headerHeight 是头部 Item 的高度
                outRect.set(0, headerHeight, 0, 0);

            }else {
//                decorationTop   分割线的高度
                outRect.set(0, decorationTop, 0, 0);
            }
在 getItemOffsets() 中添加上面代码后,预留的 item 的头部空间就出来了,运行如下

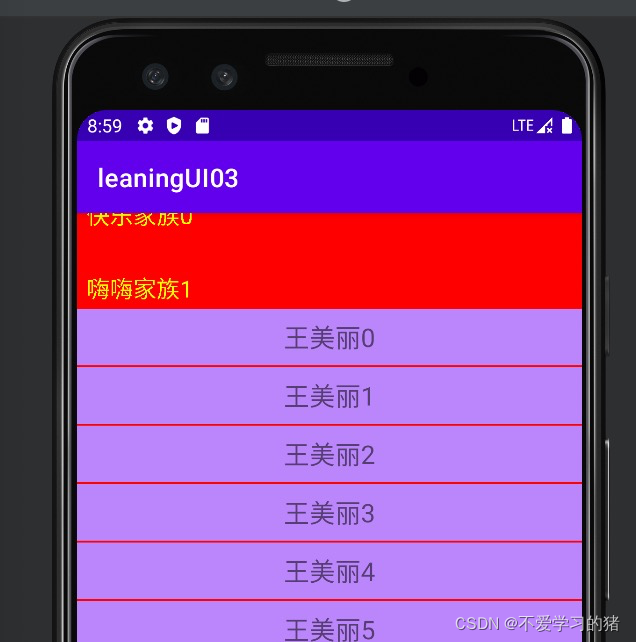
5、重写 onDraw() 绘制头部
//  绘制自己
    @Override
    public void onDraw(@NonNull Canvas c, @NonNull RecyclerView parent, @NonNull RecyclerView.State state) {
        super.onDraw(c, parent, state);

        if (parent.getAdapter() instanceof StarAdapter){
            StarAdapter starAdapter = (StarAdapter) parent.getAdapter();

//             当前屏幕上展示的
            int count = parent.getChildCount();

//            实现 itemView 的宽度和分割线的宽度一样
            int left = parent.getPaddingLeft();
            int right = parent.getWidth() - parent.getPaddingLeft();

            for (int i = 0; i < count; i++) {
                View view = parent.getChildAt(i);
//                当前item 的位置
                int position = parent.getChildLayoutPosition(view);
//                判断是否是头部
                boolean isGroupHeader = starAdapter.isFirstItemOfGroup(position);
                if (isGroupHeader){
                    c.drawRect(left, view.getTop() - headerHeight, right, view.getTop(), headPaint);
//                    获取当前组名
                    String groupName = starAdapter.getGroupName(position);

                    c.drawText(groupName,left + groupNameLeftPadding,
                            view.getTop() - headerHeight / 2 + textRect.height() / 2,
                            drawTextPaint);

                }else {
                    c.drawRect(left, view.getTop() - valueHeight, right, view.getTop(), headPaint);
                }
            }
        }
    }
代码运行结果如下:
6、绘制吸顶效果
//    绘制吸顶效果
    @Override
    public void onDrawOver(@NonNull Canvas c, @NonNull RecyclerView parent, @NonNull RecyclerView.State state) {
        super.onDrawOver(c, parent, state);

        if (parent.getAdapter() instanceof StarAdapter){
            StarAdapter starAdapter = (StarAdapter) parent.getAdapter();

            int left = parent.getPaddingLeft();
            int right = parent.getRight();
            int top = parent.getTop();

//            当前显示在界面的第一个 item
            int position = ((LinearLayoutManager)parent.getLayoutManager()).findFirstVisibleItemPosition();
            View itemView = parent.findViewHolderForAdapterPosition(position).itemView;

//            获取当前的上一个 头部 item
            boolean isFirstItemOfGroup = starAdapter.isFirstItemOfGroup(position +1 );
            if(isFirstItemOfGroup){
                int bottom = Math.min(top + headerHeight, itemView.getBottom());
                c.drawRect(left, top, right, bottom, headPaint);

                String groupName = starAdapter.getGroupName(position);

                drawTextPaint.getTextBounds(groupName, 0, groupName.length(), textRect);
                c.clipRect(left, top, right, bottom);
                c.drawText(groupName, left + 20,
                        bottom - headerHeight / 2 + textRect.height() / 2, drawTextPaint);

            }else {
//                固定的头部信息
                c.drawRect(left, top, right, top + headerHeight, headPaint);
                String groupName = starAdapter.getGroupName(position);
                drawTextPaint.getTextBounds(groupName, 0, groupName.length(), textRect);

//                绘制文字
                c.drawText(groupName, left + 20, top + headerHeight / 2 + textRect.height() /2, drawTextPaint);
            }
        }
    }
运行结果如下:
7、StarDecoration 完整代码
public class StarDecoration extends RecyclerView.ItemDecoration {

    //    分组栏的高度
    private int headerHeight;
    private int valueHeight = 50;

    private Paint headPaint;
    private Paint drawTextPaint;

    private Rect textRect;

    private int decorationTop = 4;
//    组名的 padding
    private int groupNameLeftPadding = 20;

    public StarDecoration(Context context){
        //    顶部吸顶栏的高度
        headerHeight = dp2px(context, valueHeight);

//        每一组的头部的Paint
        headPaint = new Paint();
        headPaint.setColor(Color.RED);

        drawTextPaint = new Paint();
        drawTextPaint.setColor(Color.YELLOW);
        drawTextPaint.setTextSize(50);

        textRect = new Rect();
    }


//  绘制自己
    @Override
    public void onDraw(@NonNull Canvas c, @NonNull RecyclerView parent, @NonNull RecyclerView.State state) {
        super.onDraw(c, parent, state);

        if (parent.getAdapter() instanceof StarAdapter){
            StarAdapter starAdapter = (StarAdapter) parent.getAdapter();

//             当前屏幕上展示的
            int count = parent.getChildCount();

//            实现 itemView 的宽度和分割线的宽度一样
            int left = parent.getPaddingLeft();
            int right = parent.getWidth() - parent.getPaddingLeft();

            for (int i = 0; i < count; i++) {
                View view = parent.getChildAt(i);
//                当前item 的位置
                int position = parent.getChildLayoutPosition(view);
//                判断是否是头部
                boolean isGroupHeader = starAdapter.isFirstItemOfGroup(position);
                if (isGroupHeader){
                    c.drawRect(left, view.getTop() - headerHeight, right, view.getTop(), headPaint);
//                    获取当前组名
                    String groupName = starAdapter.getGroupName(position);

                    c.drawText(groupName,left + groupNameLeftPadding,
                            view.getTop() - headerHeight / 2 + textRect.height() / 2,
                            drawTextPaint);

                }else {
                    c.drawRect(left, view.getTop() - decorationTop, right, view.getTop(), headPaint);
                }
            }
        }
    }

//    绘制吸顶效果
    @Override
    public void onDrawOver(@NonNull Canvas c, @NonNull RecyclerView parent, @NonNull RecyclerView.State state) {
        super.onDrawOver(c, parent, state);

        if (parent.getAdapter() instanceof StarAdapter){
            StarAdapter starAdapter = (StarAdapter) parent.getAdapter();

            int left = parent.getPaddingLeft();
            int right = parent.getRight();
            int top = parent.getTop();

//            当前显示在界面的第一个 item
            int position = ((LinearLayoutManager)parent.getLayoutManager()).findFirstVisibleItemPosition();
            View itemView = parent.findViewHolderForAdapterPosition(position).itemView;

//            获取当前的上一个 头部 item
            boolean isFirstItemOfGroup = starAdapter.isFirstItemOfGroup(position +1 );
            if(isFirstItemOfGroup){
                int bottom = Math.min(top + headerHeight, itemView.getBottom());
                c.drawRect(left, top, right, bottom, headPaint);

                String groupName = starAdapter.getGroupName(position);

                drawTextPaint.getTextBounds(groupName, 0, groupName.length(), textRect);
                c.clipRect(left, top, right, bottom);
                c.drawText(groupName, left + 20,
                        bottom - headerHeight / 2 + textRect.height() / 2, drawTextPaint);

            }else {
//                固定的头部信息
                c.drawRect(left, top, right, top + headerHeight, headPaint);
                String groupName = starAdapter.getGroupName(position);
                drawTextPaint.getTextBounds(groupName, 0, groupName.length(), textRect);

//                绘制文字
                c.drawText(groupName, left + 20, top + headerHeight / 2 + textRect.height() /2, drawTextPaint);
            }
        }
    }

    @Override
    public void getItemOffsets(@NonNull Rect outRect, @NonNull View view,
                               @NonNull RecyclerView parent, @NonNull RecyclerView.State state) {
        super.getItemOffsets(outRect, view, parent, state);

//        绑定自己的 Adapter
        if (parent.getAdapter() instanceof StarAdapter){
            StarAdapter starAdapter = (StarAdapter) parent.getAdapter();
//            当前item 的位置
            int position = parent.getChildLayoutPosition(view);

//           判断 Item 是头部
            boolean isGroupHeader = starAdapter.isFirstItemOfGroup(position);
            if (isGroupHeader){
//                headerHeight 是头部 Item 的高度
                outRect.set(0, headerHeight, 0, 0);

            }else {
//                decorationTop   分割线的高度
                outRect.set(0, decorationTop, 0, 0);
            }
        }
    }

    /**
     * 分辩率
     * @param context
     * @param dpValue
     * @return
     */
    private int dp2px(Context context, float dpValue){
        return (int) TypedValue.applyDimension(TypedValue.COMPLEX_UNIT_DIP, dpValue,
                context.getResources().getDisplayMetrics());
    }

}
总结
计算的我有点头晕

【声明】本内容来自华为云开发者社区博主,不代表华为云及华为云开发者社区的观点和立场。转载时必须标注文章的来源(华为云社区)、文章链接、文章作者等基本信息,否则作者和本社区有权追究责任。如果您发现本社区中有涉嫌抄袭的内容,欢迎发送邮件进行举报,并提供相关证据,一经查实,本社区将立刻删除涉嫌侵权内容,举报邮箱:
cloudbbs@huaweicloud.com
- 点赞
- 收藏
- 关注作者
评论(0)