20分钟学会flex布局,熊二都表示学会了,你呢?
✏️ 作者:大二计算机专业学生
♉ 星座:金牛座
🏠 主页:查看更多文章
🏂 关键:flex前端布局熊二都会
大家好,我是小周,今天分享的是熊二都能学会的前端 flex 布局,篇幅中等,内容充实,认真学习完本篇,你能 掌握 flex 布局,剩下的就是自己多运用了,好了,原创不易,如果觉得本博主写的不错,那就点赞,收藏,支持博主吧,我是小周,期待你的关注 ฅʕ•̫͡•ʔฅ✏️

1. flex 布局简介
flex 是 flexible box 的缩写,意思是 弹性布局 或 弹性盒子,是 CSS3 中一种新的布局模式,可以简单、完整、响应式地实现各种页面布局,当页面需要适应不同的屏幕大小以及多种设备类型时非常适合用flex布局,目前 几乎所有的浏览器都支持 flex 布局,特别是在移动端

2. 适用场景
弹性布局适合于移动开发,在 Android 和 iOS 上也完美支持

3. 开启 flex 布局
📌 开启 flex 布局,只需将元素的 display 属性设置为 flex
⚠️ 注意:开启弹性布局后,子项的 float、clear 和 vertical-align 属性将失效
<div class="container"></div>
- 1
.container {
    display: flex;
}
- 1
- 2
- 3
开启 Flex 布局的元素称为 Flex 容器,简称 容器 ,容器的所有子元素将自动成为容器的成员,称为 Flex 子项,简称 子项

4. flex 布局的两根轴
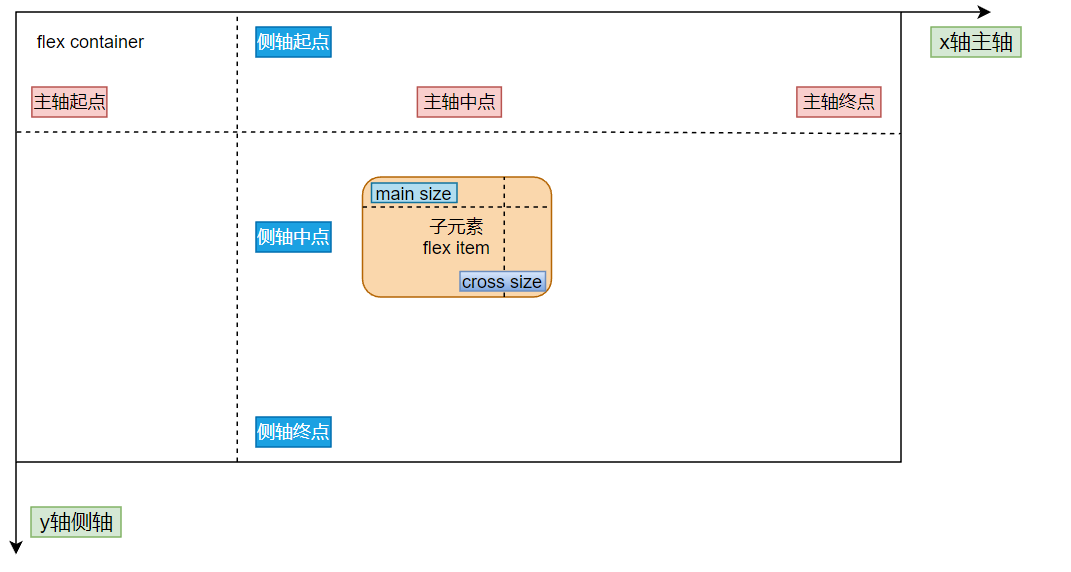
Flex 布局默认以x轴为主轴,y轴为交叉轴,这就是flex布局中,很重要的两个概念,子元素默认沿主轴排列,单个子元素占据主轴空的间叫做 main size,占据的交叉轴空间叫做 cross size
一部分作用在容器上,称为 容器属性,比如 flex container 的主轴x轴和交叉轴y轴的起点,中点,终点都是可以设置的,甚至于主轴的方向也可以改变,另一部分作用于子元素上,称为 子项属性,比如子元素在主轴的大小,在交叉轴的大小等等
好的,接下来就是对容器属性和子项属性进行详细的学习,加油

5. 容器属性
以下内容是对容器属性的具体学习
flex-direction 主轴方向
📌 flex-direction 属性决定主轴的方向,从而决定子元素在容器中的位置,共有四个值可选
flex-direction: row | row-reverse | column | column-reverse;
- 1
<!DOCTYPE html>
<html lang="en">
<head>
    <style>
        .container {
            display: flex;
            flex-direction: row;
        }

        .item {
            width: 100px;
            height: 20px;
            background-color: skyblue;
            margin-right: 10px;
            margin-top: 10px;
        }
    </style>
</head>
<body>
    <div class="container">
        <div class="item">1</div>
        <div class="item">2</div>
        <div class="item">3</div>
    </div>
</body>
</html>
- 1
- 2
- 3
- 4
- 5
- 6
- 7
- 8
- 9
- 10
- 11
- 12
- 13
- 14
- 15
- 16
- 17
- 18
- 19
- 20
- 21
- 22
- 23
- 24
- 25
- 26
row(默认):子项从左向右排列,此时x轴为主轴

row-reverse:子项从右向左排列,反转

column:子项从上向下排列,此时y轴为主轴

column-reverse:子项从下向上排列,反转

flex-wrap 是否换行
📌 flex-wrap 属性用于指定弹性布局中子项是否换行,默认不换行,共有三个值可以选
flex-wrap: nowrap | wrap | wrap-reverse;
- 1
<!DOCTYPE html>
<html lang="en">
<head>
    <style>
        body{
            background-color: skyblue;
        }
        .container {
            display: flex;
            flex-direction: row;
            /* 使用该属性,需要为弹性容器添加固定宽度,
            当弹性容器宽度超过子项宽度总和时,
            值设为 wrap 或 wrap-reverse 均不起效果 */
            width: 250px;
            background-color: rgb(252, 144, 144);
        }

        .item {
            width: 100px;
            height: 100px;
            background-color: yellow;
            margin-right: 10px;
            margin-bottom: 10px;
        }
    </style>
</head>
<body>
    <div class="container">
        <div class="item">1</div>
        <div class="item">2</div>
        <div class="item">3</div>
    </div>
</body>
</html>
- 1
- 2
- 3
- 4
- 5
- 6
- 7
- 8
- 9
- 10
- 11
- 12
- 13
- 14
- 15
- 16
- 17
- 18
- 19
- 20
- 21
- 22
- 23
- 24
- 25
- 26
- 27
- 28
- 29
- 30
- 31
- 32
- 33
- 34
nowrap(默认):不换行,所有子项目单行排列,子项可能会溢出
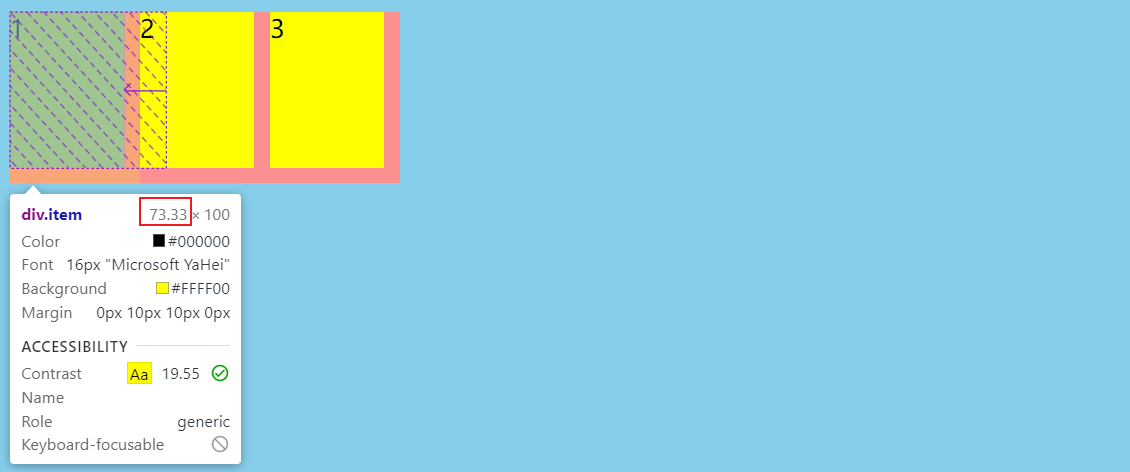
wrap:换行,所有子项目多行排列,溢出的子项会被放到下一行,按从上向下顺序排列

wrap-reverse:所有子项目多行排列,按从下向上顺序排列

⚠️ 注意:使用该属性,需要为弹性容器添加固定宽度,当弹性容器宽度超过子项宽度总和时,值设为 wrap 或 wrap-reverse 均不起效果
flex-flow 简写属性
📌 flex-flow 属性是 flex-direction 属性和 flex-wrap 属性的简写形式,默认值为 row nowrap,这里就不写例子了,一写就明白了
flex-flow: < 'flex-direction' > || < 'flex-wrap' >;
flex-flow: row nowrap;
flex-flow: row wrap;
flex-flow: row wrap-reverse;
flex-flow: column nowrap;
flex-flow: column wrap;
flex-flow: column wrap-reverse;
- 1
- 2
- 3
- 4
- 5
- 6
- 7
justify-content 主轴对齐方式
📌 justify-content 属性定义了子项在 主轴(水平方向x轴)上的对齐方式,可选值有
justify-content: flex-start | flex-end | center | space-between | space-around;
- 1
<html lang="en">
<head>
    <style>
        body{
            background-color: skyblue;
        }
        .container {
            display: flex;
        }
        .item {
            width: 100px;
            height: 100px;
            background-color: yellow;
            margin-right: 10px;
            margin-bottom: 10px;
        }
    </style>
</head>
<body>
    <div class="container">
        <div class="item">1</div>
        <div class="item">2</div>
        <div class="item">3</div>
    </div>
</body>
</html>
- 1
- 2
- 3
- 4
- 5
- 6
- 7
- 8
- 9
- 10
- 11
- 12
- 13
- 14
- 15
- 16
- 17
- 18
- 19
- 20
- 21
- 22
- 23
- 24
- 25
- 26
flex-start(默认):弹性容器子项按主轴起点线对齐

flex-end:弹性容器子项按主轴终点线对齐

center: 居中排列

space-between:弹性容器子项均匀分布,第一项紧贴主轴起点线,最后一项紧贴主轴终点线,子项目之间的间隔都相等。要注意特殊情况,当剩余空间为负数或者只有一个项时,效果等同于 flex-start

space-around:弹性容器子项均匀分布,每个项目两侧的间隔相等,相邻项目之间的距离是两个项目之间留白的和。所以,项目之间的间隔比项目与边框的间隔大一倍。要注意特殊情况,当剩余空间为负数或者只有一个项时,效果等同于center

space-evenly:弹性容器子项均匀分布,所有项目之间及项目与边框之间的距离相等

⚠️ 仅当 flex-direction 为 row 时生效,因为 justify-content 仅定义子项在水平方向上的对齐方式
align-items 交叉轴对齐方式
📌 align-items 属性定义弹性容器子项在交叉轴(垂直方向)上的对齐方式,可选值:
align-items: flex-start | flex-end | center | baseline | stretch;
- 1
<!DOCTYPE html>
<html lang="en">
<head>
    <style>
        body{
            background-color: skyblue;
        }
        .container {
            display: flex;
            height: 200px;
        }
        .item {
            width: 100px;
            /* height: 100px; */
            background-color: orange;
            margin-right: 10px;
            margin-bottom: 10px;
        }
        .item:nth-of-type(2){
            height: 140px;
        }
    </style>
</head>
<body>
    <div class="container">
        <div class="item">1</div>
        <div class="item">2</div>
        <div class="item">3</div>
    </div>
</body>
</html>
- 1
- 2
- 3
- 4
- 5
- 6
- 7
- 8
- 9
- 10
- 11
- 12
- 13
- 14
- 15
- 16
- 17
- 18
- 19
- 20
- 21
- 22
- 23
- 24
- 25
- 26
- 27
- 28
- 29
- 30
- 31
stretch(默认):当子项未设置高度或者高度为 atuo 时,子项的高度设为行高。这里需要注意,在只有一行的情况下,行的高度为容器的高度,即子项高度为容器的高度(当子项设定了高度时无法展开)

flex-start:子项与交叉轴的起点线对齐

flex-end:子项与交叉轴的终点线对齐

center:与交叉轴的中线对齐

baseline:基线对齐,当行内轴与侧轴在同一线上,即所有子项的基线在同一线上时,效果等同于flex-start

align-content 多根轴线对齐方式
📌 align-content 属性定义了多根轴线的对齐方式,如果项目只有一根轴线,那么该属性不起作用,简单说就是盒子内部的元素超过了盒子项的宽度(默认)出现了换行,也就是有多行才可以
align-content: flex-start | flex-end | center | space-between | space-around | stretch;
- 1
<!DOCTYPE html>
<html lang="en">

<head>
    <style>
        body {
            background-color: skyblue;
        }
        .container {
            display: flex;
            height: 240px;
            flex-wrap: wrap;
            background-color: gray;
        }
        .item {
            width: 80px;
            height: 80px;
            display: flex;
            align-items: center;
            justify-content: center;
            background-color: orange;
            margin: 5px;
        }
    </style>
</head>

<body>
    <div class="container">
        <div class="item">1</div>
        <div class="item">2</div>
        <div class="item">3</div>
        <div class="item">4</div>
        <div class="item">5</div>
        <div class="item">6</div>
        <div class="item">7</div>
        <div class="item">8</div>
        <div class="item">9</div>
    </div>
</body>

</html>
- 1
- 2
- 3
- 4
- 5
- 6
- 7
- 8
- 9
- 10
- 11
- 12
- 13
- 14
- 15
- 16
- 17
- 18
- 19
- 20
- 21
- 22
- 23
- 24
- 25
- 26
- 27
- 28
- 29
- 30
- 31
- 32
- 33
- 34
- 35
- 36
- 37
- 38
- 39
- 40
- 41
stretch(默认):轴线占满整个交叉轴(当子项设定了高度时无法展开)
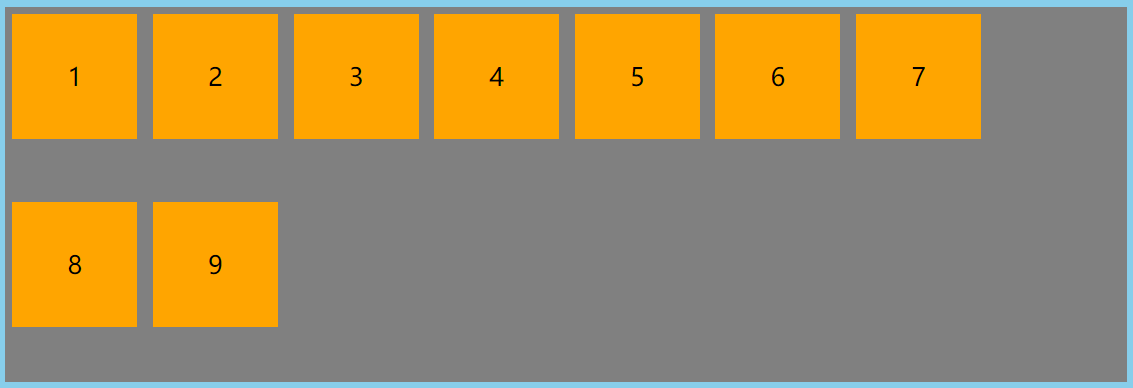
flex-start:各行与交叉轴的起点线对齐
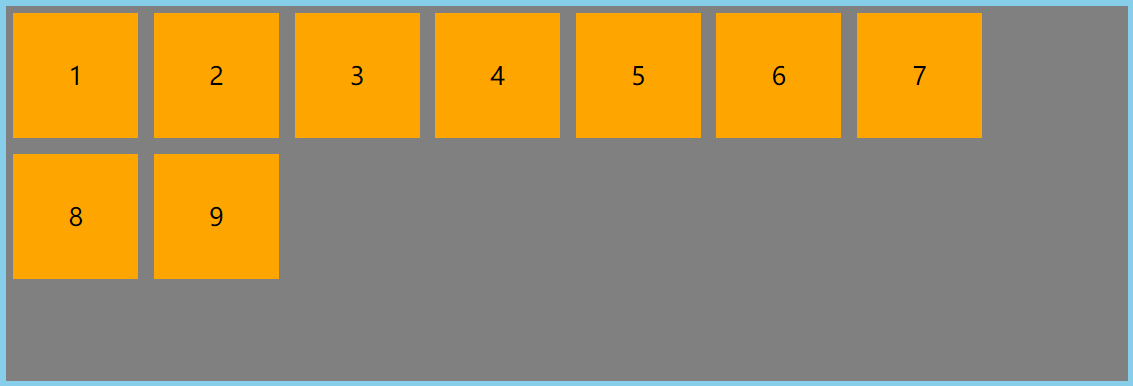
flex-end:各行与交叉轴的终点线对齐
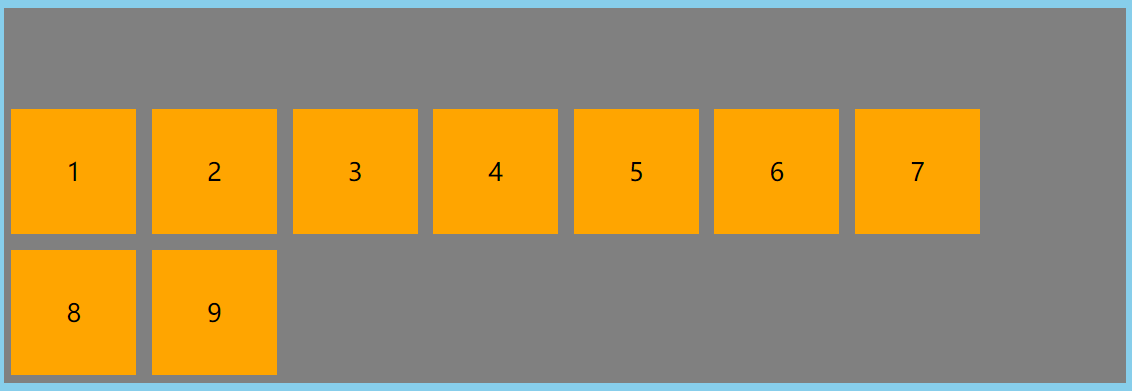
center:各行与交叉轴的中线对齐
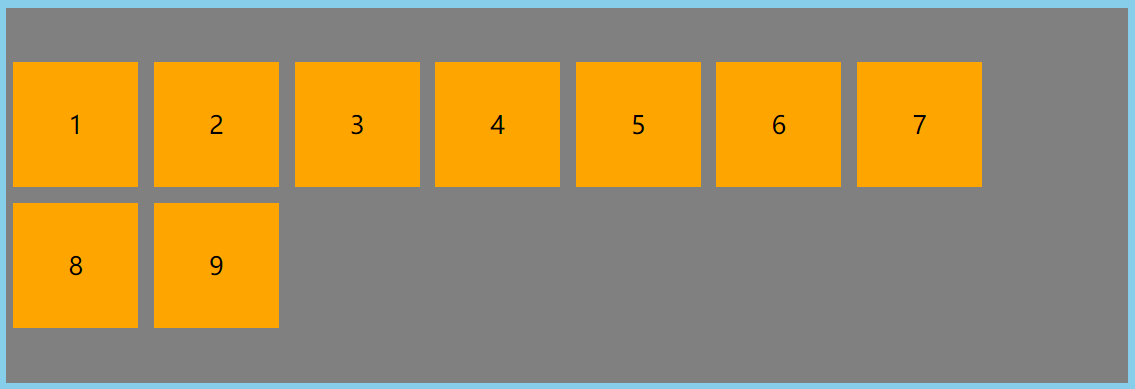
space-between:与交叉轴两端对齐,轴线之间的间隔平均分布。要注意特殊情况,当剩余空间为负数时,效果等同于flex-start
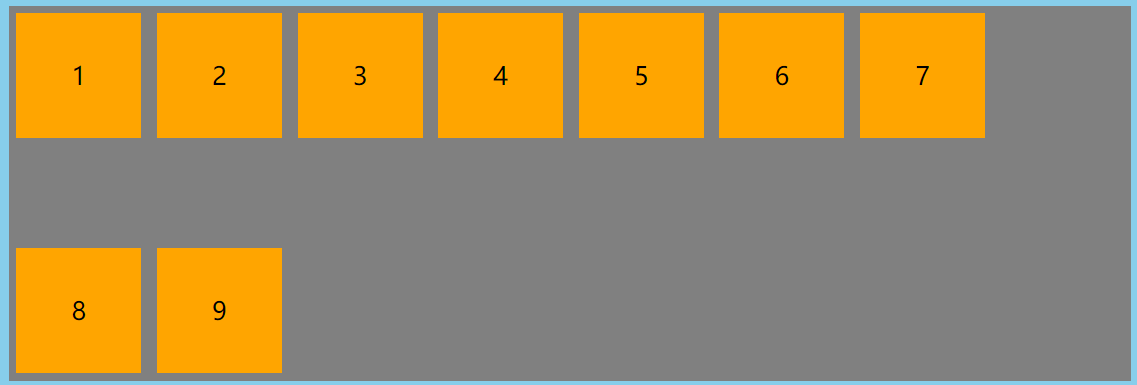
space-around:每根轴线两侧的间隔都相等。所以,轴线之间的间隔比轴线与边框的间隔大一倍。要注意特殊情况,当剩余空间为负数时,效果等同于center
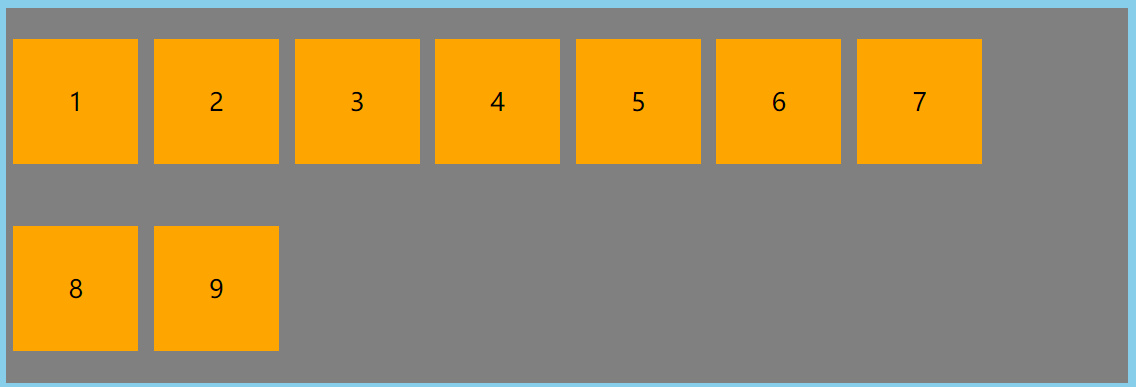
⚠️ 注意:该属性只作用于多行的情况(flex-warp: wrap / warp-reverse),在只有一行的弹性容器上无效,该属性可以很好的处理换行以后相邻行之间产生的间距。

6. 子项属性
下面的内容是对 flex 布局子元素具有属性的学习
order 排列顺序
当不写时,Flex 子项是按照在代码中出现的先后顺序排列的,CSS3 新增加 order 属性定义项目的排列顺序,是数值类型,数值越小,排列越靠前,默认值为 0
⚠️ 注意:此属性使用在子项上,浏览器自动按照 order 的大小排序盒子,默认都是 0,如果相同的 order 则按照编写标签的顺序排放盒子,如下所示,将第一个子元素的order设置为1,其他都为默认值0,所以它最大,会被排在最后
<!DOCTYPE html>
<html lang="en">

<head>
    <style>
        body {
            background-color: skyblue;
        }

        .container {
            display: flex;
        }

        .item {
            width: 80px;
            height: 80px;
            display: flex;
            align-items: center;
            justify-content: center;
            background-color: orange;
            margin: 5px;
        }

        .item:first-child {
            order: 1;
        }
    </style>
</head>

<body>
    <div class="container">
        <div class="item">1</div>
        <div class="item">2</div>
        <div class="item">3</div>
        <div class="item">4</div>
        <div class="item">5</div>
    </div>
</body>

</html>
- 1
- 2
- 3
- 4
- 5
- 6
- 7
- 8
- 9
- 10
- 11
- 12
- 13
- 14
- 15
- 16
- 17
- 18
- 19
- 20
- 21
- 22
- 23
- 24
- 25
- 26
- 27
- 28
- 29
- 30
- 31
- 32
- 33
- 34
- 35
- 36
- 37
- 38
- 39
- 40

flex-grow 扩展比例
📌 flex-grow 属性决定了子项要占用父容器多少剩余空间
flex-grow 属性定义子项的 扩展比例,取值必须是一个单位的正整数,表示放大的比例。默认为 0,即如果存在额外空间,也不放大,负值无效。Flex 容器会根据子项设置的扩展比例作为比率来分配剩余空间
如果所有项目的 flex-grow 属性都为 1,则它们将等分剩余空间(如果有的话)。如果一个项目的 flex-grow 属性为 2,其他项目都为 1,则前者占据的剩余空间将比其他项多一倍
比如:空间为 720px,a、b 和 c 的 flex-grow 分别为 1、2 和 3,那么 a 占比剩余空间:1/(1+2+3) = 1/6,那么 a 瓜分到的剩余空间宽度是 720*(1/6)=120,加上 a 原本的宽度,实际的宽度为 原始宽度 + 120
<!DOCTYPE html>
<html lang="en">

<head>
    <style>
        body {
            background-color: skyblue;
        }

        .container {
            display: flex;
            width: 720px;
            background-color: wheat;
        }

        .item:nth-of-type(1) {
            width: 10px;
            flex-grow: 1;
            background-color: pink;
        }

        .item:nth-of-type(2) {
            flex-grow: 2;
            background-color: tomato;
        }

        .item:nth-of-type(3) {
            flex-grow: 3;
            background-color: goldenrod;
        }
    </style>
</head>

<body>
    <div class="container">
        <div class="item">1</div>
        <div class="item">2</div>
        <div class="item">3</div>
    </div>
</body>

</html>
- 1
- 2
- 3
- 4
- 5
- 6
- 7
- 8
- 9
- 10
- 11
- 12
- 13
- 14
- 15
- 16
- 17
- 18
- 19
- 20
- 21
- 22
- 23
- 24
- 25
- 26
- 27
- 28
- 29
- 30
- 31
- 32
- 33
- 34
- 35
- 36
- 37
- 38
- 39
- 40
- 41
- 42

flex-shrink 缩小比例
如果子容器宽度超过父容器宽度,即使是设置了 flex-grow,但是由于没有剩余空间,就分配不到剩余空间了。这个时候有两个办法:换行和压缩。由于 flex 默认不换行,那么压缩的话,怎么压缩呢,压缩多少?此时就需要用到 flex-shrink 属性了
📌 flex-shrink 属性定义了项目的缩小比例,默认为 1,即如果空间不足,该项目将缩小
flex-shrink: <number>; /* 默认 1 */
- 1
如果所有项目的 flex-shrink 属性都为 1,当空间不足时,都将等比例缩小。如果一个项目的 flex-shrink 属性为 0,其他项目都为 1,则空间不足时,前者不缩小,其他项目继续缩小
⚠️ 注意:负值对该属性无效,并且如果弹性子项总和没有超出父容器,设置 flex-shrink 将无效
flex-basis 分配前占据主轴空间
flex-basis 属性定义了在分配多余空间之前,项目占据的主轴空间,浏览器根据这个属性,计算主轴是否有多余空间,它的默认值为 auto 项目的本来大小
flex-basis: <number> | <百分比> | auto; /*默认 auto*/
- 1
<!DOCTYPE html>
<html lang="en">

<head>
    <style>
        body {
            background-color: skyblue;
        }

        .container {
            display: flex;
            width: 720px;
            background-color: wheat;
        }

        .item:nth-of-type(1) {
            flex-basis: 20%;
            background-color: pink;
        }

        .item:nth-of-type(2) {
            flex-basis: 40%;
            background-color: tomato;
        }

        .item:nth-of-type(3) {
            flex-basis: 40%;
            background-color: goldenrod;
        }
    </style>
</head>

<body>
    <div class="container">
        <div class="item">1</div>
        <div class="item">2</div>
        <div class="item">3</div>
    </div>
</body>

</html>
- 1
- 2
- 3
- 4
- 5
- 6
- 7
- 8
- 9
- 10
- 11
- 12
- 13
- 14
- 15
- 16
- 17
- 18
- 19
- 20
- 21
- 22
- 23
- 24
- 25
- 26
- 27
- 28
- 29
- 30
- 31
- 32
- 33
- 34
- 35
- 36
- 37
- 38
- 39
- 40
- 41

flex 复合属性
📌 flex 属性是 flex-grow、flex-shrink 和 flex-basis 的简写,默认值为 0 1 auto。后两个属性可选
该属性有两个快捷值:auto (1 1 auto) 和 none (0 0 auto)
<!DOCTYPE html>
<html lang="en">

<head>
    <style>
        body {
            background-color: skyblue;
        }

        .container {
            display: flex;
            width: 720px;
            background-color: wheat;
        }

        .item:nth-of-type(1) {
            flex: 1;
            background-color: pink;
        }

        .item:nth-of-type(2) {
            flex: 2;
            background-color: tomato;
        }

        .item:nth-of-type(3) {
            flex: 9;
            background-color: goldenrod;
        }
    </style>
</head>

<body>
    <div class="container">
        <div class="item">1</div>
        <div class="item">2</div>
        <div class="item">9</div>
    </div>
</body>

</html>
- 1
- 2
- 3
- 4
- 5
- 6
- 7
- 8
- 9
- 10
- 11
- 12
- 13
- 14
- 15
- 16
- 17
- 18
- 19
- 20
- 21
- 22
- 23
- 24
- 25
- 26
- 27
- 28
- 29
- 30
- 31
- 32
- 33
- 34
- 35
- 36
- 37
- 38
- 39
- 40
- 41
一共被分为12份,分别占1,2,9份

align-self 指定子元素对齐
📌 align-self 属性用于指定子项的对齐方式,可覆盖 align-items 属性,默认值为 auto,表示继承父元素的 align-items 属性,如果没有父元素,则等同于 stretch
align-self: auto || flex-start || flex-end || center || baseline || stretch;
- 1
总结
1.开启 flex 布局
.container {
  display: flex;
}
- 1
- 2
- 3
2.容器属性
.container {
    flex-direction: row | row-reverse | column | column-reverse;
    /* 主轴方向: 左到右(默认)| 右到左 | 上到下 | 下到上 */

    flex-wrap: nowrap | wrap | wrap-reverse;
    /* 换行: 不换行(默认)| 换行 | 换行并第一行在下方 */

    flex-flow: <flex-direction> | <flex-wrap>
    /* 主轴方向和换行简写 */

    justify-content: flex-start | flex-end | center | space-between | space-around;
    /* 主轴对齐方式: 左对齐(默认) | 右对齐 | 居中对齐 | 两端对齐 | 平均分布 */

    align-items: flex-start | flex-end | center | baseline | stretch;
    /* 交叉轴对齐方式: 顶部对齐(默认)| 底部对齐 | 居中对齐 | 上下对齐并铺满 | 文本基线对齐 */

    align-content: flex-start | flex-end | center | space-between | space-around | stretch;
    /* 多主轴对齐: 顶部对齐(默认)| 底部对齐 | 居中对齐 | 上下对齐并铺满 | 上下平均分布*/
}
- 1
- 2
- 3
- 4
- 5
- 6
- 7
- 8
- 9
- 10
- 11
- 12
- 13
- 14
- 15
- 16
- 17
- 18
- 19
3.子元素属性
.item {
    order: <integer>;
    /* 排序: 数值越小,排越前,默认为0 */

    flex-grow: <number>; /* default 0*/
    /* 放大: 默认0(即如果有剩余空间也不放大,值为1则放大,2是1的双倍大小,以此类推)*/

    flex-shrink: <number>; /* default 1*/
    /* 缩小: 默认1(如果空间不足则会缩小,值为0不缩小)*/

    flex-basis: <length> | auto; /* default auto */
    /* 固定大小: 默认为0,可以设置px值,也可以设置为百分比大小 */

    flex: none | [<'flex-grow'> <'flex-shrink'>? || <'flex-basis'>]
    /* flex-grow, flex-shrink 和 flex-basis 的简写,默认值为0 1 auto */

    align-self: auto | flex-start | flex-end | center | baseline | stretch;
    /* 单独对齐方式: 自动(默认)| 顶部对齐 | 底部对齐 | 居中对齐 | 上下对齐并铺满 | 文本基线对齐 */
}
- 1
- 2
- 3
- 4
- 5
- 6
- 7
- 8
- 9
- 10
- 11
- 12
- 13
- 14
- 15
- 16
- 17
- 18
- 19
4.几乎所有的浏览器都支持 flex 布局,特别是在移动端
bye,┏ (゜ω゜)=👉
到这里,你就已经学习完了 flex 布局,真棒啊,继续加油,觉得对你有帮助,多多点赞收藏,关注小周,一起进步 👋👋

文章来源: blog.csdn.net,作者:王 子,版权归原作者所有,如需转载,请联系作者。
原文链接:blog.csdn.net/m0_53321320/article/details/125356916
- 点赞
- 收藏
- 关注作者


评论(0)