Flutter macOS 模板 – Flutter macOSDrawer Widget 示例

在本文中,我们将通过在 Flutter macOS 中实现一个 Flutter Drawer 小部件来讨论和实现 Flutter macOS 模板。我们将用示例源代码解释它是如何实现的每一个细节。
Flutter macOS
Flutter抽屉小部件
Flutter 的抽屉小部件是在应用程序的各个屏幕之间导航的绝佳方式。Flutter 配备了一个抽屉小部件,因此我们可以使用它在我们的 Flutter 应用程序中实现漂亮的导航方法。我们将在我们的 Flutter macOS 模板中实现抽屉小部件方法,并将查看它在我们的 Flutter macOS 应用程序中的外观。我们将尝试详细解释抽屉,如果遗漏了什么,我们也会支持它。所以,不用担心,所提到的设计的完整详细解释也将与完整的源代码一起提供。让我们结束这部分,以便我们开始工作。
Flutter 抽屉实现广告
drawer: Drawer( )Flutter 的脚手架抽屉小部件旨在开发抽屉,如上代码所示。我们通过了源代码中显示的抽屉类,但抽屉不会显示,虽然它已经在应用程序中实现,因此我们将无法在屏幕上看到它。为此,我们将使用 appbar 小部件。让我们使用它,然后看看在 appbar 中会实现什么新东西。
appBar: AppBar(backgroundColor: Colors.black54)我们还在子构造函数中使用了一个列小部件,第一个子小部件是一个容器小部件,在我们的抽屉小部件中具有一定的高度和宽度以及背景颜色。让我们看看它的外观:
Container(
                height: 200,
                width: double.infinity,
                color: Colors.black12.withOpacity(.6),)
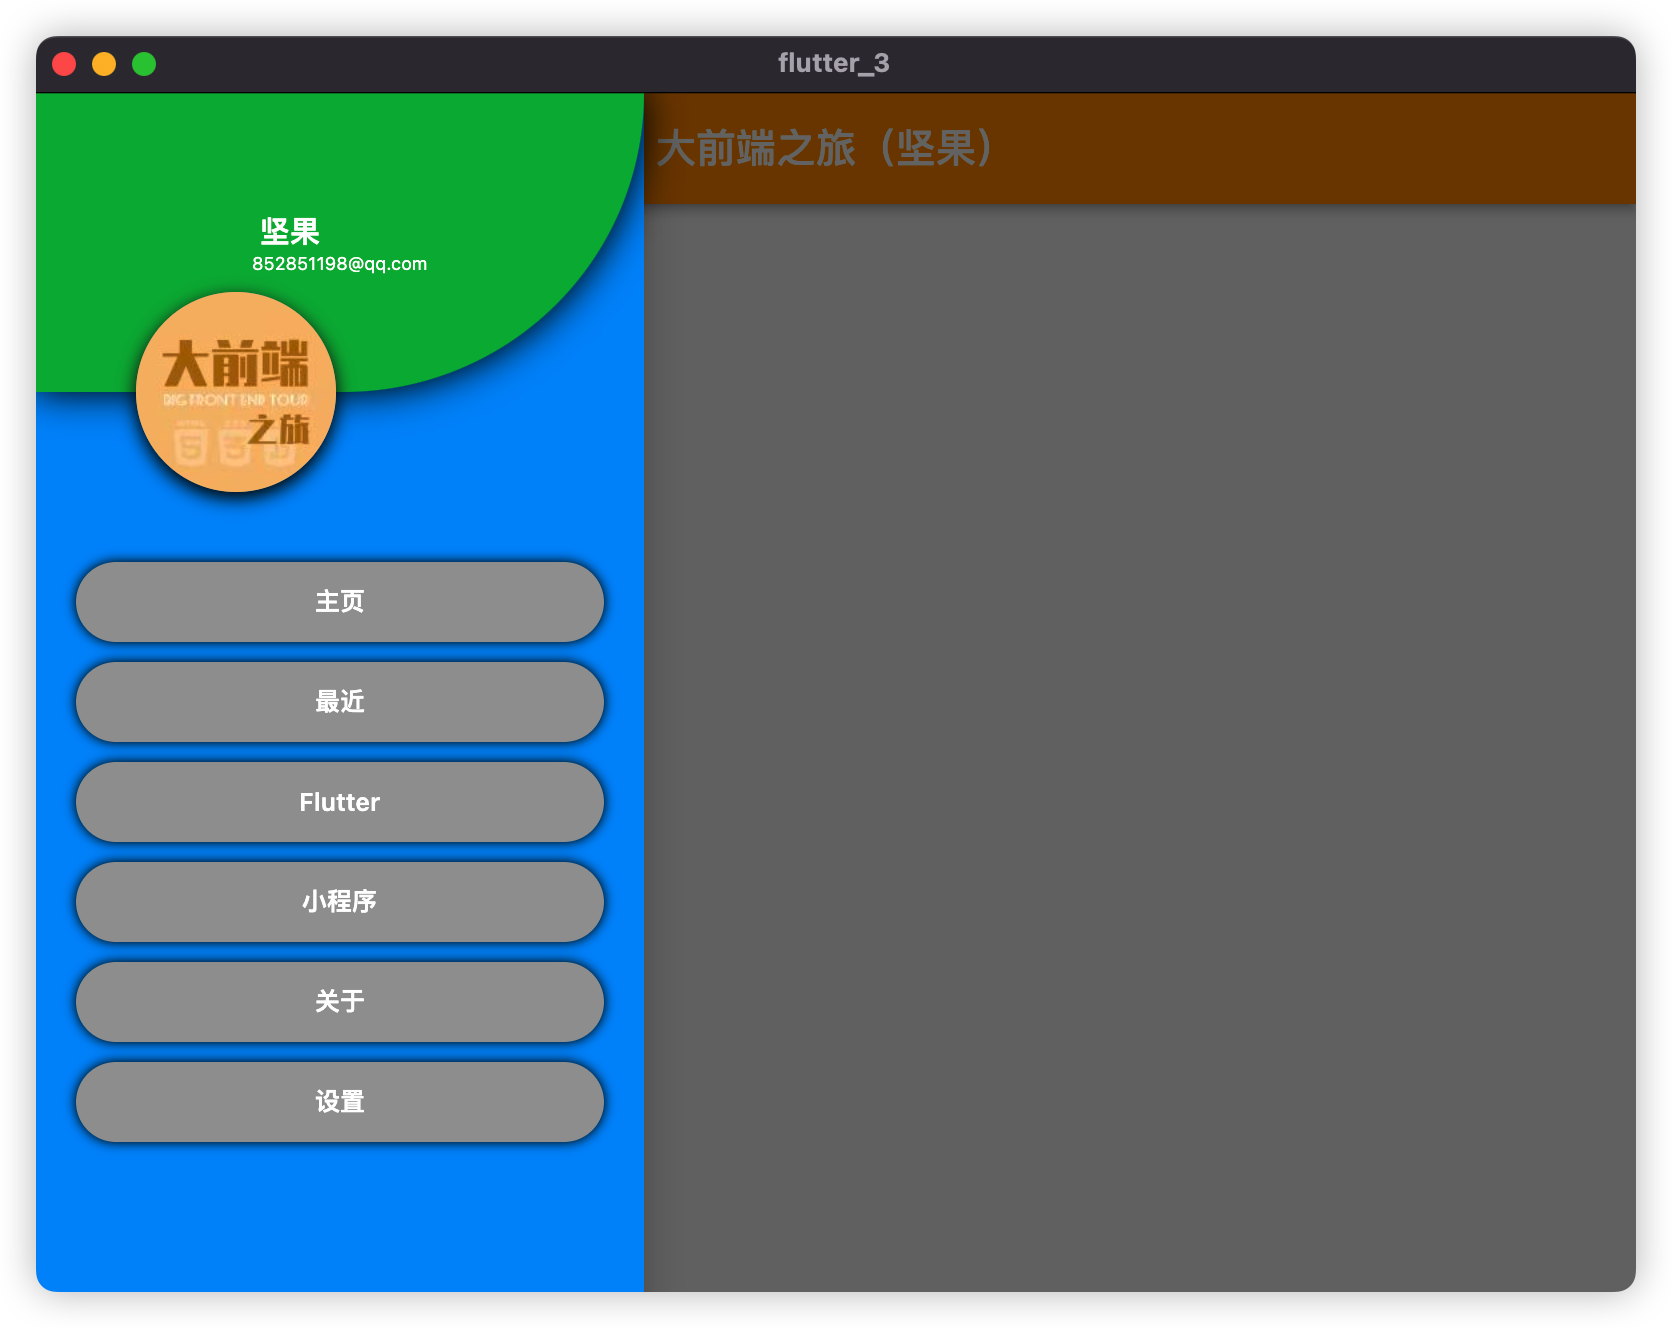
我们可以在应用栏中看到一个领先的图标,通过单击它,我们从左侧的抽屉滑块。我们可以在下图中看到抽屉:
抽屉顶块
SizedBox(
height: 200,
width: double.infinity,
// color: Colors.black12.withOpacity(.6),
child: Stack(children: [
Container(
height: 150,
decoration: const BoxDecoration(
color: Colors.green,
boxShadow: [BoxShadow(blurRadius: 15)],
borderRadius: BorderRadius.only(
bottomRight: Radius.circular(150))),
padding: const EdgeInsets.all(10),
width: double.infinity,
child: Column(
mainAxisAlignment: MainAxisAlignment.center,
children: [
Padding(
padding: const EdgeInsets.only(right: 50),
child: Text(
'坚果',
style: GoogleFonts.montserrat(
color: Colors.white,
fontWeight: FontWeight.bold,
fontSize: 15),
),
),
Text(
'852851198@qq.com',
style: GoogleFonts.montserrat(
color: Colors.white, fontSize: 9),
)
],
)),
 Positioned(
                    bottom: 0,
                    left: 50,
                    child: Align(
                      alignment: Alignment.bottomCenter,
                      child: Container(
                          height: 100,
                          width: 100,
                          decoration: const BoxDecoration(
                            color: Colors.grey,
                            shape: BoxShape.circle,
                            image: DecorationImage(
                                fit: BoxFit.cover,
                                image: AssetImage('assets/avatar.jpg')),
                            boxShadow: [
                              BoxShadow(blurRadius: 7, offset: Offset(0, 3))
                            ],
                          )),
                    ),
                  )
]),
),如您所见,通过实现上面的代码,我们设计了抽屉小部件中的第一个列容器,为其提供了背景图像和居中的文本小部件。
顶部块圆形图像容器
Positioned(
bottom: 0,
left: 50,
child: Align(
alignment: Alignment.bottomCenter,
child: Container(
height: 100,
width: 100,
decoration: const BoxDecoration(
color: Colors.grey,
shape: BoxShape.circle,
image: DecorationImage(
fit: BoxFit.cover,
image: AssetImage('assets/avatar.jpg')),
boxShadow: [
BoxShadow(blurRadius: 7, offset: Offset(0, 3))
],
)),
),
)我们使用堆栈小部件将圆形图像容器堆叠在顶部容器中,如您在上面的代码中所见,我们使用定位小部件来指定此圆形容器的位置。
Flutter 抽屉容器按钮
ListView.builder(
physics: const NeverScrollableScrollPhysics(),
padding: const EdgeInsets.only(top: 30),
shrinkWrap: true,
itemCount: categories.length,
itemBuilder: (context, index) {
return GestureDetector(
onTap: () {},
child: Container(
height: 40,
decoration: const BoxDecoration(
borderRadius: BorderRadius.only(
bottomRight: Radius.circular(30),
bottomLeft: Radius.circular(30),
topLeft: Radius.circular(30),
topRight: Radius.circular(30)),
color: Colors.grey,
boxShadow: [BoxShadow(blurRadius: 4)]),
// width: 150,
margin: const EdgeInsets.symmetric(
horizontal: 20, vertical: 5),
alignment: Alignment.center,
child: Text(
categories[index],
style: const TextStyle(
fontSize: 12.5,
color: Colors.white,
fontWeight: FontWeight.w600),
),
),
);
})我们使用列表视图构建器来显示这些容器可点击按钮,这些按钮具有一些装饰和居中的文本,我们从下面给出的列表中获取了这些文本:
List<String> categories = ['主页', '最近', 'Flutter', '小程序', '关于', '设置'];我们已经实现了我们的 Flutter macOS模板抽屉设计。我们知道我们还没有充分解释它。那是因为我已经在另一篇文章中解释过了。以下部分提供了完整的源代码。尝试自己实现这个设计,如果你遇到问题,那么你可以从这个代码中获得帮助。
源代码
import 'package:flutter/material.dart';
import 'package:google_fonts/google_fonts.dart';
void main() {
runApp(MyApp());
}
class MyApp extends StatelessWidget {
@override
Widget build(BuildContext context) {
return MaterialApp(
debugShowCheckedModeBanner: false,
title: 'Flutter macos Beautiful Drawer Widget',
home: homePage());
}
}
class homePage extends StatefulWidget {
@override
_homePageState createState() => _homePageState();
}
class _homePageState extends State<homePage> {
@override
Widget build(BuildContext context) {
return DrawerWidget();
}
}
class DrawerWidget extends StatelessWidget {
List<String> categories = ['主页', '最近', 'Flutter', '小程序', '关于', '设置'];
@override
Widget build(BuildContext context) {
return SafeArea(
child: Scaffold(
appBar: AppBar(
backgroundColor: Colors.orange,
title: const Text("大前端之旅(坚果)"),
),
drawer: Drawer(
backgroundColor: Colors.blue,
elevation: 20,
shape: RoundedRectangleBorder(borderRadius: BorderRadius.circular(1)),
child: Container(
height: double.infinity,
width: double.infinity,
color: Colors.blue,
child: Column(
children: [
SizedBox(
height: 200,
width: double.infinity,
// color: Colors.black12.withOpacity(.6),
child: Stack(children: [
Container(
height: 150,
decoration: const BoxDecoration(
color: Colors.green,
boxShadow: [BoxShadow(blurRadius: 15)],
borderRadius: BorderRadius.only(
bottomRight: Radius.circular(150))),
padding: const EdgeInsets.all(10),
width: double.infinity,
child: Column(
mainAxisAlignment: MainAxisAlignment.center,
children: [
Padding(
padding: const EdgeInsets.only(right: 50),
child: Text(
'坚果',
style: GoogleFonts.montserrat(
color: Colors.white,
fontWeight: FontWeight.bold,
fontSize: 15),
),
),
Text(
'852851198@qq.com',
style: GoogleFonts.montserrat(
color: Colors.white, fontSize: 9),
)
],
)),
Positioned(
bottom: 0,
left: 50,
child: Align(
alignment: Alignment.bottomCenter,
child: Container(
height: 100,
width: 100,
decoration: const BoxDecoration(
color: Colors.grey,
shape: BoxShape.circle,
image: DecorationImage(
fit: BoxFit.cover,
image: AssetImage('assets/avatar.jpg')),
boxShadow: [
BoxShadow(blurRadius: 7, offset: Offset(0, 3))
],
)),
),
)
]),
),
ListView.builder(
physics: const NeverScrollableScrollPhysics(),
padding: const EdgeInsets.only(top: 30),
shrinkWrap: true,
itemCount: categories.length,
itemBuilder: (context, index) {
return GestureDetector(
onTap: () {},
child: Container(
height: 40,
decoration: const BoxDecoration(
borderRadius: BorderRadius.only(
bottomRight: Radius.circular(30),
bottomLeft: Radius.circular(30),
topLeft: Radius.circular(30),
topRight: Radius.circular(30)),
color: Colors.grey,
boxShadow: [BoxShadow(blurRadius: 4)]),
// width: 150,
margin: const EdgeInsets.symmetric(
horizontal: 20, vertical: 5),
alignment: Alignment.center,
child: Text(
categories[index],
style: const TextStyle(
fontSize: 12.5,
color: Colors.white,
fontWeight: FontWeight.w600),
),
),
);
})
],
),
),
),
));
}
}
笔记:

- 点赞
- 收藏
- 关注作者
评论(0)