【约束布局】ConstraintLayout 屏幕适配案例 ( 使用代码生成约束布局控件属性 )
【摘要】
文章目录
一、ConstraintLayout 屏幕适配案例二、使用代码生成约束布局
一、ConstraintLayout 屏幕适配案例
ConstraintLay...
一、ConstraintLayout 屏幕适配案例
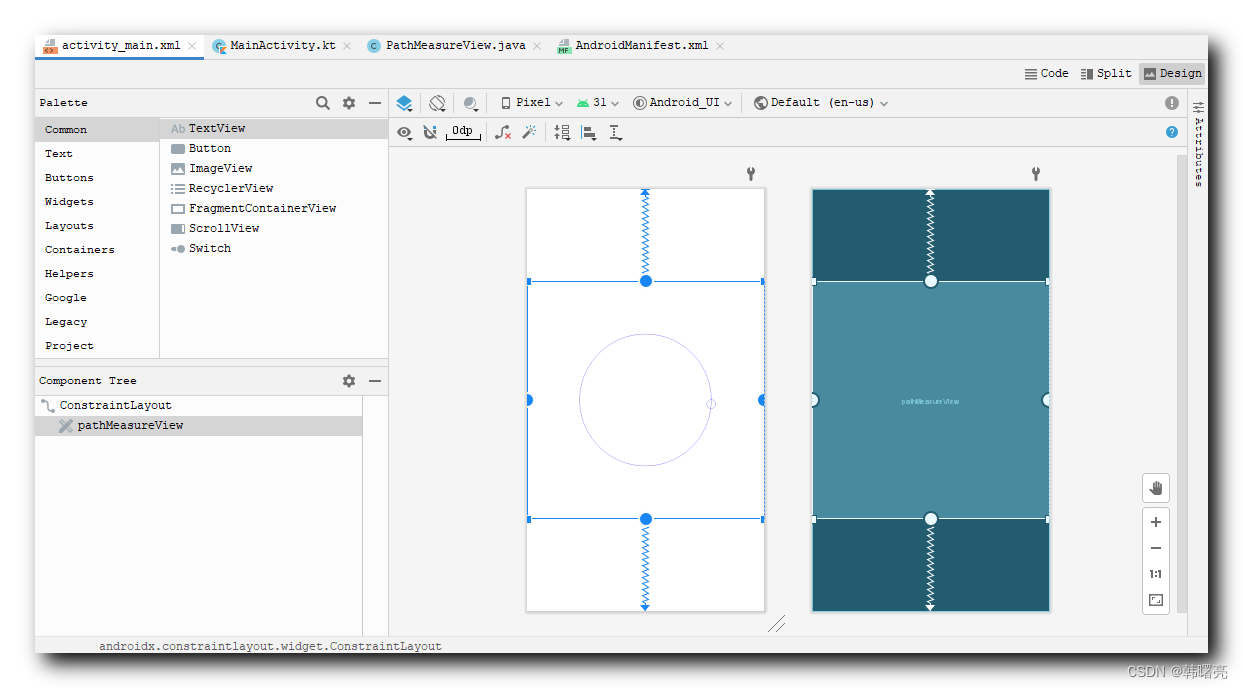
ConstraintLayout 屏幕适配案例 :
<?xml version="1.0" encoding="utf-8"?>
<androidx.constraintlayout.widget.ConstraintLayout
	xmlns:android="http://schemas.android.com/apk/res/android"
    xmlns:app="http://schemas.android.com/apk/res-auto"
    xmlns:tools="http://schemas.android.com/tools"
    android:layout_width="match_parent"
    android:layout_height="match_parent"
    tools:context=".MainActivity">

    <kim.hsl.android_ui.PathMeasureView
        android:id="@+id/pathMeasureView"
        android:layout_width="0dip"
        android:layout_height="0dip"

        app:layout_constraintHeight_default="percent"
        app:layout_constraintHeight_percent="0.5"

        app:layout_constraintWidth_default="percent"
        app:layout_constraintWidth_percent="0.5"

        app:layout_constraintDimensionRatio="1:1"

        app:layout_constraintLeft_toLeftOf="parent"
        app:layout_constraintRight_toRightOf="parent"
        app:layout_constraintHorizontal_bias="0.5"

        app:layout_constraintTop_toTopOf="parent"
        app:layout_constraintBottom_toBottomOf="parent"
        app:layout_constraintVertical_bias="0.5" />

</androidx.constraintlayout.widget.ConstraintLayout>
- 1
- 2
- 3
- 4
- 5
- 6
- 7
- 8
- 9
- 10
- 11
- 12
- 13
- 14
- 15
- 16
- 17
- 18
- 19
- 20
- 21
- 22
- 23
- 24
- 25
- 26
- 27
- 28
- 29
- 30
- 31
布局样式如下 :

二、使用代码生成约束布局
public class BoundaryCaculate {

	public static void main(String[] args) {
		caculate_constraint();
	}

	// 给定左上值计算
	public static void caculate_constraint() {

		// 相对于父类 比例计算 的原始数据 : 屏幕 宽高 , 其比例肯定是相对于父控件进行计算
		float width = 200, height = 260;

		// 计算 垂直 水平方向 bias 数据 , 子布局 , 如果是相对于父控件 , 就是 750, 1334
		// 计算流程 :
		// ① bias 宽度计算 : 计算出总的 bias 总长度 = width_inner - 控件长度 , 左侧值 / 总长度 = 水平方向的
		// bias 值
		// ② bias 高度计算 : 计算出总的 bias 总高度 = height_inner - 控件高度 , 顶部值 / 总高度 =
		// 垂直方向的 bias 值
		float width_inner = width, height_inner = height;

		// 中心点坐标
		float[][] left_top_data = {
				{ 0, 0 },
				{ 0, 186 },
				{ 400, 0 },
				{ 600, 0 },
				{ 800, 0 },
				{ 1000, 0 },

				{ 2, 260 },
				{ 200, 260 },
				{ 400, 260 },
				{ 600, 260 },
				{ 800, 260 },
				{ 1000, 260 }

		} ;

		// 图片坐标,0位置是宽,1位置是高
		float[][] width_height_data = {
				{ 200, 200 },
				{ 200, 78 },
				{ 200, 260 },
				{ 200, 260 },
				{ 200, 260 },
				{ 200, 260 },

				{ 200, 260 },
				{ 200, 260 },
				{ 200, 260 },
				{ 200, 260 },
				{ 200, 260 },
				{ 200, 260 }
		} ;

		for (int i = 0; i < left_top_data.length; i++) {
			float width_percent = width_height_data[i][0] / width;
			width_percent = format_float(width_percent);

			float height_percent = width_height_data[i][1] / height;
			height_percent = format_float(height_percent);

			float left = left_top_data[i][0];
			float top = left_top_data[i][1];

			float horizontal_bias = 0.5f;
			if (width_inner - width_height_data[i][0] != 0) {
				horizontal_bias = left / (width_inner - width_height_data[i][0]);
				horizontal_bias = format_float(horizontal_bias);
			}

			float vertical_bias = 0.5f;
			if ((height_inner - width_height_data[i][1]) != 0) {
				vertical_bias = top / (height_inner - width_height_data[i][1]);
				vertical_bias = format_float(vertical_bias);
			}

			float margin_parent_top = top / height;
			margin_parent_top = format_float(margin_parent_top);

			System.out.println("第" + i + "个点 : left : " + left + " , left : " + top + " , width : "
					+ width_height_data[i][0] + " , height : " + width_height_data[i][1] + "\n");

			System.out.println("android:layout_width=\"0dip\"\n" + "android:layout_height=\"0dip\"\n\n" +

			"app:layout_constraintHeight_default=\"percent\"\n" + "app:layout_constraintHeight_percent=\""
					+ height_percent + "\"\n\n" +

			"app:layout_constraintWidth_default=\"percent\"\n" + "app:layout_constraintWidth_percent=\"" + width_percent
					+ "\"\n\n\n" +

			"app:layout_constraintDimensionRatio=\"" + (int) width_height_data[i][0] + ":"
					+ (int) width_height_data[i][1] + "\"\n\n" +

			"app:layout_constraintLeft_toLeftOf=\"parent\"\n" + "app:layout_constraintRight_toRightOf=\"parent\"\n"
					+ "app:layout_constraintHorizontal_bias=\"" + horizontal_bias + "\"\n\n" +

			"app:layout_constraintTop_toTopOf=\"parent\"\n" + "app:layout_constraintBottom_toBottomOf=\"parent\"\n"
					+ "app:layout_constraintVertical_bias=\"" + vertical_bias + "\"\n\n" +

			"android:scaleType=\"fitXY\"\n" + "android:src=\"@mipmap/actual_\"\n");
		}
	}
}
- 1
- 2
- 3
- 4
- 5
- 6
- 7
- 8
- 9
- 10
- 11
- 12
- 13
- 14
- 15
- 16
- 17
- 18
- 19
- 20
- 21
- 22
- 23
- 24
- 25
- 26
- 27
- 28
- 29
- 30
- 31
- 32
- 33
- 34
- 35
- 36
- 37
- 38
- 39
- 40
- 41
- 42
- 43
- 44
- 45
- 46
- 47
- 48
- 49
- 50
- 51
- 52
- 53
- 54
- 55
- 56
- 57
- 58
- 59
- 60
- 61
- 62
- 63
- 64
- 65
- 66
- 67
- 68
- 69
- 70
- 71
- 72
- 73
- 74
- 75
- 76
- 77
- 78
- 79
- 80
- 81
- 82
- 83
- 84
- 85
- 86
- 87
- 88
- 89
- 90
- 91
- 92
- 93
- 94
- 95
- 96
- 97
- 98
- 99
- 100
- 101
- 102
- 103
- 104
输出结果 : 可以直接作为约束布局中组件的属性。
第0个点 : left : 0.0 , left : 0.0 , width : 200.0 , height : 200.0

android:layout_width="0dip"
android:layout_height="0dip"

app:layout_constraintHeight_default="percent"
app:layout_constraintHeight_percent="0.76923"

app:layout_constraintWidth_default="percent"
app:layout_constraintWidth_percent="1.0"


app:layout_constraintDimensionRatio="200:200"

app:layout_constraintLeft_toLeftOf="parent"
app:layout_constraintRight_toRightOf="parent"
app:layout_constraintHorizontal_bias="0.5"

app:layout_constraintTop_toTopOf="parent"
app:layout_constraintBottom_toBottomOf="parent"
app:layout_constraintVertical_bias="0.0"

android:scaleType="fitXY"
android:src="@mipmap/actual_"
- 1
- 2
- 3
- 4
- 5
- 6
- 7
- 8
- 9
- 10
- 11
- 12
- 13
- 14
- 15
- 16
- 17
- 18
- 19
- 20
- 21
- 22
- 23
- 24
文章来源: hanshuliang.blog.csdn.net,作者:韩曙亮,版权归原作者所有,如需转载,请联系作者。
原文链接:hanshuliang.blog.csdn.net/article/details/125158941
【版权声明】本文为华为云社区用户转载文章,如果您发现本社区中有涉嫌抄袭的内容,欢迎发送邮件进行举报,并提供相关证据,一经查实,本社区将立刻删除涉嫌侵权内容,举报邮箱:
cloudbbs@huaweicloud.com
- 点赞
- 收藏
- 关注作者


评论(0)