Android 12 快速适配要点

Android 12 需要更新适配点并不多,本篇主要介绍最常见的两个需要适配的点:android:exported 和 SplashScreen 。
一、android:exported
它主要是设置 Activity 是否可由其他应用的组件启动, “true” 则表示可以,而“false”表示不可以。
若为“
false”,则Activity只能由同一应用的组件或使用同一用户 ID 的不同应用启动。
当然不止是 Activity, Service 和 Receiver 也会有 exported 的场景。
一般情况下如果使用了 intent-filter,则不能将 exported 设置为“false”,不然在 Activity 被调用时系统会抛出 ActivityNotFoundException 异常。
相反如果没有
intent-filter,那就不应该把Activity的exported设置为true,这可能会在安全扫描时被定义为安全漏洞。
而在 Android 12 的平台上,也就是使用 targetSdkVersion 31 时,那么你就需要注意:
如果 Activity 、 Service 或 Receiver 使用 intent-filter ,并且未显式声明 android:exported 的值,App 将会无法安装。
这时候你可能会选择去 AndroidManifest 一个一个手动修改,但是如果你使用的 SDK 或者第三方库没有支持怎么办?或者你想要打出不同 target 平台的包?这时候下面这段 gradle 脚本可以给你省心:
com.android.tools.build:gradle:3.4.3 以下版本
/**
 * 修改 Android 12 因为 exported 的构建问题
 */
android.applicationVariants.all { variant ->
    variant.outputs.all { output ->
        output.processResources.doFirst { pm ->
            String manifestPath = output.processResources.manifestFile
            def manifestFile = new File(manifestPath)
            def xml = new XmlParser(false, true).parse(manifestFile)
            def exportedTag = "android:exported"
            ///指定 space
            def androidSpace = new groovy.xml.Namespace('http://schemas.android.com/apk/res/android', 'android')

            def nodes = xml.application[0].'*'.findAll {
                //挑选要修改的节点,没有指定的 exported 的才需要增加
                (it.name() == 'activity' || it.name() == 'receiver' || it.name() == 'service') && it.attribute(androidSpace.exported) == null

            }
            ///添加 exported,默认 false
            nodes.each {
                def isMain = false
                it.each {
                    if (it.name() == "intent-filter") {
                        it.each {
                            if (it.name() == "action") {
                                if (it.attributes().get(androidSpace.name) == "android.intent.action.MAIN") {
                                    isMain = true
                                    println("......................MAIN FOUND......................")
                                }
                            }
                        }
                    }
                }
                it.attributes().put(exportedTag, "${isMain}")
            }

            PrintWriter pw = new PrintWriter(manifestFile)
            pw.write(groovy.xml.XmlUtil.serialize(xml))
            pw.close()
        }
    }

}
- 1
- 2
- 3
- 4
- 5
- 6
- 7
- 8
- 9
- 10
- 11
- 12
- 13
- 14
- 15
- 16
- 17
- 18
- 19
- 20
- 21
- 22
- 23
- 24
- 25
- 26
- 27
- 28
- 29
- 30
- 31
- 32
- 33
- 34
- 35
- 36
- 37
- 38
- 39
- 40
- 41
- 42
- 43
com.android.tools.build:gradle:4.1.0 以上版本
/**
 * 修改 Android 12 因为 exported 的构建问题
 */

android.applicationVariants.all { variant ->
    variant.outputs.each { output ->
        def processManifest = output.getProcessManifestProvider().get()
        processManifest.doLast { task ->
            def outputDir = task.multiApkManifestOutputDirectory
            File outputDirectory
            if (outputDir instanceof File) {
                outputDirectory = outputDir
            } else {
                outputDirectory = outputDir.get().asFile
            }
            File manifestOutFile = file("$outputDirectory/AndroidManifest.xml")
            println("----------- ${manifestOutFile} ----------- ")

            if (manifestOutFile.exists() && manifestOutFile.canRead() && manifestOutFile.canWrite()) {
                def manifestFile = manifestOutFile
                ///这里第二个参数是 false ,所以 namespace 是展开的,所以下面不能用 androidSpace,而是用 nameTag
                def xml = new XmlParser(false, false).parse(manifestFile)
                def exportedTag = "android:exported"
                def nameTag = "android:name"
                ///指定 space
                //def androidSpace = new groovy.xml.Namespace('http://schemas.android.com/apk/res/android', 'android')

                def nodes = xml.application[0].'*'.findAll {
                    //挑选要修改的节点,没有指定的 exported 的才需要增加
                    //如果 exportedTag 拿不到可以尝试 it.attribute(androidSpace.exported)
                    (it.name() == 'activity' || it.name() == 'receiver' || it.name() == 'service') && it.attribute(exportedTag) == null

                }
                ///添加 exported,默认 false
                nodes.each {
                    def isMain = false
                    it.each {
                        if (it.name() == "intent-filter") {
                            it.each {
                                if (it.name() == "action") {
                                    //如果 nameTag 拿不到可以尝试 it.attribute(androidSpace.name)
                                    if (it.attributes().get(nameTag) == "android.intent.action.MAIN") {
                                        isMain = true
                                        println("......................MAIN FOUND......................")
                                    }
                                }
                            }
                        }
                    }
                    it.attributes().put(exportedTag, "${isMain}")
                }

                PrintWriter pw = new PrintWriter(manifestFile)
                pw.write(groovy.xml.XmlUtil.serialize(xml))
                pw.close()

            }

        }
    }
}
- 1
- 2
- 3
- 4
- 5
- 6
- 7
- 8
- 9
- 10
- 11
- 12
- 13
- 14
- 15
- 16
- 17
- 18
- 19
- 20
- 21
- 22
- 23
- 24
- 25
- 26
- 27
- 28
- 29
- 30
- 31
- 32
- 33
- 34
- 35
- 36
- 37
- 38
- 39
- 40
- 41
- 42
- 43
- 44
- 45
- 46
- 47
- 48
- 49
- 50
- 51
- 52
- 53
- 54
- 55
- 56
- 57
- 58
- 59
- 60
- 61
- 62
com.android.tools.build:gradle:7.0.3 以下版本
调试中,目前 AGP 有奇怪的 Bug,XmlUtil 无法正常序列化。
这段脚本你可以直接放到 app/build.gradle 下执行,也可以单独放到一个 gradle 文件之后 apply 引入,它的作用就是:
在打包过程中检索所有没有设置 exported 的组件,给他们动态配置上 exported。这里有个特殊需要注意的是,因为启动 Activity 默认就是需要被 Launcher 打开的,所以 "android.intent.action.MAIN" 需要 exported 设置为 true 。(PS:应该是用 LAUNCHER 类别,这里故意用 MAIN)
如果有需要,还可以自己增加判断设置了
"intent-filter"的才配置exported。
二、SplashScreen
Android 12 新增加了 SplashScreen 的 API,它包括启动时的进入应用的动作、显示应用的图标画面,以及展示应用本身的过渡效果。
它大概由如下 4 个部分组成,这里需要注意:
- 1 最好是矢量的可绘制对象,当然它可以是静态或动画形式。
- 2 是可选的,也就是图标的背景。
- 与自适应图标一样,前景的三分之一被遮盖 (3)。
- 4 就是窗口背景。
启动画面动画机制由进入动画和退出动画组成。
- 进入动画由系统视图到启动画面组成,这由系统控制且不可自定义。
- 退出动画由隐藏启动画面的动画运行组成。如果要对其进行自定义,可以通过
SplashScreenView自定义。

更详细的介绍这里就不展开了,有兴趣的可以自己看官方的资料: https://developer.android.com/guide/topics/ui/splash-screen ,这里主要介绍下如何适配和使用的问题。
首先不管你的 TargetSDK 什么版本,当你运行到 Android 12 的手机上时,所有的 App 都会增加 SplashScreen 的功能。
如果你什么都不做,那 App 的 Launcher 图标会变成 SplashScreen 界面的那个图标,而对应的原主题下 windowBackground 属性指定的颜色,就会成为 SplashScreen 界面的背景颜色。这个启动效果在所有应用的冷启动和热启动期间会出现。
其实不适配好像也没啥问题。
关于如何迁移和使用 SplashScreen 可以查阅官方详细文档: https://developer.android.com/guide/topics/ui/splash-screen/migrate
另外还可以参考 《Jetpack新成员SplashScreen:打造全新的App启动画面》 这篇文章,文章详细介绍了如果使用官方的 Jetpack 库来让这个效果适配到更低的 Target 平台。
而正常情况下我们可以做的就是:
- 1、升级
compileSdkVersion 31、targetSdkVersion 31&buildToolsVersion '31.0.0' - 2、 添加依赖
implementation "androidx.core:core-splashscreen:1.0.0-alpha02" - 3、增加
values-v31的目录 - 4、添加
styles.xml对应的主题,例如:
<resources>
    <style name="LaunchTheme" parent="Theme.SplashScreen">
        <item name="windowSplashScreenBackground">@color/splashScreenBackground</item>
        <!--<item name="windowSplashScreenAnimatedIcon">@drawable/splash</item>-->
        <item name="windowSplashScreenAnimationDuration">500</item>
        <item name="postSplashScreenTheme">@style/AppTheme</item>
    </style>
</resources>
- 1
- 2
- 3
- 4
- 5
- 6
- 7
- 8
- 5、给你的启动
Activity添加这个主题,不同目录下使用不同主题来达到适配效果。
PS: 我个人是一点都不喜欢这个玩意。
三、其他
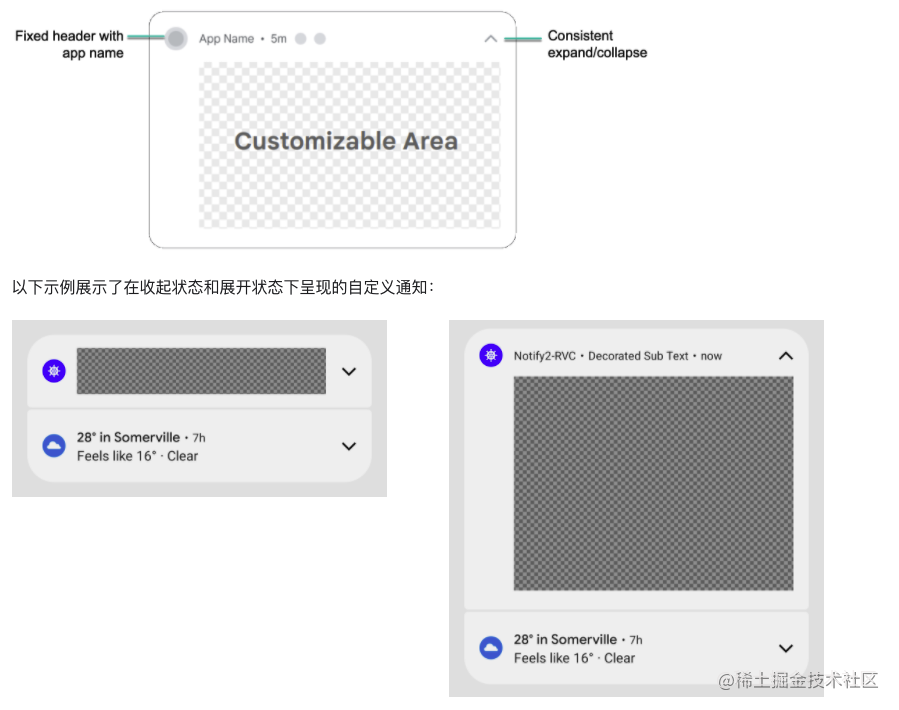
1、通知中心又又又变了
Android 12 更改了可以完全自定义通知外观和行为,以前自定义通知能够使用整个通知区域并提供自己的布局和样式,现在它行为变了。
使用 TargetSDK 为 31 的 App,包含自定义内容视图的通知将不再使用完整通知区域;而是使用系统标准模板。
此模板可确保自定义通知在所有状态下都与其他通知长得一模一样,例如在收起状态下的通知图标和展开功能,以及在展开状态下的通知图标、应用名称和收起功能,与 Notification.DecoratedCustomViewStyle 的行为几乎完全相同。
2、Android App Links 验证
Android App Links 是一种特殊类型的 DeepLink ,用于让 Web 直接在 Android 应用中打开相应对应 App 内容而无需用户选择应用。使用它需要执行以下步骤:
如何使用可查阅:https://developer.android.com/training/app-links/verify-site-associations#auto-verification
使用 TargetSDK 为 31 的 App,系统对 Android App Links 的验证方式进行了一些调整,这些调整会提升应用链接的可靠性。
如果你的 App 是依靠 Android App Links 验证在应用中打开网页链接,那么在为 Android App Links 验证添加 intent 过滤器时,请确保使用正确的格式,尤其需要注意的是确保这些
intent-filter包含 BROWSABLE 类别并支持https方案。
3、安全和隐私设置
3.1、大致位置
使用 TargetSDK 为 31 的 App,用户可以请求应用只能访问大致位置信息。
如果 App 请求
ACCESS_COARSE_LOCATION但未请求ACCESS_FINE_LOCATION那么不会有任何影响。
TargetSDK 为 31 的 App 请求 ACCESS_FINE_LOCATION 运行时权限,还必须请求 ACCESS_COARSE_LOCATION 权限。当 App 同时请求这两个权限时,系统权限对话框将为用户提供以下新选项:

3.2、SameSite Cookie
Cookie 的 SameSite 属性决定了它是可以与任何请求一起发送,还是只能与同站点请求一起发送。
- 没有
SameSite属性的 Cookie 被视为SameSite=Lax。 - 带有
SameSite=None的 Cookie 还必须指定Secure属性,这意味着它们需要安全的上下文,需要通过 HTTPS 发送。 - 站点的 HTTP 版本和 HTTPS 版本之间的链接现在被视为跨站点请求,因此除非将 Cookie 正确标记为
SameSite=None; Secure,否则 Cookie 不会被发送。
在 WebView devtools 中 切换界面标志 webview-enable-modern-cookie-same-site,可以在测试设备上手动启用 SameSite 行为。
4、应用休眠
Android 12 在 Android 11(API 级别 30)中引入的自动重置权限行为 的基础上进行了扩展。
如果 TargetSDK 为 31 的 App 用户几个月不打开,则系统会自动重置授予的所有权限并将App 置于休眠状态。
更多可以查阅:https://developer.android.com/topic/performance/app-hibernation
四、最后
大致需要注意的就是这些,基本上其实除了 exproted 和 SplashScreen 之外,其他基本都不怎么需要适配,事实上 SplashScreen 我个人觉得会很遭产品嫌弃,毕竟 Material Design 在国内的待遇确实有点惨,没办法去掉 SplashScreen 这点估计需要和产品扯皮一段时间,不过产品和设计一般没有 Android 手机,何况 Android 12,所以日后再说吧~
文章来源: carguo.blog.csdn.net,作者:恋猫de小郭,版权归原作者所有,如需转载,请联系作者。
原文链接:carguo.blog.csdn.net/article/details/121687834

- 点赞
- 收藏
- 关注作者
评论(0)