Spring Cloud Alibaba 系列之 Sentinel(服务容错)
Spring Cloud Alibaba 系列之 Sentinel(服务容错)
一、前言
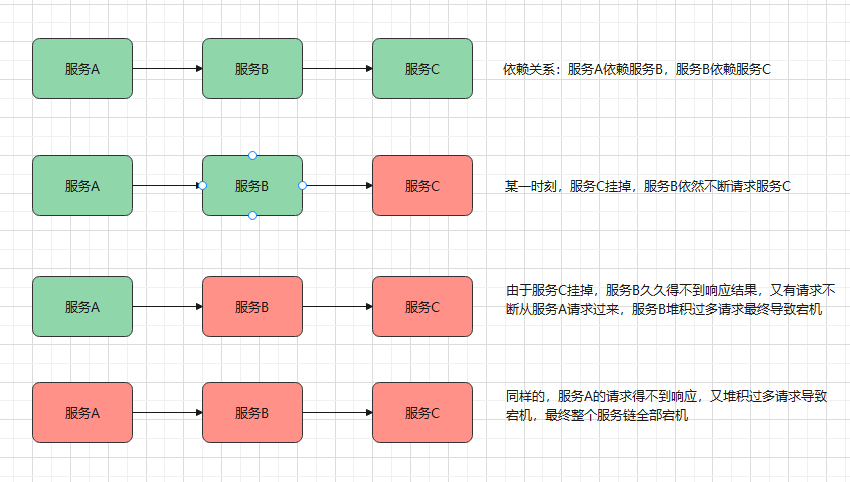
在微服务架构中,我们将业务拆分成一个个的服务,服务与服务之间可以相互调用,但是由于网络原因或者自身的原因,服务并不能保证服务的100%可用,如果单个服务出现问题,调用这个服务就会出现网络延迟,此时若有大量的网络涌入,会形成任务堆积,最终导致服务瘫痪。
由于服务与服务之间的依赖性,故障会传播,会对整个微服务系统造成灾难性的严重后果,这就是服务故障的 “雪崩效应”,如下图:
要防止雪崩的扩散,我们就要做好服务的容错,常见的容错方案如下:
- 隔离
它是指将系统按照一定的原则划分为若干个服务模块,各个模块之间相对独立,无强依赖。当有故障发生时,能将问题和影响隔离在某个模块内部,而不扩散风险,不波及其它模块,不影响整体的系统服务。常见的隔离方式有:线程池隔离和信号量隔离.
 复制
- 超时
在上游服务调用下游服务的时候,设置一个最大响应时间,如果超过这个时间,下游未作出反应,就断开请求,释放掉线程
 复制
- 限流
限制系统的输入和输出流量已达到保护系统的目的。为了保证系统的稳固运行,一旦达到的需要限制的阈值,就需要限制流量并采取少量措施以完成限制流量的目的
 复制
- 熔断
在互联网系统中,当下游服务因访问压力过大而响应变慢或失败,上游服务为了保护系统整体的可用性,可以暂时切断对下游服务的调用。这种牺牲局部,保全整体的措施就叫做熔断
 复制
- 降级
为服务提供一个托底方案,一旦服务无法正常调用,就使用托底方案
 复制
二、Sentinel 介绍
2.1 基础介绍
Sentinel (分布式系统的流量防卫兵) 是阿里开源的一套用于服务容错的综合性解决方案。它以流量为切入点,从流量控制、熔断降级、系统负载保护等多个维度来保护服务的稳定性。
Sentinel 具有以下特征:
- 丰富的应用场景: Sentinel 承接了阿里巴巴近 10 年的双十一大促流量的核心场景,例如秒杀(即突发流量控制在系统容量可以承受的范围)、消息削峰填谷、实时熔断下游不可用应用等。
- 完备的实时监控: Sentinel 同时提供实时的监控功能。您可以在控制台中看到接入应用的单台机器秒级数据,甚至 500 台以下规模的集群的汇总运行情况。
- 广泛的开源生态: Sentinel 提供开箱即用的与其它开源框架/库的整合模块,例如与 Spring Cloud、Dubbo、gRPC 的整合。您只需要引入相应的依赖并进行简单的配置即可快速地接入 Sentinel。
- 完善的 SPI 扩展点: Sentinel 提供简单易用、完善的 SPI 扩展点。您可以通过实现扩展点,快速的定制逻辑。例如定制规则管理、适配数据源等。
2.2 概念介绍
**资源:**Sentinel 要保护的东西。 Java 应用程序中的任何内容,可以是一个服务,也可以是一个方法,甚至可以是一段代码。
规则: 用来定义如何进行保护资源的。作用在资源之上, 定义以什么样的方式保护资源,主要包括流量控制规则、熔断降级规则以及系统保护规则。
2.3 架构体系介绍
Sentinel 架构分为2部分:
- 核心库(Java 客户端): 不依赖任何框架/库,能够运行于所有 Java 运行时环境,同时对 Dubbo / Spring Cloud 等框架也有较好的支持。
- 控制台(Dashboard): 主要负责管理推送规则、监控、集群限流分配管理、机器发现等。
我们通过在 sentinel 控制台上设置规则来作用到客户端上,其运行原理如下图:
三、环境搭建
3.1 安装 Sentinel 控制台
Sentinel 提供一个轻量级的控制台, 它提供机器发现、单机资源实时监控以及规则管理等功能。
- 下载 Sentinel 控制台 jar 包,笔者下载 1.8.2 版本 jar 包。
- 启动控制台:
java -Dserver.port=8081 -Dcsp.sentinel.dashboard.server=localhost:8081 -Dproject.name=sentinel-dashboard -jar sentinel-dashboard-1.8.2.jar
 复制
3.2 微服务集成 Sentinel 客户端
- 创建 Spring Boot 项目,添加如下依赖:
<parent>
    <groupId>org.springframework.boot</groupId>
    <artifactId>spring-boot-starter-parent</artifactId>
    <version>2.2.5.RELEASE</version>
</parent>


<dependencies>
    <dependency>
        <groupId>org.springframework.boot</groupId>
        <artifactId>spring-boot-starter-web</artifactId>
    </dependency>

    <dependency>
        <groupId>org.springframework.boot</groupId>
        <artifactId>spring-boot-starter-test</artifactId>
        <scope>test</scope>
    </dependency>

    <dependency>
        <groupId>com.alibaba.cloud</groupId>
        <artifactId>spring-cloud-starter-alibaba-sentinel</artifactId>
    </dependency>

    <dependency>
        <groupId>org.projectlombok</groupId>
        <artifactId>lombok</artifactId>
        <optional>true</optional>
    </dependency>

</dependencies>

<dependencyManagement>
    <dependencies>
        <!-- spring cloud 依赖 -->
        <dependency>
            <groupId>org.springframework.cloud</groupId>
            <artifactId>spring-cloud-dependencies</artifactId>
            <version>Hoxton.SR3</version>
            <type>pom</type>
            <scope>import</scope>
        </dependency>

        <!-- spring cloud alibaba 依赖-->
        <dependency>
            <groupId>com.alibaba.cloud</groupId>
            <artifactId>spring-cloud-alibaba-dependencies</artifactId>
            <version>2.2.1.RELEASE</version>
            <type>pom</type>
            <scope>import</scope>
        </dependency>
    </dependencies>
</dependencyManagement>
 复制
- 配置文件 application.yml:
server:
  port: 8080

spring:
  application:
    name: sentinel-test
  cloud:
    sentinel:
      transport:
        port: 8719 #跟控制台交流的端口,随意指定一个未使用的端口即可
        dashboard: localhost:8081 # 下边启动 dashboard 服务的地址
 复制
- 编写测试类:
@Service
public class HelloService {

    public String say(String message) {
        return message;
    }
}

@RestController
public class HelloController {

    @Autowired
    private HelloService helloService;

    @RequestMapping("/sayHello")
    public String sayHello() {
        return this.helloService.say("hello");
    }

    @RequestMapping("/sayHi")
    public String sayHi() {
        return this.helloService.say("hi");
    }
}
 复制
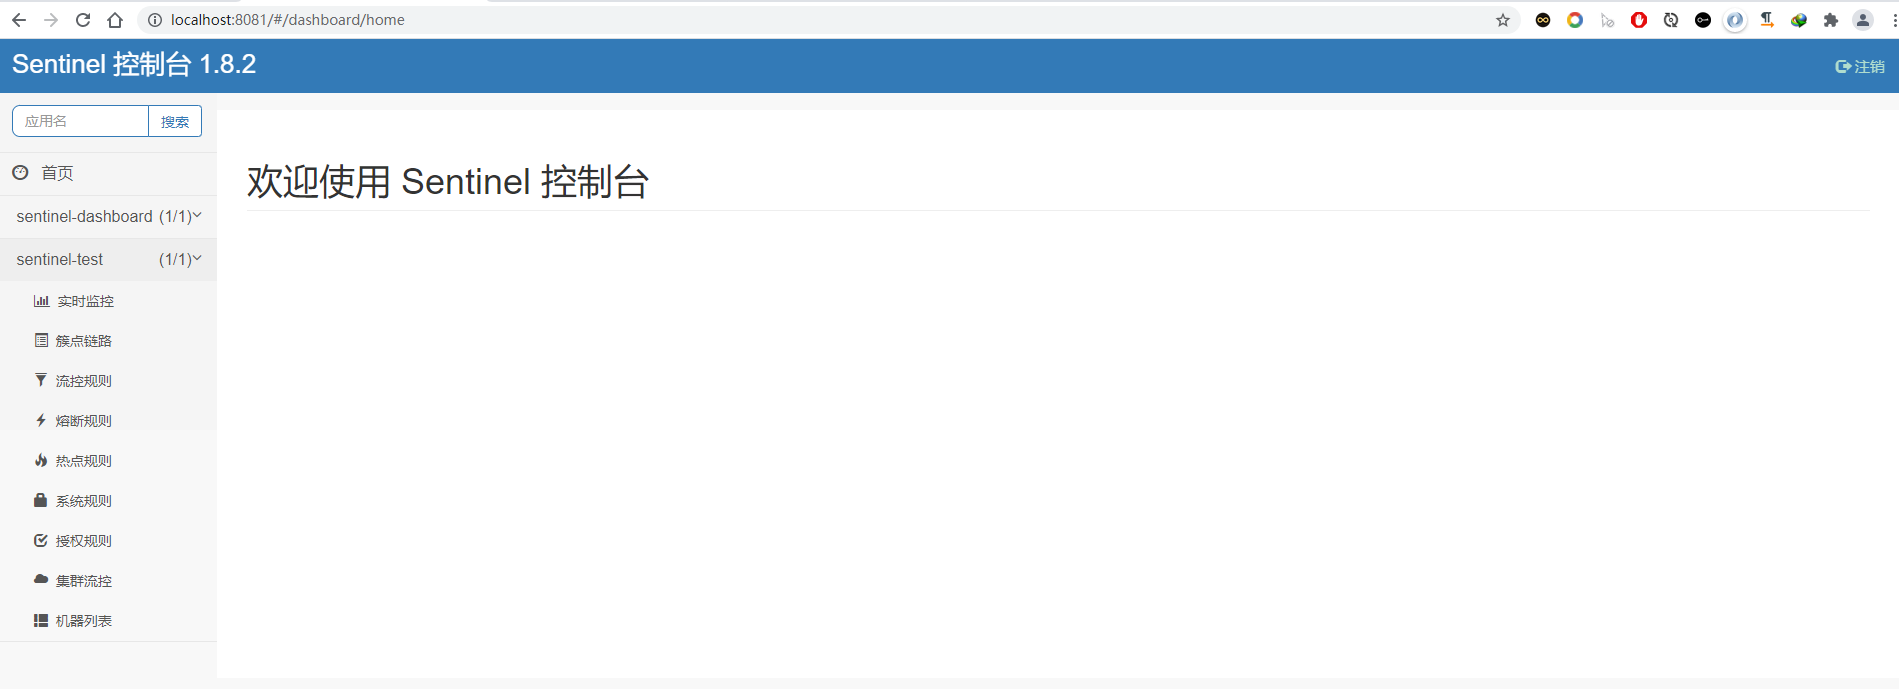
- 启动微服务客户端。在 3.1 步骤时我们启动了 Sentinel 服务,打开浏览器访问其控制台输入 http://localhost:8081 ,默认账号 sentinel/sentinel。
补充:如需修改账户,在启动 jar 包的命令后添加如下参数:
-Dsentinel.dashboard.auth.username=admin
-Dsentinel.dashboard.auth.password=123456
 复制
访问结果如下:
注意:需要先访问微服务接口(任意接口),sentinel-test 菜单才会出现
Sentinel 控制台提供了一个操作界面,我们需要将微服务程序注册到控制台上, 即在微服务中指定控制台的地址(上边配置文件 dashboard 值), 并且还要开启一个跟控制台传递数据的端口(上边配置文件 port 的值), 控制台也可以通过此端口调用微服务中的监控程序获取微服务的各种信息。
补充:Sentinel 单独给我们提供一个接口用于获取信息:http://localhost:8719/api
四、Sentinel 规则
Sentinel 实现限流、服务降级等功能都是通过在控制台配置 规则 来完成的,接下来笔者将介绍和演示常用的规则。
4.1 流控规则
流量控制,其原理是监控应用流量的QPS(每秒查询率)或并发线程数等指标,当达到指定的阈值时对流量进行控制,以避免被瞬时的流量高峰冲垮,从而保障应用的高可用性。
Sentinel 提供了 3 中控制流量的模式:
- 直接流控模式(默认)
- 关联流控模式
- 链路流控模式
在创建流控规则时,我们需要设置如下属性:
| 属性 | 说明 |
|---|---|
| 资源名 | 规则的作用对象,如请求路径 |
| 针对来源 | 指定对哪个微服务进行限流,默认指default,意思是不区分来源,全部限制 |
| 资源名 | 规则的作用对象,如请求路径 |
| 阈值类型 | QPS / 线程数 |
| 单机阈值 | - |
| 流控模式 | 直接 / 关联 / 链路 |
| 流控效果 | 快速失败 / Warm Up / 排队等待 |
其中:
- 快速失败:默认的流量控制方式,当 QPS 超过任意规则的阈值后,新的请求就会被立即拒绝,拒绝方式为抛出 FlowException
- Warm Up:它从开始阈值到最大 QPS 阈值会有一个缓冲阶段,一开始的阈值是最大 QPS 阈值的 1/3,然后慢慢增长,直到最大阈值,适用于将突然增大的流量转换为缓步增长的场景。
- 排队等待:让请求以均匀的速度通过,单机阈值为每秒通过数量,其余的排队等待; 它还会让设 置一个超时时间,当请求超过超时间时间还未处理,则会被丢弃。
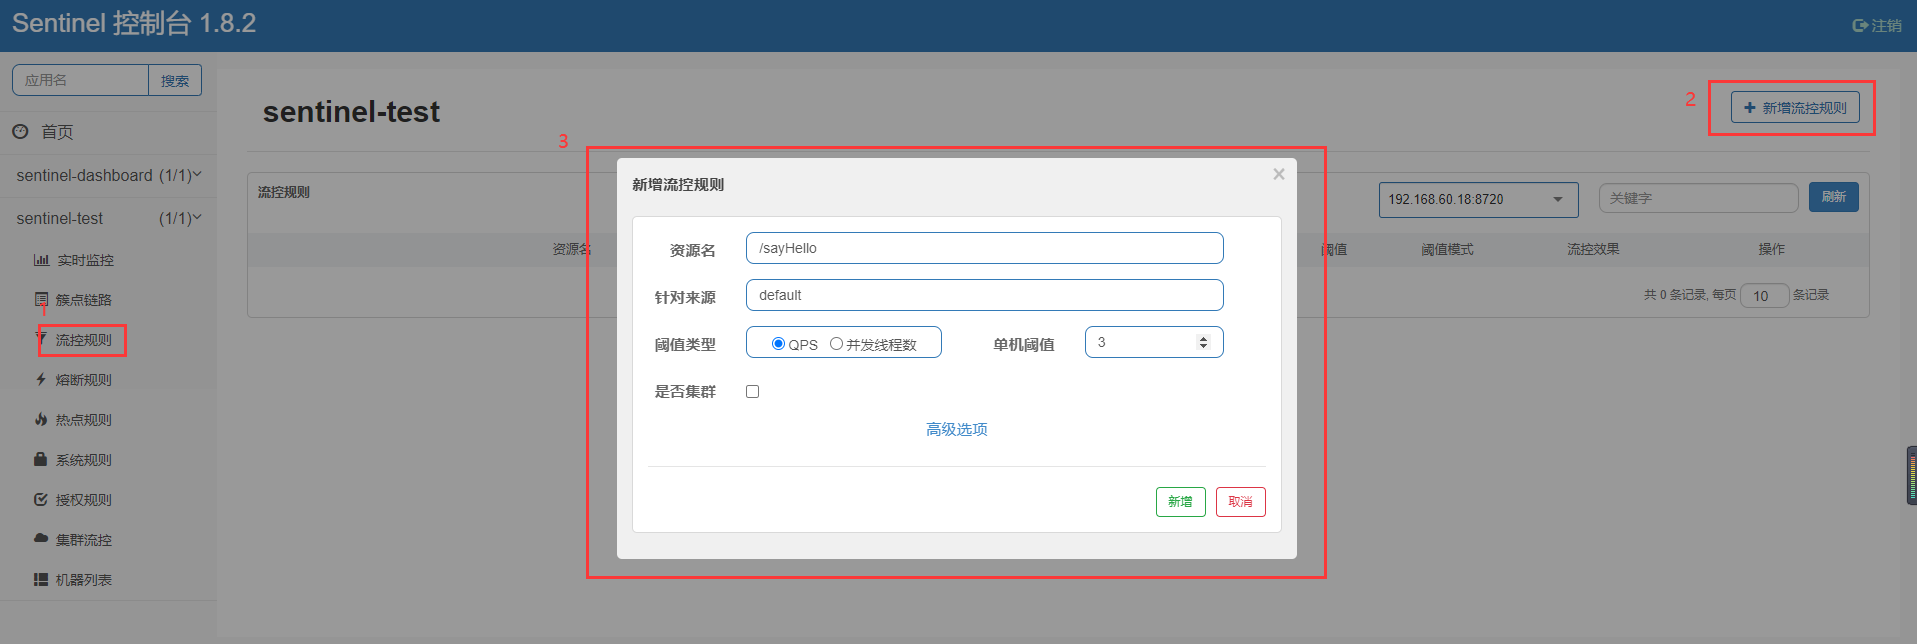
来到 sentinel 控制台,我们在 sentinel-test 菜单中添加新的流控规则,如下图:
本次测试,我们使用默认的直接流控模式,我们设置阀值类型是 QPS,阀值为 3,即每秒请求量大于 3 的时候开始限流。
笔者使用 postman 设置10次批量请求,访问 http://localhost:8080/sayHello 接口,结果如下图:
在 1 秒内发起 10 次请求,只有前 3 个请求正常返回结果,剩下 7 个请求被限流返回 too many requests 提示,流控规则生效。
关联流控模式
当指定接口关联的接口达到限流条件时,开启对指定接口开启限流。
创建新的流控规则,资源名: /sayHello ,关联资源: /sayHi,阀值类型:QPS,单机阀值依然是 3。使用 JMeter 对 /sayHi 发起请求:
请求关联资源接口,超过阀值依然对指定的资源接口进行限流。
链路流控模式:
当从某个接口过来的资源达到限流条件时,开启限流。它的功能有点类似于针对来源配置项,区别在于:针对来源是针对上级微服务,而链路流控是针对上级接口,也就是说它的粒度更细。
本次演示使用了是 2.2.1.RELEASE 版本的 Spring Cloud Alibaba,其整合的 sentinel 使用 1.7.1 版本。 由于版本问题,该模式存在 BUG,故不再演示,详细信息查看 Sentinel issue
4.2 降级规则
降级规则就是设置当满足什么条件的时候,对服务进行降级。
Sentinel 提供了三套降级规则:
- 慢调用比例:当资源的平均响应时间超过 RT 之后,资源进入准降级状态。
- 异常比例:当资源的每秒异常总数占通过量的比值超过阈值之后,资源进入降级状态,即在接下的熔断时长内,对这个方法的调用都会自动地返回。
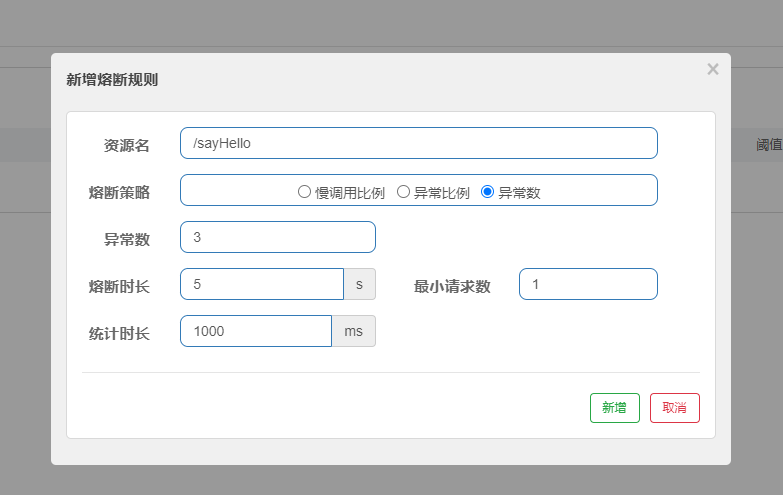
- 异常数:当资源近 1 分钟的异常数目超过阈值之后会进行服务降级。
创建降级规则时,需要用到如下属性配置:
| 属性 | 说明 |
|---|---|
| 资源名 | 规则的作用对象 |
| 熔断策略 | 慢调用比例(默认)/ 异常比例 /异常数策略 |
| 最大 RT | 即 Round Trip Time,最大响应时间 |
| 最小请求数 | 熔断触发的最小请求数,请求数小于该值时即使异常比率超出阈值也不会熔断,默认值:5 |
| 熔断时长 | 单位为 s |
| 比例阈值 | - |
- 配置非常简单,我们拿异常数熔断策略为例,先修改测试类:
@RequestMapping("/sayHello")
public String sayHello() {
    try {
        int a = 3 / 0;
    } catch (Exception e) {
        throw new RuntimeException("运算异常");
    }
    return this.helloService.say("hello");
}
 复制
- 创建降级规则:
- 测试结果:
请求 4 次接口,前 3 次服务抛异常,第 4 次服务降级。
4.3 热点规则
针对资源的热点参数而定制规则。热点参数限流会统计传入参数中的热点参数,并根据配置的限流阈值与模式,对包含热点参数的资源调用进行限流。
热点参数限流可以看做是一种特殊的流量控制,仅对包含热点参数的资源调用生效。
创建热点规则时,需要用到如下属性配置:
| 属性 | 说明 |
|---|---|
| 资源名 | 规则的作用对象 |
| 参数索引 | 对应 SphU.entry(xxx, args) 中的参数索引位置 |
| 单机阈值 | - |
| 统计窗口时长 | 单位:秒 |
- 接下来我们演示一下效果,创建一个新接口,搭配 @SentinelResource 注解:
@RequestMapping("/sayGoodBye")
@SentinelResource("say")
public String sayGoodBye(String name, Integer type) {
    return this.helloService.say(name);
}
 复制
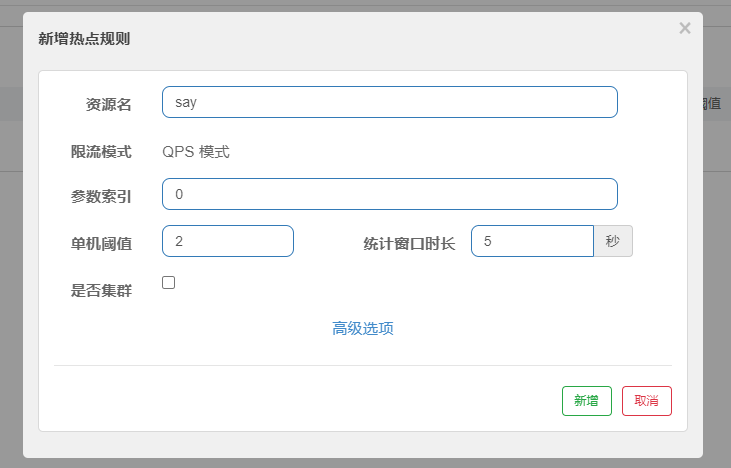
- 创建热点规则,如下图:
针对资源的第一个参数进行流量控制,阀值为2。
注意:图中资源的 say 对应 @SentinelResource 中的值
- 我们访问接口 http://localhost:8080/sayGoodBye?name=zhangsan&type=1 ,测试结果:
请求 2 次接口后,接口被限流。
4.4 系统规则
系统保护规则是从应用级别的入口流量进行控制,从单台机器的 load、CPU 使用率、平均 RT、入口 QPS 和并发线程数等几个维度监控应用指标,让系统尽可能跑在最大吞吐量的同时保证系统整体的稳定性。
系统保护规则是应用整体维度的,而不是资源维度的,并且仅对 入口流量生效。
系统规则支持以下的模式:
- Load 自适应(仅对 Linux/Unix-like 机器生效):系统的 load1 作为启发指标,进行自适应系统保护。当系统 load1 超过设定的启发值,且系统当前的并发线程数超过估算的系统容量时才会触发系统保护(BBR 阶段)。系统容量由系统的 maxQps * minRt 估算得出。设定参考值一般是 CPU cores * 2.5。
- CPU usage(1.5.0+ 版本):当系统 CPU 使用率超过阈值即触发系统保护(取值范围 0.0-1.0),比较灵敏。
- 平均 RT:当单台机器上所有入口流量的平均 RT 达到阈值即触发系统保护,单位是毫秒。
- 并发线程数:当单台机器上所有入口流量的并发线程数达到阈值即触发系统保护。
- 入口 QPS:当单台机器上所有入口流量的 QPS 达到阈值即触发系统保护。
系统规则的创建步骤与上文的一致,此处不再演示。
4.5 授权规则
很多时候,我们需要根据调用来源来判断该次请求是否允许放行,这时候可以使用 Sentinel 的来源访问控制的功能。
创建授权规则时,需要用到如下属性配置:
| 属性 | 说明 |
|---|---|
| 资源名 | 规则的作用对象 |
| 流控应用 | 用于表示调用方 |
| 授权类型 | 黑名单 / 白名单 |
其中,配置白名单,则只有请求来源位于白名单内时才可通过;配置黑名单,则请求来源位于黑名单时不通过,其余的请求通过。
接下来我们开始演示:
- 自定义来源处理规则,创建一个类实现 RequestOriginParser 接口:
@Component
public class RequestOriginParserDefinition implements RequestOriginParser {

    @Override
    public String parseOrigin(HttpServletRequest request) {
        String serviceName = request.getParameter("serviceName");
        return serviceName;
    }
}
 复制
serviceName 用来区分客户端的请求来源。
创建新类记得重启服务!
- 我们以授权黑名单为例,创建新的授权规则:
来源为 serviceName=browser 的客户端请求会被限制。
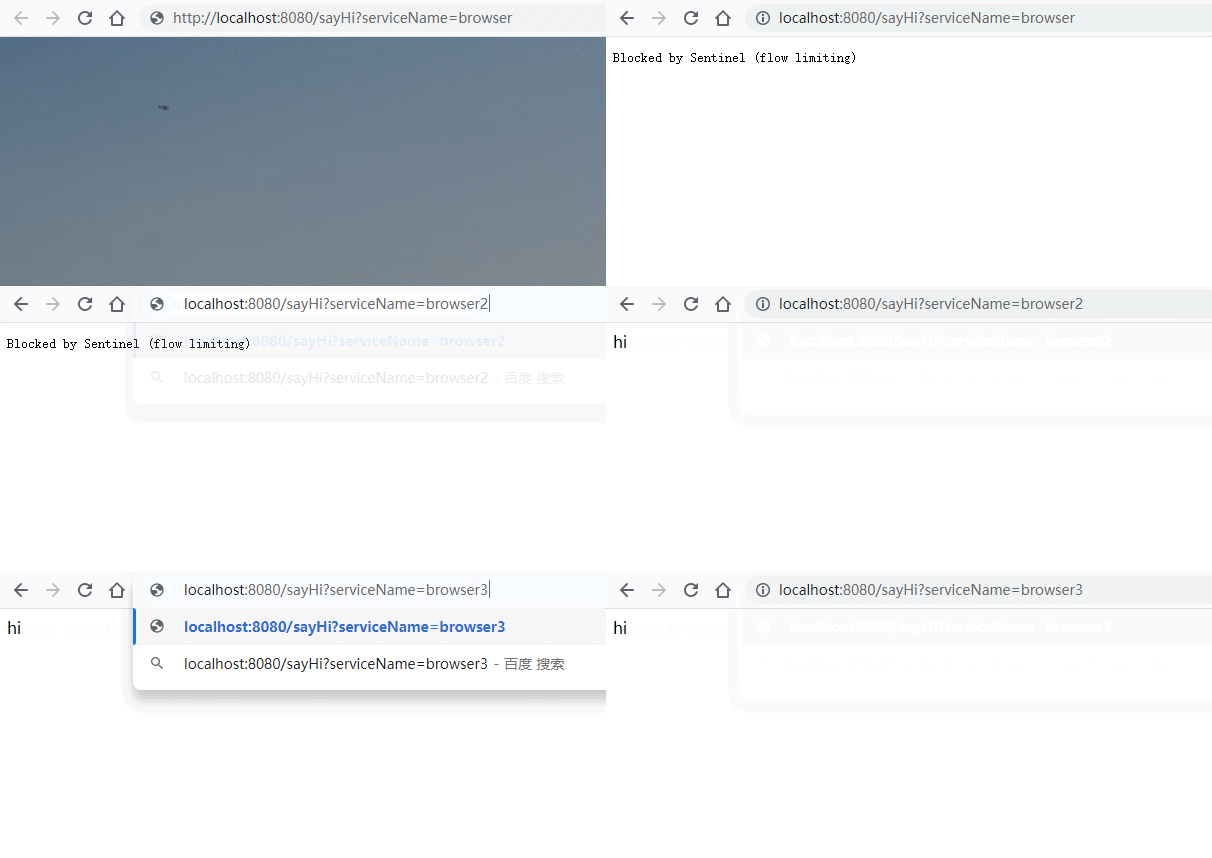
- 我们访问接口 http://localhost:8080/sayHi?serviceName=browser ,测试结果:
上图中 serviceName=browser 请求被限流,规则生效。
五、自定义异常处理器
上边介绍了 Sentinel 常用的规则,在规则生效后,会返回 Blocked by Sentinel (flow limiting) 的信息。这个信息提示描述的很笼统,我们没法确定接口是被限流还是被服务降级,且数据结构对客户端的解析也不友好。
因此,我们需要自定义异常统一处理器,根据不同场景的异常返回对应的具体描述。
实现非常简单,我们需要创建一个类来实现 BlockExceptionHandler 接口,如下:
@Component
public class CustomBlockExceptionHandler implements BlockExceptionHandler {

    @Override
    public void handle(HttpServletRequest request, HttpServletResponse response, BlockException e) throws Exception {
        Result result = null;

        // 不同的异常返回不同的提示语
        if (e instanceof FlowException) {
            result = Result.builder().code(100).msg("接口限流了").build();

        } else if (e instanceof DegradeException) {
            result = Result.builder().code(101).msg("服务降级了").build();

        } else if (e instanceof ParamFlowException) {
            result = Result.builder().code(102).msg("热点参数限流了").build();

        } else if (e instanceof SystemBlockException) {
            result = Result.builder().code(103).msg("触发系统保护规则").build();

        } else if (e instanceof AuthorityException) {
            result = Result.builder().code(104).msg("授权规则不通过").build();
        } else {
            result = Result.builder().code(105).msg("sentinel 未知异常").build();
        }

        //返回json数据
        response.setStatus(500);
        response.setCharacterEncoding("utf-8");
        response.setContentType(MediaType.APPLICATION_JSON_VALUE);
        //springmvc 的一个json转换类 (jackson)
        new ObjectMapper().writeValue(response.getWriter(), result);
    }
}
 复制
@Data
@Builder
public class Result {

    private int code;

    private String msg;
}
 复制
Sentinel 控制台中配置流控规则,资源名:/sayHi,阀值类型:QPS,阀值:2。测试效果如下图:
六、Feign 整合 Sentinel
限流不单单针对外部请求,微服务之间使用 Feign 调用也可以进行服务容错。
- 修改微服务中 application.yml 文件:
feign:
  sentinel:
    enabled: true
 复制
- 创建容错类
方式一:
@Component
public class UserServiceFallBack implements UserService {
    @Override
    public User findById(Integer id) {
        User user = new User();
        user.setId(-1);
        return user;
    }
}

@FeignClient(value = "user-module", fallback = UserServiceFallBack.class)
public interface UserService {

    @RequestMapping("/user/{id}")
    User findById(@PathVariable Integer id);
}
 复制
方式二:
@Component
public class UserServiceFallBackFactory implements FallbackFactory<UserService> {

    @Override
    public UserService create(Throwable throwable) {
        return new UserService() {
            @Override
            public User findById(Integer id) {
                throwable.printStackTrace();
                User user = new User();
                user.setId(-1);
                return user;
            }
        };
    }
}

@FeignClient(value = "user-module", fallbackFactory = UserServiceFallBackFactory.class)
public interface UserService {

    @RequestMapping("/user/{id}")
    User findById(@PathVariable Integer id);
}
 复制
七、Sentinel 规则持久化
Sentinel 规则的推送有 3 种模式:
- 原始模式:API 将规则推送至客户端并直接更新到内存中(默认)。
- Pull 模式:客户端主动向某个规则管理中心定期轮询拉取规则,这个规则中心可以是 RDBMS、文件 等。
- Push 模式:规则中心统一推送,客户端通过注册监听器的方式时刻监听变化,比如使用 Nacos、Zookeeper 等配置中心。这种方式有更好的实时性和一致性保证。生产环境下一般采用 push 模式的数据源。
我们上边的演示采用的是原始模式推送规则,数据保存在内存中,当重启 sentinel 客户端后数据就丢失了,极其不友好。因此,将规则进行持久化是必不可少的操作。
7.1 Pull 模式
- 引入依赖
<dependency>
    <groupId>com.alibaba.csp</groupId>
    <artifactId>sentinel-datasource-extension</artifactId>
</dependency>
 复制
- 创建一个类实现 InitFunc 接口,用于处理数据的持久化:
public class FileDataSourceInit implements InitFunc {

    @Override
    public void init() throws Exception {
        //可以根据需要指定规则文件的位置
        String ruleDir = System.getProperty("user.home") + "/sentinel/rules";

        String flowRulePath = ruleDir + "/flow-rule.json";
        String degradeRulePath = ruleDir + "/degrade-rule.json";
        String paramFlowRulePath = ruleDir + "/param-flow-rule.json";
        String systemRulePath = ruleDir + "/system-rule.json";
        String authorityRulePath = ruleDir + "/authority-rule.json";

        this.mkdirIfNotExits(ruleDir);

        this.createFileIfNotExits(flowRulePath);
        this.createFileIfNotExits(degradeRulePath);
        this.createFileIfNotExits(paramFlowRulePath);
        this.createFileIfNotExits(systemRulePath);
        this.createFileIfNotExits(authorityRulePath);

        // 流控规则:可读数据源
        ReadableDataSource<String, List<FlowRule>> flowRuleRDS = new FileRefreshableDataSource<>(
                flowRulePath,
                flowRuleListParser
        );
        // 将可读数据源注册至FlowRuleManager
        // 这样当规则文件发生变化时,就会更新规则到内存
        FlowRuleManager.register2Property(flowRuleRDS.getProperty());
        // 流控规则:可写数据源
        WritableDataSource<List<FlowRule>> flowRuleWDS = new FileWritableDataSource<>(
                flowRulePath,
                this::encodeJson
        );
        // 将可写数据源注册至transport模块的WritableDataSourceRegistry中
        // 这样收到控制台推送的规则时,Sentinel会先更新到内存,然后将规则写入到文件中
        WritableDataSourceRegistry.registerFlowDataSource(flowRuleWDS);


        // 降级规则:可读数据源
        ReadableDataSource<String, List<DegradeRule>> degradeRuleRDS = new FileRefreshableDataSource<>(
                degradeRulePath,
                degradeRuleListParser
        );
        DegradeRuleManager.register2Property(degradeRuleRDS.getProperty());
        // 降级规则:可写数据源
        WritableDataSource<List<DegradeRule>> degradeRuleWDS = new FileWritableDataSource<>(
                degradeRulePath,
                this::encodeJson
        );
        WritableDataSourceRegistry.registerDegradeDataSource(degradeRuleWDS);


        // 热点参数规则:可读数据源
        ReadableDataSource<String, List<ParamFlowRule>> paramFlowRuleRDS = new FileRefreshableDataSource<>(
                paramFlowRulePath,
                paramFlowRuleListParser
        );
        ParamFlowRuleManager.register2Property(paramFlowRuleRDS.getProperty());
        // 热点参数规则:可写数据源
        WritableDataSource<List<ParamFlowRule>> paramFlowRuleWDS = new FileWritableDataSource<>(
                paramFlowRulePath,
                this::encodeJson
        );
        ModifyParamFlowRulesCommandHandler.setWritableDataSource(paramFlowRuleWDS);


        // 系统规则:可读数据源
        ReadableDataSource<String, List<SystemRule>> systemRuleRDS = new FileRefreshableDataSource<>(
                systemRulePath,
                systemRuleListParser
        );
        SystemRuleManager.register2Property(systemRuleRDS.getProperty());
        // 系统规则:可写数据源
        WritableDataSource<List<SystemRule>> systemRuleWDS = new FileWritableDataSource<>(
                systemRulePath,
                this::encodeJson
        );
        WritableDataSourceRegistry.registerSystemDataSource(systemRuleWDS);


        // 授权规则:可读数据源
        ReadableDataSource<String, List<AuthorityRule>> authorityRuleRDS = new FileRefreshableDataSource<>(
                authorityRulePath,
                authorityRuleListParser
        );
        AuthorityRuleManager.register2Property(authorityRuleRDS.getProperty());
        // 授权规则:可写数据源
        WritableDataSource<List<AuthorityRule>> authorityRuleWDS = new FileWritableDataSource<>(
                authorityRulePath,
                this::encodeJson
        );
        WritableDataSourceRegistry.registerAuthorityDataSource(authorityRuleWDS);
    }


    private Converter<String, List<FlowRule>> flowRuleListParser = source -> JSON.parseObject(
            source,
            new TypeReference<List<FlowRule>>() {
            }
    );

    private Converter<String, List<DegradeRule>> degradeRuleListParser = source -> JSON.parseObject(
            source,
            new TypeReference<List<DegradeRule>>() {
            }
    );

    private Converter<String, List<SystemRule>> systemRuleListParser = source -> JSON.parseObject(
            source,
            new TypeReference<List<SystemRule>>() {
            }
    );

    private Converter<String, List<AuthorityRule>> authorityRuleListParser = source -> JSON.parseObject(
            source,
            new TypeReference<List<AuthorityRule>>() {
            }
    );

    private Converter<String, List<ParamFlowRule>> paramFlowRuleListParser = source -> JSON.parseObject(
            source,
            new TypeReference<List<ParamFlowRule>>() {
            }
    );

    private void mkdirIfNotExits(String filePath) throws IOException {
        File file = new File(filePath);
        if (!file.exists()) {
            file.mkdirs();
        }
    }

    private void createFileIfNotExits(String filePath) throws IOException {
        File file = new File(filePath);
        if (!file.exists()) {
            file.createNewFile();
        }
    }

    private <T> String encodeJson(T t) {
        return JSON.toJSONString(t);
    }
}
 复制
- 在 resources/META-INF/services 目录下创建名为
com.alibaba.csp.sentinel.init.InitFunc的文件,文件内容为上边定义的类的包全名:
com.light.senticel.config.FileDataSourceInit
 复制
根据自己的情况替换包名。
我们在 Sentinel 控制台配置新的规则就会持久化到本地文件中。当关闭微服务客户端后,控制台的规则就消失。再启动微服务客户端后,控制台又可以查看规则了。
7.2 Push 模式
注意:此模式有坑
我们采用 Nacos 作为持久化数据源。
- 引入依赖:
<dependency>
    <groupId>com.alibaba.csp</groupId>
    <artifactId>sentinel-datasource-nacos</artifactId>
</dependency>
 复制
- 修改客户端配置文件,配置持久化数据源:
server:
  port: 8080

spring:
  application:
    name: sentinel-test
  cloud:
    sentinel:
      transport:
        port: 8719 #跟控制台交流的端口,随意指定一个未使用的端口即可
        dashboard: localhost:8081 # 指定控制台服务的地址
      datasource:
        ds1:
          nacos:
            data-id: ${spring.application.name}.json
            data-type: json
            group-id: DEFAULT_GROUP
            rule-type: flow
            server-addr: localhost:8848
 复制
- 启动 Nacos。
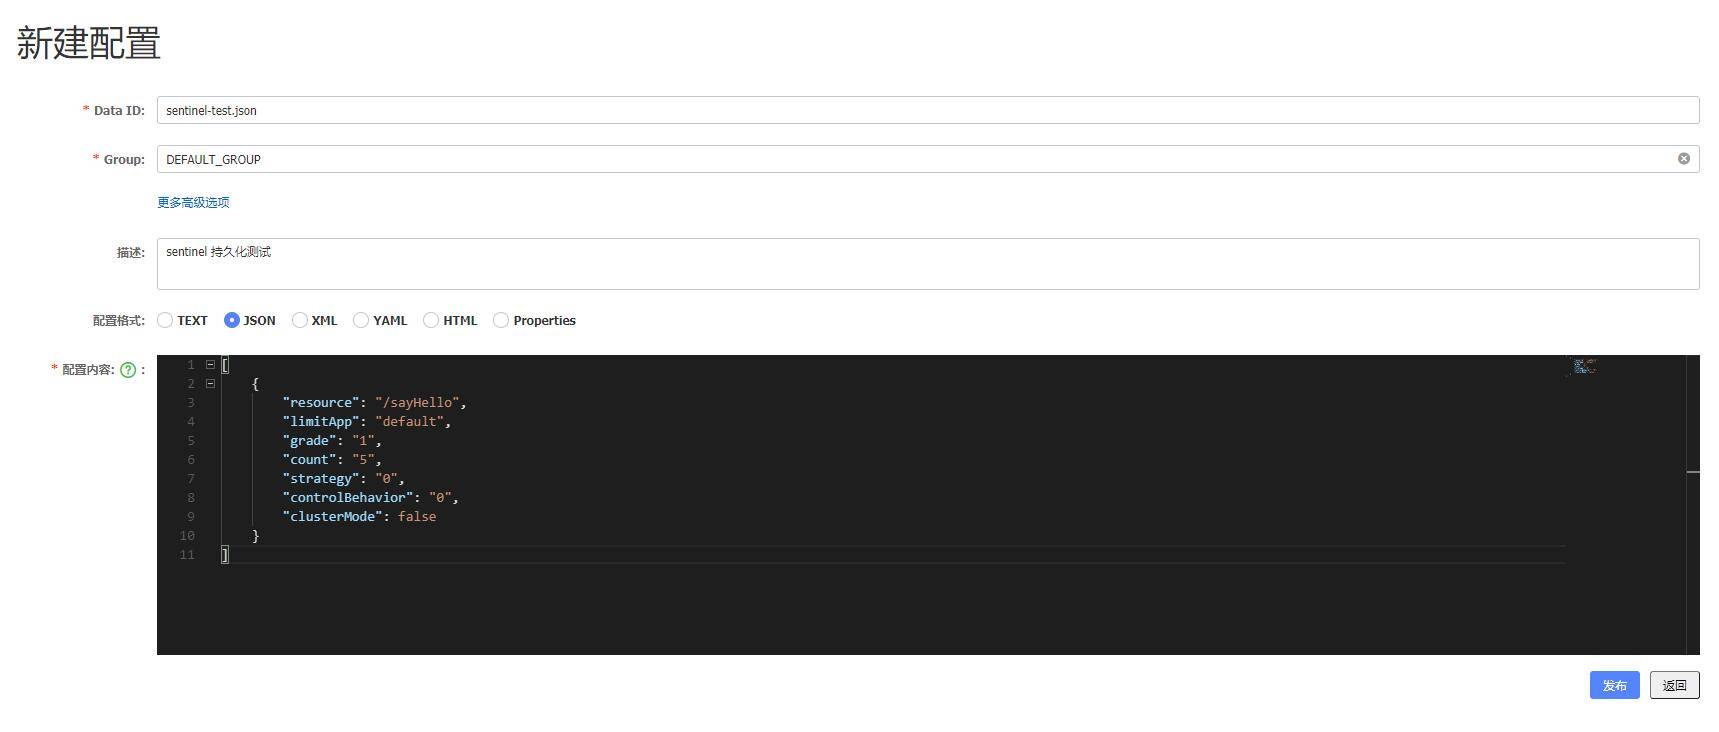
- 在 Nacos 控制台-配置管理-配置列表创建一条新的规则数据,规则格式如下:
[
    {
        "resource": "/sayHello",
        "limitApp": "default",
        "grade": "1",
        "count": "5",
        "strategy": "0",
        "controlBehavior": "0",
        "clusterMode": false
    }
]
 复制
其中:
- resource:资源名,即限流规则的作用对象
- count:限流阈值
- grade:限流阈值类型(QPS 或并发线程数)
- limitApp:流控针对的调用来源,若为 default 则不区分调用来源
- strategy:调用关系限流策略
- controlBehavior:流量控制效果(直接拒绝、Warm Up、匀速排队)
- clusterMode:是否集群
启动 Sentinel 客户端后,在 Sentinel 控制台里可以查看上边新建的规则。
注意:正常流程应该是在 Sentinel 的控制台配置规则,然后数据持久化到 Nacos。但是 Push 模式的持久化是直接在 Nacos 中配置规则! 我们在 Sentinel 控制台配置的规则,不会持久化到 Nacos,Sentinel 框架没有实现这部分功能,这需要我们修改 Sentinel 控制台源码来实现!
- 点赞
- 收藏
- 关注作者









评论(0)