Spring Cloud Alibaba 系列之 Gateway(网关)
Spring Cloud Alibaba 系列之 Gateway(网关)
一、前言
Spring Cloud 原先整合 Zuul 作为网关组件,Zuul 由 Netflix 公司提供的,现在已经不维护了。后面 Netflix 公司又出来了一个 Zuul2.0 网关,但由于一直没有发布稳定版本,所以 Spring Cloud 等不及了就自己推出一个网关,已经不打算整合 zuul2.0 了。
Spring Cloud Gateway 是 Spring 公司基于 Spring 5.0, Spring Boot 2.0 和 Project Reactor 等技术开发的网关,它旨在为微服务架构提供一种简单有效的统一的 API 路由管理方式。它的目标是替代 Netflix Zuul,其不仅提供统一的路由方式,并且基于 Filter 链的方式提供了网关基本的功能,例如:安全,监控和限流。
补充:Spring Cloud Gateway 不属于 Spring Cloud Alibaba 的技术栈,为了该系列的微服务介绍的完整性,故添加此篇章。
二、Gateway 介绍
2.1 核心概念
- 路由:网关的基本构建组成,表示一个具体的路由信息载体。它由 ID,目标 URI,谓词集合和过滤器集合定义
- 谓词/断言:Java 8 函数谓词,输入类型是 Spring Framework ServerWebExchange,可以匹配 HTTP 请求中的所有内容,例如请求头或参数
- 过滤器:使用特定工厂构造的 Spring Framework GatewayFilter 实例,可以在发送给下游请求之前或之后修改请求和响应
2.2 执行流程
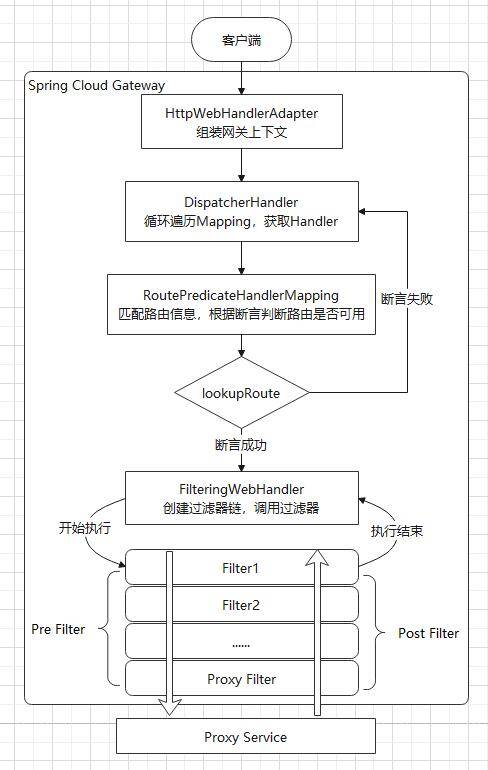
执行流程大体如下:
- Gateway Client 向 Gateway Server 发送请求
- 请求首先会被 HttpWebHandlerAdapter 进行提取组装成网关上下文
- 然后网关的上下文会传递到 DispatcherHandler,它负责将请求分发给 RoutePredicateHandlerMapping
- RoutePredicateHandlerMapping 负责路由查找,并根据路由断言判断路由是否可用
- 如果过断言成功,由 FilteringWebHandler 创建过滤器链并调用
- 请求会一次经过 PreFilter -> 微服务 -> PostFilter 的方法,最终返回响应
三、环境搭建
为了更好的理解上边提到核心概念,我们现用简单的实战案例演示。
| 项目名称 | 端口 | 描述 |
|---|---|---|
| gateway-test | - | pom 项目,父工厂 |
| user-service | 9001 | 用户微服务,服务注册到 nacos |
| gateway-service | 9090 | 网关服务,服务注册到 nacos |
注意:搭建项目启动前,必须先开启 Nacos 服务。 不熟悉 Nacos 的读者可以先打开 传送门 浏览相关文章。
3.1 搭建 gateway-test 项目
该工程为 pom 项目,只需要添加如下依赖:
<packaging>pom</packaging>

<parent>
    <groupId>org.springframework.boot</groupId>
    <artifactId>spring-boot-starter-parent</artifactId>
    <version>2.2.5.RELEASE</version>
</parent>

<dependencyManagement>
    <dependencies>
        <!-- spring cloud 依赖 -->
        <dependency>
            <groupId>org.springframework.cloud</groupId>
            <artifactId>spring-cloud-dependencies</artifactId>
            <version>Hoxton.SR3</version>
            <type>pom</type>
            <scope>import</scope>
        </dependency>

        <!-- spring cloud alibaba 依赖-->
        <dependency>
            <groupId>com.alibaba.cloud</groupId>
            <artifactId>spring-cloud-alibaba-dependencies</artifactId>
            <version>2.2.1.RELEASE</version>
            <type>pom</type>
            <scope>import</scope>
        </dependency>
    </dependencies>
</dependencyManagement>
 复制
3.2 搭建 user-service 项目
该项目为用户微服务,模拟提供用户相关接口。
- 添加依赖:
<dependencies>
    <dependency>
        <groupId>org.springframework.boot</groupId>
        <artifactId>spring-boot-starter-web</artifactId>
    </dependency>

    <dependency>
        <groupId>org.springframework.boot</groupId>
        <artifactId>spring-boot-starter-test</artifactId>
        <scope>test</scope>
    </dependency>

    <dependency>
        <groupId>com.alibaba.cloud</groupId>
        <artifactId>spring-cloud-starter-alibaba-nacos-discovery</artifactId>
    </dependency>

    <dependency>
        <groupId>org.projectlombok</groupId>
        <artifactId>lombok</artifactId>
        <optional>true</optional>
    </dependency>
</dependencies>
 复制
- 配置文件(application.yml):
server:
  port: 9001

spring:
  application:
    name: user-service
  cloud:
    nacos:
      discovery:
        server-addr: 127.0.0.1:8848
        username: nacos
        password: nacos
 复制
- 业务类:
@Data
@AllArgsConstructor
public class User {

    private Integer id;

    private String name;
}
 复制
@RestController
@RequestMapping("/user")
public class UserController {

    private static Map<Integer, User> userMap;

    static {
        userMap = new HashMap<>();
        userMap.put(1, new User(1, "张三"));
        userMap.put(2, new User(2, "李四"));
        userMap.put(3, new User(3, "王五"));
    }

    @RequestMapping("/findById/{id}")
    public User findById(@PathVariable("id") Integer id) {
        // 为了测试方便,用此方式模拟用户查询
        return userMap.get(id);
    }
}
 复制
- 启动类:
@SpringBootApplication
@EnableDiscoveryClient
public class UserApplication {

    public static void main(String[] args) {
        SpringApplication.run(UserApplication.class, args);
    }
}
 复制
启动用户微服务,浏览器输入: http://localhost:9001/user/findById/1 ,结果如下图:
用户微服务正常。
3.3 搭建 gateway-service 项目
该服务提供网关功能,核心就是配置路由规则。
- 添加依赖:
<dependencies>
    <dependency>
        <groupId>org.springframework.cloud</groupId>
        <artifactId>spring-cloud-starter-gateway</artifactId>
    </dependency>

    <dependency>
        <groupId>com.alibaba.cloud</groupId>
        <artifactId>spring-cloud-starter-alibaba-nacos-discovery</artifactId>
    </dependency>
</dependencies>
 复制
- 配置文件(application.yml):
server:
  port: 9090

spring:
  application:
    name: gateway-service

  cloud:
    nacos:
      discovery:
        server-addr: 127.0.0.1:8848
        username: nacos
        password: nacos
    gateway:
      discovery:
        locator:
          enabled: true # gateway 可以从 nacos 发现微服务
 复制
我们暂不配置路由规则。
- 启动类:
@EnableDiscoveryClient
@SpringBootApplication
public class GatewayApplication {

    public static void main(String[] args) {
        SpringApplication.run(GatewayApplication.class, args);
    }
}
 复制
启动网关项目,我们试着通过网关请求用户微服务接口。
请求规则:网关地址/微服务应用名/接口
我们在浏览器输入: http://localhost:9090/user-service/user/findById/2 ,结果如下图:
请求成功,网关项目搭建完成。
使用路由规则:
server:
  port: 9090

spring:
  application:
    name: gateway-service

  cloud:
    nacos:
      discovery:
        server-addr: 127.0.0.1:8848
        username: nacos
        password: nacos
    gateway:
      discovery:
        locator:
          enabled: true # gateway 可以从 nacos 发现微服务
      routes:
        - id: user_service_route  # 路由 id,确定唯一加尔肯
          uri: lb://user-service  # lb 表示从 nacos 中按照名称获取微服务,并遵循负载均衡策略,user-service 对应用户微服务应用名
          predicates:
            - Path=/user-api/**  # 使用断言
          filters:
            - StripPrefix=1       # 使用过滤器
 复制
其中:
- id: 路由标识符,区别于其他 Route
- uri:路由指向的目的地 uri,即客户端请求最终被转发到的微服务
- predicate:断言,用于条件判断,只有断言都返回真,才会真正的执行路由
- filter:过滤器用于修改请求和响应信息
添加 routes 相关配置,重启网关项目,请求用户微服务接口。
请求规则:网关地址/断言配置的 Path 路径/接口
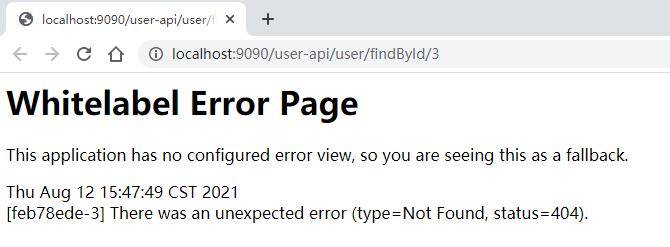
我们在浏览器输入: http://localhost:9090/user-api/user/findById/3 ,结果如下图:
路由规则生效。
简单的使用了路由规则,下文将具体介绍路由规则的使用方式。
四、断言
Predicate(断言, 谓词) 用于进行条件判断,只有断言都返回真,才会真正的执行路由。
SpringCloud Gateway 的断言通过继承 AbstractRoutePredicateFactory 类实现,因此我们可以根据自己的需求自定义断言。
当然,开发团队已为使用者提供了一些内置断言工厂,在开发中已足够使用,请继续阅读下文。
4.1 内置断言
Spring Cloud Gateway 包括 11 种内置的断言工厂,所有这些断言都与 HTTP 请求的不同属性匹配。
补充:断言可以同时使用
- AfterRoutePredicateFactory:接收一个日期参数,判断请求日期是否晚于指定日期
- BeforeRoutePredicateFactory:接收一个日期参数,判断请求日期是否早于指定日期
- BetweenRoutePredicateFactory:接收两个日期参数,判断请求日期是否在指定时间段内
上边三个断言工厂都是根据时间判断。使用方式如下:
predicates:
    - After=2021-10-01T00:00:00.789+08:00[Asia/Shanghai]
#    - Between=2021-08-01T00:00:00.789+08:00[Asia/Shanghai],2021-10-01T00:00:00.789+08:00[Asia/Shanghai]
 复制
我们设置在 2021年10月01日之后才能访问接口,当前请求时间为 2021年08月12日,请求结果如下图:
请求接口失败。
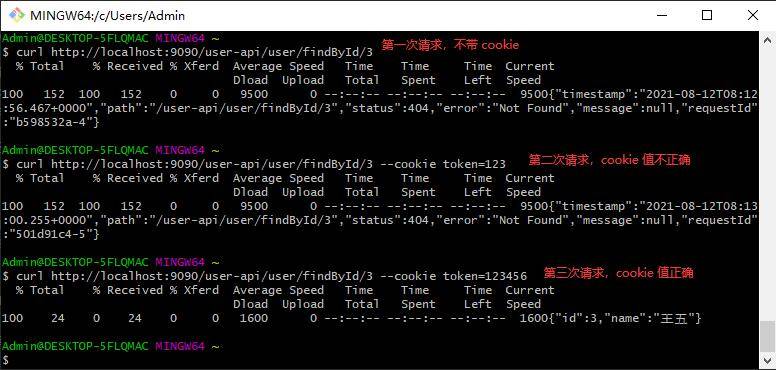
- CookieRoutePredicateFactory: 接收两个参数,cookie 名字和值。 判断请求 cookie 是否具有给定名称且值与正则表达式匹配。
predicates:
    - Cookie=token, 123456
 复制
其中,token 为 cookie 名称,123456 为 cookie 值。
我们可以支持 curl 的工具测试,键入 curl http://localhost:9090/user-api/user/findById/3 --cookie token=123456,结果如下图:
- HeaderRoutePredicateFactory:接收两个参数,标题名称和正则表达式。 判断请求 Header 是否具有给定名称且值与正则表达式匹配。
predicates:
    - Header=X-Request-Id, \d+
 复制
其中,X-Request-Id 为 header 名称,\d+ 为正则表达式,表示数字。
我们可以支持 curl 的工具测试,键入 curl http://localhost:9090/user-api/user/findById/3 --header "X-Request-Id:9527",结果如下图:
- HostRoutePredicateFactory:接收一个参数,主机名模式。判断请求的 Host 是否满足匹配规则。
predicates:
    - Host=**.somehost.org,**.anotherhost.org
 复制
支持 URI 模板变量(例如{sub} .myhost.org),如果请求的主机标头的值为 www.somehost.org 或 beta.somehost.org 或 www.anotherhost.org,则此路由匹配
- MethodRoutePredicateFactory: 接收一个参数,判断请求类型是否跟指定的类型匹配。
predicates:
    - Method=GET,POST
 复制
如果请求方法是 GET 或 POST,则此路由匹配。
- PathRoutePredicateFactory:接收一个参数,判断请求的 URI 部分是否满足路径规则。
predicates:
    - Path=/user-api/**
 复制
这个就是我们在上边配置的断言,请求是 /user-api/ 开头,则路由到用户微服务上。
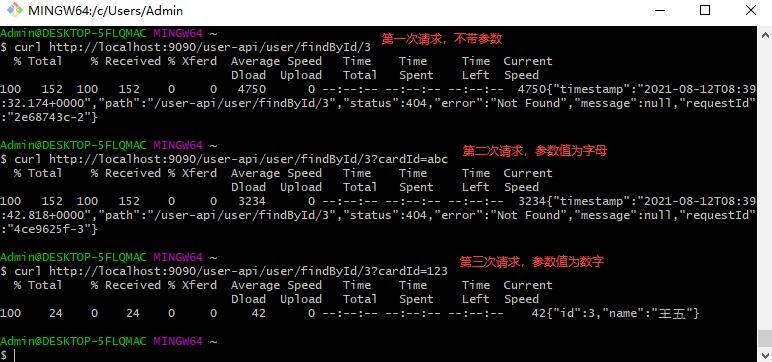
- QueryRoutePredicateFactory:接收两个参数,请求 param 和正则表达式, 判断请求参数是否具有给定名称且值与正则表达式匹配。
predicates:
    - Query=cardId, \d+
 复制
请求包含名称为 cardId 的参数,且参数值为数字,则匹配路由。
测试如下:
- RemoteAddrRoutePredicateFactory:接收一个 IP 地址段,判断请求主机地址是否在地址段中
predicates:
    - RemoteAddr=192.168.0.1/16
 复制
其中,192.168.0.1 是 IP 地址,而 16 是子网掩码。当请求的远程地址为该值时,匹配路由。
- WeightRoutePredicateFactory:接收一个[组名,权重], 然后对于同一个组内的路由按照权重转发。
spring:
  cloud:
    gateway:
      routes:
      - id: weight_high
        uri: https://weighthigh.org
        predicates:
            - Weight=group1, 8
      - id: weight_low
        uri: https://weightlow.org
        predicates:
            - Weight=group1, 2
 复制
配置多组路由规则时使用。路由会将约 80% 的流量转发至 weighthigh.org,并将约 20% 的流量转发至 weightlow.org。
4.2 自定义断言
当内置的断言不满足我们的业务需求时,我们可以自定义断言工厂。
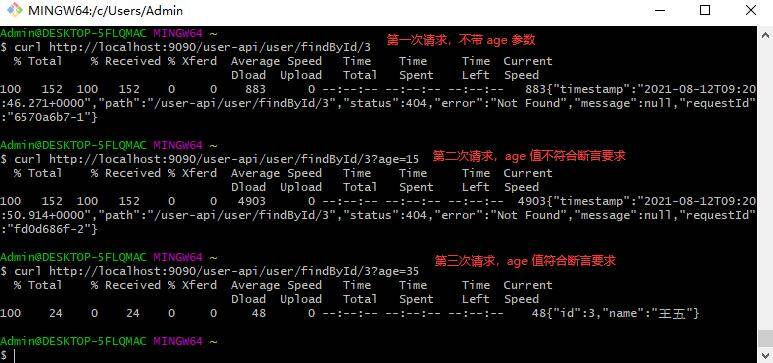
比如,我们需要判断请求 url 中传过来的 age 值在 18~60 范围才可正常路由。
- 配置断言:
predicates:
    - Age=18, 60
 复制
- 我们需要创建一个类继承 AbstractRoutePredicateFactory 类:
注意:自定义类名有格式要求-> 断言名称 + RoutePredicateFactory。此处断言名称为 Age,对应配置文件中的 Age。
@Component
public class AgeRoutePredicateFactory extends AbstractRoutePredicateFactory<AgeRoutePredicateFactory.Config> {

    public AgeRoutePredicateFactory() {
        super(AgeRoutePredicateFactory.Config.class);
    }

    @Override
    public List<String> shortcutFieldOrder() {
        return Arrays.asList("minAge", "maxAge");
    }

    @Override
    public Predicate<ServerWebExchange> apply(Config config) {
        return new Predicate<ServerWebExchange>() {
            @Override
            public boolean test(ServerWebExchange serverWebExchange) {
                // 判断逻辑
                String ageStr = serverWebExchange.getRequest().getQueryParams().getFirst("age");
                if (ageStr == null || ageStr.length() == 0) {
                    return false;
                }

                int age = Integer.parseInt(ageStr);
                return age > config.getMinAge() && age < config.getMaxAge();
            }
        };
    }

    @Data
    static class Config {
        private int minAge;
        private int maxAge;
    }
}
 复制
- 保存,重启网关项目,测试结果如下:
五、过滤器
路由过滤器允许以某种方式修改传入的 HTTP 请求或传出的 HTTP 响应。
在 Gateway 中, Filter 的生命周期只有两个: “pre” 和 “post”。
- PRE:这种过滤器在请求被路由之前调用。我们可利用这种过滤器实现身份验证、在集群中选择请求的微服务、记录调试信息等
- POST:这种过滤器在路由到微服务以后执行。这种过滤器可用来为响应添加标准的 HTTP Header、收集统计信息和指标、将响应从微服务发送给客户端等。
根据 Filter 的作用范围可以分成两种:GatewayFilter 与 GlobalFilter。
- GatewayFilter:应用到单个路由或者一个分组的路由上。
- GlobalFilter:应用到所有的路由上。
5.1 局部过滤器
局部过滤器是针对单个路由的过滤器。
Spring Cloud Gateway 也提供了 31 种局部的内置 GatewayFilter 工厂。
由于数量较多,笔者只列举部分内置局部过滤器进行展示。
| 过滤器工厂 | 作用 | 参数 |
|---|---|---|
| AddRequestHeader | 为原始请求添加Header | Header的名称及值 |
| AddRequestParameter | 为原始请求添加请求参数 | 参数名称及值 |
| AddResponseHeader | 为原始响应添加Header | Header的名称及值 |
| DedupeResponseHeader | 剔除响应头中重复的值 | 需要去重的Header名称及去重策略 |
| PrefixPath | 为原始请求路径添加前缀 | 前缀路径 |
| RequestRateLimiter | 用于对请求限流, 限流算法为令牌桶 | keyResolver、rateLimiter、statusCode、denyEmptyKey、emptyKeyStatus |
| RedirectTo | 将原始请求重定向到指定的URL | http状态码及重定向的url |
| StripPrefix | 用于截断原始请求的路径 | 使用数字表示要截断的路径的数量 |
| Retry | 针对不同的响应进行重试 | retries、 statuses、methods、 series |
| ModifyRequestBody | 在转发请求之前修改原始请求体内容 | 修改后的请求体内容 |
| ModifyResponseBody | 修改原始响应体的内容 | 修改后的响应体内容 |
| SetStatus | 修改原始响应的状态码 | HTTP 状态码, 可以是数字, 也可以是字符串 |
使用方式:
spring:
    gateway:
      discovery:
        locator:
          enabled: true # gateway 可以从 nacos 发现微服务
      routes:
        - id: user_service_route
          uri: lb://user-service
          predicates:
            - Path=/user-api/**  # 使用断言
          filters:
            - StripPrefix=1
            - SetStatus=2000  # 修改返回状态
 复制
同样地,当内置的局部过滤器不符合我们的业务需求时,我们也可以自定义过滤器。
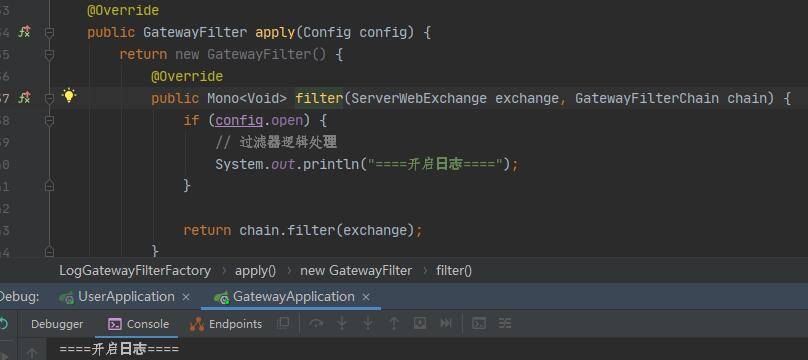
比如:我们需要在调用/路由一个接口之前打印一下日志。
- 配置局部过滤器
filters:
    - Log=true
 复制
- 创建一个类继承 AbstractGatewayFilterFactory 类:
注意:自定义类名有格式要求-> 过滤器名称 + GatewayFilterFactory。此处过滤器名称为 Log,对应配置文件中的 Log。
@Component
public class LogGatewayFilterFactory extends AbstractGatewayFilterFactory<LogGatewayFilterFactory.Config> {


    public LogGatewayFilterFactory() {
        super(LogGatewayFilterFactory.Config.class);
    }

    @Override
    public List<String> shortcutFieldOrder() {
        return Arrays.asList("open");
    }

    @Override
    public GatewayFilter apply(Config config) {
        return new GatewayFilter() {
            @Override
            public Mono<Void> filter(ServerWebExchange exchange, GatewayFilterChain chain) {
                if (config.open) {
                    // 过滤器逻辑处理
                    System.out.println("====开启日志====");
                }

                return chain.filter(exchange);
            }
        };
    }

    @Data
    static class Config {
        private boolean open;
    }
}
 复制
- 保存,重启网关项目,测试结果如下:
5.2 全局过滤器
全局过滤器作用于所有路由, 无需配置。通过全局过滤器可以实现对权限的统一校验,安全性验证等功能。
同样地,框架也内置了一些全局过滤器,它们都实现 GlobalFilter 和 Ordered 接口。有兴趣的读者可以自行查看 GlobalFilter 的实现类或浏览下文提供的官方文档获取详细信息。
这里我们主要演示自定义全局过滤器。
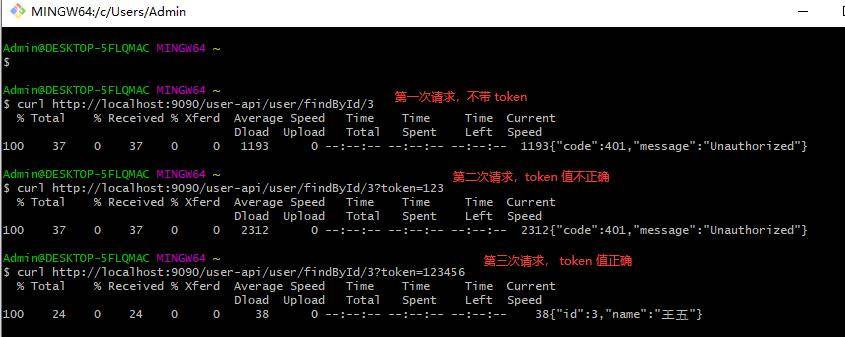
比如:我们在接受请求时需要验证 token。
由于是全局过滤器,因此无需修改配置文件,需要定义类实现 GlobalFilter 和 Ordered 接口。
@Component
public class TokenGlobalFilter implements GlobalFilter, Ordered {

    @SneakyThrows
    @Override
    public Mono<Void> filter(ServerWebExchange exchange, GatewayFilterChain chain) {
        String token = exchange.getRequest().getQueryParams().getFirst("token");
        if (token == null || token.length() == 0 || !token.equals("123456")) {
            System.out.println("鉴权失败");
            ServerHttpResponse response = exchange.getResponse();

            response.setStatusCode(HttpStatus.OK);
            response.getHeaders().add("Content-Type", "application/json;charset=UTF-8");

            // 鉴权失败,返回的数据结构
            Map<String, Object> map = new HashMap<>();
            map.put("code", HttpStatus.UNAUTHORIZED.value());
            map.put("message", HttpStatus.UNAUTHORIZED.getReasonPhrase());

            DataBuffer buffer = response.bufferFactory().wrap(new ObjectMapper().writeValueAsBytes(map));
            return response.writeWith(Flux.just(buffer));
        }

        return chain.filter(exchange);
    }

    @Override
    public int getOrder() {
        return 0;
    }
}
 复制
保存,重启网关项目,测试结果如下:
token 验证失败,返回 401,鉴权失败的提示;token 验证成功,返回接口结果。
六、 路由失败处理
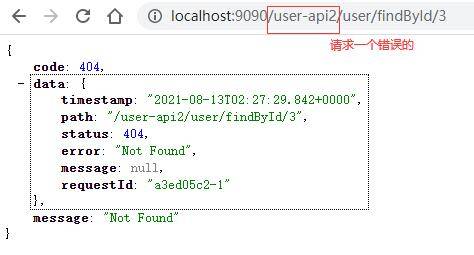
当请求路由地址不匹配或断言为 false 时,Gateway 会默认返回 Whitelabel Error Page 错误页面,这种错误提示不符合我们业务需求。
- 我们可以自定义返回一个较为友好的错误提示,需要创建一个类继承 DefaultErrorWebExceptionHandler 类,重写其方法:
public class MyErrorWebExceptionHandler extends DefaultErrorWebExceptionHandler {

    public MyErrorWebExceptionHandler(ErrorAttributes errorAttributes,
                                      ResourceProperties resourceProperties,
                                      ErrorProperties errorProperties,
                                      ApplicationContext applicationContext) {
        super(errorAttributes, resourceProperties, errorProperties, applicationContext);
    }

    @Override
    protected RouterFunction<ServerResponse> getRoutingFunction(ErrorAttributes errorAttributes) {
        return RouterFunctions.route(RequestPredicates.all(), this::renderErrorResponse);
    }

    @Override
    protected Mono<ServerResponse> renderErrorResponse(ServerRequest request) {
        boolean includeStackTrace = isIncludeStackTrace(request, MediaType.ALL);
        Map<String, Object> errorMap = getErrorAttributes(request, includeStackTrace);
        int status = Integer.valueOf(errorMap.get("status").toString());
        Map<String, Object> response = this.response(status, errorMap.get("error").toString(), errorMap);
        return ServerResponse.status(status).contentType(MediaType.APPLICATION_JSON)
                .body(BodyInserters.fromValue(response));
    }

    // 我们希望返回的数据结构
    public static Map<String, Object> response(int status, String errorMessage, Map<String, Object> errorMap) {
        Map<String, Object> map = new HashMap<>();
        map.put("code", status);
        map.put("message", errorMessage);
        map.put("data", errorMap);
        return map;
    }
}
 复制
- 配置 Bean 实例:
@Configuration
public class GatewayConfiguration {

    private final ServerProperties serverProperties;

    private final ApplicationContext applicationContext;

    private final ResourceProperties resourceProperties;

    private final List<ViewResolver> viewResolvers;

    private final ServerCodecConfigurer serverCodecConfigurer;

    public GatewayConfiguration(ServerProperties serverProperties,
                                ApplicationContext applicationContext,
                                ResourceProperties resourceProperties,
                                ObjectProvider<List<ViewResolver>> viewResolversProvider,
                                ServerCodecConfigurer serverCodecConfigurer) {
        this.serverProperties = serverProperties;
        this.applicationContext = applicationContext;
        this.resourceProperties = resourceProperties;
        this.viewResolvers = viewResolversProvider.getIfAvailable(Collections::emptyList);
        this.serverCodecConfigurer = serverCodecConfigurer;
    }


    @Bean("myErrorWebExceptionHandler")
    @Order(Ordered.HIGHEST_PRECEDENCE)
    public ErrorWebExceptionHandler myErrorWebExceptionHandler(ErrorAttributes errorAttributes) {

        MyErrorWebExceptionHandler exceptionHandler = new MyErrorWebExceptionHandler(
                errorAttributes,
                this.resourceProperties,
                this.serverProperties.getError(),
                this.applicationContext);

        exceptionHandler.setViewResolvers(this.viewResolvers);
        exceptionHandler.setMessageWriters(this.serverCodecConfigurer.getWriters());
        exceptionHandler.setMessageReaders(this.serverCodecConfigurer.getReaders());
        return exceptionHandler;
    }
}
 复制
- 保存后重启网关项目,请求一个错误的接口地址,结果如下:
请求的 url 地址不匹配路由规则返回我们定义的错误提示。
七、跨域问题
针对 PC 端的页面请求,如果项目前后端分离,则请求会出现跨域请求问题。为什么呢?接着看。
URL 由协议、域名、端口和路径组成,如果两个 URL 的协议、域名和端口相同,则表示它们同源,否则反之。
浏览器提供同源策略,限制了来自不同源的 document 或脚本,对当前 document 读取或设置某些属性。其目的是为了保证用户信息的安全,防止恶意的网站窃取数据。
下面笔者演示跨域问题,编写一个简单页面:
<!DOCTYPE html>
<html lang="zh">
<head>
    <meta charset="UTF-8">
</head>
<body>
    <button id="sendBtn">发送请求</button>
    <script src="jquery.min.js"></script>
    <script type="text/javascript">
        $(function() {
            $("#sendBtn").on("click", function() {
                $.ajax({
                    type: "GET",
                    url: "http://localhost:9090/user-api/user/findById/3?token=123456",
                    success: function(resp) {
                        console.log(resp);
                    }
                })
            });
        });
    </script>
</body>
</html>
 复制
启动一个服务容器(笔者采用 sublime 的插件),分配了 10800 端口,请求结果如下:
由于请求端的端口与网关端口不一致,不是同源,因此出现跨域问题。
解决方案有两种,如下:
方式一:修改配置文件
spring:
  cloud:
    gateway:
      globalcors:
        cors-configurations:
          '[/**]':
              allowedOrigins: "*"
              allowedMethods: "*"
              allowedHeaders: "*"
 复制
方式二:配置 CorsWebFilter 过滤器
@Configuration
public class CorsConfig {
    @Bean
    public CorsWebFilter corsFilter() {
        CorsConfiguration config = new CorsConfiguration();
        config.addAllowedMethod("*");
        config.addAllowedOrigin("*");
        config.addAllowedHeader("*");
        UrlBasedCorsConfigurationSource source = new UrlBasedCorsConfigurationSource(new PathPatternParser());
        source.registerCorsConfiguration("/**", config);
        return new CorsWebFilter(source);
    }
}
 复制
八、整合 Sentinel
网关作为微服务,我们也可以对其进行限流和降级操作。不熟悉 Sentinel 的读者可以先打开 传送门 浏览相关文章。
注意:配置前记得启动 Sentinel 控制台。
8.1 基础整合
- 添加依赖:
<dependency>
	<groupId>com.alibaba.cloud</groupId>
	<artifactId>spring-cloud-starter-alibaba-sentinel</artifactId>
</dependency>

<dependency>
    <groupId>com.alibaba.csp</groupId>
    <artifactId>sentinel-spring-cloud-gateway-adapter</artifactId>
</dependency>
 复制
- 修改配置文件,连接 Sentinel 控制台:
spring:
  cloud:
    sentinel:
      transport:
        port: 8719
        dashboard: localhost:8081
 复制
- 配置 Sentinel Filter 实例
@Configuration
public class GatewayConfiguration {

    @Bean
    @Order(-1)
    public GlobalFilter sentinelGatewayFilter() {
        return new SentinelGatewayFilter();
    }
}
 复制
最后,重启网关微服务,在 Sentinel 控制台查看或配置规则即可。
8.2 异常处理器
在 Sentinel 控制台配置规后,服务出现限流或降级时,我们需要服务端返回友好的异常信息,而不是一个简单的错误页面。
在上篇文章中介绍了自定义异常处理器,即实现 BlockExceptionHandler 接口来完成功能。但是,Gateway 整合 Sentienl 后,该方案就失效了。
我们需要配置 BlockRequestHandler 实例。
@Configuration
public class GatewayConfiguration {

    @Bean
    @Order(-1)
    public GlobalFilter sentinelGatewayFilter() {
        return new SentinelGatewayFilter();
    }

    @Bean(name = "myBlockRequestHandler")
    public BlockRequestHandler myBlockRequestHandler() {
        BlockRequestHandler blockRequestHandler = new BlockRequestHandler() {
            @SneakyThrows
            @Override
            public Mono<ServerResponse> handleRequest(ServerWebExchange serverWebExchange, Throwable throwable) {

                Result result;
                if (throwable instanceof FlowException) {
                    result = Result.builder().code(100).msg("接口限流了").build();

                } else if (throwable instanceof DegradeException) {
                    result = Result.builder().code(101).msg("服务降级了").build();

                } else if (throwable instanceof ParamFlowException) {
                    result = Result.builder().code(102).msg("热点参数限流了").build();

                } else if (throwable instanceof SystemBlockException) {
                    result = Result.builder().code(103).msg("触发系统保护规则").build();

                } else if (throwable instanceof AuthorityException) {
                    result = Result.builder().code(104).msg("授权规则不通过").build();
                } else {
                    result = Result.builder().code(105).msg("sentinel 未知异常").build();
                }

                return ServerResponse.status(HttpStatus.BAD_GATEWAY)
                        .contentType(MediaType.APPLICATION_JSON)
                        .body(BodyInserters.fromValue(new ObjectMapper().writeValueAsString(result)));
            }
        };
        return blockRequestHandler;
    }

    @Bean
    @Order(Ordered.HIGHEST_PRECEDENCE)
    public SentinelGatewayBlockExceptionHandler sentinelGatewayBlockExceptionHandler(BlockRequestHandler myBlockRequestHandler) {

        //重定向bloack处理
        //GatewayCallbackManager.setBlockHandler(new RedirectBlockRequestHandler("https://www.extlight.com"));

        //自定义bloack处理
        GatewayCallbackManager.setBlockHandler(myBlockRequestHandler);
        return new SentinelGatewayBlockExceptionHandler(viewResolvers, serverCodecConfigurer);
    }
}
 复制
@Data
@Builder
public class Result {

    private int code;

    private String msg;
}
 复制
注意:当多个 Bean 上都配置 @Order 注解时,要多留意 order 值,否则接口请求后达不到预期效果
- 点赞
- 收藏
- 关注作者






评论(0)