【人脸表情识别】基于matlab GUI CNN人脸表情识别【含Matlab源码 787期】

一、CNN简介
1 机器如何识图
先给大家出个脑筋急转弯:在白纸上画出一个大熊猫,一共需要几种颜色的画笔?——大家应该都知道,只需要一种黑色的画笔,只需要将大熊猫黑色的地方涂上黑色,一个大熊猫的图像就可以展现出来。
我们画大熊猫的方式,其实和妈妈们的十字绣很接近——在给定的格子里,绣上不同的颜色,最后就可以展现出一幅特定的“图片”。而机器识图的方式正好和绣十字绣的方式相反,现在有了一幅图片,机器通过识别图片中每个格子(像素点)上的颜色,将每个格子里的颜色都用数字类型存储,得到一张很大的数字矩阵,图片信息也就存储在这张数字矩阵中。
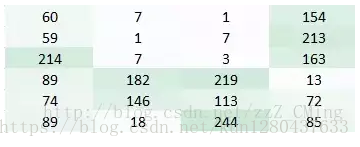
上图中每一个格子代表一个像素点,像素点里的数字代表颜色码,颜色码范围是[0,255],(各式各样的颜色都是由红、绿、蓝三色组成,每个颜色都是0~255之间数字)
我们在得到的一张大数字矩阵的基础上开展卷积神经网络识别工作:
机器识图的过程:机器识别图像并不是一下子将一个复杂的图片完整识别出来,而是将一个完整的图片分割成许多个小部分,把每个小部分里具有的特征提取出来(也就是识别每个小部分),再将这些小部分具有的特征汇总到一起,就可以完成机器识别图像的过程了
2 卷积神经网络原理介绍
用CNN卷积神经网络识别图片,一般需要的步骤有:
(1)卷积层初步提取特征
(2)池化层提取主要特征
(3)全连接层将各部分特征汇总
(4)产生分类器,进行预测识别
2.1 卷积层工作原理
卷积层的作用:就是提取图片每个小部分里具有的特征
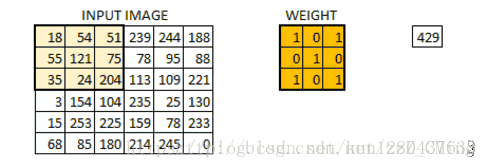
假定我们有一个尺寸为66 的图像,每一个像素点里都存储着图像的信息。我们再定义一个卷积核(相当于权重),用来从图像中提取一定的特征。卷积核与数字矩阵对应位相乘再相加,得到卷积层输出结果。
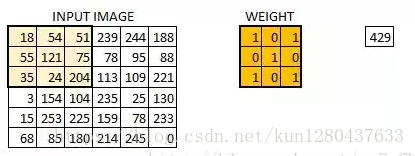
(429 = 181+540+511+550+1211+750+351+240+2041)
卷积核的取值在没有以往学习的经验下,可由函数随机生成,再逐步训练调整
当所有的像素点都至少被覆盖一次后,就可以产生一个卷积层的输出(下图的步长为1)
机器一开始并不知道要识别的部分具有哪些特征,是通过与不同的卷积核相作用得到的输出值,相互比较来判断哪一个卷积核最能表现该图片的特征——比如我们要识别图像中的某种特征(比如曲线),也就是说,这个卷积核要对这种曲线有很高的输出值,对其他形状(比如三角形)则输出较低。卷积层输出值越高,就说明匹配程度越高,越能表现该图片的特征。
卷积层具体工作过程:
比如我们设计的一个卷积核如下左,想要识别出来的曲线如下右:

现在我们用上面的卷积核,来识别这个简化版的图片——一只漫画老鼠

当机器识别到老鼠的屁股的时候,卷积核与真实区域数字矩阵作用后,输出较大:6600

而用同一个卷积核,来识别老鼠的耳朵的时候,输出则很小:0

我们就可以认为:现有的这个卷积核保存着曲线的特征,匹配识别出来了老鼠的屁股是曲线的。我们则还需要其他特征的卷积核,来匹配识别出来老鼠的其他部分。卷积层的作用其实就是通过不断的改变卷积核,来确定能初步表征图片特征的有用的卷积核是哪些,再得到与相应的卷积核相乘后的输出矩阵
2.2 池化层工作原理
池化层的输入就是卷积层输出的原数据与相应的卷积核相乘后的输出矩阵
池化层的目的:
为了减少训练参数的数量,降低卷积层输出的特征向量的维度
减小过拟合现象,只保留最有用的图片信息,减少噪声的传递
最常见的两种池化层的形式:
最大池化:max-pooling——选取指定区域内最大的一个数来代表整片区域
均值池化:mean-pooling——选取指定区域内数值的平均值来代表整片区域
举例说明两种池化方式:(池化步长为2,选取过的区域,下一次就不再选取)
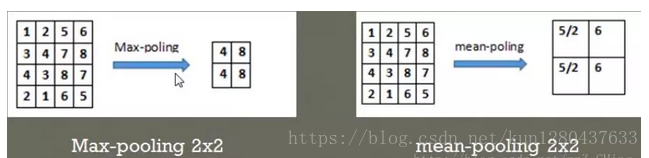
在44的数字矩阵里,以步长22选取区域,比如上左将区域[1,2,3,4]中最大的值4池化输出;上右将区域[1,2,3,4]中平均值5/2池化输出
2.3 全连接层工作原理
卷积层和池化层的工作就是提取特征,并减少原始图像带来的参数。然而,为了生成最终的输出,我们需要应用全连接层来生成一个等于我们需要的类的数量的分类器。
全连接层的工作原理和之前的神经网络学习很类似,我们需要把池化层输出的张量重新切割成一些向量,乘上权重矩阵,加上偏置值,然后对其使用ReLU激活函数,用梯度下降法优化参数既可。
二、部分源代码
function main
clc
close all

% 创建人脸检测对象
faceDetector = vision.CascadeObjectDetector;

% 人脸检测
FaceRecognition(faceDetector);
end

%% 选择图片
function I = SelectPicture()
[FileName,PathName] = uigetfile('*.jpg', '选择一张图片');
if isequal(FileName,0)
    disp('没选择图片,请重新选择!')
    I = [];
else
    I = imread(fullfile(PathName,FileName));
end
end

%% 人脸检测
function [I_faces, bbox] = GetFaces(faceDetector, I)
% 检测人脸
bbox = step(faceDetector, I);

% 创建一个形状插入对象来绘制边框圈出的检测的结果
if size(I, 3) == 1 % 灰度图像,插入白色或黑色框
    if mean(I(:)) > 128 % 图像较亮,使用黑框
        shapeInserter = vision.ShapeInserter();
    else % 图像较暗,使用白框
        shapeInserter = vision.ShapeInserter('BorderColor','White');
    end
else % 彩色图像,插入红色框
    shapeInserter = vision.ShapeInserter('BorderColor','Custom','CustomBorderColor',[255 0 0]);
end

% 绘制边框以圈出结果
I_faces = step(shapeInserter, I, int32(bbox));
end

%% 图片人脸检测
function FaceRecognition(faceDetector)
% 鼠标单击响应
    function BtnDownFcn(h, evt)
        FaceRecognition(faceDetector);
    end

% 选择文件
I = SelectPicture();
if isempty(I)
    return
end

% 人脸检测
[I_faces, bbox] = GetFaces(faceDetector, I);

close all
% 创建figure对象
fig1 = figure;
pos1 = get(fig1,'Position');
set(fig1,'Position',[10 pos1(2:4)]);
set(fig1,'WindowButtonDownFcn',@BtnDownFcn);

% 显示
figure(fig1)
imshow(I_faces)
title('单击此图片选择另一图片识别')
for i = 1:size(bbox, 1)
    text(bbox(i, 1), bbox(i, 2), mat2str(i), 'color', 'r')
end

% 检测
intbbox = int32(bbox);
for i = 1:size(intbbox, 1)
    xs = intbbox(i, 1);
    xe = xs + intbbox(i,3);
    ys = intbbox(i, 2);
    ye = ys + intbbox(i,4);

    % 创建figure
    if rem(i, 16) == 1
        fig2 = figure; %#ok
    end
    function varargout = FaceSystem(varargin)
% FACESYSTEM MATLAB code for FaceSystem.fig
%      FACESYSTEM, by itself, creates a new FACESYSTEM or raises the existing
%      singleton*.
%
%      H = FACESYSTEM returns the handle to a new FACESYSTEM or the handle to
%      the existing singleton*.
%
%      FACESYSTEM('CALLBACK',hObject,eventData,handles,...) calls the local
%      function named CALLBACK in FACESYSTEM.M with the given input arguments.
%
%      FACESYSTEM('Property','Value',...) creates a new FACESYSTEM or raises the
%      existing singleton*.  Starting from the left, property value pairs are
%      applied to the GUI before FaceSystem_OpeningFcn gets called.  An
%      unrecognized property name or invalid value makes property application
%      stop.  All inputs are passed to FaceSystem_OpeningFcn via varargin.
%
%      *See GUI Options on GUIDE's Tools menu.  Choose "GUI allows only one
%      instance to run (singleton)".
%
% See also: GUIDE, GUIDATA, GUIHANDLES

% Edit the above text to modify the response to help FaceSystem

% Last Modified by GUIDE v2.5 20-Apr-2018 19:18:59

% Begin initialization code - DO NOT EDIT
gui_Singleton = 1;
gui_State = struct('gui_Name',       mfilename, ...
                   'gui_Singleton',  gui_Singleton, ...
                   'gui_OpeningFcn', @FaceSystem_OpeningFcn, ...
                   'gui_OutputFcn',  @FaceSystem_OutputFcn, ...
                   'gui_LayoutFcn',  [] , ...
                   'gui_Callback',   []);
if nargin && ischar(varargin{1})
    gui_State.gui_Callback = str2func(varargin{1});
end

if nargout
    [varargout{1:nargout}] = gui_mainfcn(gui_State, varargin{:});
else
    gui_mainfcn(gui_State, varargin{:});
end
% End initialization code - DO NOT EDIT


% --- Executes just before FaceSystem is made visible.
function FaceSystem_OpeningFcn(hObject, eventdata, handles, varargin)
% This function has no output args, see OutputFcn.
% hObject    handle to figure
% eventdata  reserved - to be defined in a future version of MATLAB
% handles    structure with handles and user data (see GUIDATA)
% varargin   command line arguments to FaceSystem (see VARARGIN)

% Choose default command line output for FaceSystem
handles.output = hObject;

% Update handles structure
guidata(hObject, handles);

% UIWAIT makes FaceSystem wait for user response (see UIRESUME)
% uiwait(handles.figure1);


% --- Outputs from this function are returned to the command line.
function varargout = FaceSystem_OutputFcn(hObject, eventdata, handles)
% varargout  cell array for returning output args (see VARARGOUT);
% hObject    handle to figure
% eventdata  reserved - to be defined in a future version of MATLAB
% handles    structure with handles and user data (see GUIDATA)

% Get default command line output from handles structure
varargout{1} = handles.output;


% --- Executes on button press in pushbutton1.
function pushbutton1_Callback(hObject, eventdata, handles)
% hObject    handle to pushbutton1 (see GCBO)
% eventdata  reserved - to be defined in a future version of MATLAB
% handles    structure with handles and user data (see GUIDATA)
global str;
global a0;

[filename,pathname]=...
    uigetfile({'*.jpg';'*.bmp';'*.gif'},'choose');

str=[pathname filename]
if str~=0;
a0=imread(str);

% 同学在这里写上进度条的代码 等待对话框
h=waitbar(0,'Pleast waiting, reading...');
%*********
axes(handles.axes1);
axis off
imshow(a0);
title('原图像')

waitbar(1,h,'finish');
pause(0.05);
delete(h);
end
% hObject    handle to pushbutton1 (see GCBO)
% eventdata  reserved - to be defined in a future version of MATLAB
% handles    structure with handles and user data (see GUIDATA)


% --- Executes on button press in pushbutton2.
function pushbutton2_Callback(hObject, eventdata, handles)
global a0;
global dets
global i_face;
global im
i_face=0;
faceDetector = vision.CascadeObjectDetector;
[im, dets] = GetFaces(faceDetector, a0);
DisplayDetections(im, dets);


% --- Executes on button press in pushbutton3.
function pushbutton3_Callback(hObject, eventdata, handles)
% hObject    handle to pushbutton3 (see GCBO)
% eventdata  reserved - to be defined in a future version of MATLAB
% handles    structure with handles and user data (see GUIDATA)
global dets
global i_face;
global a0;
global A_face;
[M,N]=size(dets);
if (i_face>0)&(i_face<=M)
    i_face=i_face-1;
    i=i_face
    A_face=a0(dets(i,2):(dets(i,2)+dets(i,4)),dets(i,1):(dets(i,1)+dets(i,3)),:);
    axes(handles.axes2);
    axis off
    imshow(A_face);
    title('待识别的人脸');
end

% --- Executes on button press in pushbutton4.
function pushbutton4_Callback(hObject, eventdata, handles)
% hObject    handle to pushbutton4 (see GCBO)
% eventdata  reserved - to be defined in a future version of MATLAB
% handles    structure with handles and user data (see GUIDATA)
global dets
global a0;
global i_face;
global A_face;
[M,N]=size(dets);
if (i_face>=0)&(i_face<M)
    i_face=i_face+1;
    i=i_face
    A_face=a0(dets(i,2):(dets(i,2)+dets(i,4)),dets(i,1):(dets(i,1)+dets(i,3)),:);
    axes(handles.axes2);
    axis off
    imshow(A_face);
    title('待识别的人脸');
end
- 1
- 2
- 3
- 4
- 5
- 6
- 7
- 8
- 9
- 10
- 11
- 12
- 13
- 14
- 15
- 16
- 17
- 18
- 19
- 20
- 21
- 22
- 23
- 24
- 25
- 26
- 27
- 28
- 29
- 30
- 31
- 32
- 33
- 34
- 35
- 36
- 37
- 38
- 39
- 40
- 41
- 42
- 43
- 44
- 45
- 46
- 47
- 48
- 49
- 50
- 51
- 52
- 53
- 54
- 55
- 56
- 57
- 58
- 59
- 60
- 61
- 62
- 63
- 64
- 65
- 66
- 67
- 68
- 69
- 70
- 71
- 72
- 73
- 74
- 75
- 76
- 77
- 78
- 79
- 80
- 81
- 82
- 83
- 84
- 85
- 86
- 87
- 88
- 89
- 90
- 91
- 92
- 93
- 94
- 95
- 96
- 97
- 98
- 99
- 100
- 101
- 102
- 103
- 104
- 105
- 106
- 107
- 108
- 109
- 110
- 111
- 112
- 113
- 114
- 115
- 116
- 117
- 118
- 119
- 120
- 121
- 122
- 123
- 124
- 125
- 126
- 127
- 128
- 129
- 130
- 131
- 132
- 133
- 134
- 135
- 136
- 137
- 138
- 139
- 140
- 141
- 142
- 143
- 144
- 145
- 146
- 147
- 148
- 149
- 150
- 151
- 152
- 153
- 154
- 155
- 156
- 157
- 158
- 159
- 160
- 161
- 162
- 163
- 164
- 165
- 166
- 167
- 168
- 169
- 170
- 171
- 172
- 173
- 174
- 175
- 176
- 177
- 178
- 179
- 180
- 181
- 182
- 183
- 184
- 185
- 186
- 187
- 188
- 189
- 190
- 191
- 192
- 193
- 194
- 195
- 196
- 197
- 198
- 199
- 200
- 201
- 202
- 203
- 204
- 205
- 206
- 207
- 208
- 209
- 210
- 211
- 212
- 213
- 214
- 215
- 216
- 217
- 218
- 219
- 220
- 221
- 222
- 223
- 224
- 225
- 226
- 227
- 228
- 229
- 230
- 231
- 232
- 233
- 234
- 235
- 236
- 237
- 238
- 239
- 240
- 241
- 242
- 243
- 244
三、运行结果


四、matlab版本及参考文献
1 matlab版本
2014a
2 参考文献
[1] 蔡利梅.MATLAB图像处理——理论、算法与实例分析[M].清华大学出版社,2020.
[2]杨丹,赵海滨,龙哲.MATLAB图像处理实例详解[M].清华大学出版社,2013.
[3]周品.MATLAB图像处理与图形用户界面设计[M].清华大学出版社,2013.
[4]刘成龙.精通MATLAB图像处理[M].清华大学出版社,2015.
文章来源: qq912100926.blog.csdn.net,作者:海神之光,版权归原作者所有,如需转载,请联系作者。
原文链接:qq912100926.blog.csdn.net/article/details/115803378

- 点赞
- 收藏
- 关注作者
评论(0)