【指纹识别】基于matlab GUI指纹打卡系统【含Matlab源码 867期】

一、指纹识别简介
21世纪是信息化时代,在这个特殊的时代,我们的生活中电子设备越来越多,比如,笔记本电脑, ATM取款机,考勤系统,门禁系统和各种智能卡,网络中的网上银行,人人网账号等,都需要验证身份。对个人身份识别技术的要求不断提高,如果没有安全可靠和快捷的身份识别技术,电子商务、网上购物等就存在重大隐患。目前许多身份验证系统都采用“用户名+密码”的方式来进行用户访问控制,但此方法存在诸多隐患,比如密码被窃取、破解或遗忘。因此我们在与机器交互时急需一种准确、安全快捷的识别技术来取代现有的身份验证。

1 指纹识别的流程:
指纹图像采集
指纹预处理
特征提取
指纹的匹配
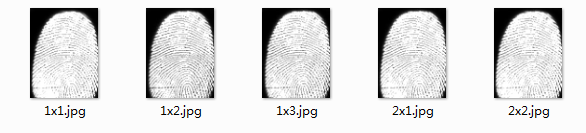
指纹图像的采集,本文选取了五种指纹图像,具体如图所示,
1.1 指纹图像采集
指纹图像的采集,本文选取了五种指纹图像,具体如图所示
1.2 指纹预处理
指纹的预处理是为了准确可靠找到图像的特征,以保障后续的指纹匹配与分类。这主要包括灰度图像滤波去噪、二值化、二值化图像去噪、指纹的细化处理等。

1.3 特征提取
指纹的特征提取,用3x3的模板逐点对细化后的指纹图像的脊线进行检测,就可以初步选出所有的细节特征,记录下这些细节特征的类型和位置坐标,以便于下一步的剪枝处理。先去除伪特征端点,得到想要的特征点和中心点。特征端点用’o’标注,特征分叉点用’+‘标注,中心点用红色’*'标注。

1.4 指纹的匹配
指纹的匹配,根据得到的特征端点和特征点进行分类,特征端点分类为1,特征分叉点分类为2;建立特征端点相对中心点的距离向量,和特征分叉点相对中心点的距离向量;建立特征端点相对中心点的方向向量,和特征分叉点相对中心点的方向向量。按相同的原理得到待匹配指纹的特征点和特征端点。选用点类型匹配,找到一个指纹细化图像的特征点后,在该端点周围找到四十个端点或者交叉点,统计在这四十个特征点中端点的个数和交叉点的个数。若有两幅指纹细化图像中的端点所占的比例近似相同,则两幅图像相匹配,越近似,则越相同。

二、部分源代码
function varargout = Fingerprint_gui(varargin)
%FINGERPRINT_GUI M-file for Fingerprint_gui.fig
%      FINGERPRINT_GUI, by itself, creates a new FINGERPRINT_GUI or raises the existing
%      singleton*.
%
%      H = FINGERPRINT_GUI returns the handle to a new FINGERPRINT_GUI or the handle to
%      the existing singleton*.
%
%      FINGERPRINT_GUI('Property','Value',...) creates a new FINGERPRINT_GUI using the
%      given property value pairs. Unrecognized properties are passed via
%      varargin to Fingerprint_gui_OpeningFcn.  This calling syntax produces a
%      warning when there is an existing singleton*.
%
%      FINGERPRINT_GUI('CALLBACK') and FINGERPRINT_GUI('CALLBACK',hObject,...) call the
%      local function named CALLBACK in FINGERPRINT_GUI.M with the given input
%      arguments.
%
%      *See GUI Options on GUIDE's Tools menu.  Choose "GUI allows only one
%      instance to run (singleton)".
%
% See also: GUIDE, GUIDATA, GUIHANDLES

% Edit the above text to modify the response to help Fingerprint_gui

%

% Begin initialization code - DO NOT EDIT
gui_Singleton = 1;
gui_State = struct('gui_Name',       mfilename, ...
    'gui_Singleton',  gui_Singleton, ...
    'gui_OpeningFcn', @Fingerprint_gui_OpeningFcn, ...
    'gui_OutputFcn',  @Fingerprint_gui_OutputFcn, ...
    'gui_LayoutFcn',  [], ...
    'gui_Callback',   []);
if nargin && ischar(varargin{1})
    gui_State.gui_Callback = str2func(varargin{1});
end

if nargout
    [varargout{1:nargout}] = gui_mainfcn(gui_State, varargin{:});
else
    gui_mainfcn(gui_State, varargin{:});
end

% End initialization code - DO NOT EDIT


% --- Executes just before Fingerprint_gui is made visible.
function Fingerprint_gui_OpeningFcn(hObject, eventdata, handles, varargin)
% This function has no output args, see OutputFcn.
% hObject    handle to figure
% eventdata  reserved - to be defined in a future version of MATLAB
% handles    structure with handles and user data (see GUIDATA)
% varargin   unrecognized PropertyName/PropertyValue pairs from the
%            command line (see VARARGIN)

% Choose default command line output for Fingerprint_gui
handles.output = hObject;

% Update handles structure
guidata(hObject, handles);

% UIWAIT makes Fingerprint_gui wait for user response (see UIRESUME)
% uiwait(handles.figure1);


% --- Outputs from this function are returned to the command line.
function varargout = Fingerprint_gui_OutputFcn(hObject, eventdata, handles)
% varargout  cell array for returning output args (see VARARGOUT);
% hObject    handle to figure
% eventdata  reserved - to be defined in a future version of MATLAB
% handles    structure with handles and user data (see GUIDATA)

% Get default command line output from handles structure
varargout{1} = handles.output;


% --- Executes when figure1 is resized.
function figure1_ResizeFcn(hObject, eventdata, handles)
% hObject    handle to figure1 (see GCBO)
% eventdata  reserved - to be defined in a future version of MATLAB
% handles    structure with handles and user data (see GUIDATA)

%%%%%%%%%%%%%%%%%%%%%%%%%%%%%%%%%%%%%%%%%%%%%%%%%%%%%%%%%%%%%%%%%%%%%%%%%
%%%%%%%%%%%%%%%%%%%%%%%%%%%%%%%%%%%%%%%%%%%%%%%%              二值化
%%%%%%%%%%%%%%%%%%%%%%%%%%%%%%%%%%%%%%%%%%%%%%%%%%%%%%%%%%%%%%%%%%%%%%%%%

% --- Executes on button press in BW.
function BW_Callback(hObject, eventdata, handles)
% hObject    handle to BW (see GCBO)
% eventdata  reserved - to be defined in a future version of MATLAB
% handles    structure with handles and user data (see GUIDATA)
I = handles.OriginalImage;

% I=rgb2gray(I);

level = graythresh(I);
BWimg = im2bw(I, level);
handles.BWimg=BWimg;
set(handles.Thining,'enable','on');
axes(handles.axes2);
% set(gca,'NextPlot','add');
hImg_BW=imshow(BWimg);
handles.hImg_BW=hImg_BW;
set(hImg_BW,'ButtonDownFcn',{@ImgButtonDown,handles});
guidata(hObject,handles);

%%%%%%%%%%%%%%%%%%%%%%%%%%%%%%%%%%%%%%%%%%%%%%%%%%%%%%%%%%%%%%%%%%%%%%%%%
%%%%%%%%%%%%%%%%%%%%%%%%%%%%%%%%%%%%%%%%%%%%%%%%        细化
%%%%%%%%%%%%%%%%%%%%%%%%%%%%%%%%%%%%%%%%%%%%%%%%%%%%%%%%%%%%%%%%%%%%%%%%%
function [path1,path2,path3] = separate( path1 , image )


next_x = zeros(3,1);
next_y = zeros(3.1);

x = path1(1,1);
y = path1(1,2);

%only one pixel in the path list
% so, simply track forward

count = 1;

        if image(x,y-1) == 1

                next_x(count) = x;
                next_y(count) = y -1;
		count = count + 1;
	end;

        if image(x-1,y-1) == 1

                next_x(count) = x-1;
                next_y(count) = y-1;
		count = count + 1;
	end;

        if image(x-1,y) == 1

                next_x(count) = x-1;
                next_y(count) = y;
		count = count + 1;
	end;

        if  image(x-1,y+1) == 1

                next_x(count) = x-1;
                next_y(count) = y+1;
		count = count + 1;
	end;

        if image(x+1,y-1) == 1

                next_x(count) = x+1;
                next_y(count) = y-1;
		count = count + 1;
	end;

        if image(x+1,y) == 1

                next_x(count) = x+1;
                next_y(count) = y;
		count = count + 1;
	end;

        if image(x+1,y+1) == 1

                next_x(count) = x+1;
                next_y(count) = y+1;
		count = count + 1;
	end;

        if image(x,y+1) == 1

                next_x(count) = x;
                next_y(count) = y+1;
		count = count + 1;

        end;


path1(2,1) = next_x(1);
path1(2,2) = next_y(1);
path2(2,1) = next_x(2);
path2(2,2) = next_y(2);
path3(2,1) = next_x(3);
path3(2,2) = next_y(3);

if count ~= 4
- 1
- 2
- 3
- 4
- 5
- 6
- 7
- 8
- 9
- 10
- 11
- 12
- 13
- 14
- 15
- 16
- 17
- 18
- 19
- 20
- 21
- 22
- 23
- 24
- 25
- 26
- 27
- 28
- 29
- 30
- 31
- 32
- 33
- 34
- 35
- 36
- 37
- 38
- 39
- 40
- 41
- 42
- 43
- 44
- 45
- 46
- 47
- 48
- 49
- 50
- 51
- 52
- 53
- 54
- 55
- 56
- 57
- 58
- 59
- 60
- 61
- 62
- 63
- 64
- 65
- 66
- 67
- 68
- 69
- 70
- 71
- 72
- 73
- 74
- 75
- 76
- 77
- 78
- 79
- 80
- 81
- 82
- 83
- 84
- 85
- 86
- 87
- 88
- 89
- 90
- 91
- 92
- 93
- 94
- 95
- 96
- 97
- 98
- 99
- 100
- 101
- 102
- 103
- 104
- 105
- 106
- 107
- 108
- 109
- 110
- 111
- 112
- 113
- 114
- 115
- 116
- 117
- 118
- 119
- 120
- 121
- 122
- 123
- 124
- 125
- 126
- 127
- 128
- 129
- 130
- 131
- 132
- 133
- 134
- 135
- 136
- 137
- 138
- 139
- 140
- 141
- 142
- 143
- 144
- 145
- 146
- 147
- 148
- 149
- 150
- 151
- 152
- 153
- 154
- 155
- 156
- 157
- 158
- 159
- 160
- 161
- 162
- 163
- 164
- 165
- 166
- 167
- 168
- 169
- 170
- 171
- 172
- 173
- 174
- 175
- 176
- 177
- 178
- 179
- 180
- 181
- 182
- 183
- 184
- 185
- 186
- 187
- 188
- 189
- 190
- 191
三、运行结果


四、matlab版本及参考文献
1 matlab版本
2014a
2 参考文献
[1] 蔡利梅.MATLAB图像处理——理论、算法与实例分析[M].清华大学出版社,2020.
[2]杨丹,赵海滨,龙哲.MATLAB图像处理实例详解[M].清华大学出版社,2013.
[3]周品.MATLAB图像处理与图形用户界面设计[M].清华大学出版社,2013.
[4]刘成龙.精通MATLAB图像处理[M].清华大学出版社,2015.
文章来源: qq912100926.blog.csdn.net,作者:海神之光,版权归原作者所有,如需转载,请联系作者。
原文链接:qq912100926.blog.csdn.net/article/details/116308915

- 点赞
- 收藏
- 关注作者
评论(0)