【虹膜识别】基于matlab GUI形态学虹膜检测【含Matlab源码 959期】

一、形态学检测简介
1 图像分析及预处理
拍摄图像会产生随机的扰动,图像有一定的噪声,为消除掉图像中的无关信息,对图像进行预处理。
1.1 灰度化
为降低运算量,需要将拍摄的三通道的RGB图像转化为单通道的灰度图像。采用加权平均法的灰度化方法,其中心理学灰度公式根据人眼对RGB三色的敏感程度选择不同的权重:

式(1)中,R、G、B分别为RGB三通道灰度值,灰度化结果如图1 (a)所示。
1.2 平滑处理
为了尽可能避免将背景当作缺陷,需要对图像进行平滑处理,这样虽然会使缺陷的边界模糊,但是有利于减少背景的干扰。注意所采用的去噪处理为均值滤波,均值滤波公式为:

式(2)中,m、n分别为所选择的滤波核的长和宽,Sxy是以(x,y)为中心的滤波核对应像素的位置集合,平滑处理结果如图1 (b)所示。均值滤波的缺点是会使一些细节如边缘等信息丢失,因此在找到种子点后,对没有经过平滑处理的图像进行区域生长,找到缺陷边界。
2 算法原理
2.1 阈值分割
阈值分割是图像分割中最简单、基础的方法,性能比较稳定,计算量较小,运算速度快;它主要有全局阈值分割、局部阈值分割、自适应阈值分割等方法。阈值算法基于阈值T,将像素灰度值大于阈值T和小于阈值T的部分分别叫做前景和背景。变换函数表达式:

图1 均值滤波处理

式(3)中,T为阈值,g (x,y)为原图像像素点(x,y)的灰度值,f (x,y)为分割后图像像素点(x,y)的灰度值,阈值分割结果如图2所示。

图2 阈值分割结果
2.2 形态学开运算降噪
数学形态学简称形态学,其处理方式为领域运算,即把领域结构元素与图像对应位置像素进行逻辑运算,这种运算的影响因素主要有结构元素大小、形状和逻辑运算的规则。形态学操作主要有膨胀、腐蚀、梯度运算、礼帽运算、黑帽运算、开运算和闭运算等,但其基础为腐蚀和膨胀,利用膨胀和腐蚀就能完成不同形式的运算。
腐蚀运算能消除轮廓边界点,使边界向内缩小,主要用于细化二值图像目标轮廓、去除噪声等。

式(4)中,A为原图像,B为结构元素。首先给结构元素B定义一个原点,当结构元素B的原点移动到图像A的(x,y)上时,如果结构元素B上等于1的像素点对应图像A也等于1,则将图像A的(x,y)的灰度值置为1,否则置为0,腐蚀示意图如图3所示。

图3 腐蚀示意图
膨胀运算则与腐蚀运算相反,使边界向外扩张,主要用于填补图像分割后的空白,使相近的不相连的轮廓相连。其公式为:

式(5)中,A为原图像,B为结构元素。首先给结构元素B定义一个原点,当结构元素B的原点移动到图像A的(x,y)上时,如果结构元素B上等于1的像素点对应图像A中至少有一个等于1,则将图像A的(x,y)的灰度值置为1,否则置为0。
先进行腐蚀操作,然后在腐蚀的基础上进行膨胀操作,主要用于去噪和计数等。其公式为:

式(6)中,A为原图像,B、C为结构元素。开运算效果如图4所示,图5为开运算处理的结果。

图4 开运算效果
2.3 区域生长法
区域生长的思想就是把领域(四领域、八领域等)相同的化为一个区域。首先需要一个种子点作为生长的开始,然后将种子点领域内满足相似准则要求的像素点合并到种子的区域,将这个区域的像素做为种子点,继续进行生长,直到没有符合要求的点,生长结束,所有种子点像素作为生长的区域。分割的好坏由初始种子点和相似准则决定。

图5 形态学开运算结果
2.3.1 种子点选择与检测
经过阈值分割和形态学处理后,将二值图像各轮廓中心作为待定种子点。如果选择的种子点位于缺陷的绝对区域,那么种子点总有一个方向各像素的深度值呈现高-低-高的形态。设计检测模板如图6所示,计算出种子点在0°、45°、90°、135°方向上的深度变化,判断其变化是否呈高低高形态。
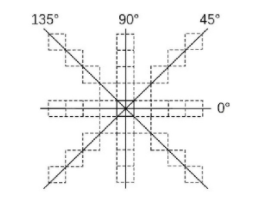
图6 检测模板
种子点左右两侧r个像素的灰度平均值分别为:

各方向的灰度变化为:

深度形Si态变化判定:

式(10)中,I (u)为检测模板中第u个像素的灰度值,w=1,2,3,4,分别代表0°,45°,90°,135°方向,mwm为w方向两侧的最小灰度值,T1为形态变化阈值。如果种子点不满足深度形态变化判定,则去除该待定种子点。
2.3.2 生长过程
区域生长的具体流程如下:
(1)将种子点坐标放入种子点集seeds。
(2)顶出种子点集中的一个种子点,对种子点八邻域的像素点进行相似准则判断;满足相似准则条件的点,视为种子点放入种子点集seeds。
(3)将顶出的种子点存入种子集S。
(4)如果种子点集内没有元素,则跳到步骤(4);如果种子点集中还有元素,则跳到步骤(2)。
(5)生成一张和输入图像长宽一致,像素值全为0的图像I。
(6)将图像I中对应种子集S坐标的像素值置为255,得到分割图像I’。
其中生长的相似准则为:

式(11)中,gray (seed)为当轮种子点的灰度值,gray (8_n)为其八邻域各点的像素值,Thresh为设置的阈值。区域生长结果如图7所示。

图7 区域生长结果
3 实验过程
图像分割就是按照预先设定的规则,将图像分割为有意义的前景和背景的过程。区域生长是一个分割效果比较好的算法,但前提是需要找到适合的种子点。单一的分割算法就容易遇到这种不足的情况,结合使用形态学和阈值分割的方法来找到合适的种子点,帮助区域生长算法完成分割任务,达到满足要求的分割效果,分割方法流程如图8所示。

图8 分割流程图
首先对输入的图片进行灰度化处理,变成单通道的灰度图片,然后滤波去除噪声,使图像更平滑,选择合适的阈值进行阈值分割,在利用开运算去除掉分割后较小的前景,以各前景区域的中心点为起始种子点,进行区域生长,得到最终所满足要求的前景。
二、部分源代码
function varargout = code(varargin)
% CODE M-file for code.fig
%      CODE, by itself, creates a new CODE or raises the existing
%      singleton*.
%
%      H = CODE returns the handle to a new CODE or the handle to
%      the existing singleton*.
%
%      CODE('CALLBACK',hObject,eventData,handles,...) calls the local
%      function named CALLBACK in CODE.M with the given input arguments.
%
%      CODE('Property','Value',...) creates a new CODE or raises the
%      existing singleton*.  Starting from the left, property value pairs are
%      applied to the GUI before code_OpeningFcn gets called.  An
%      unrecognized property name or invalid value makes property application
%      stop.  All inputs are passed to code_OpeningFcn via varargin.
%
%      *See GUI Options on GUIDE's Tools menu.  Choose "GUI allows only one
%      instance to run (singleton)".
%
% See also: GUIDE, GUIDATA, GUIHANDLES
% Edit the above text to modify the response to help code
% Last Modified by GUIDE v2.5 07-May-2020 17:46:00
% Begin initialization code - DO NOT EDIT
gui_Singleton = 1;
gui_State = struct('gui_Name',       mfilename, ...
                   'gui_Singleton',  gui_Singleton, ...
                   'gui_OpeningFcn', @code_OpeningFcn, ...
                   'gui_OutputFcn',  @code_OutputFcn, ...
                   'gui_LayoutFcn',  [] , ...
                   'gui_Callback',   []);
if nargin && ischar(varargin{1})
    gui_State.gui_Callback = str2func(varargin{1});
end

if nargout
    [varargout{1:nargout}] = gui_mainfcn(gui_State, varargin{:});
else
    gui_mainfcn(gui_State, varargin{:});
end
% End initialization code - DO NOT EDIT

% --- Executes just before code is made visible.
function code_OpeningFcn(hObject, eventdata, handles, varargin)
% This function has no output args, see OutputFcn.
% hObject    handle to figure
% eventdata  reserved - to be defined in a future version of MATLAB
% handles    structure with handles and user data (see GUIDATA)
% varargin   command line arguments to code (see VARARGIN)
% Choose default command line output for code
handles.output = hObject;
clc;
% Update handles structure
guidata(hObject, handles);
% UIWAIT makes code wait for user response (see UIRESUME)
% uiwait(handles.figure1);

% --- Outputs from this function are returned to the command line.
function varargout = code_OutputFcn(hObject, eventdata, handles)
% varargout  cell array for returning output args (see VARARGOUT);
% hObject    handle to figure
% eventdata  reserved - to be defined in a future version of MATLAB
% handles    structure with handles and user data (see GUIDATA)
% Get default command line output from handles structure
varargout{1} = handles.output;

% --- Executes on button press in pushbutton1.
function pushbutton1_Callback(hObject, eventdata, handles)
% hObject    handle to pushbutton1 (see GCBO)
% eventdata  reserved - to be defined in a future version of MATLAB
% handles    structure with handles and user data (see GUIDATA)
global str
global filenamestr
global I2;
[filename,pathname]=uigetfile({'*.bmp';'*.jpg';'*.gif'},'选择图片');
if isequal(filename,0)
    disp('Users Selected Canceled');
else
str=[pathname,filename];
filenamestr=filename;
im = imread(str);
I2 = imread(str);
axes(handles.axes1);%axes1是坐标轴的标示
imshow(im);
end

% --- Executes on button press in pushbutton2.
function pushbutton2_Callback(hObject, eventdata, handles) %识别
% hObject    handle to pushbutton2 (see GCBO)
% eventdata  reserved - to be defined in a future version of MATLAB
% handles    structure with handles and user data (see GUIDATA)
global str
global template
global mask
global filenamestr
testimage=str;

hmthresh = 0.3;
write = 0;
nname=filenamestr(1:4);
samep=1; %判断是不是要与当前同一个人对比
if samep
    InputPath=['.\',nname,'\']; %同一个人
else
    InputPath='.\0024\'; %不同人
end
if exist(InputPath)
% [result,time] = final1(str)
templatetest=template;
masktest=mask;
tic
shibie();
axes(handles.axes12);
pic=[InputPath,result];
imshow(pic);title('匹配到虹膜');
else
    result='o~o, No match found!';
end
set(handles.text2,'String',result);
t=toc;
disp(['识别用时:',num2str(t)])
% --- Executes on button press in pushbutton3.
function pushbutton3_Callback(hObject, eventdata, handles) %图片运算
% hObject    handle to pushbutton3 (see GCBO)
% eventdata  reserved - to be defined in a future version of MATLAB
% handles    structure with handles and user data (see GUIDATA)
global str
global I2;
%I2=imread('image004.jpg');
% axes(handles.axes2);
% imshow(I2);

eI=edge(I2,'canny', 0.2);
axes(handles.axes3);
imshow(eI);title('canny边缘提取');
% 利用hough变换找到图像中的一个圆
[y0detect,x0detect,Accumulator] = houghcircle(eI,45,4);

axes(handles.axes4);
imshow(I2);
hold on;
for i=1:length(y0detect)
    plot(x0detect,y0detect,'.r');hold on;
end
% figure;imshow(I2)
axes(handles.axes13);
imshow(Accumulator,[]);
[r,c]=size(I2);

M = circle( c,r,x0detect,y0detect,45);
axes(handles.axes5);
imshow(M,[]);

outI=M.*double(I2);
axes(handles.axes6);
imshow(outI,[]);

outI2=(1-M).*double(I2);
axes(handles.axes7);
imshow(outI2,[]);


function edit1_Callback(hObject, eventdata, handles)
% hObject    handle to edit1 (see GCBO)
% eventdata  reserved - to be defined in a future version of MATLAB
% handles    structure with handles and user data (see GUIDATA)
% Hints: get(hObject,'String') returns contents of edit1 as text
%        str2double(get(hObject,'String')) returns contents of edit1 as a double

% --- Executes during object creation, after setting all properties.
function edit1_CreateFcn(hObject, eventdata, handles)
% hObject    handle to edit1 (see GCBO)
% eventdata  reserved - to be defined in a future version of MATLAB
% handles    empty - handles not created until after all CreateFcns called
% Hint: edit controls usually have a white background on Windows.
%       See ISPC and COMPUTER.
if ispc && isequal(get(hObject,'BackgroundColor'), get(0,'defaultUicontrolBackgroundColor'))
    set(hObject,'BackgroundColor','white');
end

% --- Executes on button press in pushbutton4.
function pushbutton4_Callback(hObject, eventdata, handles) %定位
% hObject    handle to pushbutton4 (see GCBO)
% eventdata  reserved - to be defined in a future version of MATLAB
% handles    structure with handles and user data (see GUIDATA)
global str
global DIAGPATH % path for writing diagnostic images
%DIAGPATH = 'C:\Documents and Settings\Administrator\桌面\iris';
% DIAGPATH = ' template';
DIAGPATH = '.\0023\template';
eyeimage_filename=str;
write=0;
dingwei();
% --- Executes on button press in pushbutton5.
function pushbutton5_Callback(hObject, eventdata, handles) %归一化
% hObject    handle to pushbutton5 (see GCBO)
% eventdata  reserved - to be defined in a future version of MATLAB
% handles    structure with handles and user data (see GUIDATA)
global str
global polar_array
global noise_array
eyeimage_filename=str;
%参数设置
%normalisation parameters
radial_res = 100;
angular_res = 240;
write=0;
% with these settings a 9600 bit iris template is created
guiyihua();
% --- Executes on button press in pushbutton6.
function pushbutton6_Callback(hObject, eventdata, handles)%特征提取
% hObject    handle to pushbutton6 (see GCBO)
% eventdata  reserved - to be defined in a future version of MATLAB
% handles    structure with handles and user data (see GUIDATA)
%feature encoding parameters
global str
global polar_array
global noise_array
global template
global mask
eyeimage_filename=str;
nscales=1;
minWaveLength=18;
mult=1; % not applicable if using nscales = 1
sigmaOnf=0.5;
tezhengtiqu()
% --- Executes during object creation, after setting all properties.
function axes10_CreateFcn(hObject, eventdata, handles) %归一化
% hObject    handle to axes10 (see GCBO)
% eventdata  reserved - to be defined in a future version of MATLAB
% handles    empty - handles not created until after all CreateFcns called
% Hint: place code in OpeningFcn to populate axes10

% --- Executes on button press in pushbutton8.
% hObject    handle to pushbutton8 (see GCBO)
% eventdata  reserved - to be defined in a future version of MATLAB
% handles    structure with handles and user data (see GUIDATA)

% --- Executes on button press in pushbutton9.
function pushbutton9_Callback(hObject, eventdata, handles) %退出
% hObject    handle to pushbutton9 (see GCBO)
% eventdata  reserved - to be defined in a future version of MATLAB
% handles    structure with handles and user data (see GUIDATA)
clc;
close all;

% --- Executes during object creation, after setting all properties.
function axes4_CreateFcn(hObject, eventdata, handles)
% hObject    handle to axes4 (see GCBO)
% eventdata  reserved - to be defined in a future version of MATLAB
% handles    empty - handles not created until after all CreateFcns called
% Hint: place code in OpeningFcn to populate axes4
- 1
- 2
- 3
- 4
- 5
- 6
- 7
- 8
- 9
- 10
- 11
- 12
- 13
- 14
- 15
- 16
- 17
- 18
- 19
- 20
- 21
- 22
- 23
- 24
- 25
- 26
- 27
- 28
- 29
- 30
- 31
- 32
- 33
- 34
- 35
- 36
- 37
- 38
- 39
- 40
- 41
- 42
- 43
- 44
- 45
- 46
- 47
- 48
- 49
- 50
- 51
- 52
- 53
- 54
- 55
- 56
- 57
- 58
- 59
- 60
- 61
- 62
- 63
- 64
- 65
- 66
- 67
- 68
- 69
- 70
- 71
- 72
- 73
- 74
- 75
- 76
- 77
- 78
- 79
- 80
- 81
- 82
- 83
- 84
- 85
- 86
- 87
- 88
- 89
- 90
- 91
- 92
- 93
- 94
- 95
- 96
- 97
- 98
- 99
- 100
- 101
- 102
- 103
- 104
- 105
- 106
- 107
- 108
- 109
- 110
- 111
- 112
- 113
- 114
- 115
- 116
- 117
- 118
- 119
- 120
- 121
- 122
- 123
- 124
- 125
- 126
- 127
- 128
- 129
- 130
- 131
- 132
- 133
- 134
- 135
- 136
- 137
- 138
- 139
- 140
- 141
- 142
- 143
- 144
- 145
- 146
- 147
- 148
- 149
- 150
- 151
- 152
- 153
- 154
- 155
- 156
- 157
- 158
- 159
- 160
- 161
- 162
- 163
- 164
- 165
- 166
- 167
- 168
- 169
- 170
- 171
- 172
- 173
- 174
- 175
- 176
- 177
- 178
- 179
- 180
- 181
- 182
- 183
- 184
- 185
- 186
- 187
- 188
- 189
- 190
- 191
- 192
- 193
- 194
- 195
- 196
- 197
- 198
- 199
- 200
- 201
- 202
- 203
- 204
- 205
- 206
- 207
- 208
- 209
- 210
- 211
- 212
- 213
- 214
- 215
- 216
- 217
- 218
- 219
- 220
- 221
- 222
- 223
- 224
- 225
- 226
- 227
- 228
- 229
- 230
- 231
- 232
- 233
- 234
- 235
- 236
- 237
- 238
- 239
- 240
- 241
- 242
- 243
- 244
- 245
- 246
- 247
- 248
- 249
- 250
- 251
- 252
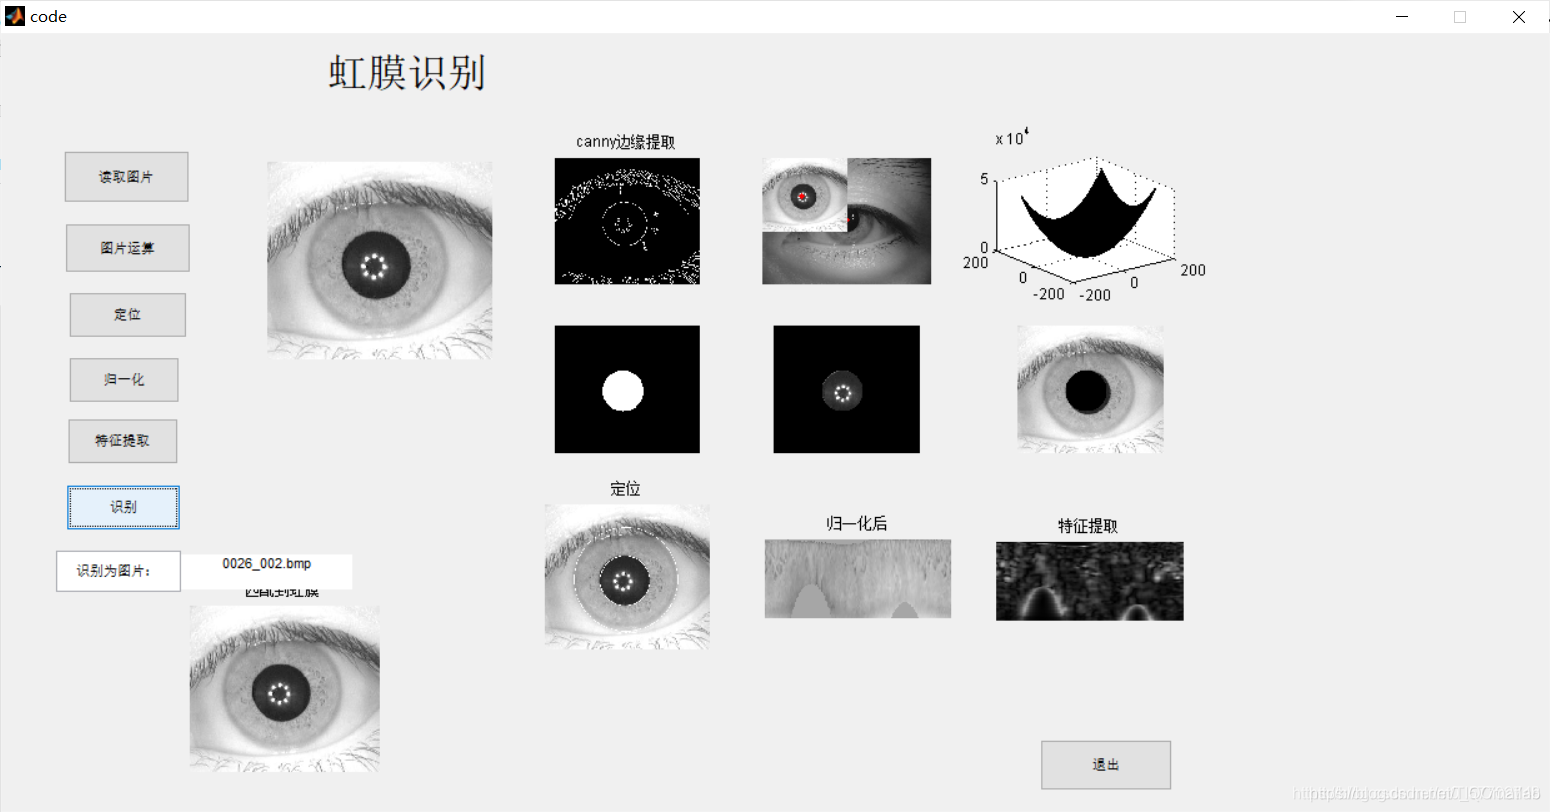
三、运行结果
四、matlab版本及参考文献
1 matlab版本
2014a
2 参考文献
[1] 蔡利梅.MATLAB图像处理——理论、算法与实例分析[M].清华大学出版社,2020.
[2]杨丹,赵海滨,龙哲.MATLAB图像处理实例详解[M].清华大学出版社,2013.
[3]周品.MATLAB图像处理与图形用户界面设计[M].清华大学出版社,2013.
[4]刘成龙.精通MATLAB图像处理[M].清华大学出版社,2015.
文章来源: qq912100926.blog.csdn.net,作者:海神之光,版权归原作者所有,如需转载,请联系作者。
原文链接:qq912100926.blog.csdn.net/article/details/117452544

- 点赞
- 收藏
- 关注作者
评论(0)